In this article I write how I installed Elasticsearch, Logstash and Kibana on an Amazon AWS Linux Server.
Elasticsearch is a database-server, which can handle Logfiles. One can talk to this database via port 9200 with http (or curl) post and get commands in json format.
Logstash is a tool, which can translate logfiles into this json format. The input is a logfile, the output is something, that Elasticsearch can understand. Logstash can listen to port 9600, or in our case, just read a file.
Kibana is the graphical interpreter of the Elasticsearch database. One can create some figures and charts with it. Kibana listens to port 5601.
Precondition
A Linux server has to be installed. I took an AWS T2.large with 8 GB RAM and 8 GB discspace (Attention: Fees! 10 Cent/hour).
I need this ELK Server only a few hours per month so these costs are ok for me.
How I did this is written here: @achimmertens/how-to-install-an-amazon-linux-server
Preparing The Linux Server
First we need to update all installed tools:
sudo su
[root@ip-172-31-66-169 ec2-user]# yum update -y
Now let's install java:
[root@ip-172-31-66-169 ec2-user]# yum install java
[root@ip-172-31-66-169 ec2-user]# java -version
openjdk version "11.0.9" 2020-10-20 LTS
OpenJDK Runtime Environment Corretto-11.0.9.11.1 (build 11.0.9+11-LTS)
OpenJDK 64-Bit Server VM Corretto-11.0.9.11.1 (build 11.0.9+11-LTS, mixed mode)
Installing Elasticsearch
Be root.
Let's prepare the repository for Elasticsearch:
vim /etc/yum.repos.d/elasticsearch.repo
Insert:
[elasticsearch]
name=Elasticsearch repository for 7.x packages
baseurl=https://artifacts.elastic.co/packages/7.x/yum
gpgcheck=1
gpgkey=https://artifacts.elastic.co/GPG-KEY-elasticsearch
enabled=0
autorefresh=1
type=rpm-md
Install Elasticsearch:
yum install --enablerepo=elasticsearch elasticsearch
Now let us make a copy of the original config file:
[root@ip-172-31-85-48 ~]# cp /etc/elasticsearch//elasticsearch.yml /etc/elasticsearch//elasticsearch.yml_orig
We add the network to the config file:
[root@ip-172-31-85-48 ~]# echo "network.host: 0.0.0.0" >> /etc/elasticsearch/elasticsearch.yml
Insert discoverytype: single node into elasticsearch.yml:
[root@ip-172-31-85-48 ~]# vim /etc/elasticsearch/elasticsearch.yml
discovery.type: single-node
See also:
https://www.elastic.co/guide/en/elasticsearch/reference/7.10/rpm.html#rpm-repo
Installing Kibana
Update all tools:
sudo su
yum update -y
Download and install the GPG-Keyfile:
[root@ip-172-31-66-169 ec2-user]# rpm --import https://artifacts.elastic.co/GPG-KEY-elasticsearch
Insert the following into the yum-repository:
[root@ip-172-31-66-169 ec2-user]# cd /etc/yum.repos.d/
[root@ip-172-31-66-169 yum.repos.d]# vim kibana.repo
[kibana-7.x]
name=Kibana repository for 7.x packages
baseurl=https://artifacts.elastic.co/packages/7.x/yum
gpgcheck=1
gpgkey=https://artifacts.elastic.co/GPG-KEY-elasticsearch
enabled=1
autorefresh=1
type=rpm-md
Now install Kibana:
[root@ip-172-31-66-169 yum.repos.d]# yum install kibana
[root@ip-172-31-66-169 yum.repos.d]# systemctl daemon-reload
Configure Kibana:
[root@ip-172-31-66-169 kibana]# cd /etc/kibana
[root@ip-172-31-66-169 kibana]# cp kibana.yml kibana.yml_orig
vim kibana.yml ("localhost" or "server.host" has to be exchanged/inserted)
#elasticsearch.host: "http://127.0.0.1:9200"
server.host: "0.0.0.0"
Enable Kibana in systemctl:
[root@ip-172-31-66-169 kibana]# systemctl enable kibana
Created symlink from /etc/systemd/system/multi-user.target.wants/kibana.service to /etc/systemd/system/kibana.service.
Start Kibana:
[root@ip-172-31-66-169 elasticsearch]# service kibana start
[root@ip-172-31-66-169 kibana]# tail -f /var/log/kibana/kibana.stdout
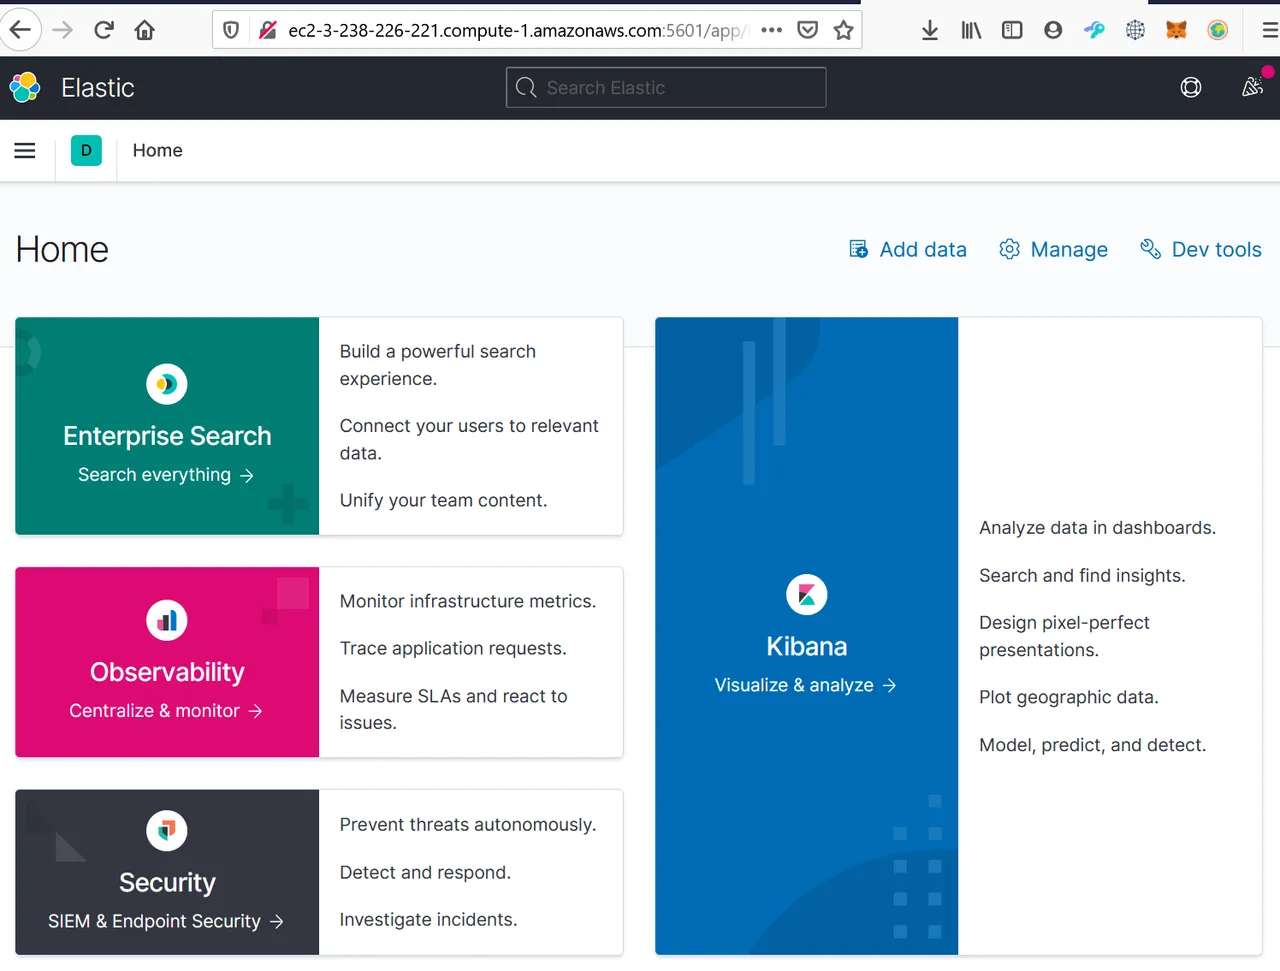
Check Kibana:
Open a browser, type in the AWS-Internet-adress and add port ":5601". Example: http://ec2-3-238-226-221.compute-1.amazonaws.com:5601
The result should look like this:
See also:
https://www.elastic.co/guide/en/kibana/current/rpm.html
https://www.elastic.co/guide/en/kibana/current/settings.html
Installation of Logstash
Stop elasticsearch and kibana
[root@ip-172-31-66-169 kibana]# service kibana stop
[root@ip-172-31-66-169 kibana]# service elasticsearch stop
Update everything:
[root@ip-172-31-66-169 kibana]# yum update
[root@ip-172-31-66-169 kibana]# rpm --import https://artifacts.elastic.co/GPG-KEY-elasticsearch
Add Logstash into the repository
[root@ip-172-31-66-169 kibana]# vim /etc/yum.repos.d/logstash.repo
[logstash-7.x]
name=Elastic repository for 7.x packages
baseurl=https://artifacts.elastic.co/packages/7.x/yum
gpgcheck=1
gpgkey=https://artifacts.elastic.co/GPG-KEY-elasticsearch
enabled=1
autorefresh=1
type=rpm-md
Install Logstash:
[root@ip-172-31-66-169 kibana]# yum install logstash
Prepare the config file:
[root@ip-172-31-66-169 kibana]# vim /etc/logstash/console.conf
input
{
stdin{}
file {
path => "/var/log/messages"
path => "/home/ec2-user/testdata.txt"
}
}
output
{
stdout {}
elasticsearch
{ hosts => ["127.0.0.1:9200"]}
}
Starting and stopping Logstash (test)
service elasticsearch start
Service kibana start
/usr/share/logstash/bin/logstash -f /etc/logstash/console.conf --path.settings /etc/logstash
The output should look like this:
….
{
"@version" => "1",
"message" => "Oct 23 09:50:01 ip-172-31-69-122 systemd: Stopping User Slice of root.",
"@timestamp" => 2020-10-23T09:50:01.527Z,
"path" => "/var/log/messages",
"host" => "ip-172-31-69-122.ec2.internal"
}
{
"@version" => "1",
"message" => "Oct 23 09:51:48 ip-172-31-69-122 dhclient[3964]: XMT: Solicit on eth0, interval 123190ms.",
"@timestamp" => 2020-10-23T09:51:49.646Z,
"path" => "/var/log/messages",
"host" => "ip-172-31-69-122.ec2.internal"
}
….
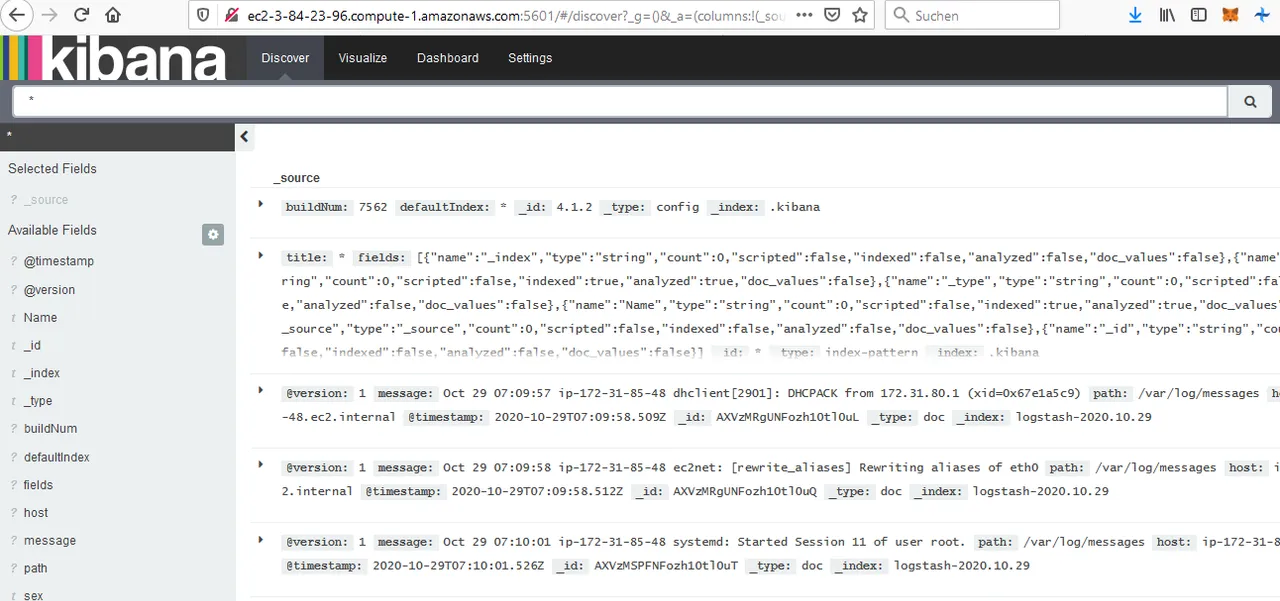
One can stop logststash with CTRL-C
Watch the results in Kibana. You should see some first entries in the discover tab. Search for "*":
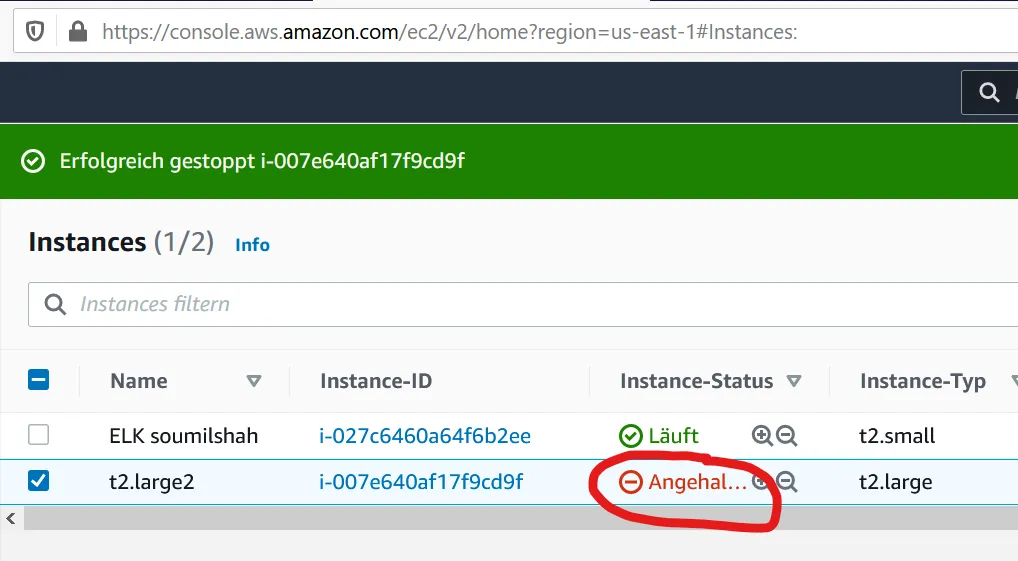
Don't forget to shutdown the Linux server after your work otherwise you have to pay lot of costs to Amazon!!!
See also:
https://www.elastic.co/guide/en/logstash/current/installing-logstash.html
Learn Elastic Search and Kibana in 75 Minutes 0 to Hero