Saludos cordiales para todos los lectores. Para el esta ocasión, vengo con un tutorial detallado para realizar una increíble flor de Lirio.
Warm greetings to all readers. For this occasion, I come with a detailed tutorial to make an amazing Lily flower.
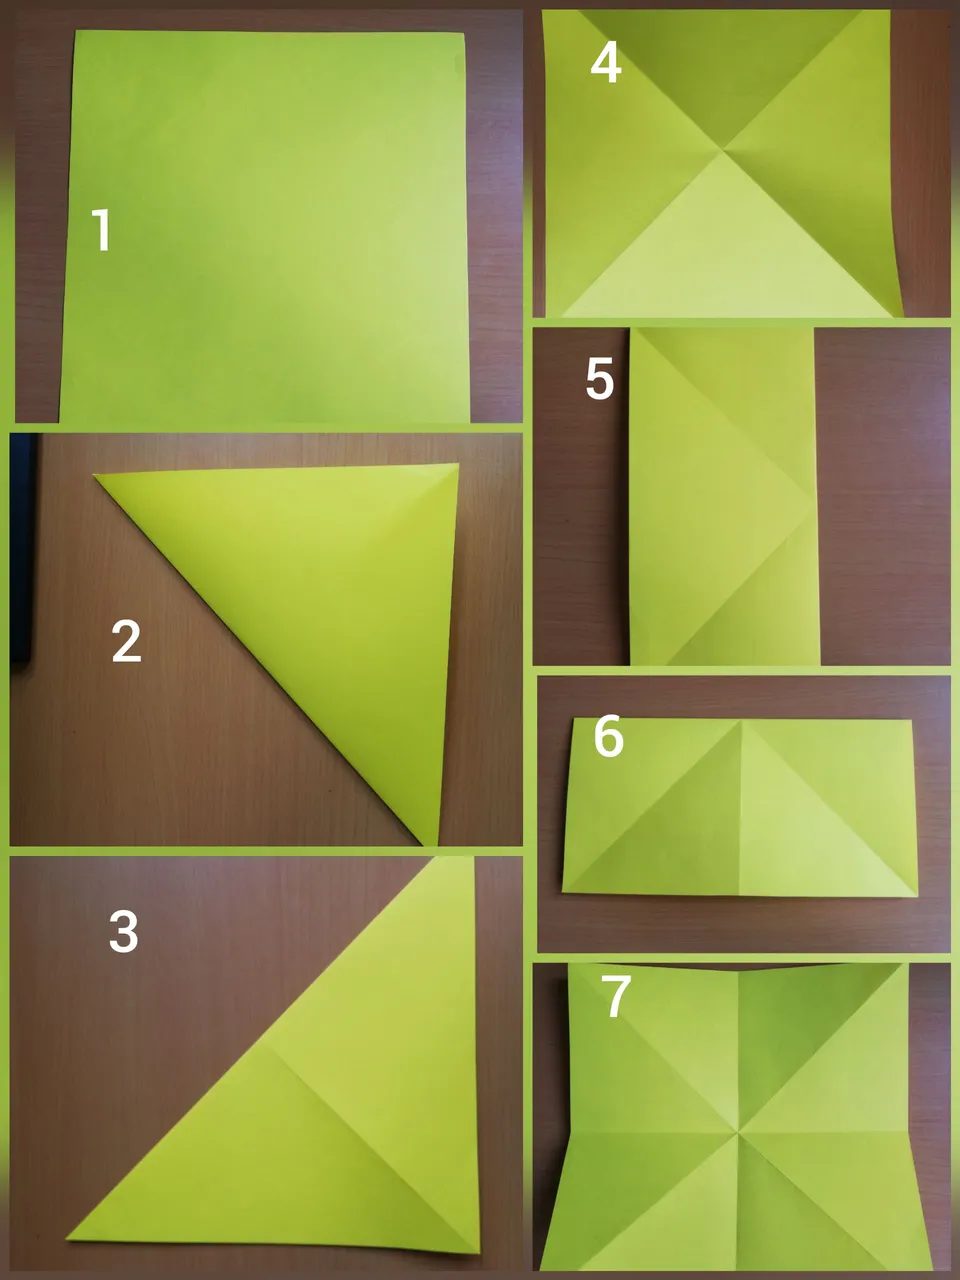
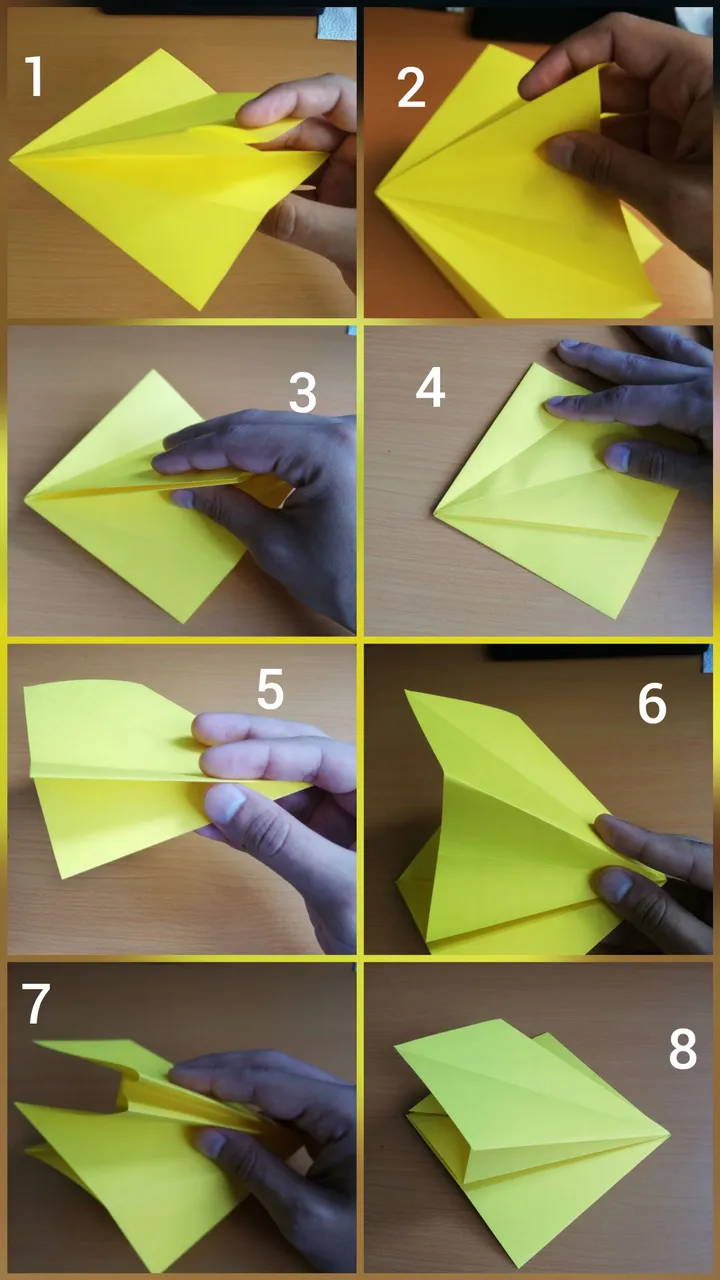
- Para comenzar, necesitaremos una hoja cuadrada del color que deseen para la flor (1)
- Doblaremos una esquina hacia otra para formar una diagonal (2)
- Repetiremos el proceso para obtener la otra diagonal (3)
- Abrimos (4) y ahora le damos vuelta a la hoja
- Doblaremos por la mitad vertical (5)
- Abrimos y doblamos por la mitad horizontal (6) y abrimos (7)
- To begin, we will need a square sheet of the color you want for the flower (1)
- Fold one corner towards the other to form a diagonal (2)
- We will repeat the process to get the other diagonal (3)
- We open (4) and now we turn the sheet over
- Fold in half vertically (5)
- We open and fold in half horizontally (6) and open (7)
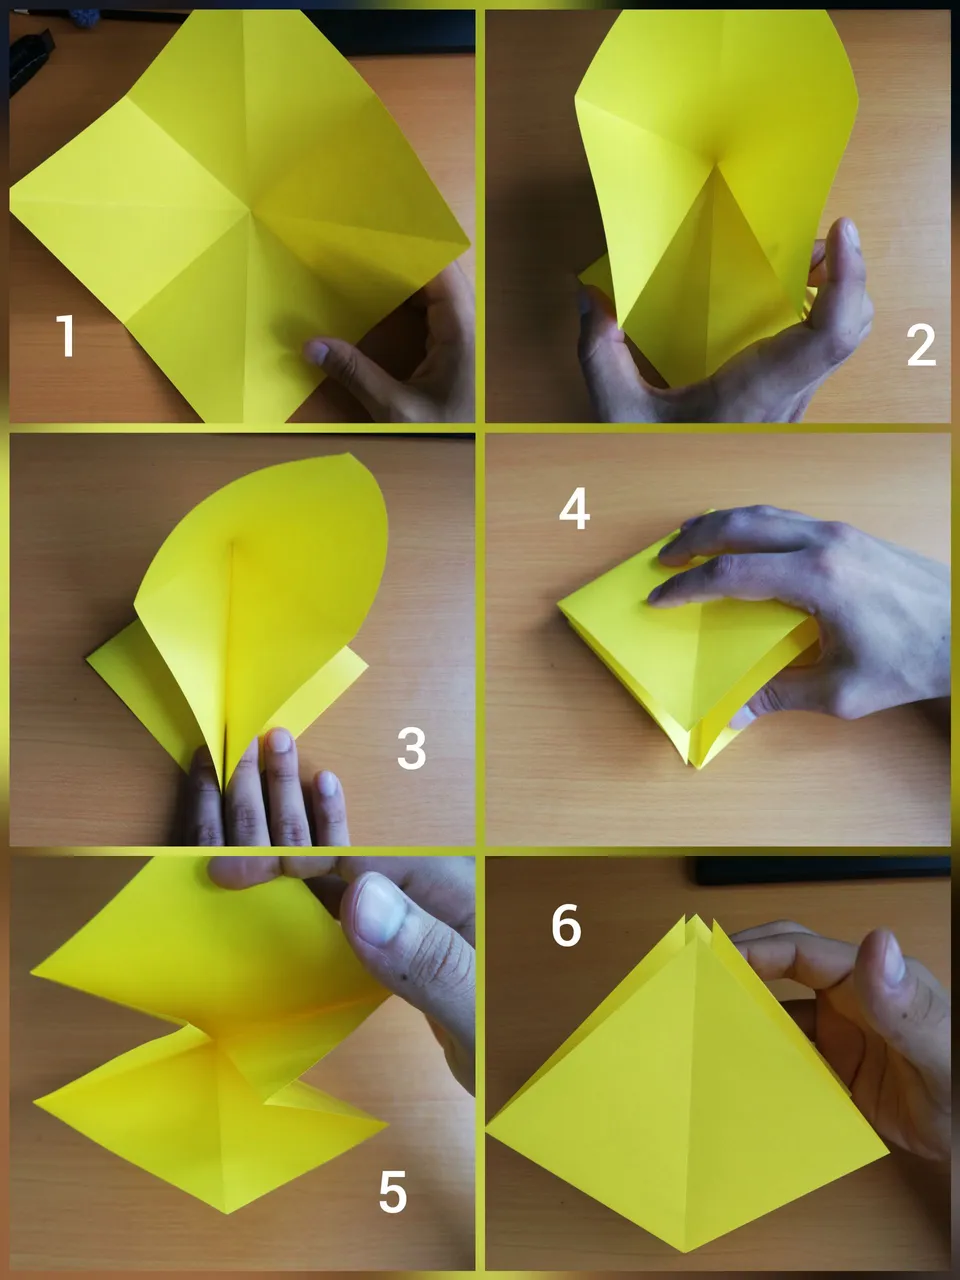
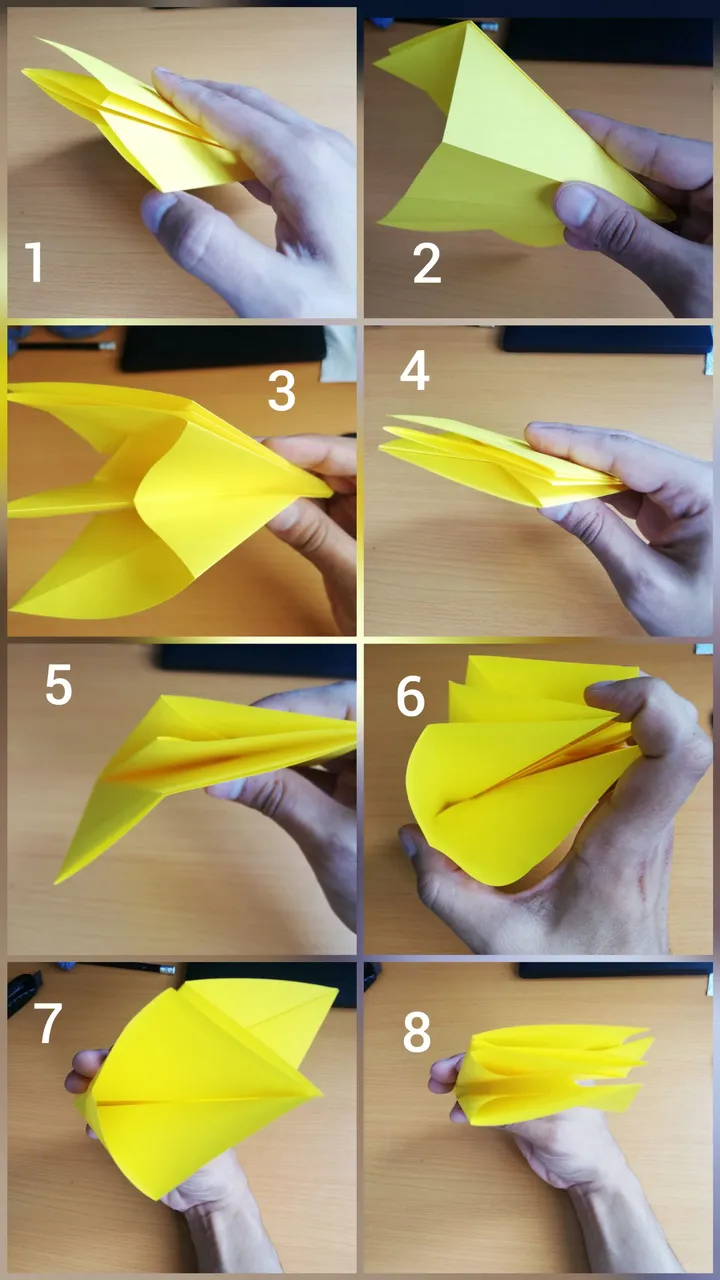
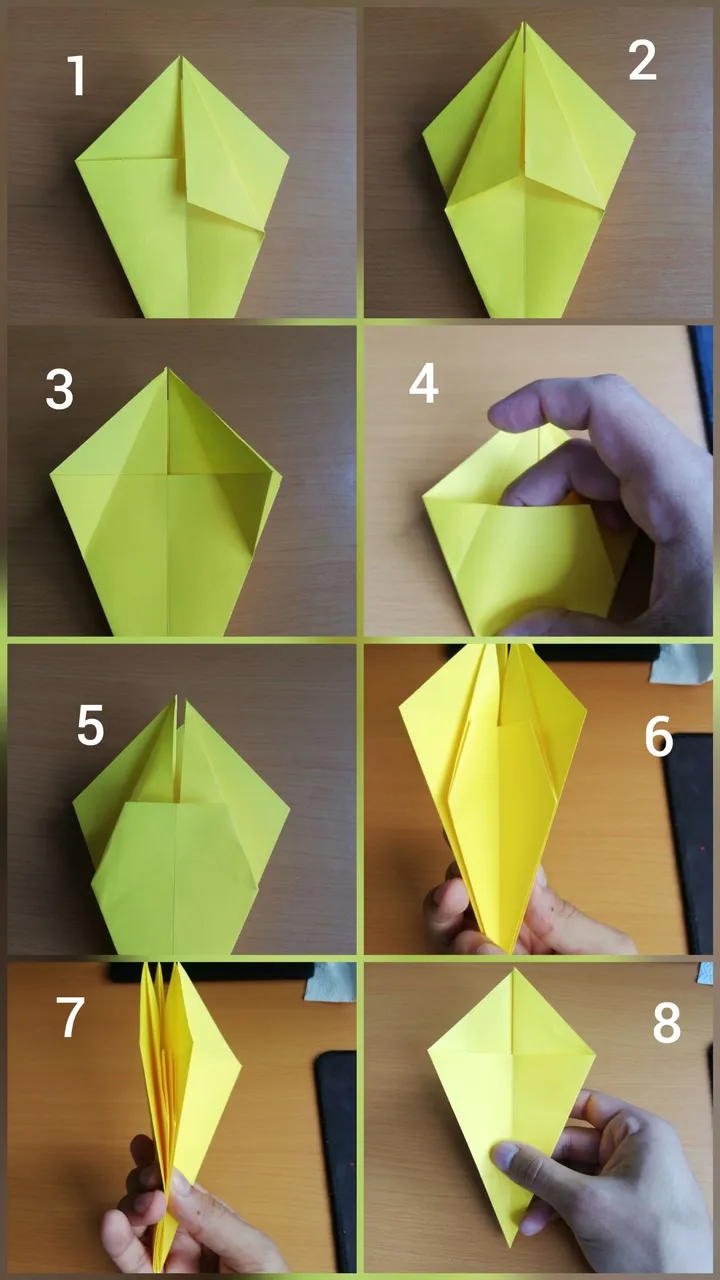
- Ahora buscaremos cerrar (1) desde los laterales (2) y (3)
- Bajamos la parte superior (4)
- Volteamos la posición hacia arriba (5) y (6)
- Now we will seek to close (1) from the sides (2) and (3)
- We lower the upper part (4)
- We flip the position up (5) and (6)
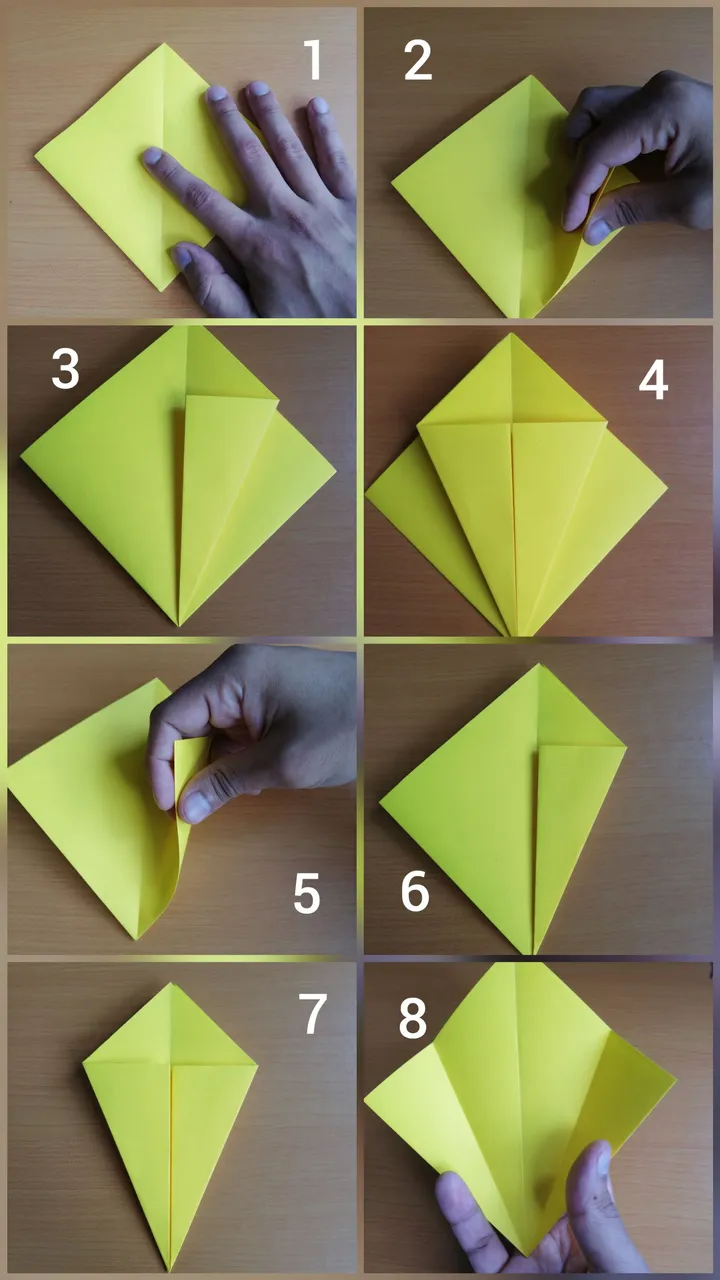
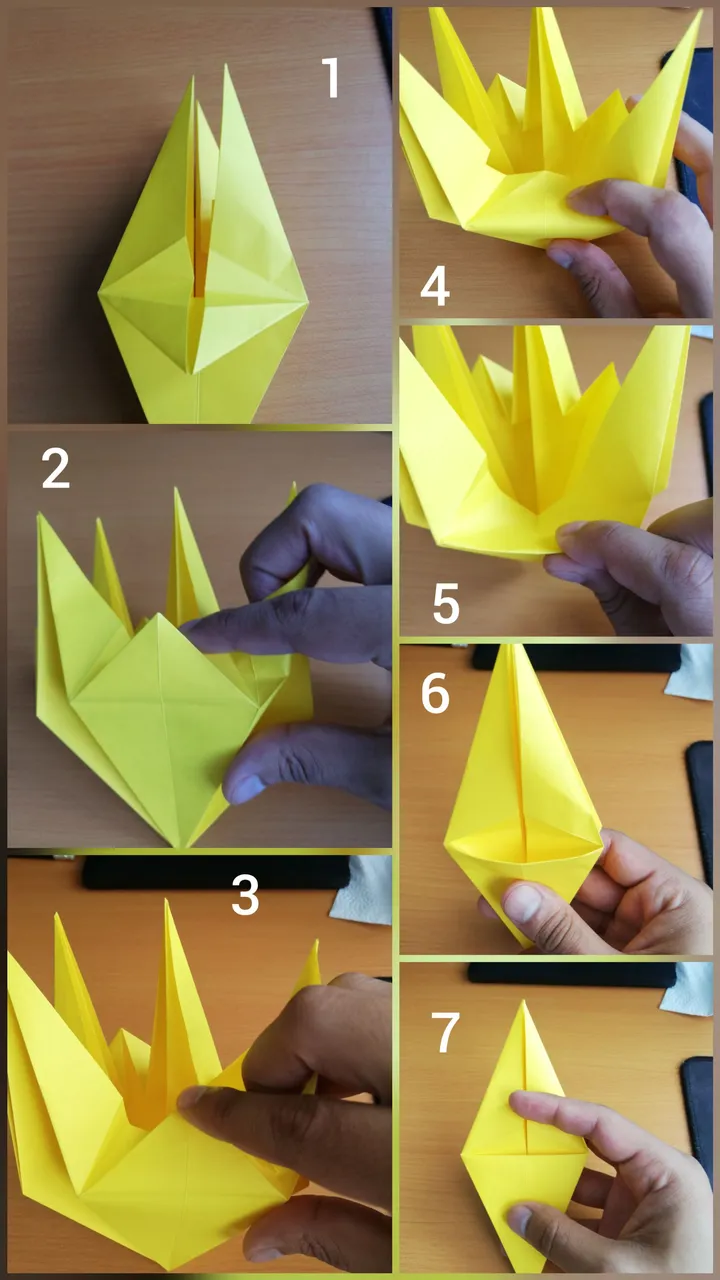
- Ya en posición (1), doblaremos la parte inferior para formar un triángulo de un lado (2) y (3)
- Repetimos con el otro lado inferior (4)
- Damos vuelta y doblamos los triángulos nuevamente (5), (6) y (7)
- Abrimos los triángulos (8)
- Already in position (1), we will fold the lower part to form a triangle of one side (2) and (3)
- Repeat with the other bottom side (4)
- Turn and fold the triangles again (5), (6) and (7)
- Open the triangles (8)
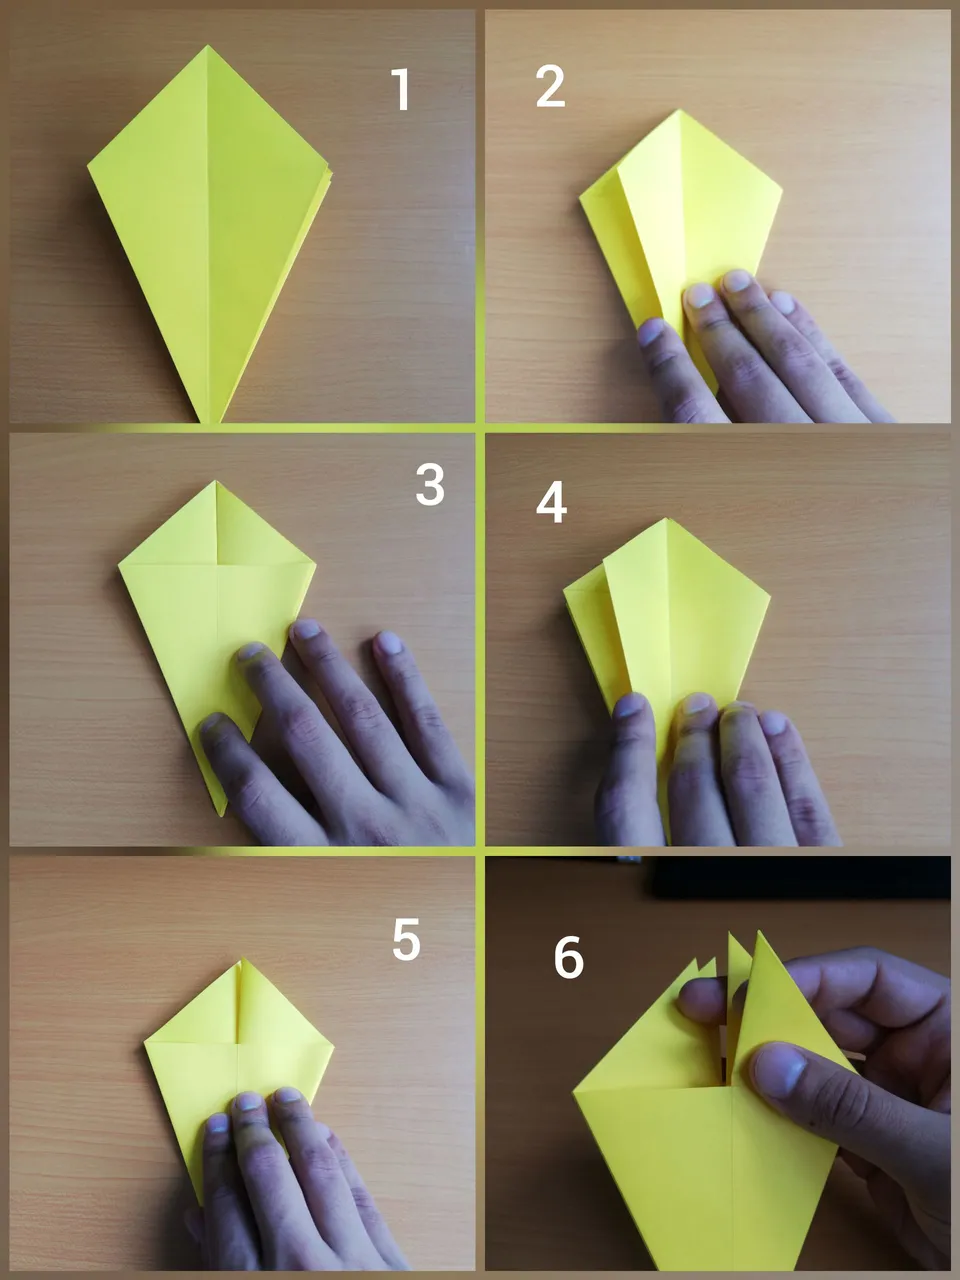
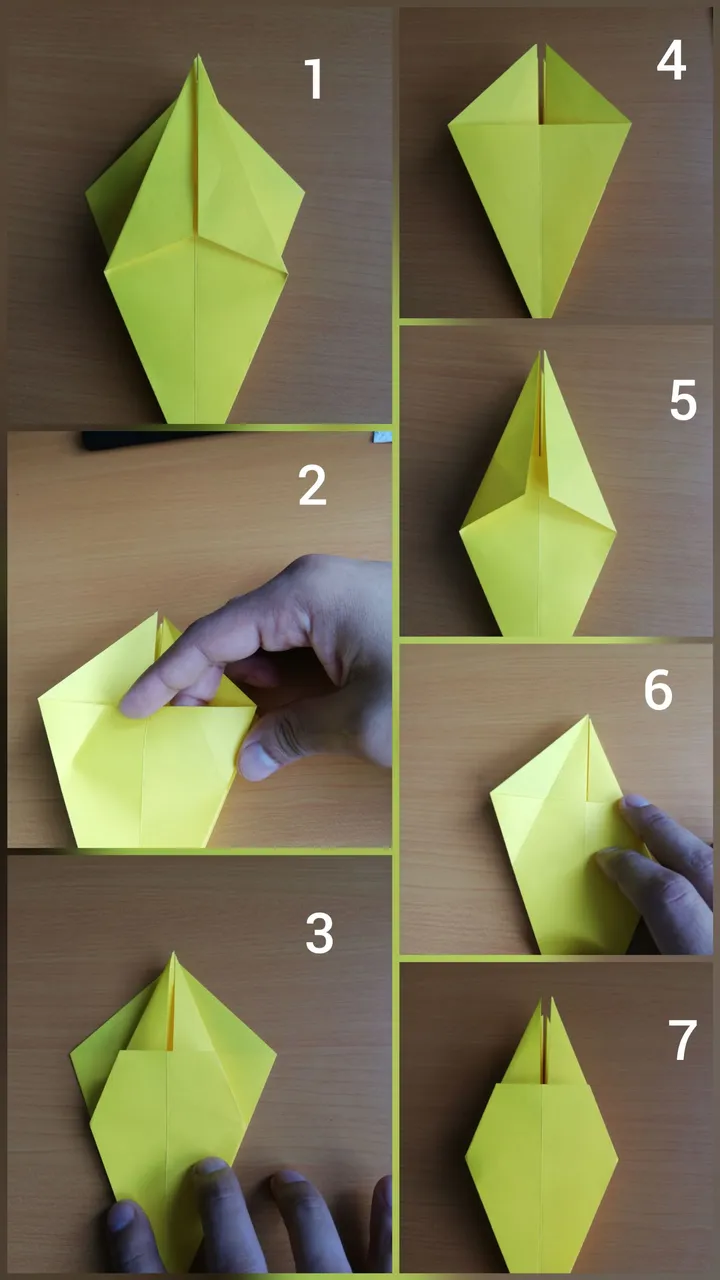
- Lo que haremos ahora, es invertir los triángulos marcados (1), (2) y (3) y nos queda (4)
- Repetimos con el otro lado (5), (6) y (7) y nos queda (8)
- Repetimos el mismo proceso con los triángulos restantes (1, 2, 3, 4, 5, 6, 7, 8)
- Repeat the same process with the remaining triangles (1, 2, 3, 4, 5, 6, 7, 8)
- Cerramos la posición (1) y pasamos el lado izquierdo (2) al lado derecho (3)
- Le damos vuelta y repetimos el procedimiento (4) y (5)
- Nos queda (6)
- We close the position (1) and pass the left side (2) to the right side (3)
- We turn it over and repeat the procedure (4) and (5)
- We are left with (6)
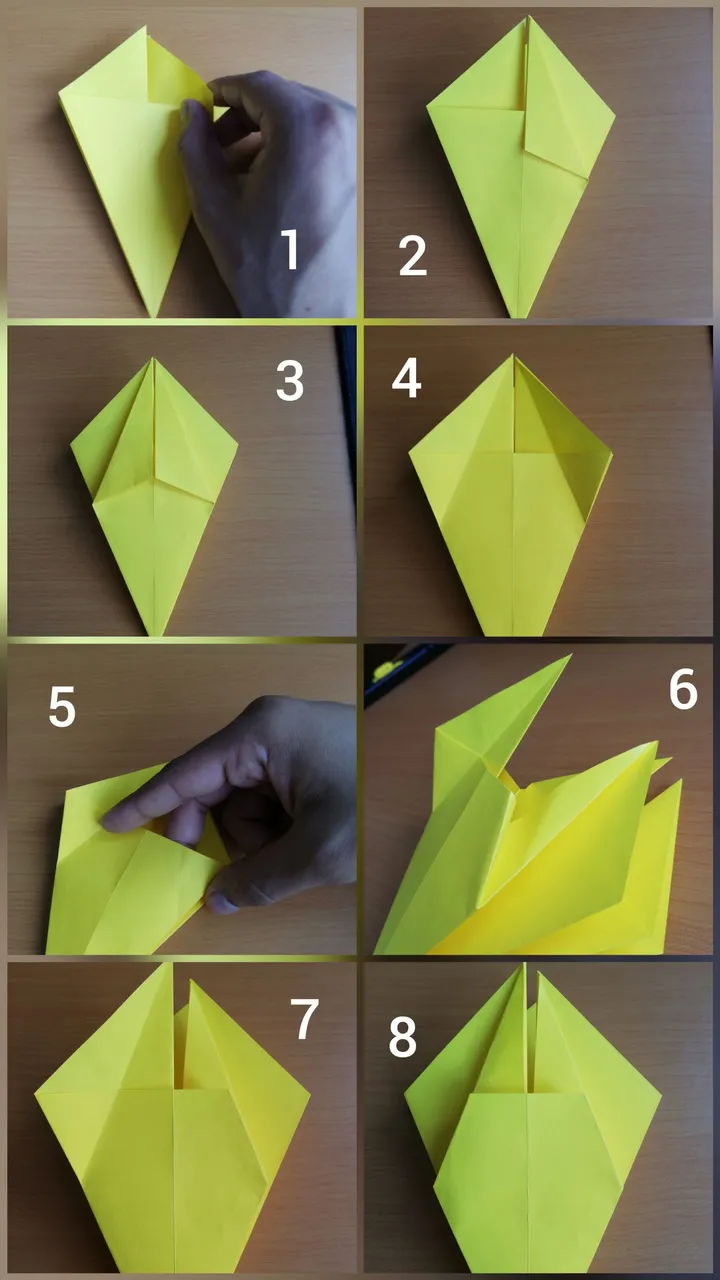
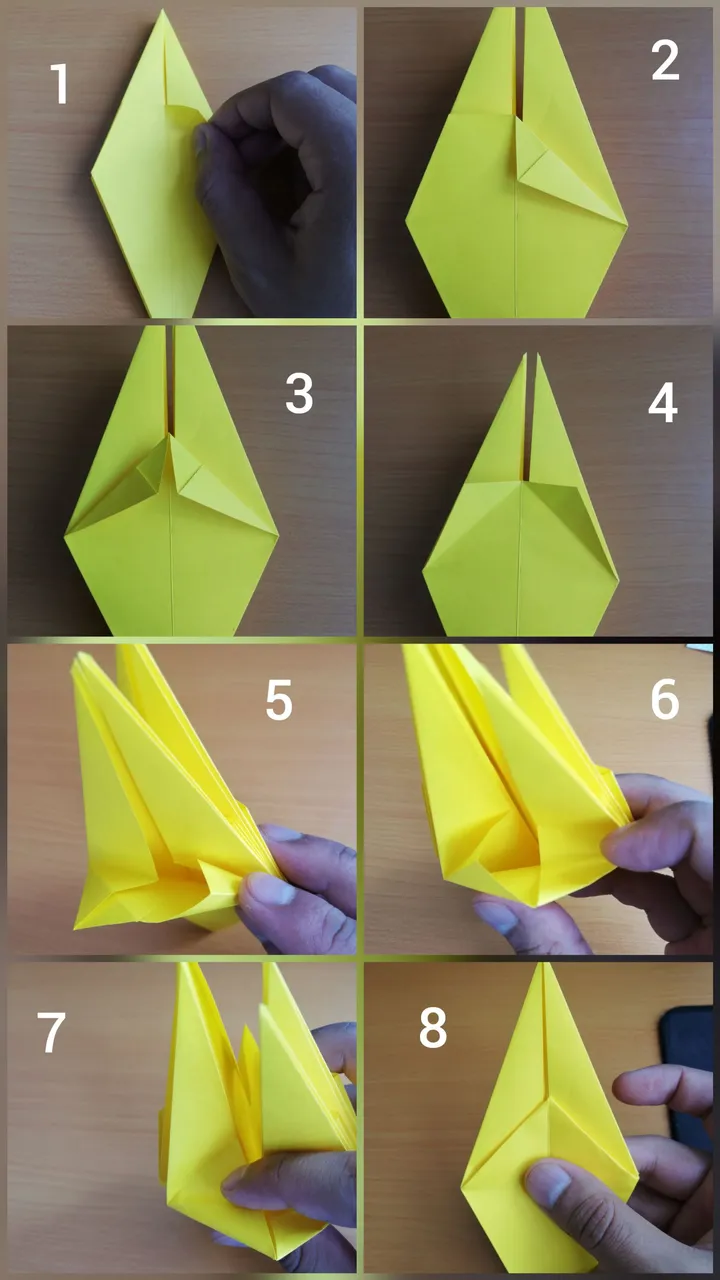
- Doblaremos las esquinas para formar un triángulo en la parte superior (1), (2) y (3)
- Abriremos (4)
- Buscaremos invertir los triángulos formados (5) y (6)
- Repetimos y nos queda (7) y (8)
- Fold the corners to form a triangle at the top (1), (2) and (3)
- We will open (4)
- We will try to invert the triangles formed (5) and (6)
- Repeat and we are left with (7) and (8)
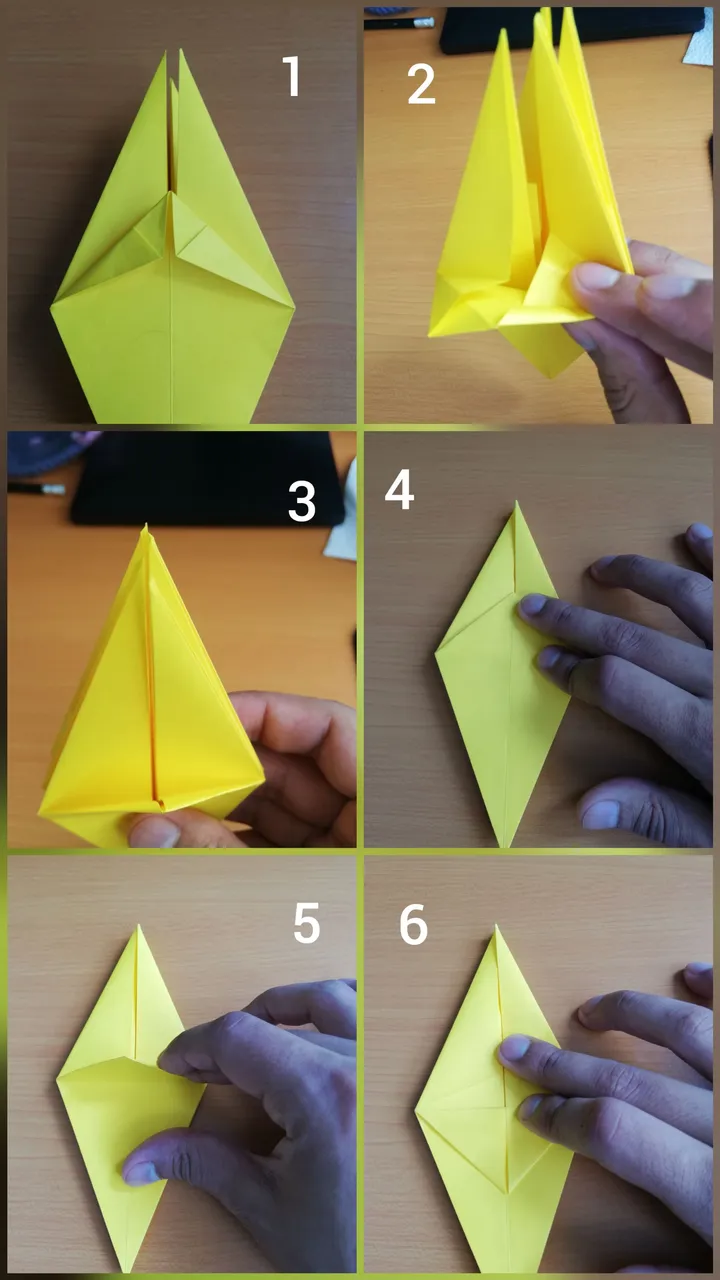
- Damos vuelta y repetimos el proceso anterior (1, 2, 3, 4, 5)
- Tomaremos los laterales y cerraremos hacia el centro (6) y (7)
- Nos quedará (8)
- Turn over and repeat the previous process (1, 2, 3, 3, 4, 5)
- We will take the sides and close towards the center (6) and (7)
- We will be left with (8)
- Formaremos nuevamente los triángulos (1)
- Invertiremos los triángulos (2) y (3)
- Voltearemos (4) y repetiremos el proceso (5, 6, 7)
- We will form the triangles (1) again
- Invert the triangles (2) and (3)
- We will flip (4) and repeat the process (5, 6, 7)
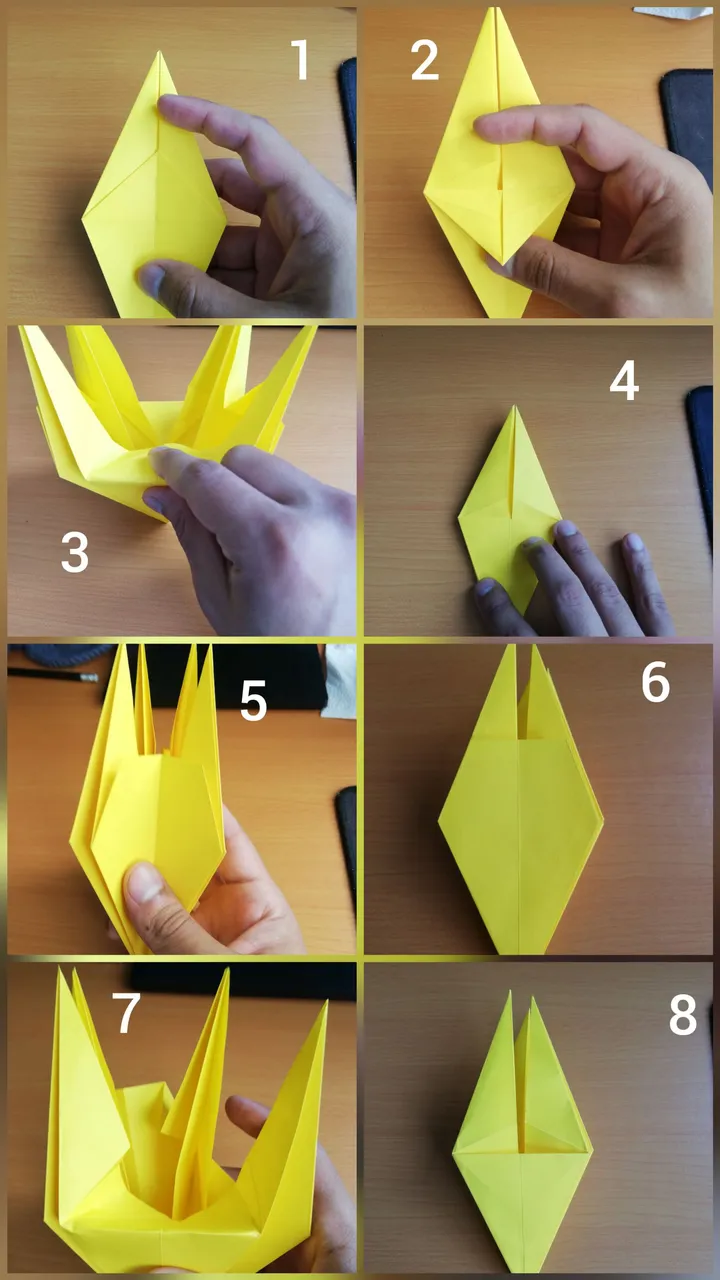
- Doblaremos las puntas superiores para formar unos pequeños triángulos (1), (2) y (3)
- Abriremos (4)
- Buscaremos invertir los triángulos (5), (6) y (7)
- Cerramos (8)
- Fold the upper ends to form small triangles (1), (2) and (3)
- We will open (4)
- We will try to invert the triangles (5), (6) and (7)
- Close (8)
- Damos vuelta y repetimos el procedimiento anterior (1, 2, 3, 4)
- Ahora doblamos el triángulo hacia abajo para marcar (5) y (6)
- Turn over and repeat the previous procedure (1, 2, 3, 4)
- Now we fold the triangle down to mark (5) and (6)
- Ahora buscaremos introducir el triángulo (1) hacia dentro
- Abriendo (3) para poder doblar por las marcas (4), (5)
- Cerramos (6) y (7)
- Now we will seek to introduce the triangle (1) inwards.
- Opening (3) in order to be able to bend by the marks (4), (5)
- Closing (6) and (7)
- Volteamos (1) y repetimos el procedimiento anterior (2), (3) y (4)
- Abrimos por los costados (5) y nos queda (6)
- Repetimos el procedimiento anterior en ambos lados(7) y (8)
- Turn over (1) and repeat the above procedure (2), (3) and (4)
- Open the sides (5) and we have (6)
- We repeat the previous procedure on both sides (7) and (8)
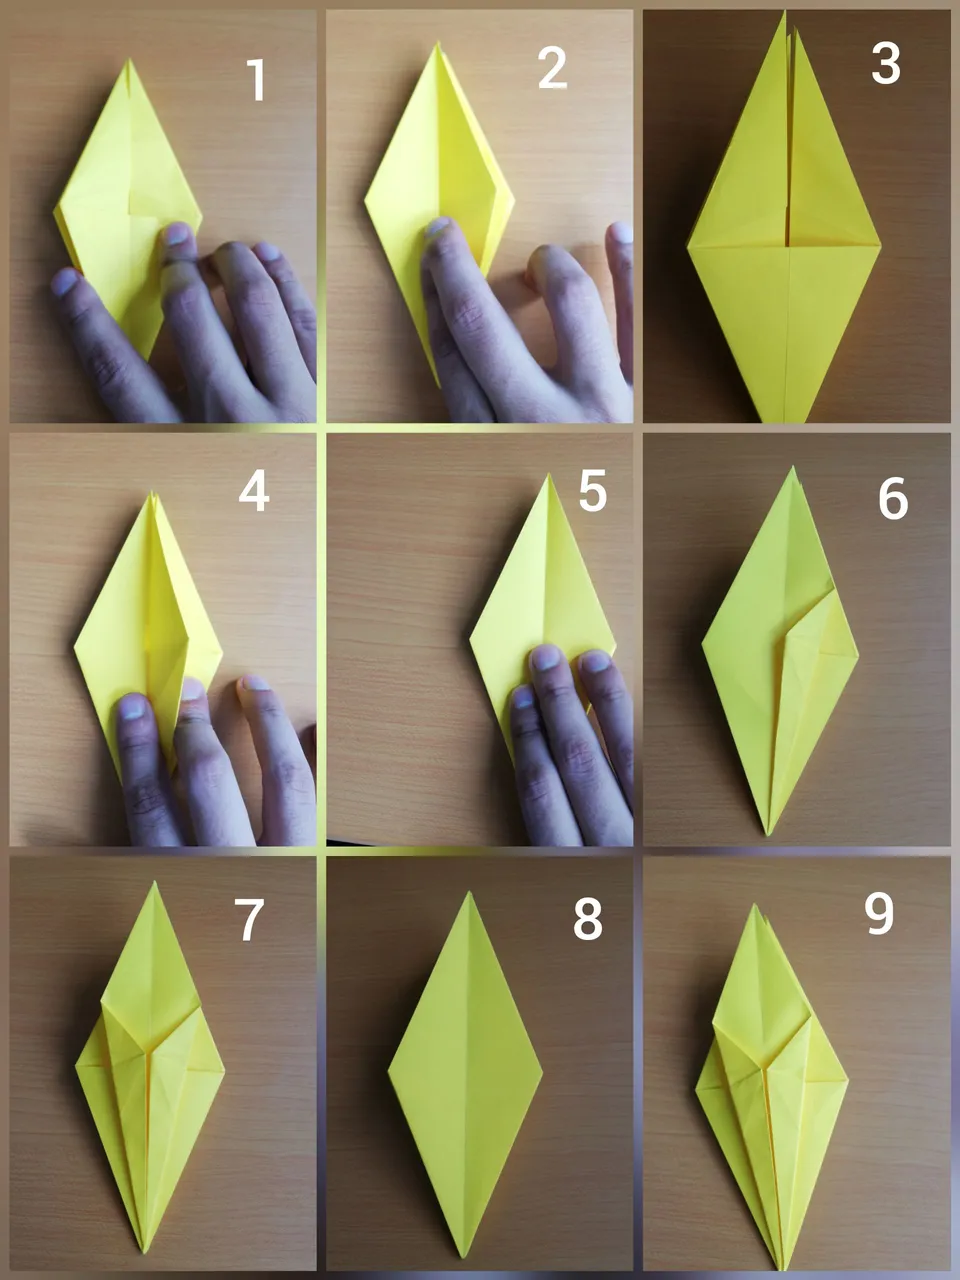
- Llevaremos el lado izquierdo (1) hacia la derecha (2)
- Volteamos (3) y repetimos (4) y (5)
- Ahora formaremos unos triángulos en la parte inferior (6) y (7)
- Volteamos y repetimos (8) y (9)
- We will take the left side (1) to the right (2)
- We flip (3) and repeat (4) and (5)
- Now we will form some triangles in the lower part (6) and (7)
- We flip and repeat (8) and (9)
- Tomamos los laterales y cerramos hacia el centro (1) y (2)
- Nos queda (3) y repetimos el procedimiento anterior (4)
- Damos vuelta (5) y repetimos el procedimiento anterior (6)
- We take the sides and close towards the center (1) and (2)
- We are left with (3) and repeat the above procedure (4)
- Turn over (5) and repeat the above procedure (6)
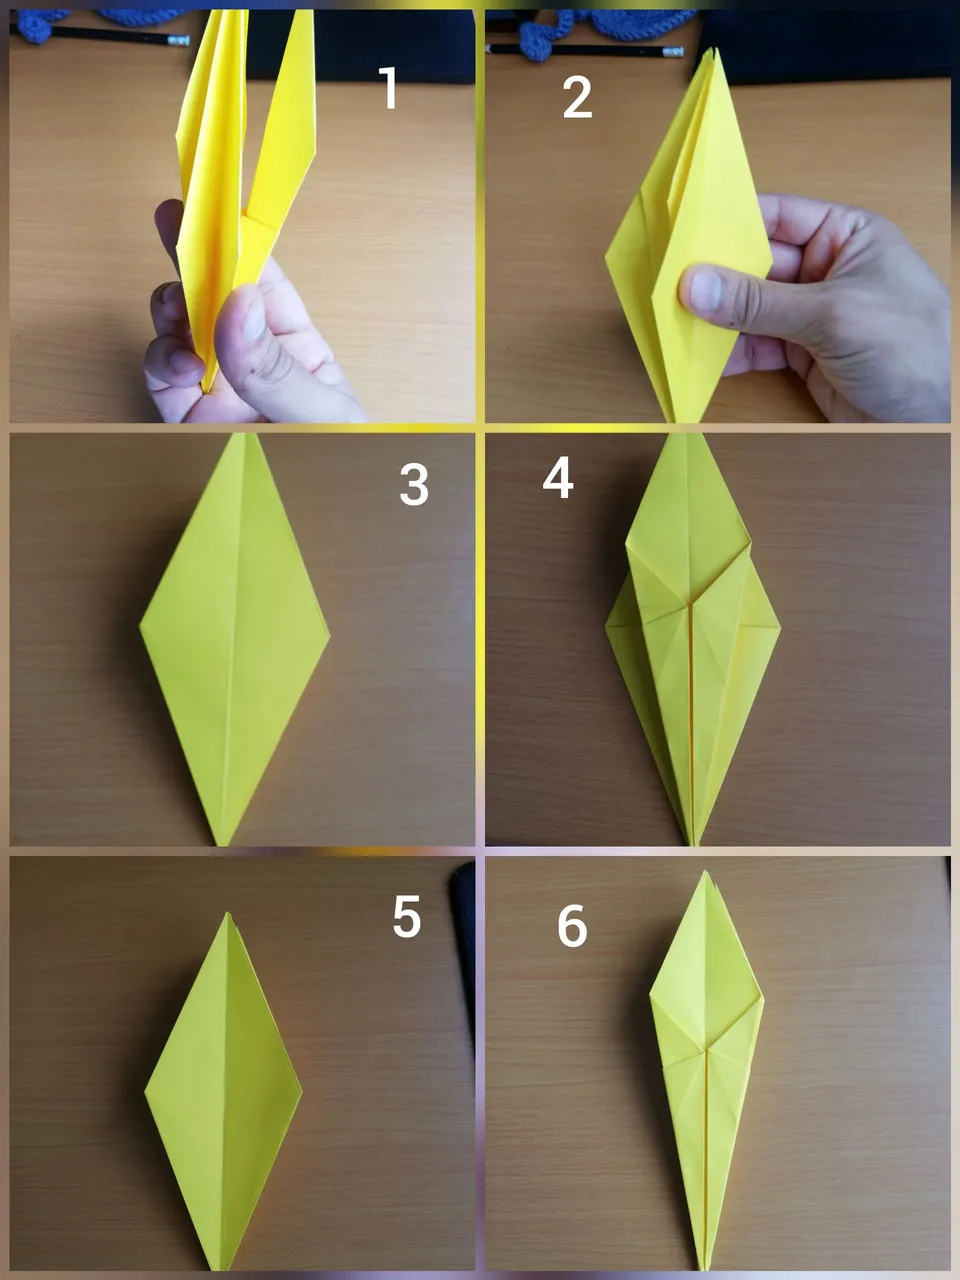
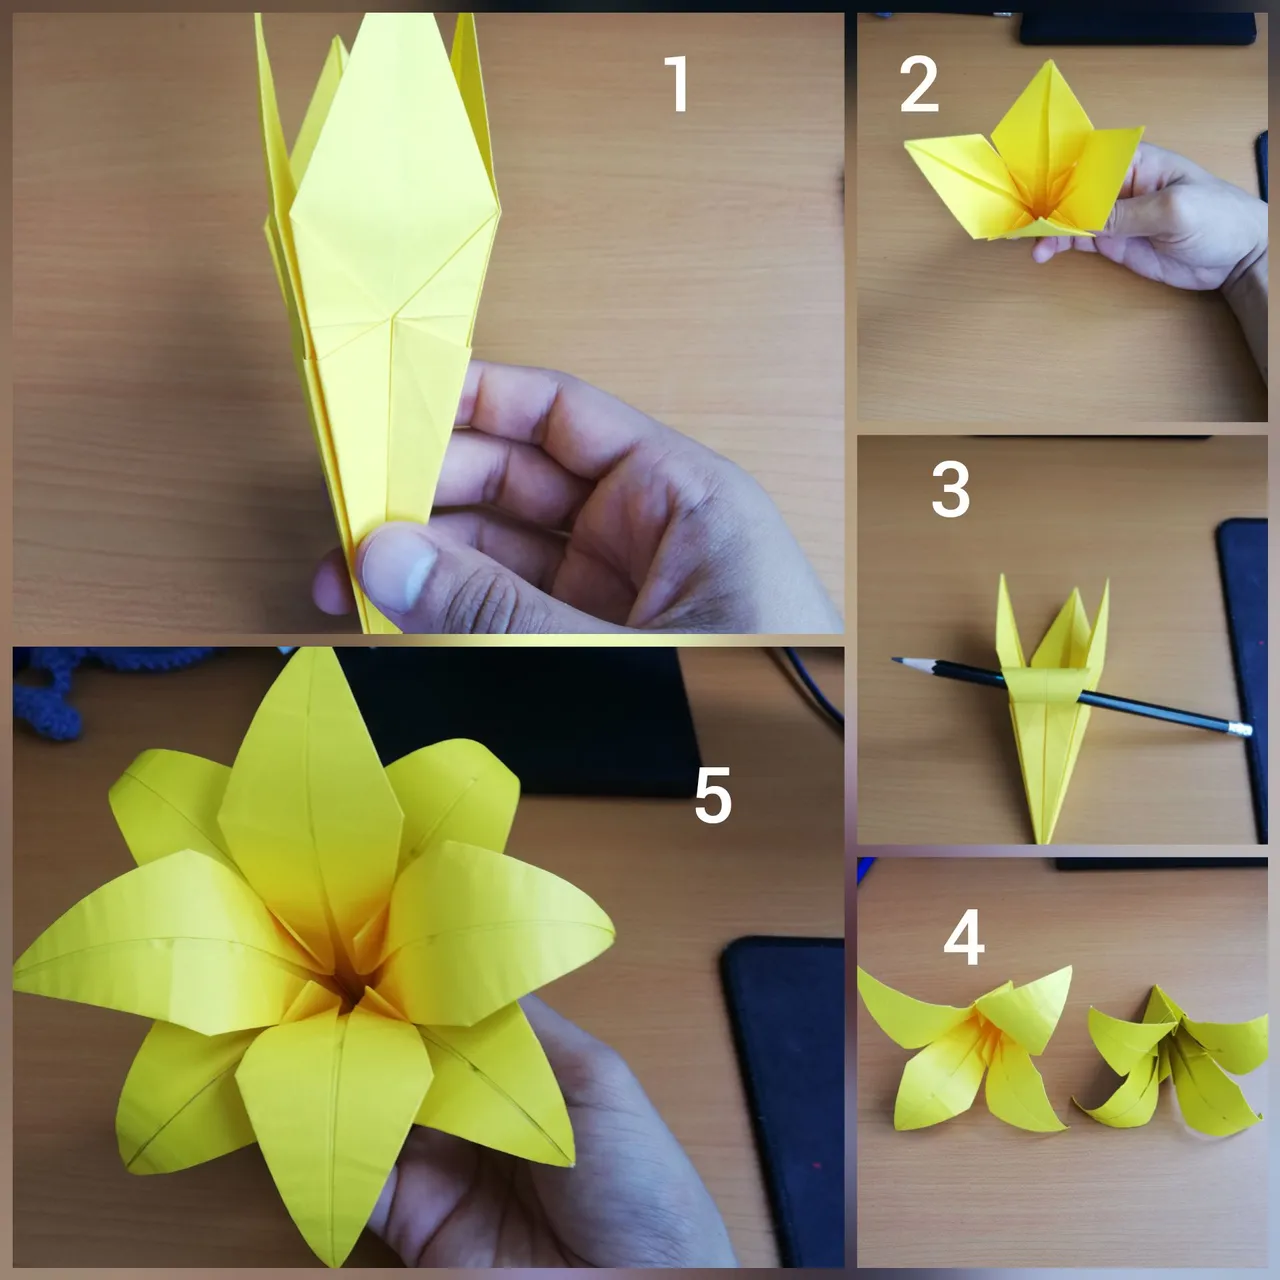
- Abrimos un poco (1)
- Visto desde otro ángulo (2)
- Buscamos un lápiz para darle curva a las hojas (3)
- Y repetimos todo con otro papel para tener (4)
- Introducimos una dentro de la otra (5)
Con esto estaría lista la flor. También con una sola hoja si no desea repetir todo el procedimiento.
- We open a little (1)
- Seen from another angle (2)
- We look for a pencil to give curve to the leaves (3)
- And we repeat everything with another paper to have (4)
- We introduce one inside the other (5)
With this the flower is ready. Also with a single sheet if you do not want to repeat the whole procedure.
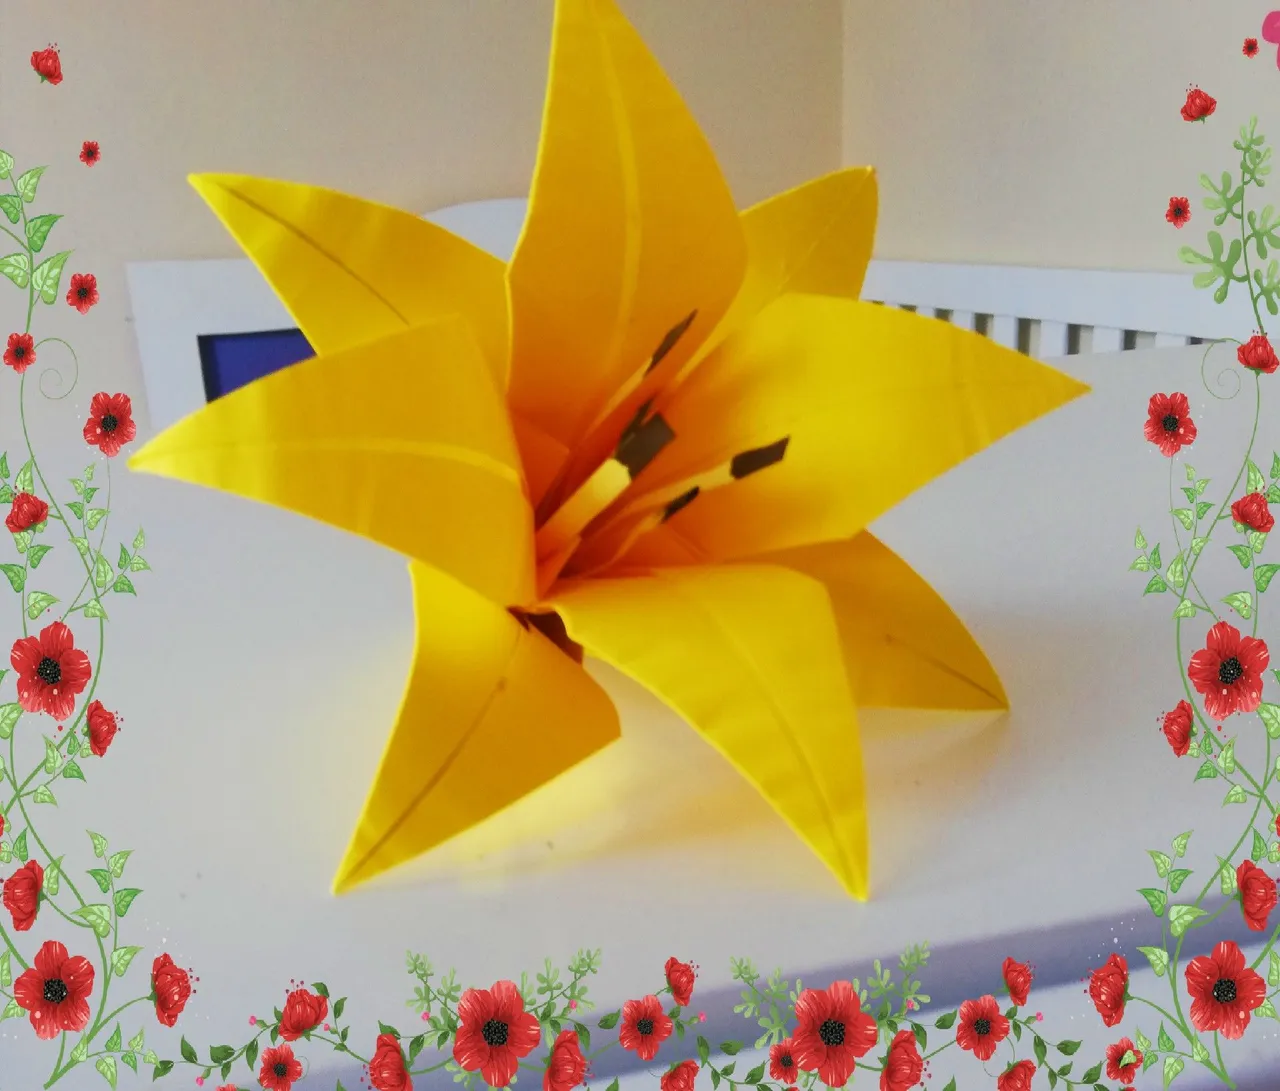
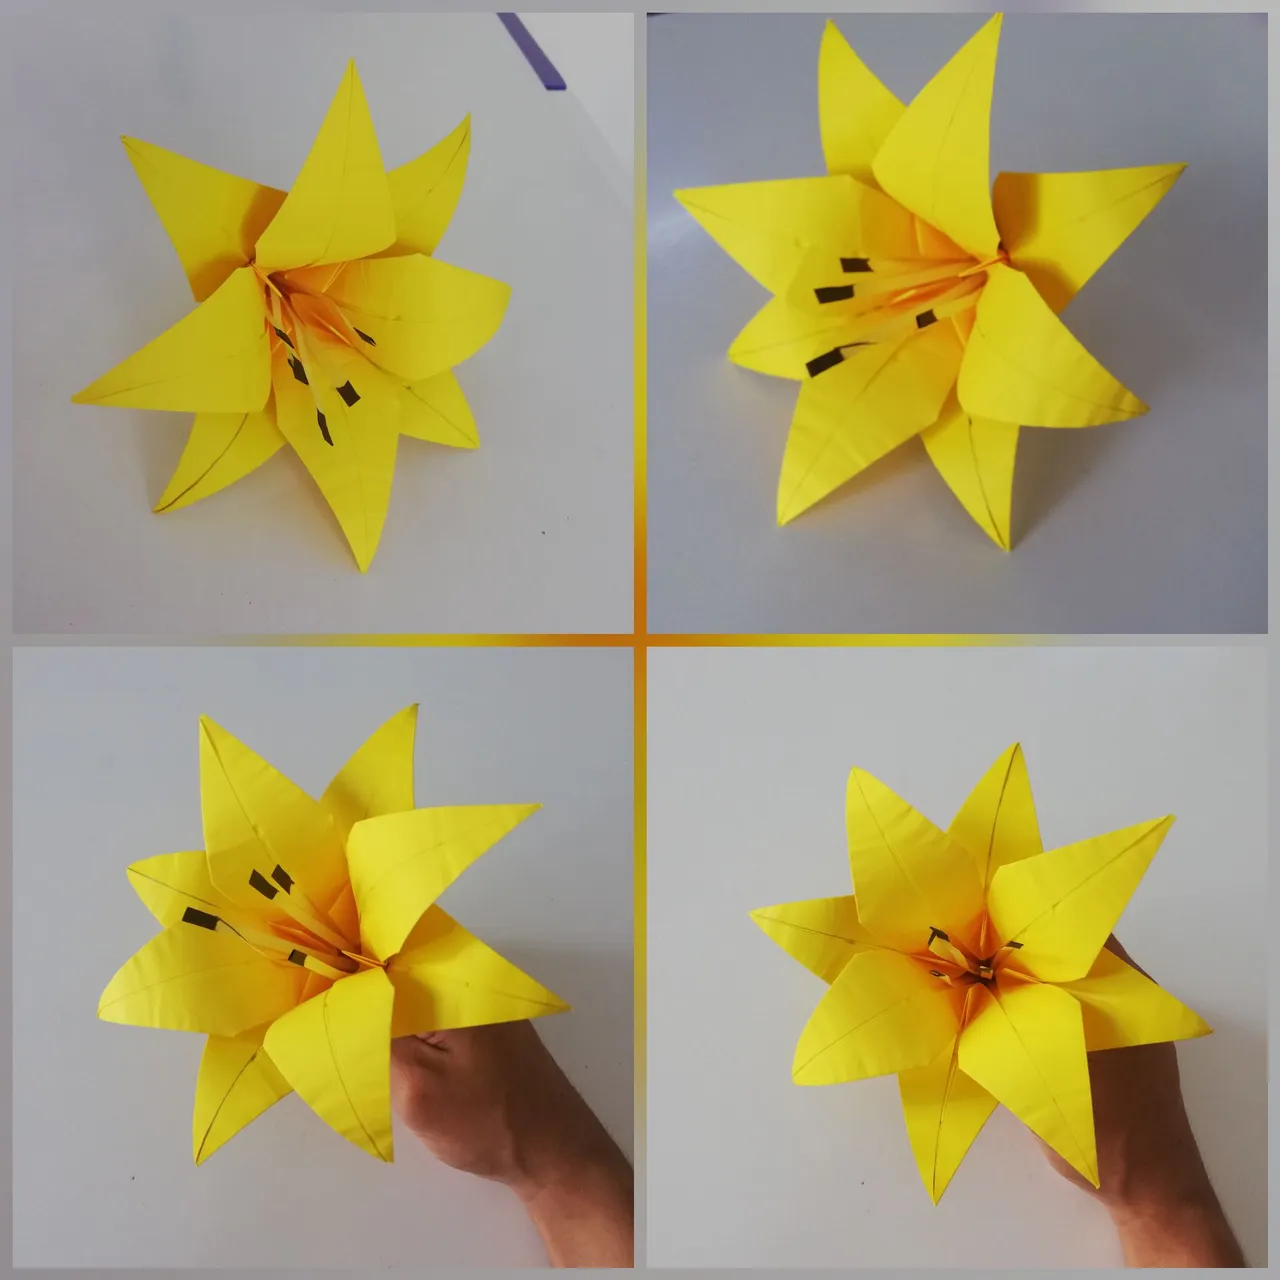
Para un detalle extra, corté unos rectángulos muy delgados y alargados, le coloque pega, los doblé por la mitad y les pinté la punta.
For an extra detail, I cut some very thin and elongated rectangles, glued them together, folded them in half and painted the tip.

El resultado, una bella flor de lirio.
The result, a beautiful lily flower.
Con esto me despido hasta una próxima publicación, atento a sus recomendaciones y opiniones. Si desean alguna flor en particular, me lo pueden dejar en los comentarios.
With this I say goodbye until a future publication, attentive to your recommendations and opinions. If you want any flower in particular, you can leave it in the comments.

Otros Origamis/ Other Origami
Hermosa Flor de Loto en origami/
Beautiful Lotus Flower in origami
(Tutorial)
Boomerang en origami, Si vuelve!/
Origami Boomerang, If it comes back!
(Tutorial)

Fotos de mi autoría/Photos of my authorship