Saludos cordiales para todos los lectores. ¿Quién no ha soñado de niño con lanzar un boomerang? y siempre con la duda si en verdad, regresan jajaja 😄 Pues el día de hoy les presento como hacer uno con papel. Obviamente no es tan potente y fuerte como uno que puedas comprar pero hace alusión.
Warm greetings to all readers. Who has not dreamed as a child to throw a boomerang? and always with the doubt if they really come back hahaha 😄 Well today I present you how to make one with paper. Obviously it is not as powerful and strong as one you can buy but it alludes.
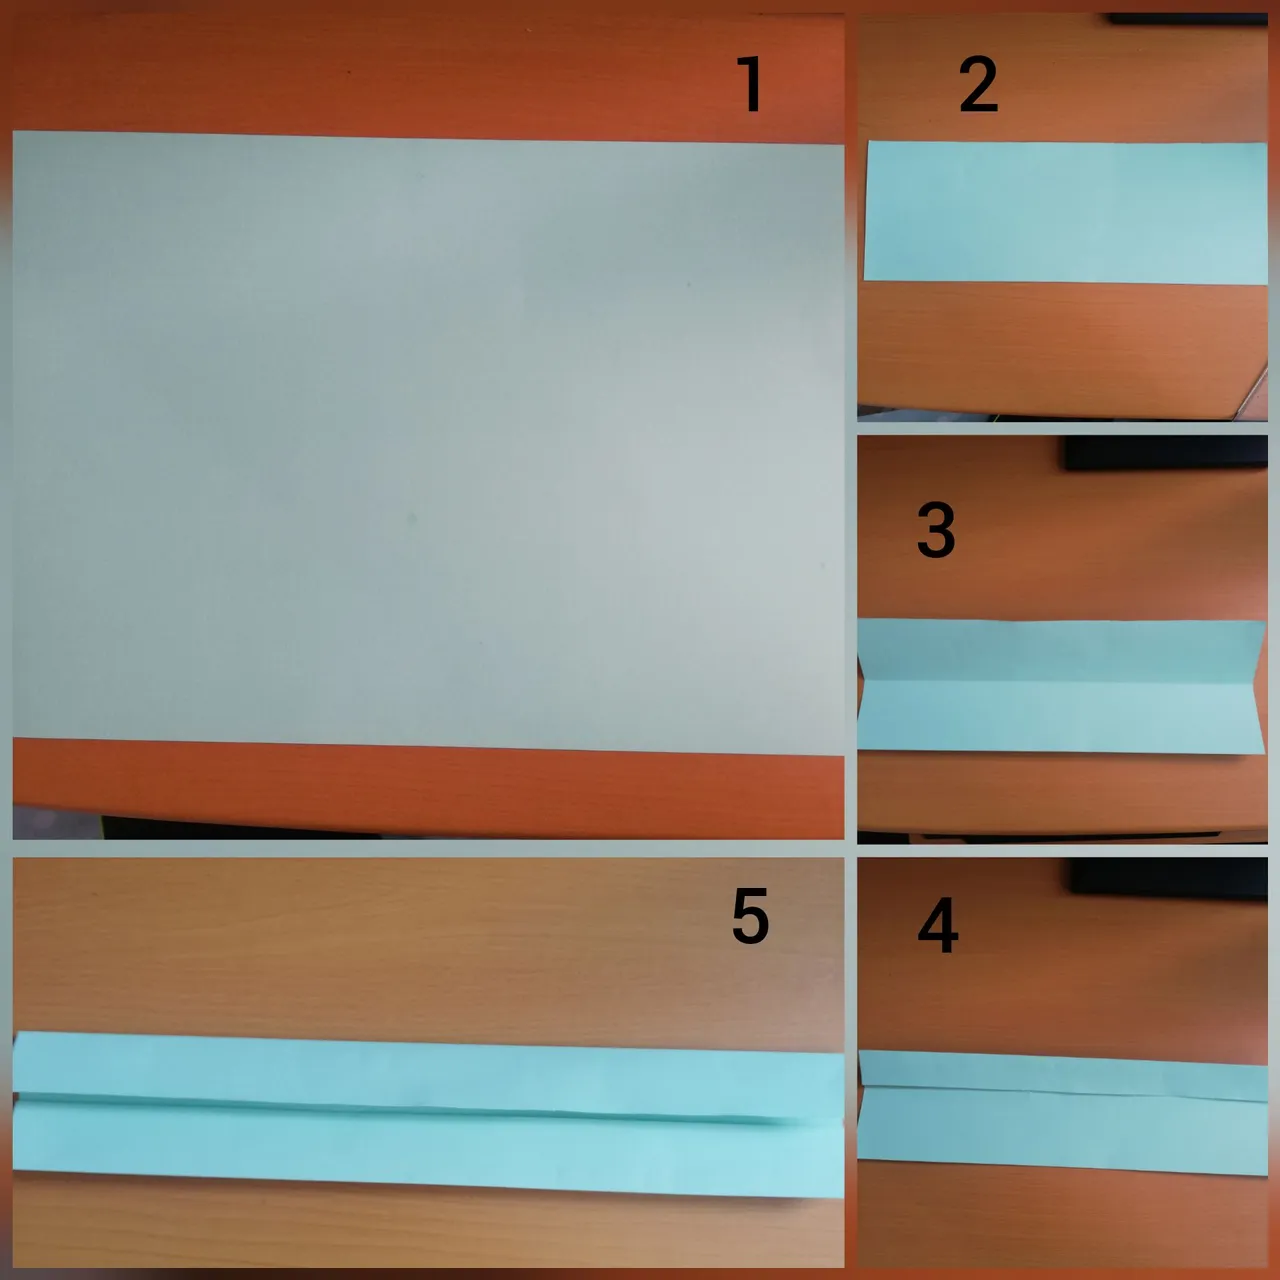
- Buscaremos una hoja del color que prefieras o dispongas (1)
- Picamos por la mitad a lo largo (2)
- Doblaremos por la mitad el pedazo picado y abrimos (3)
- Doblaremos hacia la mitad desde un extremo (4) y luego desde el otro (5)
- We will look for a leaf of the color that you prefer or have (1)
- Cut in half lengthwise (2)
- We will fold in half the chopped piece and open (3)
- Fold in half from one end (4) and then from the other (5)
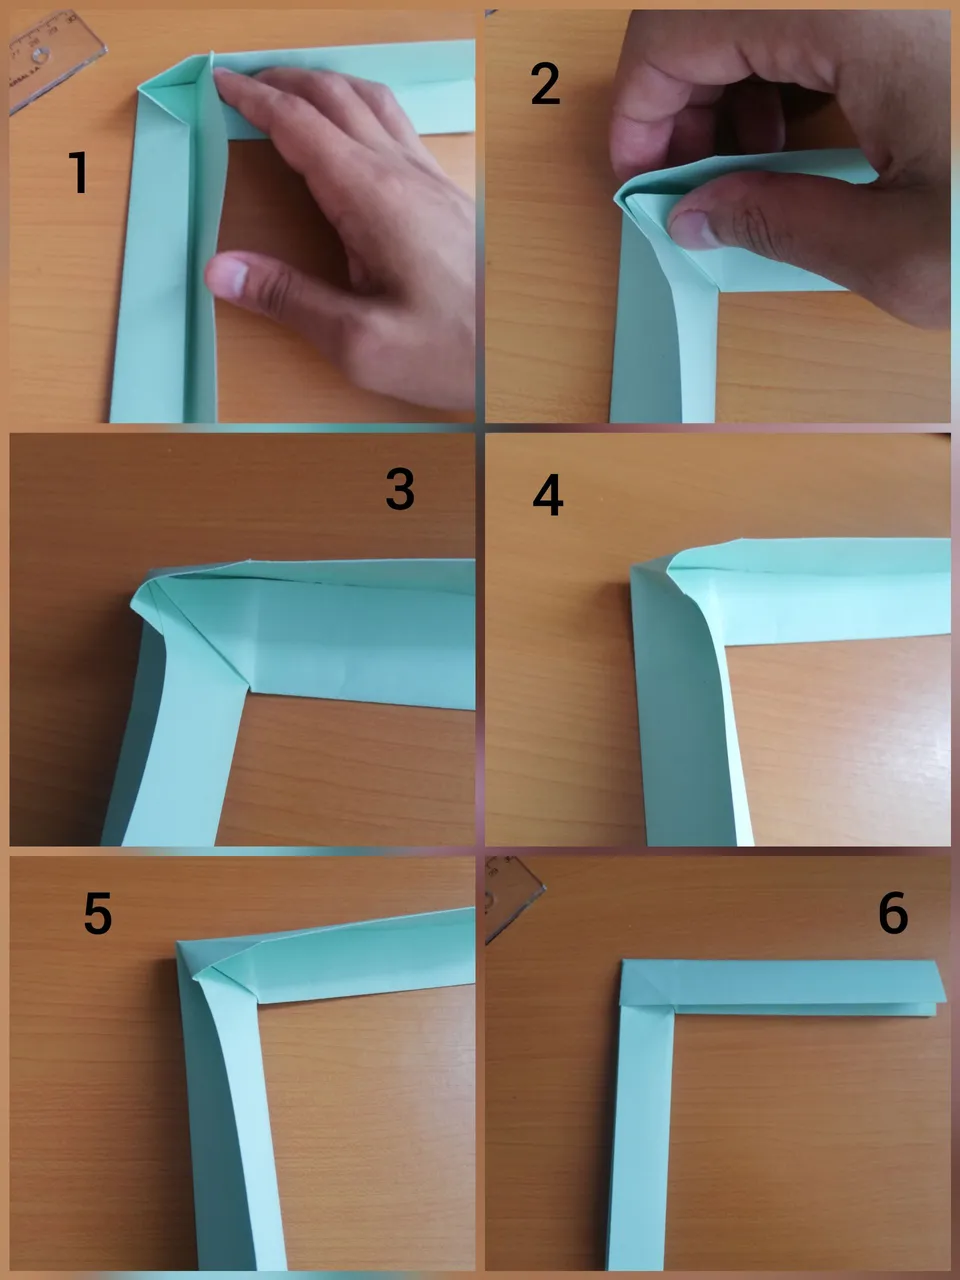
- Ahora doblaremos por la mitad (1)
- Y doblaremos las esquinas para formar triángulos
(2) - Luego abriremos (3) y (4)
- Now fold in half (1)
- And fold the corners to form triangles.
(2)- Then we will open (3) and (4)

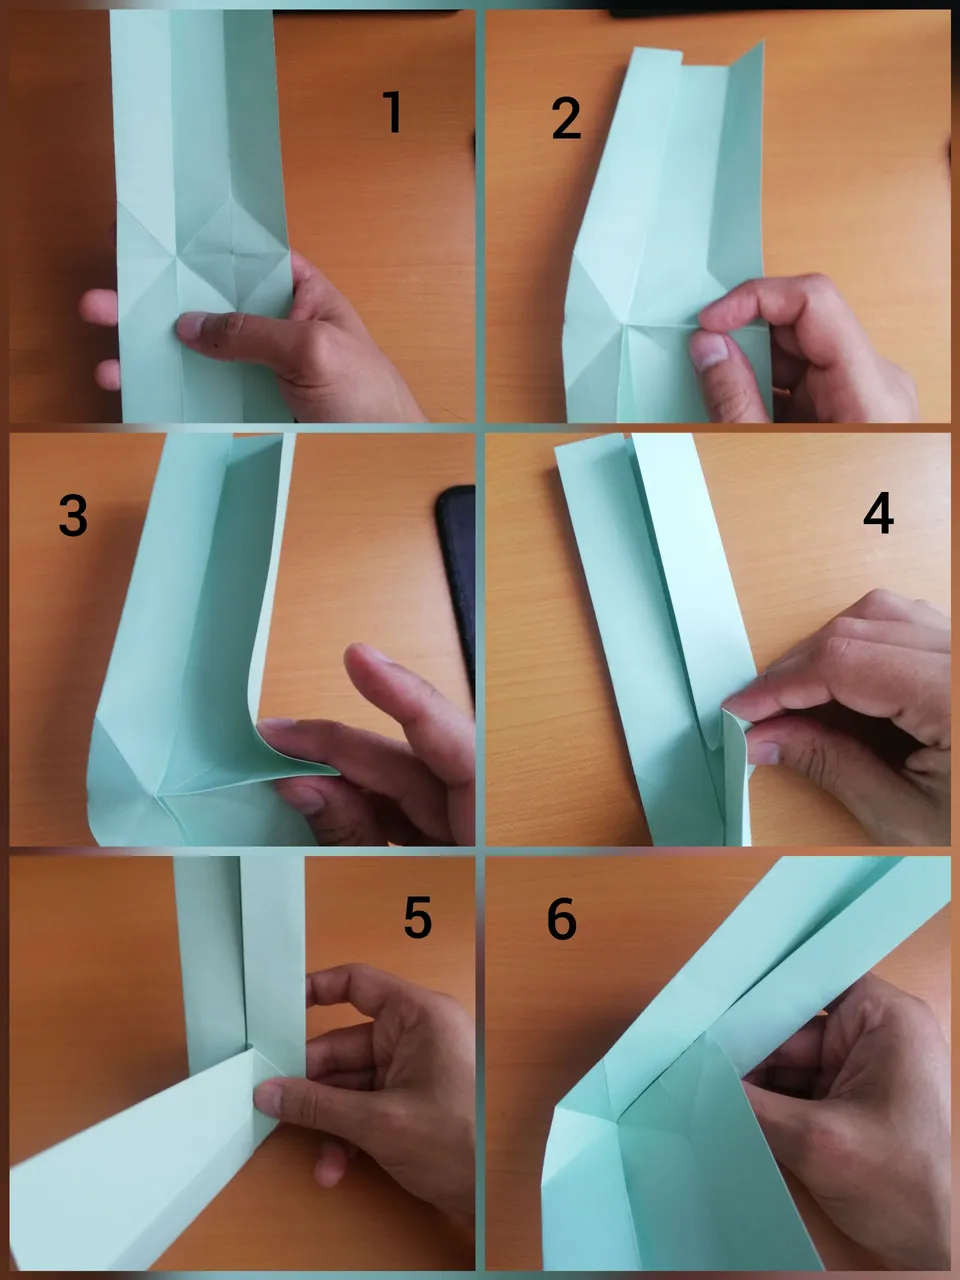
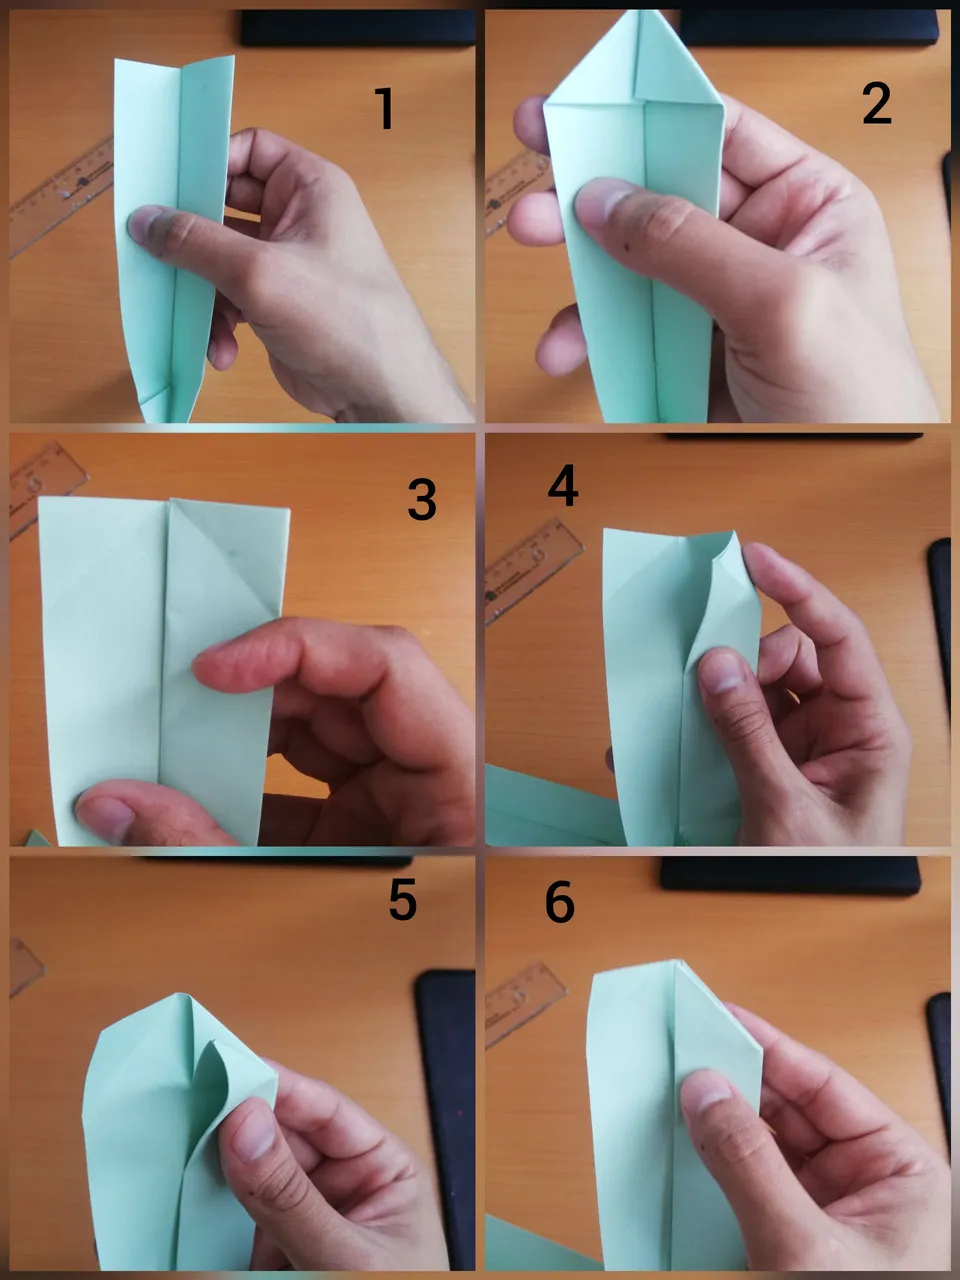
- Ahora abriremos el lateral derecho (1), se puede observar un rombo.
- Remarcamos en el centro (2)
- Doblaremos (3) buscando cerrar la parte superior (4) y (5)
- Visto desde otro ángulo (6)
- Now we will open the right side (1), you can see a rhombus
- We highlight in the center (2)
- Fold (3) looking to close the top (4) and (5)
- Seen from another angle (6)
- Ahora buscaremos doblar desde ese lado externo (1) y (2)
- Cerramos (3)
- Y doblaremos en el rombo como se indica en (4) y (5)
- Cerramos para remarcar(6)
- Now we will try to fold from that external side (1) and (2).
- We close (3)
- And we will fold in the rhombus as indicated in (4) and (5)
- We close to emphasize (6)
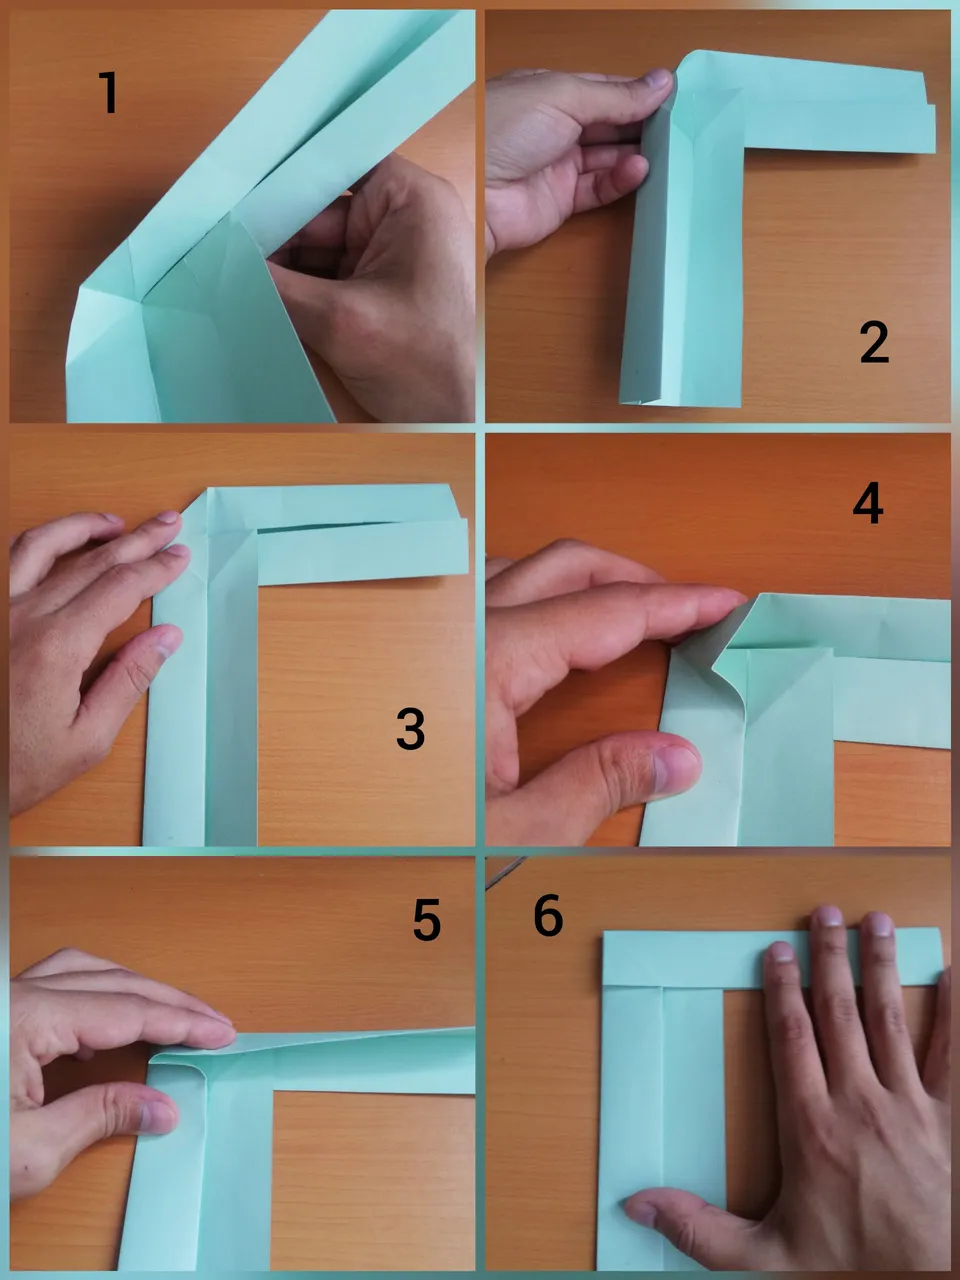
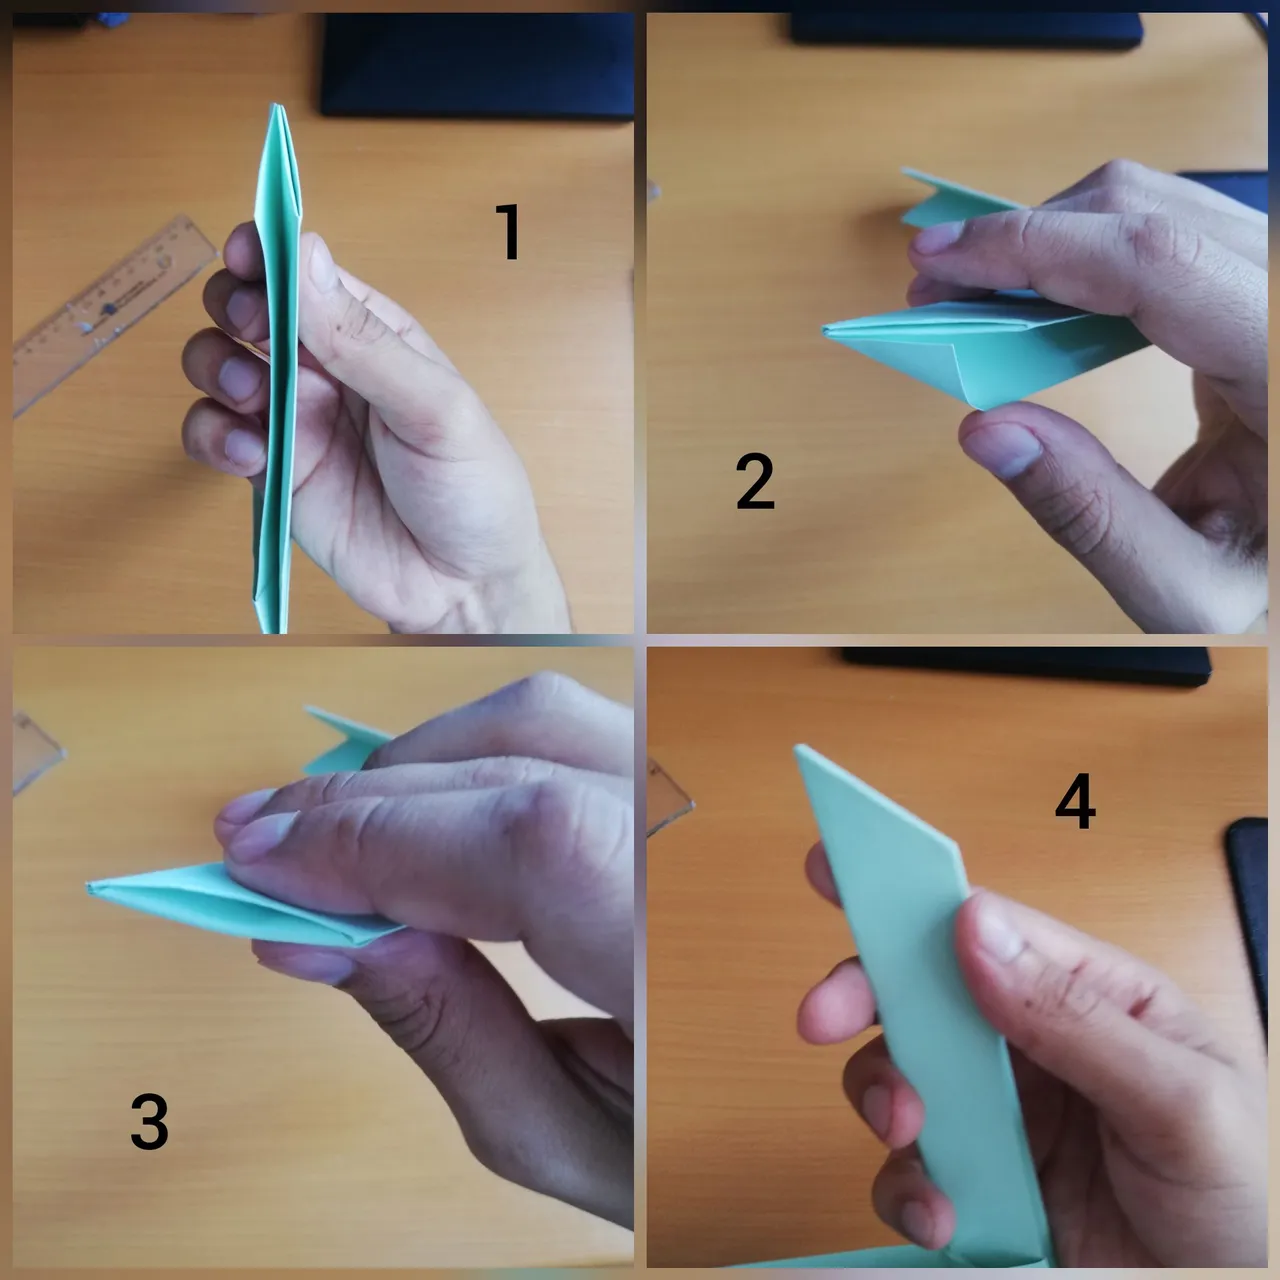
- Levantamos levemente la esquina (1)
- Introducimos el lado faltante (2) y (3)
- Visto desde otro ángulo (4) y (5)
- Cerramos y remarcamos (6)
- Slightly raise the corner (1)
- Insert the missing side (2) and (3)
- Seen from another angle (4) and (5)
- Close and mark (6)
- Abrimos uno de los extremos (1) sim que se desarme en el centro.
- Doblamos las esquinas (2) y abrimos (3)
- Del lado derecho, introduciremos la punta (4) hacia dentro (5)
- Cerramos y remarcamos
- We open one of the ends (1) so that it disassembles in the center
- Fold the corners (2) and open (3)
- On the right side, we insert the tip (4) inwards (5)
- Close and mark
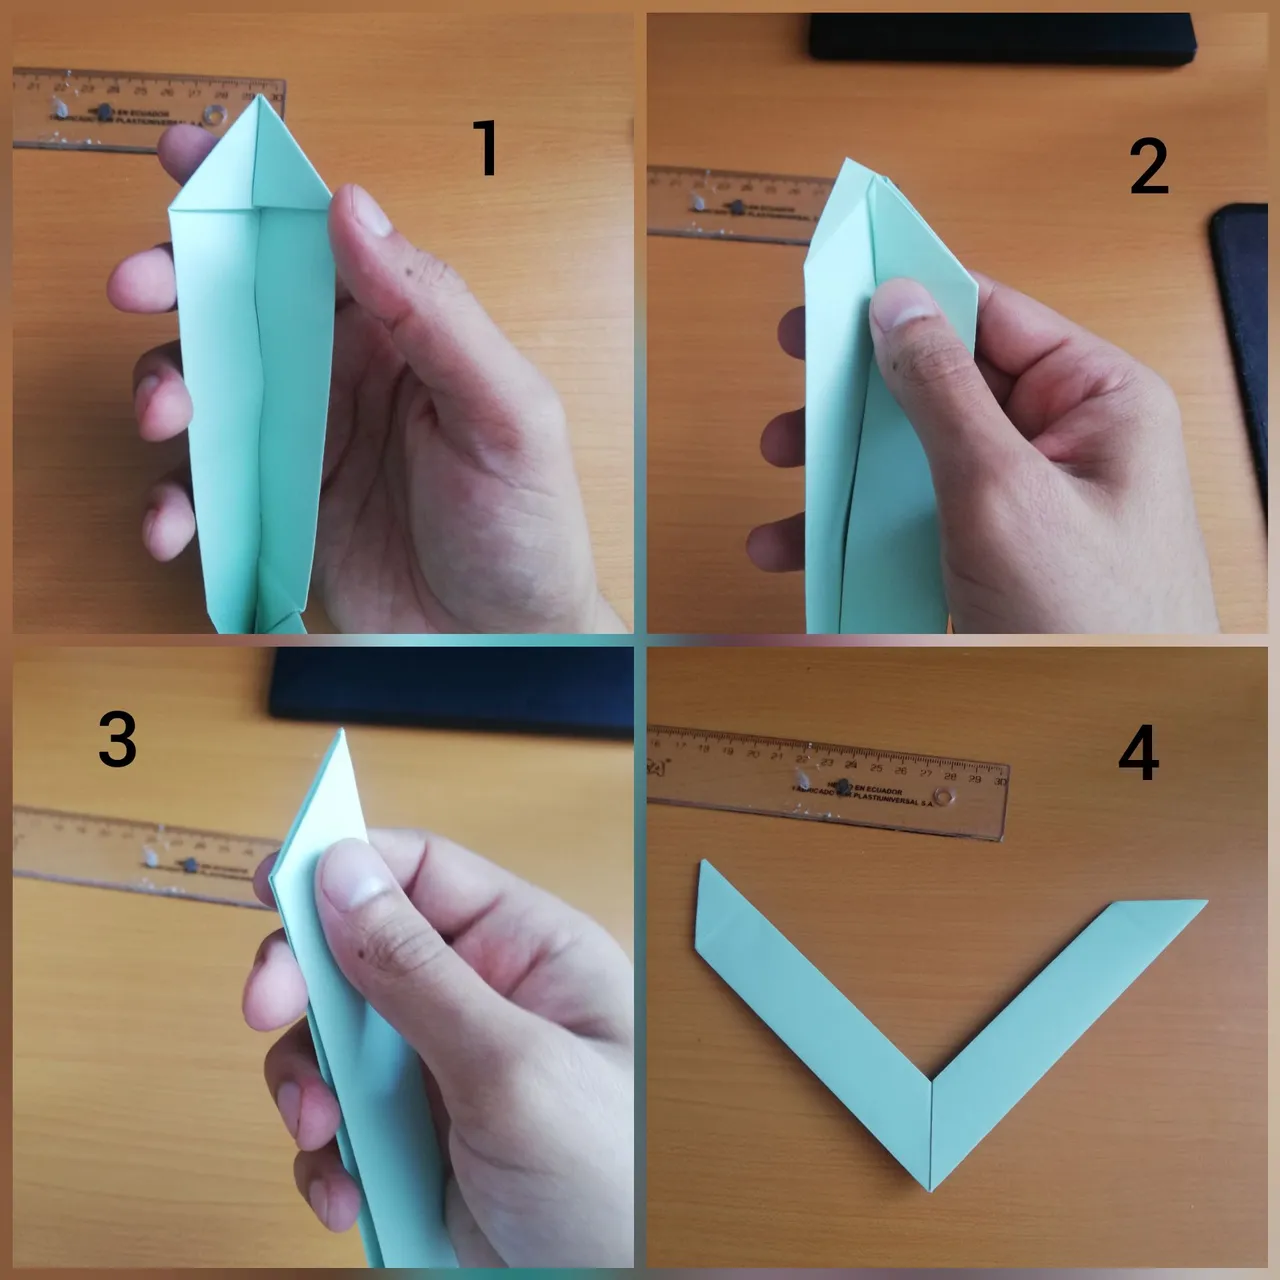
- Cerramos completamente (1)
- Buscaremos introducir la punta suelta (2) dentro del otro lado (3)
- Ajustamos bien y remarcamos (4)
- Close completely (1)
- We will try to insert the loose end (2) inside the other side (3)
- We tighten well and mark (4)
- Repetimos el proceso anterior con el otro extremo (1), (2) y (3)
- Remarcamos y con esto estaría terminado (4)
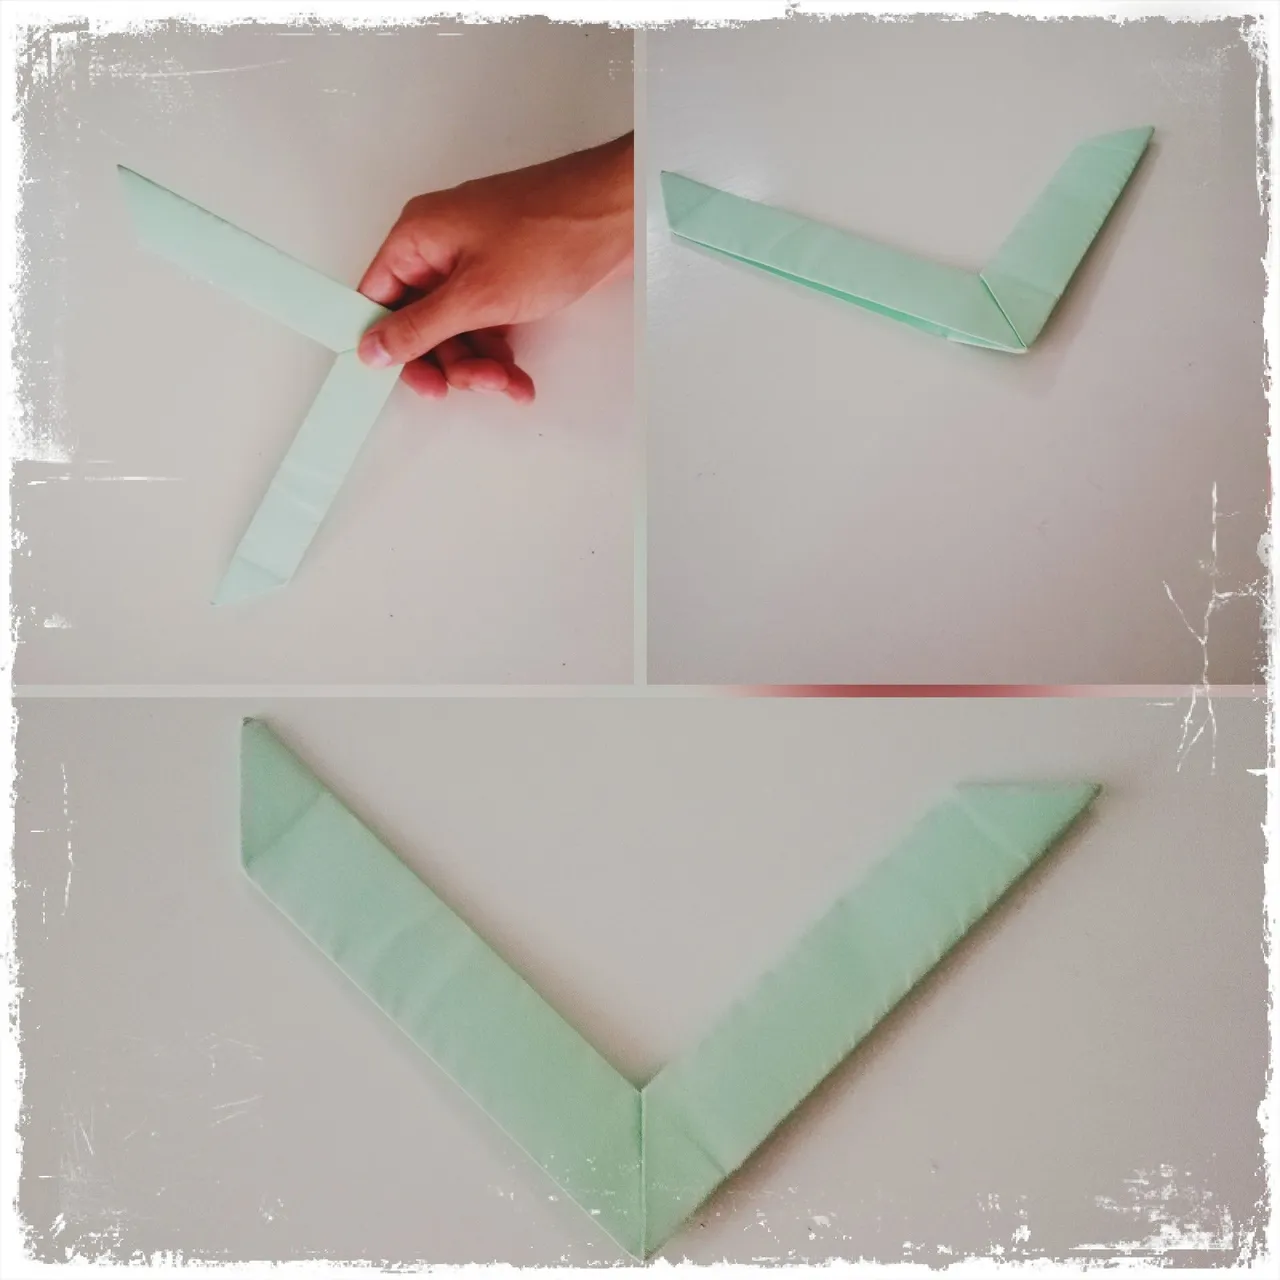
El modo para lanzar es el siguiente, y siempre con una ángulo de inclinación hacia arriba aproximado de 30° grados a 45°
The way to launch is as follows, and always with an upward tilt angle of approximately 30° degrees to 45° degrees.
Nótese que la cara superior es donde está la línea recta en el centro. Entre mejor sea el movimiento de muñeca, mayor el giro que se le da para que regrese.
Note that the top face is where the straight line is in the center. The better the wrist movement, the greater the twist that is given to bring it back.
Intenté usarlo en la cancha para tener más libertad pero había demasiada brisa. No me quedó de otra que usarlo en casa.
I tried to wear it on the court to have more freedom but it was too breezy. I had no choice but to use it at home.
Nota final: Si desea más firmeza en el boomerang, puede usar una hoja mas gruesa de lo habitual o no recorta la mitad, sino que la dobla y trabaja toda la construcción con ese extra que le dará mas peso y firmeza.
Si desea hacerlo para un zurdo, en vez de abrir el lateral derecho, sería el izquierdo y se replica todo hacia ese lado.
Final note: If you want more firmness in the boomerang, you can use a thicker sheet than usual or do not cut out the middle, but fold it and work the whole construction with that extra that will give more weight and firmness.
If you want to make it for a left-handed person, instead of opening the right side, it would be the left side and replicate everything to that side.
Origamis
Ranita Saltarina en origami/
Origami Jumping Frog
(Tutorial detallado/detailed tutorial)
Bella mariposa en origami/
Beautiful origami butterfly
(Tutorial detallado/Detailed tutorial)
Hermosa Flor de Loto en origami/
Beautiful Lotus Flower in origami
(Tutorial)

Bibliografía/Bibliography
Fotos de mi autoría/Photos of my authorship