[Custom Thumbnail]
All the Code of the series can be found at the Github repository:
https://github.com/drifter1/compiler
Introduction
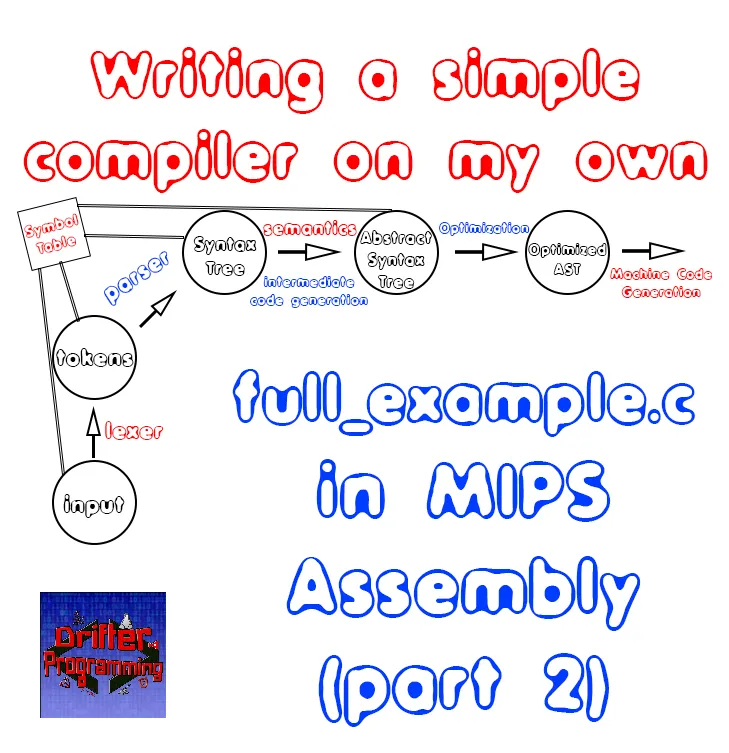
Hello it's a me again @drifter1! Today we continue with my Compiler Series, a series where we implement a complete compiler for a simple C-like language by using the C-tools Flex and Bison. In this article we will continue writing the full_example.c that we used through-out the series in MIPS Assembly Code.Part 1 can be found here.
Requirements:
Actually you need to read and understand all the topics that I covered in the series as a whole, as these articles will give you access to knowledge about:- What Compiler Design is (mainly the steps)
- For which exact Language the Compiler is build for (Tokens and Grammar)
- How to use Flex and Bison
- How to implement a lexer and parser for the language using those tools
- What the Symbol Table is and how we implement it
- How we combine Flex and Bison together
- How we can pass information from the Lexer to the Parser
- How we define operator priorities, precedencies and associativity
- What Semantic Analysis is (Attributes, SDT etc.)
- How we do the so called "Scope Resolution"
- How we declare types and check the type inter-compatibility for different cases that include function parameters and assignments
- How we check function calls later on using a "Revisit queue", as function declarations mostly happen after functions get used (in our Language)
- Intermediate Code Representations, including AST's
- How we implement an AST (structure and management)
- Action Rules for AST nodes and more
- The target system's architecture and its assembly language (MIPS)
Difficulty:
Talking about the series in general this series can be rated:- Intermediate to Advanced
- Medium
Actual Tutorial Content
full_example.c
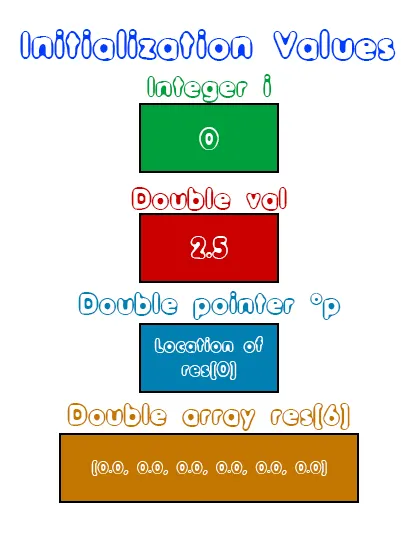
The full_example.c program, looks like this:int i;
char c = 'c';
double val = 2.5, res[6];
double *p;
p = &res;
for(i = 0; i < 10; i++){
if(i > 5){
    break;
}
else if(i == 5){
    i = 2 * i;
    val = func1();
    *p = add(val, i);
    print(res[i]);
    print("\n");
    continue;
}
else{
    *p = add(val, i);
    val = res[i];
    print(res[i]);
    print("\n");
    p = p + 1;
}
if(i == 2 && val == 4.5){
print("iteration: 3\n");
}
}
while(i < 12){
print(i);
print(" ");
func2(c);
i++;
}
print("\n");
return;
// FUNCTIONS
int func1(){
return 5;
}
void func2(char c){
char *s;
*s = c;
print(*s);
}
double add (double a, int b){
double res;
res = a + b + (-5);
return res;
}Instructions(...)
Last time we only got up to the point where we define the outer part of the for-loop. So, let's continue on...For loop
The outer for loop goes from 0 to 10 and in code is:# for loop
li $t0, 0 # i = 0
li $t1, 0 # address counter
for: bge $t0, 10, end_for # i < 10
...
# inner for statements
...
incr_for:
# i++
addi $t0, $t0, 1
addi $t1, $t1, 8
j for
end_for:Let's now explain the two if statements, separately...
First If statement
The first if statement looks like this:if(i > 5){
break;
}
else if(i == 5){
i = 2 * i;
val = func1();
*p = add(val, i);
print(res[i]);
print("\n");
continue;
}
else{
*p = add(val, i);
val = res[i];
print(res[i]);
print("\n");
p = p + 1;
}The if-part tells us that we break out of the for loop when the value of i is greater than 5, and so we will write a bgt (branch if greater than) instruction that takes us out of the loop and to the label "end_for" when this condition is true. In code this looks like this:
if1: bgt $t0, 5, end_forThe else-if-part tells us that we run the code of it only when the value of i is exactly 5, meaning that we will jump to the else-part when the value of i is not 5. In other words, we will write a bne instruction that makes sure that the else-if code gets executed only when the value of i is 5, else it will take us to the else code. Because the else if code contains a continue statement, we will include a "j incr_for" instruction, so that the incrementation of the loop is the only thing that gets executed inside of the 5th iteration. So, the outer code of the else-if-part is:
elseif: bne $t0, 5, else1

    # else if code

    # continue (with next iteration)
    j incr_for

else1:

    # else code
Else If section
The code inside of the else-if section is the following:i = 2 * i;
val = func1();
*p = add(val, i);
print(res[i]);
print("\n");
continue;In MIPS assembly it becomes:
# i = 2 * i
mul $t0, $t0, 2

# val = func1()
jal func1
mtc1.d $v0, $f2
cvt.d.w $f2, $f2

# *p = add(val, i)
mov.d $f0, $f2
move $a0, $t0
jal add_func
s.d  $f12, 0($s0)

# print(res[i])
l.d $f12, res($t1)
li $v0, 3
syscall

# print("\n")
li $v0, 4
la $a0, newline
syscall

# continue (with next iteration)
j incr_for
I don't think that we have to explain that much here! But, let's explained some things that you might have trouble with. The function func1() returns an integer and so we have to convert that value to a double using the two instructions that we use for that purpose. The variable val is stored inside of $f2 and so we move it to $f0 for the function call of add. The result that we take back from that function (inside of $f12) is written to the address that pointer p is pointing to ($s0). After that we only have to simple print calls: one for a double, and one for a string.
Else section
The code inside of the else-section is the following:*p = add(val, i);
val = res[i];
print(res[i]);
print("\n");
p = p + 1;In MIPS Assembly it becomes:
# *p = add(val, i)
mov.d $f0, $f2
move $a0, $t0
jal add_func
s.d  $f12, 0($s0)

# val = res[i]
l.d $f4, res($t1)
mov.d $f2, $f4
s.d $f2, val

# print(res[i))
l.d $f12, res($t1)
li $v0, 3
syscall

# print("\n")
li $v0, 4
la $a0, newline
syscall

# p = p + 1
addi $s0, $s0, 8
sw $s0, p($0)
The code in the else-section is quite similar to the code of the else if section. Let's only explain the very last instruction: In that instruction we basically increment the pointer, so that it shows to the next entry of the res array and store that new value back to memory, too...
Second If statement
This statement looks like this:if(i == 2 && val == 4.5){
print("iteration: 3\n");
}As you can see there are two conditions. One condition that has to do with integers, and one that has to do with doubles. And I can assure you that the conditions for printing out "iteration: 3\n" never occur, during the execution of this code...
So, checking for the first condition is quite simple, we just check using the reverse logic: i not equal to 2 (bne), jumping to the label incr_for when this "reverse" condition is true. If the condition is false and so i is equal to 2, then we will have to check if the double variable val and so the register $f2 has the value 4.5. This is done using the double comparison instruction "c.eq.d" that sets the flags bc1t and bc1f to true and false respectively, when the two parameter registers have the same value.
So, we simply have to store the value 4.5 to some register, let's say $f6, and then using the previously mentioned instruction and "bc1f incr_for", we make sure that we jump and don't execute print() when the two registers have different values.
In code this all looks like this:
if2:
    # i == 2
    bne $t0, 2, incr_for
    # val == 4.5
    li.d $f6, 4.5
    c.eq.d $f2, $f6
    # branch if false (and so not equal)
    bc1f incr_for

    # print("iteration: 3\n")
    li $v0, 4
    la $a0, iteration3
    syscall

incr_for:
While loop and newline print
What remains now is:while(i < 12){
print(i);
print(" ");
func2(c);
i++;
}
print("\n");
return;This one is quite simple, and I won't explain anything besides the lb instruction, that we use to read the value of char c, which is 'c', from memory. The MIPS code is:
while: bge $t0, 12, end_while
    # print(i)
    li $v0, 1
    move $a0, $t0
    syscall

    # print(" ")
    li $v0, 4
    la $a0, nbsp
    syscall

    # func2(c)
    lb $a0, c($0)
    jal func2

    # i++
    addi $t0, $t0, 1

end_while:

# print("\n");
li $v0, 4
la $a0, newline
syscall

# terminate program
li $v0, 10
syscall
Console Output
Running the final MIPS code, that you can as always find on GitHub, we get:
Step Execution
To understand what is going on, let's explain the whole code execution, step by step...first in "words' and then as a gif image.In steps, we have:
- The for loop basically gets executed for 6 iterations (0...5). During those 6 iterations the console prints out the value of the result, which is also the value of each entry in the res array.
- In the first 5 iterations, val gets the value of the previous result of the add() function. Of course starting of with the initial value of 2.5. The entry of the array in each of these 5 iterations (res[0], res[1], ..., res[4]) has the same value as the val variable in the beginning of the next iteration.
- The pointer p simply points to the entry of res that corresponds to each iteration.
- In the 6th iteration of the for loop (i = 5), the val variables gets the value 5 from func1() and i gets multiplied by 2 getting the value 10, so the 6th entry of the res array (res[5]) gets the value 5 + 10 - 5 = 10.
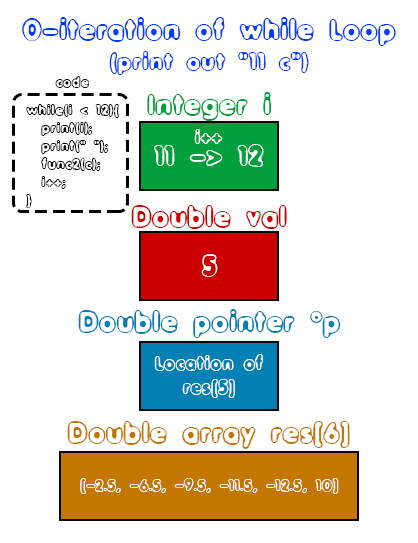
- After the final incrementation of i that occurs in the for-loop, i gets the value 11. Because that value is smaller than 12, an iteration of the while-loop gets executed, giving us the output "11 c" (printing the value of int i, a space character and the value of char c).
- After the incrementation of i, in the end of the while-loop, i gets the value 12 and so the exit condition of the while-loop is true. Lastly, a new line character gets printed out and the program gets terminated
What follows are gif images that shows us the value of each register/variable, in the beginning, the for-loop iterations, the while-loop iterations and of course also the values at the end. To keep it simple, I will disregard the value of c, because it stays 'c'...
The for-loop iterations...

The while-loop iterations...
RESOURCES
References:
No references, just writing code...Images:
All of the images are custom-made!Previous parts of the series
General Knowledge and Lexical Analysis
- Introduction
- A simple C Language
- Lexical Analysis using Flex
- Symbol Table (basic structure)
- Using Symbol Table in the Lexer
Syntax Analysis
- Syntax Analysis Theory
- Bison basics
- Creating a grammar for our Language
- Combine Flex and Bison
- Passing information from Lexer to Parser
- Finishing Off The Grammar/Parser (part 1)
- Finishing Off The Grammar/Parser (part 2)
Semantic Analysis (1)
- Semantic Analysis Theory
- Semantics Examples
- Scope Resolution using the Symbol Table
- Type Declaration and Checking
- Function Semantics (part 1)
- Function Semantics (part 2)
Intermediate Code Generation (AST)
- Abstract Syntax Tree Principle
- Abstract Syntax Tree Structure
- Abstract Syntax Tree Management
- Action Rules for Declarations and Initializations
- Action Rules for Expressions
- Action Rules for Assignments and Simple Statements
- Action Rules for If-Else Statements
- Action Rules for Loop Statements and some Fixes
- Action Rules for Function Declarations (part 1)
- Action Rules for Function Declarations (part 2)
- Action Rules for Function Calls
Semantic Analysis (2)
- Datatype attribute for Expressions
- Type Checking for Assignments
- Revisit Queue and Parameter Checking (part 1)
- Revisit Queue and Parameter Checking (part 2)
- Revisit Queue and Parameter Checking (part 3)
- Revisit Queue and Parameter Checking (part 4)
- Revisit Queue and Assignment Checking (part 1)
- Revisit Queue and Assignment Checking (part 2)
- Revisit Queue and Assignment Checking (part 3)
Machine Code Generation
- Machine Code Generation Principles
- Writing a simple Compiler on my own - MIPS Instruction Set
- Simple Examples in MIPS Assembly
- full_example.c in MIPS Assembly (part 1)
Final words | Next up on the project
And this is actually it for today's post! I hope that I explained everything as much as I needed to. Next time we will start getting into how we generate MIPS Code for various cases automatically inside of our compiler!Next up on this series, in general, are:
- Machine Code generation (MIPS Assembly)
- Various Optimizations in the Compiler's Code
Which are all topics for which we will need more than one article to complete them. Also, note that we might also get into AST Code Optimizations later on, or that we could even extend the Language by adding complex datatypes (structs and unions), more rules etc.
So, see ya next time!
GitHub Account:
https://github.com/drifter1
Keep on drifting! ;)