[Custom Thumbnail]
All the Code of the series can be found at the Github repository:
https://github.com/drifter1/compiler
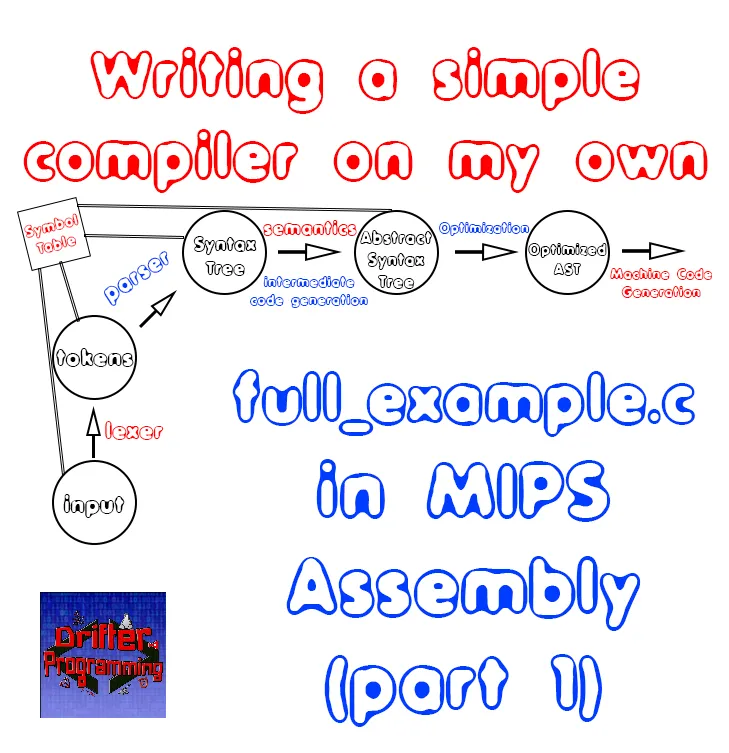
Introduction
Hello it's a me again @drifter1! Today we continue with my Compiler Series, a series where we implement a complete compiler for a simple C-like language by using the C-tools Flex and Bison. In this article we will write the full_example.c that we used through-out the series in MIPS Assembly Code. Because this example is quite difficult I suggest you to check out the simple examples of the previous article first. The explanation of how we get the MIPS code is quite enormous, and so this article is split into two parts!Requirements:
Actually you need to read and understand all the topics that I covered in the series as a whole, as these articles will give you access to knowledge about:- What Compiler Design is (mainly the steps)
- For which exact Language the Compiler is build for (Tokens and Grammar)
- How to use Flex and Bison
- How to implement a lexer and parser for the language using those tools
- What the Symbol Table is and how we implement it
- How we combine Flex and Bison together
- How we can pass information from the Lexer to the Parser
- How we define operator priorities, precedencies and associativity
- What Semantic Analysis is (Attributes, SDT etc.)
- How we do the so called "Scope Resolution"
- How we declare types and check the type inter-compatibility for different cases that include function parameters and assignments
- How we check function calls later on using a "Revisit queue", as function declarations mostly happen after functions get used (in our Language)
- Intermediate Code Representations, including AST's
- How we implement an AST (structure and management)
- Action Rules for AST nodes and more
- The target system's architecture and its assembly language (MIPS)
Difficulty:
Talking about the series in general this series can be rated:- Intermediate to Advanced
- Medium
Actual Tutorial Content
full_example.c
The full_example.c program, that we used to make syntax and semantic checks with our compiler, looks like this:int i;
char c = 'c';
double val = 2.5, res[6];
double *p;
p = &res;
for(i = 0; i < 10; i++){
if(i > 5){
break;
}
else if(i == 5){
i = 2 * i;
val = func1();
*p = add(val, i);
print(res[i]);
print("\n");
continue;
}
else{
*p = add(val, i);
val = res[i];
print(res[i]);
print("\n");
p = p + 1;
}
if(i == 2 && val == 4.5){
print("iteration: 3\n");
}
}
while(i < 12){
print(i);
print(" ");
func2(c);
i++;
}
print("\n");
return;
// FUNCTIONS
int func1(){
return 5;
}
void func2(char c){
char *s;
*s = c;
print(*s);
}
double add (double a, int b){
double res;
res = a + b + (-5);
return res;
}Data Declarations
In the .data section of the MIPS file that corresponds to the previous code, we have to include the variables ("simple" variables, arrays and pointers) and messages in ASCII format that will be printed through-out the execution using our custom "print()" function.Variables
Talking about variables, we will only define those that are declared in the main function inside of .data. So, we only have to define a:- integer variable 'i'
- character variable 'c'
- double variable 'val'
- double array of 6 entries with name 'res'
- double pointer 'p'
In .data this will look like this:
  i:     .word   0   # int i
val:     .space  8   # double val in $f2
  p:     .word   0   # double *p
res:     .space  48  # array with 6 doubles
  c:     .byte  'c'  # char c = 'c'
Note, that the pointer to double only needs to be of size .word, because it will store the address of a double and not its value. When the value of the double that p is pointing to changes through-out the code (*p = ...), we will basically store that value directly to the address that p points to, without making any change to p!
Messages
Talking about the ASCII messages that are printed out in the code, and ignoring the simple char, int and double cases, we basically only have to define the messages:- "\n"
- " "
- "iteration: 3\n"
In code, this looks like this:
   newline: .asciiz "\n"
      nbsp: .asciiz " "
iteration3: .asciiz "iteration: 3\n"
Function Declarations
The program full_example.c contains three functions, one without parameter, one with one parameter, and one with two parameters. From those three functions only one doesn't return a value.Let's analyze each on its own...
func1()
The function:int func1(){
return 5;
}It's quite useless, and I know that too :P
So, what do we have to do? We simply have to set the value of some register to 5. To stay with the format that's used for the return values of functions, we will set the value of register $v0 to 5 and basically return to main using jr $ra. Thus, this function becomes:
func1:
    # return 5
    li $v0, 5
    jr $ra
func2()
The function:void func2(char c){
char *s;
*s = c;
print(*s);
}In code the function looks like this:
func2:
    # print(c)
    li $v0, 11
    # parameter already in $a0
    syscall

    jr $ra
add()
The most complicated function of the three is:double add (double a, int b){
double res;
res = a + b + (-5);
return res;
}This function takes in two variables that are of a different datatype (!), adds them together and their result with "-5", and in the end returns that final result.
If you remember from the previous article, we faced the same problem again! So, what did we do last time? Well, because double is the "dominant" type and so the type of the final result, we have to put the value of the second parameter b inside of a floating point register, by using some quite weird instructions. Don't be too scared about them! Let's just use them, because they are needed...
Either way, let's suppose that the first parameter (a) is stored inside of $f0, whilst the second parameter (b) is stored inside of $a0. We will convert the second one into a double using mtc1.d and cvt.d.w, and in the end store the value of $a0 as a double inside of $f6. After that we simple do floating point operations with those values. The final result will be returned through the $f12 register!
Here a diagram that explains what happens:
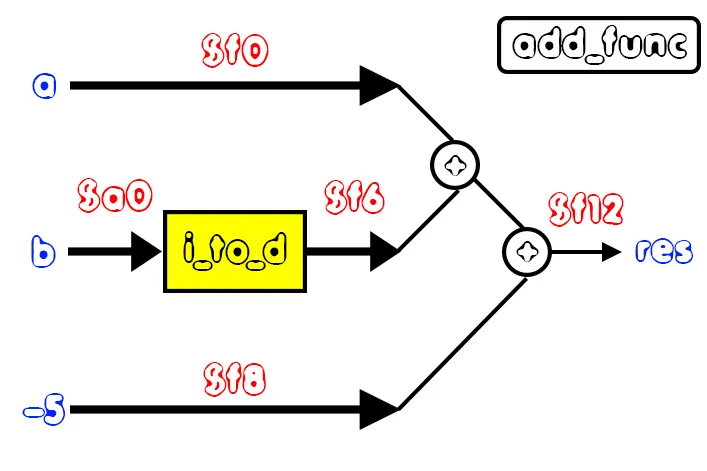
Therefore, the final function code is:
add_func:
    # parameter a in $f0
    # parameter b in $a0

    # convert int b to double
    mtc1.d $a0, $f6
    cvt.d.w $f6, $f6

    # res = a + b + (-5)

    # temp = a + b
    add.d $f12, $f0, $f6

    # res = temp + (-5)
    li.d $f8, -5.0
    add.d $f12, $f12, $f8

    # result in $f12
    jr $ra
I hope that the comments and diagram can help you understand this function, as it's quite important to understand the conversion between datatypes! Let's also note that we can't label the function "add", because that's a keyword used for the add-instruction. Thus, I named that function add_func instead!
Instructions
The program starts with the initialization of val to 2.5. We also set the pointing address of p to be the array res and so the first index of res (pointer assignment). After that there is a for loop with two nested if statements (a complicated one and a simple one). By the end, we also find a while loop and a simple print statement. Let's explain how we write each part in MIPS Assembly...Initialization of val and pointer assignment
The first part, which is:val = 2.5;
p = &res;In MIPS code this looks like this:
# val = 2.5
li.d $f2, 2.5
s.d $f2, val

# p = &res
la $s0, res
sw $s0, p($0)
For loop
The outer for loop goes from 0 to 10 and in code is:# for loop
li $t0, 0 # i = 0
li $t1, 0 # address counter
for: bge $t0, 10, end_for # i < 10
...
# inner for statements
...
incr_for:
# i++
addi $t0, $t0, 1
addi $t1, $t1, 8
j for
end_for:Similar to last time, we keep two counters, one that acts like an iteration counter and basically is the "main" loop counter, and one that gives the address, or let's better call it memory offset, for the res array (address counter).
The inner if-statements, the while-loop and a step-by-step execution of the program, will be covered next time...But, you can already find the complete code on GitHub, if you can't wait! :)
RESOURCES
References:
No references, just using code that I implemented in my previous articles.Images:
All of the images are custom-made!Previous parts of the series
General Knowledge and Lexical Analysis
- Introduction
- A simple C Language
- Lexical Analysis using Flex
- Symbol Table (basic structure)
- Using Symbol Table in the Lexer
Syntax Analysis
- Syntax Analysis Theory
- Bison basics
- Creating a grammar for our Language
- Combine Flex and Bison
- Passing information from Lexer to Parser
- Finishing Off The Grammar/Parser (part 1)
- Finishing Off The Grammar/Parser (part 2)
Semantic Analysis (1)
- Semantic Analysis Theory
- Semantics Examples
- Scope Resolution using the Symbol Table
- Type Declaration and Checking
- Function Semantics (part 1)
- Function Semantics (part 2)
Intermediate Code Generation (AST)
- Abstract Syntax Tree Principle
- Abstract Syntax Tree Structure
- Abstract Syntax Tree Management
- Action Rules for Declarations and Initializations
- Action Rules for Expressions
- Action Rules for Assignments and Simple Statements
- Action Rules for If-Else Statements
- Action Rules for Loop Statements and some Fixes
- Action Rules for Function Declarations (part 1)
- Action Rules for Function Declarations (part 2)
- Action Rules for Function Calls
Semantic Analysis (2)
- Datatype attribute for Expressions
- Type Checking for Assignments
- Revisit Queue and Parameter Checking (part 1)
- Revisit Queue and Parameter Checking (part 2)
- Revisit Queue and Parameter Checking (part 3)
- Revisit Queue and Parameter Checking (part 4)
- Revisit Queue and Assignment Checking (part 1)
- Revisit Queue and Assignment Checking (part 2)
- Revisit Queue and Assignment Checking (part 3)
Machine Code Generation
- Machine Code Generation Principles
- Writing a simple Compiler on my own - MIPS Instruction Set
- Simple Examples in MIPS Assembly
Final words | Next up on the project
And this is actually it for today's post! I hope that I explained everything as much as I needed to. The next article will be part 2, of today's article...and after that we will start getting into how we generate the automated MIPS code with our compiler...Next up on this series, in general, are:
- Machine Code generation (MIPS Assembly)
- Various Optimizations in the Compiler's Code
Which are all topics for which we will need more than one article to complete them. Also, note that we might also get into AST Code Optimizations later on, or that we could even extend the Language by adding complex datatypes (structs and unions), more rules etc.
So, see ya next time!
GitHub Account:
https://github.com/drifter1
Keep on drifting! ;)