
Buenas tardes queridos amigos de esta linda comunidad y bienvenidos a mi espacio preferido.
Me encanta este lugar ya que cada día le dedico un buen rato a lo que me gusta hacer.. Manualidades y compartirlas con ustedes.
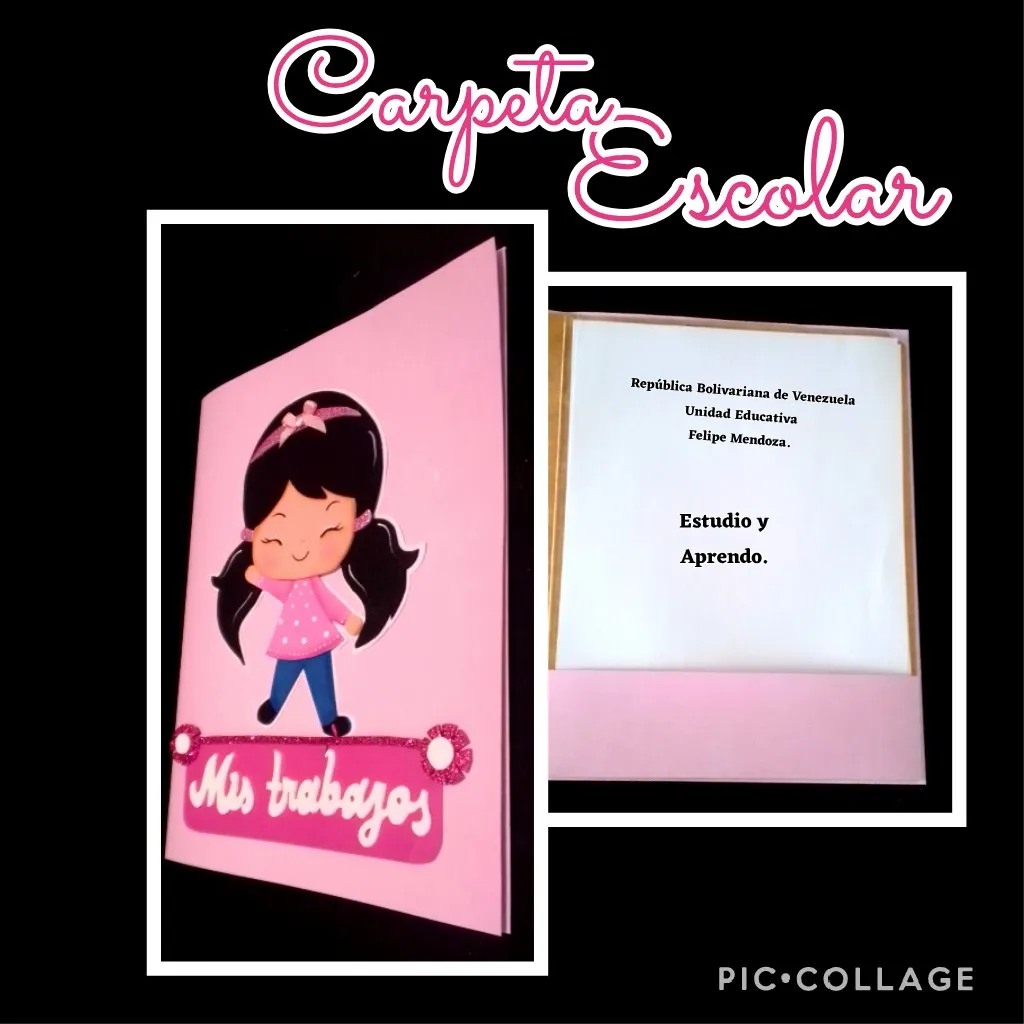
Por eso, me pareció muy buena idea mostrarles como pueden decorar una Carpeta, jajaja con eso te ahorras también un dinerito ya que tu mismo la puedes hacer con el material que gustes.
Para eso, sólo necesitas tener ganas de aprender y crear.
Lo que hago es mostrarte los pasos a seguir.
Recomendación: si vas a utilizar foamy para forrar la carpeta, te recomiendo coloques la carpeta con el lado brillante hacia adentro ya que cuando pegas con silicón líquido, tiende a despegarse.
Los materiales que usé son:

| Carpeta Marrón | Cartulina |
|---|---|
| Foamy mate y escarchado | Cinta de tela |
| Silicón líquido | Pinturas y pinceles |
| Lápiz, regla | Cuchilla |
| Tijera | Dibujo |
Ahora comienza el procedimiento:

- Remarcas el dibujo o impresión con lápiz de mina blanda, recorta o desglosa el dibujo y colocas cada pieza de papel en su color correspondiente y luego frota el papel con la ayuda de las orejas de la tijera hasta que se transfiera el dibujo sobre el foami, luego recorta.
-Ahora moja un pincel, pasas sobre un paño y dejas húmedo, mojas sólo la punta y empieza a pasar por todo el borde del foami para sombrear o poner color al borde de las piezas.

- Comienza a delinear con marcador punta fina o pincel fino, la
carita, pintando ojitos, nariz, una linda sonrisa...jajaja y deja secar.
Ahora empiezas con la parte más emocionante: el armado de la figura. - Aplica silicón líquido en cada una de las piezas y comienza a pegar sobre una cartulina blanca, tomando la precaución de no ensuciar la figura con silicón, al terminar deja secar bien y recorta por todo el contorno de la muñequita dejando 2 ò 3 milímetros de borde, has con la cinta de tela, un lacito de zapatos y pega al cintillo de la muñequita.

Ahora harás un bolsillo para pegar por dentro de la carpeta
- Abre la carpeta y mides el ancho de una cara, aumenta 1,5 cms a los lados y en la parte posterior, ahora traza estas medidas en un pedazo de cartulina, harás un rectángulo con pestañas, recorta y con la ayuda de la tijera pasa por las líneas y dobla hacia adentro y recorta el sobrante.(Ver foto).
- Aplica silicón en la pestaña y pega a la carpeta, haciendo presión para que pegue bien, este bolsillo te servirá para meter las hojas y queden más seguras.
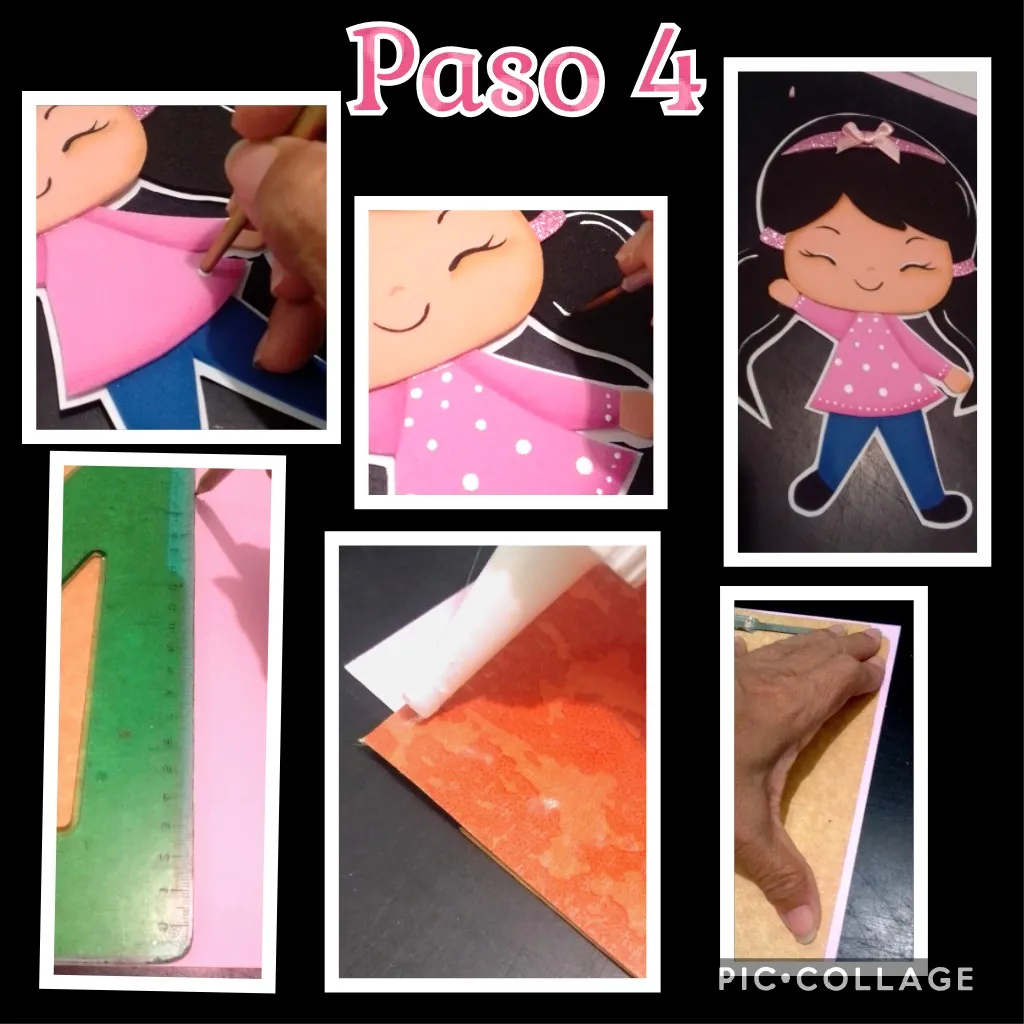
- En este paso 4, moja la punta de atrás del pincel en pintura blanca y pinta puntos en la blusita, también recorta dos pedacitos de foami escarchado y da la forma de moñeras y pega a los lados para decorar el cabello y para terminar pinta líneas en el cabello para dar luz a la figura.
Así quedará lista la muñequita.
Ahora sigue forrar la carpeta: - Coloca la carpeta sobre la cartulina, le aumentas 5mm más a cada lado, marca, recorta y pega a la carpeta.
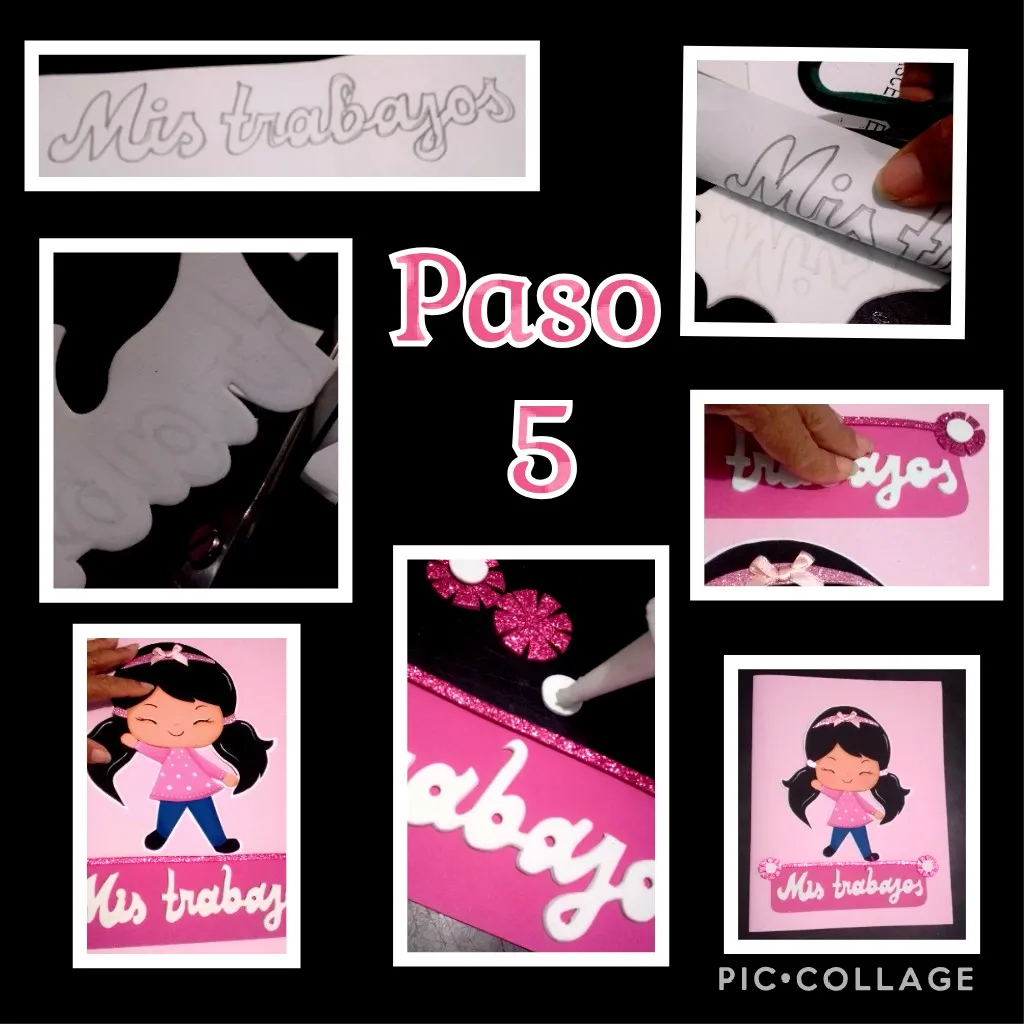
- En este último paso remarcas las palabras (Mis Trabajos) y transfieres igual sobre el foamy, recortas y pegas a un rectángulo fucsia y decoras con flores y detalles en escarchado y pega, esto hará que la carpeta luzca más linda.
Y para terminar pegas la muñequita.
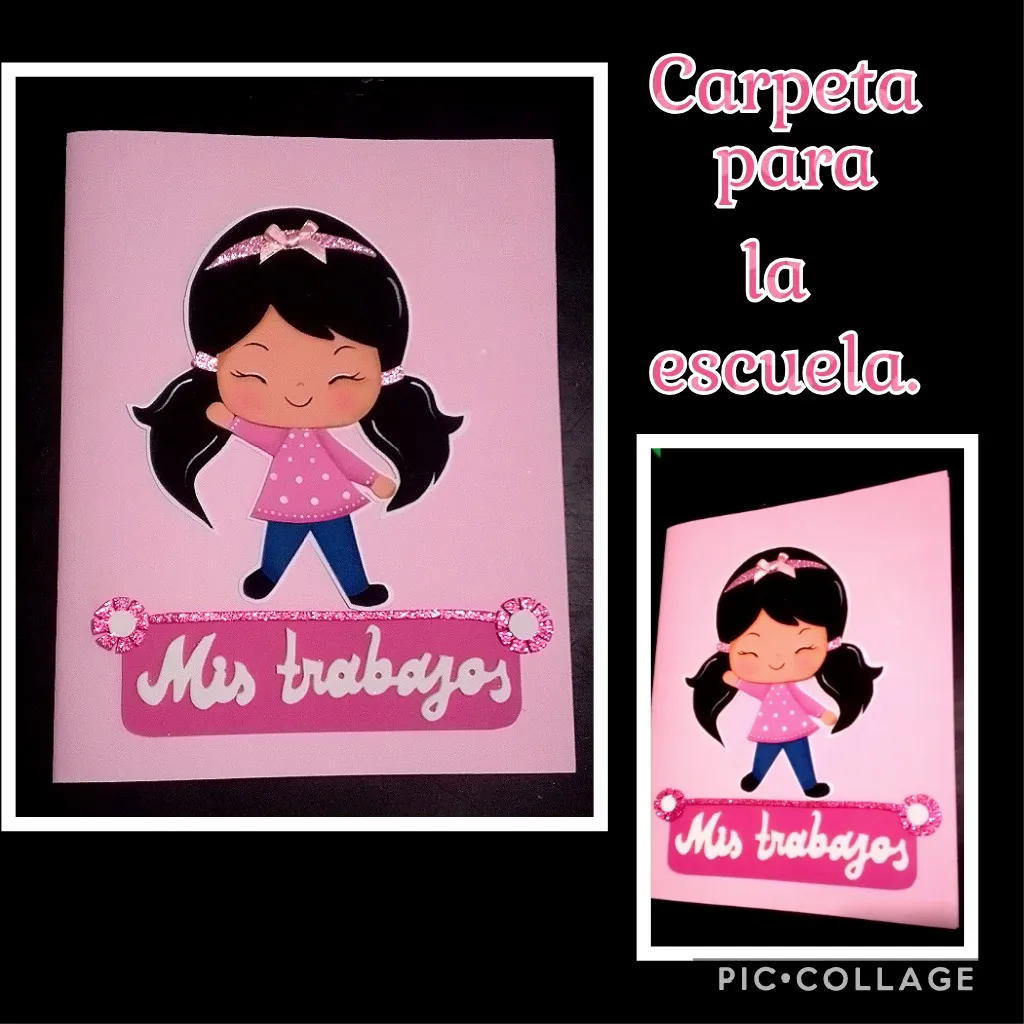
Así ya está lista para usar esta útil, sencilla y bonita Carpeta!
También la puedes personalizar.
Ahora queridos amigos, me toca despedirme no sin antes decirles que mi publicación esta traducida con DeepL, editada con etiquetas HTML, y las fotos son capturadas con mi teléfono Blu G5 y las edité con Pic Collage.
Espero te sea útil mi paso a paso y si te gustó déjame un comentario.
Saludos para todos.
English:
Good afternoon dear friends of this beautiful community and welcome to my favorite space.
I love this place because every day I dedicate a good time to what I like to do.... Crafts and share them with you.
Therefore, I thought it was a very good idea to show you how you can decorate a Folder, hahaha with that you also save a little money because you can make it yourself with the material you like.
For that, you just need to be willing to learn and create.
What I do is to show you the steps to follow.
Recommendation: if you are going to use foamy to line the folder, I recommend you to place the folder with the shiny side inward because when you glue with liquid silicone, it tends to peel off.
The materials that I used are:
| Brown Folder | Cardboard |
|---|---|
| Foamy matte and frosting | Cloth tape |
| Liquid silicone | Paints and brushes |
| Pencil, ruler | Knife |
| Scissors | Drawing |
Now the procedure begins:
- You trace the drawing or impression with a soft lead pencil, cut out or break down the drawing and place each piece of paper in its corresponding color and then rub the paper with the help of the ears of the scissors until the drawing is transferred onto the foami, then cut it out.
- Now wet a brush, pass it over a cloth and leave it wet, wet only the tip and start passing it all over the edge of the foami to shade or color the edge of the pieces.
- Start outlining with a fine tip marker or fine brush, the face, painting eyes and
Now start with the face, painting eyes, nose, a nice smile...hahaha and let it dry.
Now you start with the most exciting part: the assembly of the figure. - Apply liquid silicone on each of the pieces and start gluing on a white cardboard, taking care not to dirty the figure with silicone, when finished let dry well and cut around the contour of the doll leaving 2 or 3 millimeters of edge, make with the fabric ribbon, a bow of shoes and glue to the headband of the doll.
Now you will make a pocket to glue on the inside of the folder.
- Open the folder and measure the width of one side, increase 1.5 cm on the sides and back, now trace these measurements on a piece of cardboard, you will make a rectangle with tabs, cut and with the help of the scissors go through the lines and fold inward and trim the excess (See photo).
- Apply silicone on the tab and glue to the folder, making pressure so that it sticks well, this pocket will help you to put the sheets and make them more secure.
- In step 4, dip the tip of the back of the brush in white paint and paint dots on the blouse, also cut out two pieces of frosted foami and give the shape of bows and glue to the sides to decorate the hair and finally paint lines in the hair to give light to the figure.
This way the doll will be ready.
Next: cover the folder:
- Place the folder on the cardboard, add 5mm more on each side, mark, cut and glue to the folder.
- In this last step you mark the words (My Works) and transfer the same on the foamy, cut and glue to a fuchsia rectangle and decorate with flowers and details in frosting and glue, this will make the folder look prettier.
And finally glue the doll.
Now you are ready to use this useful, simple and pretty folder!
You can also customize it.
Now dear friends, it's my turn to say goodbye, but not before telling you that my post is translated with DeepL, edited with HTML tags, and the photos are captured with my Blu G5 phone and I edited them with Pic Collage.
I hope you find my step by step useful and if you liked it leave me a comment.
Greetings to all.