As you probably figured out long before this post, Steemit posts use markdown for formatting rather than traditional HTML. Markdown was developed by John Gruber at Daring Fireball, a very popular Apple advocate.
The advantage of using markdown is its ease of use and quick creation of formatted text for use on the web. I suspect most users learn the absolute minimum amount of markdown to post on Steemit. Markdown is really easy to learn and just as easy to master, there is no need to shy away from digging in.
This post is designed to walk you through the important features of markdown that every Steemian should know to produce awesome content on Steemit while creating quickly and efficiently. Knowing these by heart will make your posts look better but also save a lot of time. I will also talk about a few formatting suggestions I frequently use when producing content for Steem.
Headers
Almost every post will benefit from headers, this allows you to visually break down posts into sections and avoids the initial information overload most long-form posts create.
Headers correspond directly to HTML H tags, typically H1, H2, H3, H6 tags to create similar sections in HTML content. Header tags have always had some influence on Search Engine Optimization (SEO) but more importantly on readability.
You want to use header tags to highlight keys sections of your posts and engage your audience. The most common header tag is the H1 which is simply a # in markdown. If you want to highlight a section of your post you would use the # pound sign at the start of a line.
This is the most common header
There are six headers available, each one is smaller than the last. To create a smaller header, just add # to your header.
Header 1 #
Header 2 ##
Header 3 ###
Header 4 #####
Header 5 #####
Header 6 ######
In the SEO & HTML world, it is generally accepted you only really need H1, H2, H3, and H6. H4 and H5 are rarely used, but they are there if you need them. You may notice something with this paragraph, I am kind of glued to the last header. This is one of the features of headers, nice tight spacing with the content they head. The easiest solution is to put a line break </br> before the paragraph if you don't want this. This will provide spacing between the header and your content.
As you can see here:

You can also center a header, which I will show you in the section Formatting.
Emphasis
Emphasis is the "air quotes" of markdown and HTML.

They are important for highlighting or "emphasizing" keywords. Think of when your mother and father would annunciate words when speaking to you.
Although there are two ways to do emphasis * and _ I suggest only using the * syntax as that is the most popular and clearest. There are two emphasis options, bold and italics.
Use **bold** syntax to turns something bold

Italics is the same format but instead of two * you use one. *this is italics*
There is also strikethrough which is done with:

You may be wondering at this point why some of these examples are not showing the formatting. This is a cool feature I'll cover later that allows you to inline code characters. It can also be used to avoid triggering formatting.
As a final note, you can embed italics inside of bold or vice versa. This isn't used much but good to know.
Lists
There are two types of lists; ordered list and unordered list. The most popular is the unordered list, which is typically referred to as bullet points.
To do an unordered list, you simply use * in front of your items.
Shopping List
- Eggs
- Thick Toast
- Cinnamon
- Powered Sugar
- Maple Syrup
This was created using the following syntax:

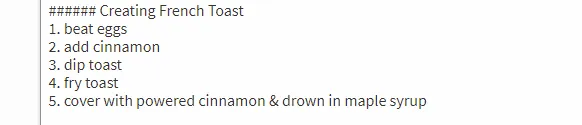
An ordered list is the same idea, just using numbers.
Creating French Toast
- beat eggs
- add cinnamon
- dip toast
- fry toast
- cover with powered cinnamon & drown in maple syrup
Like emphasis you can combine these with any combination
- Succeed on Steemit
- add value
- post regularly
- engage audiance

Quotes Aka blockquotes
This is really simple and most people probably already know this.
Life is 10% what happens to you and 90% how you react to it.
Charles R. Swindoll
To create a blockquote, just need to add > to the start of the line. If you have multiple paragraphs you will need to use a > for each line or you get a new line without the blockquote and may run into formatting issues. You may notice the name is a bit smaller, this is a subscript using <sub></sub> tags that work really nice for citation. You will notice I do it for source for my images. You can see them both in action here:

Linking
Linking is really easy and in most cases completely automatic. There is also a special link for usernames where you can just type in the username and Steemit will automatically hyperlink to their profile page. For example @themarkymark.
One thing I think confuses people with this feature is punctuation. You can use commas, periods, and any other punctuation immediately after the username, and it will still be hyperlinked.

If you want to hyperlink something, but have a customized anchor text then you would use syntax similar to images but without the leading !.

Images
If you found this post, you most likely already know how to do images on Steemit, but for the sake of completeness, I will cover them. There are also a few tricks you can do I will show you.

Alt text is primarily an SEO feature but also is used for text-only browsers. You can also center images by enclosing it with <center></center> tags.
One trick you may or may not know is to hyperlink an image. For example, I made a post yesterday talking about something I think is a big issue here on Steemit, entitlement. Say I want to provide a link to that post, but I want to use the CC0 image I got from Pixabay and have the image direct you to the post. This is a bit confusing but is really easy to do. First, you want to upload the image to Steemit like you normally would do. Then you surround that image with [ ] to act similar to the alt text of an image and then use ( ) to surround the link.
You are not entitled to an audience, you need to earn it!

You can see how this came together here:

This uses a combination of the image linking and URL linking functionality.
Formatting
Markdown has some formatting but it lacks certain features. The most common are:
- Centering
<center> </center> - Line Break
</br> - Sub script
<sub></sub>
If you want to center a header, you need to use the header # symbol on both sides of the center.
This is a centred H1 header

You can also use <table> although for simple tables there is a special markdown syntax you can use instead.
Horizontal lines
Horizontal lines can be created using ***, ___, or --- but I suggest using --- syntax for consistency.
Horizontal lines are good for breaking up sections inside of a header tag. It doesn't always work and I find it works best for small sections using a horizontal line before and after like this section.
One thing you might notice when using horizontal lines, if you do not leave a new line you will get some wierd formatting, typically unexpected H1 type header. If you see headers where you don't expect them, check to see if you forgot to leave a new line on top/bottom of your horizontal rule.
Code Formatting
If you are a programmer and want to highlight some awesome code you want to share, you can use the standard github syntax for code. There are two ways to do this, lead a line with four spaces, or surround it with . Steemit doesn't support syntax highlighting like Github does.
function test() {
 console.log("look ma’, no spaces");
}

This can also be used to highlight some preformatted text.
Tables
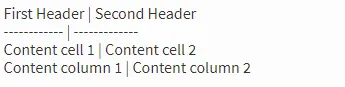
Creating simple tables is really easy with markdown and not a commonly seen feature. A simple table looks like this:
| First Header | Second Header |
|---|---|
| Content cell 1 | Content cell 2 |
| Content column 1 | Content column 2 |
To create this table is as simple as:
Inline Code Characters
A feature that came real handy in this article is the ability to show formatting syntax inline by using the ` character to avoid triggering the formatting.
This is not the standard apostrophe but the one under the ESC key that is shared with the tidle key ~. This will allow you to show special formatting sytnax without triggering formatting. I also use it to highly commands typically entered in terminal windows like on Linux. For example:
sudo apt update

Cool online markdown editors
I think that covers most everything you will need to make awesome posts on Steemit. There are many reasons you may want to use a third party markdown editor instead of Steemit's post window. One frustration I have personally is how Steemit will butcher Grammarly functionality, a popular plugin for spell checking/grammar checking when typing in fields. Due to unknown reasons, Steemit is the only site that it doesn't work properly on and will cause text to revert back to pre-correction state and show incorrect location of grammar errors.
I also like to share a post with friends or colleagues before posting and using a collaborative editor will help do this easily.
There are three online markdown editors I am familar with, I have used them all but prefer Hackmd.io as it has the best feature set and only one issue. They all have issues, but Hackmd.io only has one that frustrates me. It will not display images that are enclosed in <center> tags, a feature I use frequently. Hackmd also lacks the ability to sync with services like Google Drive & Dropbox but does save your markdown files via link to Github profile.
Hope this helps, if I left anything out, let me me know!