
Hello it's me again Drifter Programming! Today we continue with my compiler series by getting into the Lexical Analysis using the C-Tool Flex. We will start with some Theory for Lexical Analysis, get into Regular Expressions, how we write code for Flex and also write the Lexer (not final) for my Compiler.
Last time we covered the Tokens that our Simple CLanguage will contain and so I suggest you to read the previous post if you haven't already. This is only needed if you want to know why we use the specific Tokens in the Lexer for today.
So, without further do, let's get started!
Theory
In the first post of our series we already covered the steps that we use to write a compiler. The first of those steps is the Lexical Analysis. A Lexer or Lexical Analyst gets a character stream (the source code) and "tokenizes" it into Tokens (tokenizer) that are groups of those characters that have a specific meaning for our program. That's why a lot of people also call the Lexer a Scanner. A token or lexeme can be anything rom keywords, operators to identifiers or even constant/literals.
The Tokens form the so called Lexical Grammar of that programming language. There are many types of lexical grammars, and the good thing is that most programming language grammars can be written as regular languages that can be described via Regular Expressions (Regexes).
The actual Lexer/Scanner is an FSM (finite-state-machine) and we would actually have to write all the states on our own. The good thing is that there is this C-tool called Flex that gets Regular Expressions, Tokens etc. and then generates the state-machine automatically. The same will happen with Bison in Syntax Analysis, where we will only write the rules and the code will be generated automatically!
So, let's now get into Regular Expressions and Flex more specifically, and lastly also write the first/basic Lexer for our Simple C-Language.
Regular Expressions
A regex is a pattern that the scanner searches for. In a regex we specify the characters that this pattern/token must contain by using an specific syntax.

The Regexes that are needed for lexical analysis are:
- a -> search for the character a
- "abc" -> search for the literal string "abc"
- '\n' -> search for a special character like \n
- b+ -> search for 1 or more b's (like b, bbbbb, bbbbbbb, etc.)
- b* -> search for zero or more b's (like 'nothing', b, bbb, bbbbb, etc.)
- b? -> search for one or none (optional b)
- c{4} -> exactly 4 c's (cccc)
- c{4, } -> 4 or more times c (like cccc, ccccccc, ccccccc, etc.)
- . -> any (ASCII) character except '\n'
- a|b -> a or b
- a(b|c) -> ab or ac (concatenation of rules)
- [abc] -> one of the characters in the class and so a, b or c
- [a-z] -> one of the characters in the range a to z
- [^z] -> any character that is not z
- [^a-z] -> any character that is not in the range a to z
- ^a -> ^ means line start and so we search for a in the beginning of a line
- b$ -> $ means end of line and so we search for b but at the end of a line
- finally there are also some predefined classes like [:digit:] that defines digits
We will get into some examples of regular expressions for the Simple C-Language in a bit.
Flex
The basic structure of a Flex program is:
Statements/Definitions
%%
Rules
%%
User Functions (optional)
and we store the lexer in a file that ends with .l
Let's get into each part specifically...
Definitions:
We can start by adding some options for the tool like:
- %option noyywrap -> flex will read only one input file
- %option case-insensitive -> flex doesn't distinguish between uppercase and lowercase letters
We can also start states for some regular expressions using:
%x STATE_NAME
This will be useful for multiline comments for example, cause it's easier to search for something continuously and end this "State-Loop" when the end of the comment-section was reached.
We can define some Identifiers using regular expressions and giving names to them like:
print [ -~] // space to ~ (all printable ASCII characters)
that specifies {print} as a group that contains all the printable characters.
Using identifiers we can then call these instead of writing the whole regex every time we want to search for a specific token.\
Lastly, we can also define a literal block of code, that is actual c code and can contain header files, constants, global variables, function definitons etc. This code will be copied to the syntax analyst (parser) as well and will lastly be a part of the compiler!
To define this block we use:
%{
// literal c code
%}
Here we will include the symbol table header file for example and also have a global line number variable for our error function, so that we know where an error occured.
Rules:
Here we define the rules for our Tokens.
We use the syntax:
regex-rule { // c action-code }
The first is self-explanatory. It will just contain the regex rule.
The second part is literal c code that defines the action. For now we will just print out to the console that we found a specific token, after that we will return the token-id to the parser (syntax analyst) so that he can then combine the tokens based on a syntax.
So, to search for a sequence of printable character we might use:
{print}+ { printf("Found printable character sequence %s\n", yytext); }
The first is a rule that searched for one or more printable characters and if that occurs we then print out the message of the action. The variable yytext contains the recognized token every time.
User Functions:
Lastly we can also define functions.
For example the code needs to contain a main() if we don't use the parser for that. It can also contain an yyerror() function that prints an error if a "weird"-undefined character/token was found. The yywrap() function gets defined using the option "%option noyywrap". We might also want to have a function that prints out the token name and value (token-id and yytext) like ret_print() or something like that, so that we return the token to the parser later on, but also print out to the console for testing purposes.
Variables
Let's finally get into the important Flex variables, one of which we already seen!
- char *yytext -> it contains the recognized token
- int yyleng -> contains the length of the recognized token
- YYSTYPE yylval -> used for communication with the parser (will get more into that in Bison)
Running Flex
To run Flex you have to install Flex in an GNU-Linux environment or inside of an terminal simulator like Cygwin. If you are not a Linux guy I suggest you download Cygwin and install the Flex Package. Install Bison and the gcc (c-compiler) as well.

After that you can run the lexer using:
flex lexer.l // lexer.l is the lexer file
gcc lex.yy.c -o lexer -lfl // lex.yy.c is the result of "flex lexer.l"
./lexer input_file // lexer is the executable and we will set up main() to take in an input file
Lexer
Let's now finally write the Lexical Analyst (lexer) for our simple C-Language.
The code looks like this (hashtag in the includes):
%option noyywrap
%{ include <stdio.h> include <stdlib.h> include <string.h> int lineno = 1; // initialize to 1 void ret_print(char *token_type); void yyerror();%}
%x ML_COMMENT
alpha [a-zA-Z]digit [0-9]alnum {alpha}|{digit}print [ -~]
ID {alpha}+{alnum}*ICONST "0"|[0-9]{digit}*FCONST "0"|{digit}*"."{digit}+CCONST (\'{print}\')|(\'\\[nftrbv]\')STRING \"{print}*\"
%%
"//".* { printf("Eat up comment at line %d\n", lineno); }
"/*" { printf("Eat up comment from line %d ", lineno); BEGIN(ML_COMMENT); }<ML_COMMENT>"*/" { printf("to line %d\n", lineno); BEGIN(INITIAL); }<ML_COMMENT>[^*\n]+ <ML_COMMENT>"*" <ML_COMMENT>"\n" { lineno += 1; }
"char"|"CHAR" { ret_print("KEYWORD_CHAR"); }"int"|"INT" { ret_print("KEYWORD_INT"); }"float"|"FLOAT" { ret_print("KEYWORD_FLOAT"); }"double"|"DOUBLE" { ret_print("KEYWORD_DOUBLE"); }"if"|"IF" { ret_print("KEYWORD_IF"); }"else"|"ELSE" { ret_print("KEYWORD_ELSE"); }"while"|"WHILE" { ret_print("KEYWORD_WHILE"); }"for"|"FOR" { ret_print("KEYWORD_FOR"); }"continue"|"CONTINUE" { ret_print("KEYWORD_CONTINUE"); }"break"|"BREAK" { ret_print("KEYWORD_BREAK"); }"void"|"VOID" { ret_print("KEYWORD_VOID"); }"return"|"RETURN" { ret_print("KEYWORD_RETURN"); }
"+"|"-" { ret_print("ADDOP"); }"*" { ret_print("MULOP"); }"/" { ret_print("DIVOP"); }"++"|"--" { ret_print("INCR"); }"||" { ret_print("OROP"); }"&&" { ret_print("ANDOP"); }"!" { ret_print("NOTOP"); }"=="|"!=" { ret_print("EQUOP"); }">"|"<"|">="|"<=" { ret_print("RELOP"); }
"(" { ret_print("LPAREN"); }")" { ret_print("RPAREN"); }"]" { ret_print("LBRACK"); }"[" { ret_print("RBRACK"); }"{" { ret_print("LBRACE"); }"}" { ret_print("RBRACE"); }";" { ret_print("SEMI"); }"." { ret_print("DOT"); }"," { ret_print("COMMA"); }"=" { ret_print("ASSIGN"); }"&" { ret_print("REFER"); }
{ID} { ret_print("ID"); }{ICONST} { ret_print("ICONST"); }{FCONST} { ret_print("FCONST"); }{CCONST} { ret_print("CCONST"); }{STRING} { ret_print("STRING"); }
"\n" { lineno += 1; }[ \t\r\f]+ /* eat up whitespace */
. { yyerror("Unrecognized character"); }
%%
void ret_print(char *token_type){ printf("yytext: %s\ttoken: %s\tlineno: %d\n", yytext, token_type, lineno);}
void yyerror(char *message){ printf("Error: \"%s\" in line %d. Token = %s\n", message, lineno, yytext); exit(1);}
int main(int argc, char *argv[]){ yyin = fopen(argv[1], "r"); yylex(); fclose(yyin); return 0;}You can get it on pastebin: https://pastebin.com/1r8YegkA
Running it for our (final) example program of the previous post we get:
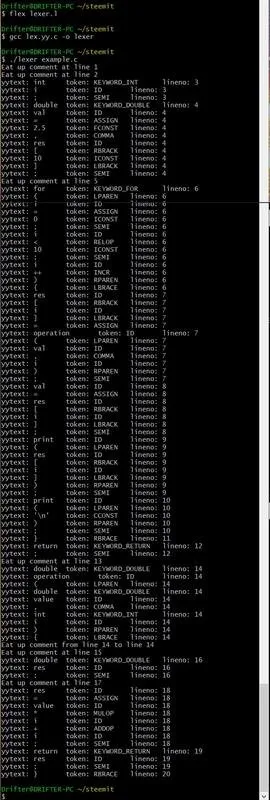
Screenshot
Which is a giant Terminal mess that tells us every token that got recognized!
You can get the example program here in pastebin: https://pastebin.com/xK3hWmhG
Image Sources:
Previous posts of the series:
Introduction -> What is a compiler, what you have to know and what you will learn.
A simple C Language -> Simplified C, comparison with C, tokens, basic structure
And this is actually it for today and I hope that you learned something!
Next time we will get into Symbol Tables that we can start "filling" in the Lexical Analysis (that I will do) and then add more specific things in the Syntax Analysis, so that it becomes easier to generate the final machine/assembly code.
Bye!