*****English version*****
(Abajo está la versión en español)
A few weeks ago I brought you one of the best sculpts I've done for HIVE. It was the Iron Kitty one, a sculpture inspired by a @theterminal staff member, the great @thekittygirl.
You can see the making of that sculpture in this post:
@gaboamc2393/iron-kitty-sculpture-escultura-de-iron-kitty-engesp
On that occasion I told you that I would make sculptures of the staff members of the community and today I would like to share the figure of someone well known to you, the PR Moderator of The Terminal, @wesphilbin.

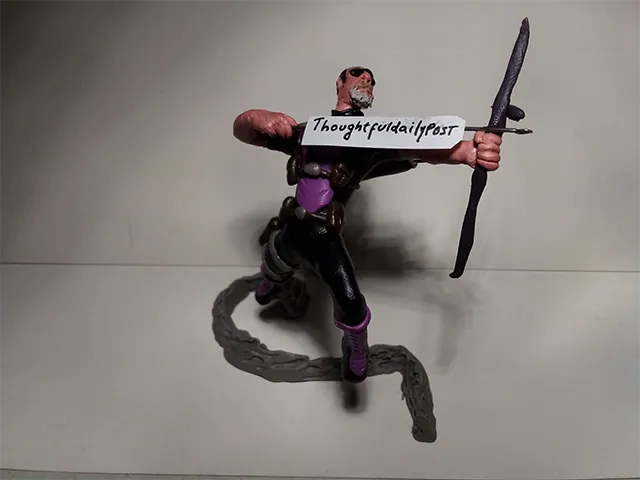
For the Iron Kitty figure I was obviously inspired by Iron Man; on the other hand, for the Wes figure I was inspired by Hawkeye, so I called the figure Hawk-Wes.
The first thing I did, as usual, was to prepare the structure of the figure (1). I molded the wire to give it a dynamic shape, then covered it with paper and clear tape. Once the wire structure was ready, I began to line the skeleton with black plasticine (2).
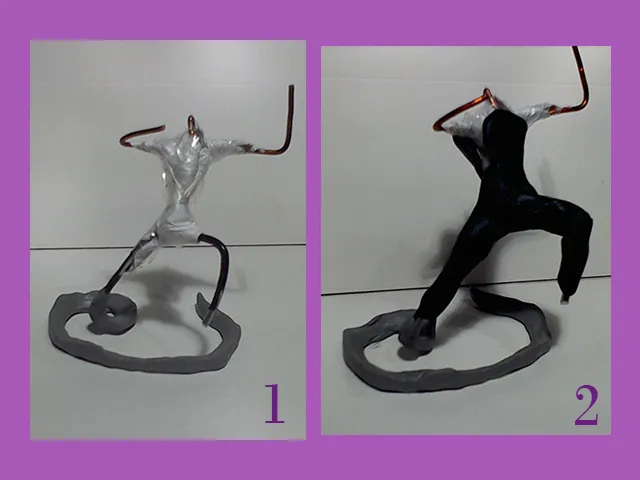
I continued covering the whole skeleton until I reached the biceps (3), where I did not cover with more black plasticine because I wanted to make a T-shirt with sleeves and the rest of the arms uncovered. Next I would start with the molding of the legs, ankles and feet (4).
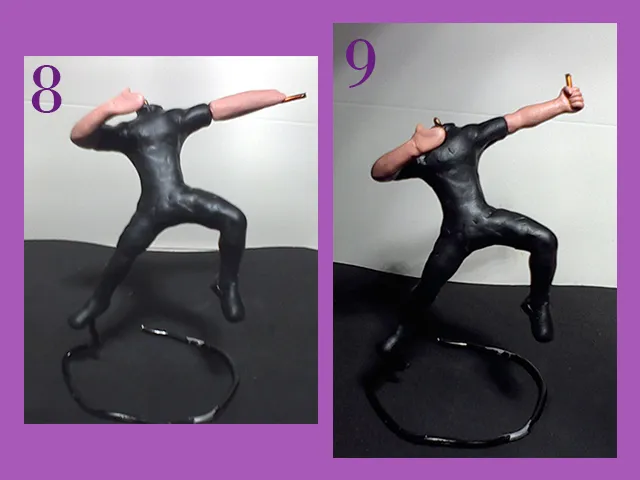
With all the plasticine in place, I used the needle to continue molding the entire anatomy, then placed one of the arms (5). With the arm in place, I molded the shoulders and neck with the proper proportion of everything else (6 and 7).
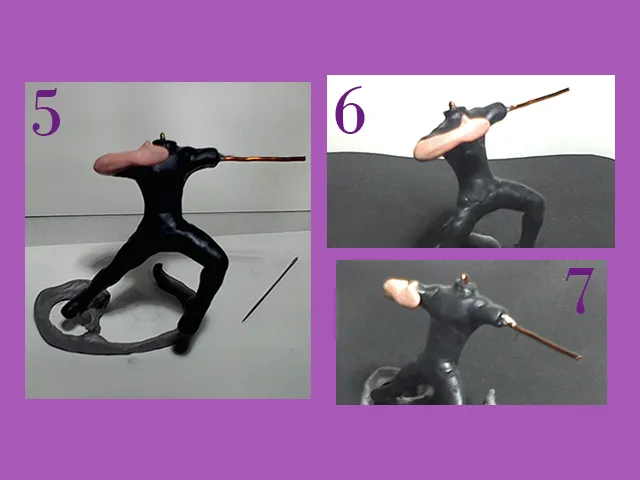
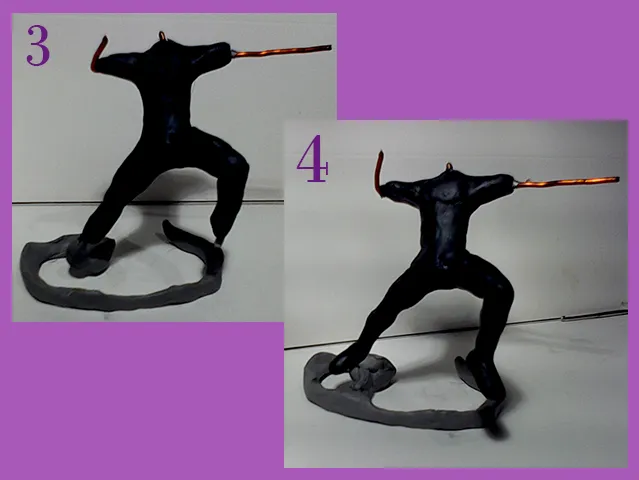
After finishing the left arm, I continued with the right arm, covering the wire for the right arm with pink plasticine (8). I had to mold the muscles of the arm and the hands, but not before giving a slight bend to the tip of the wire of the right arm (9). This bent wire tip would serve as the base for the bow of the figure.
In the image below you can see the construction of the bow. I simply stick a thin wooden stick in the middle of the hand, as if I were holding it (10), then I covered it completely with purple plasticine. I also made the hand that will hold the arrow with the help of a needle and a blade (11).
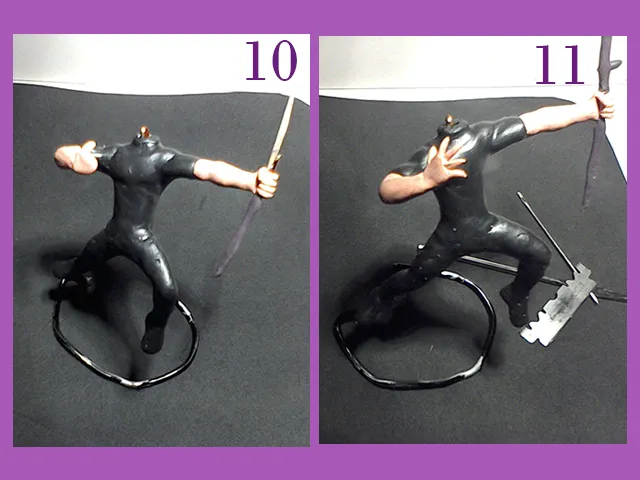
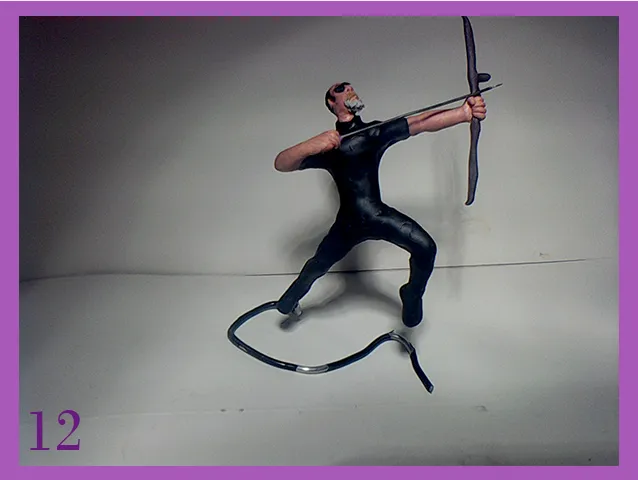
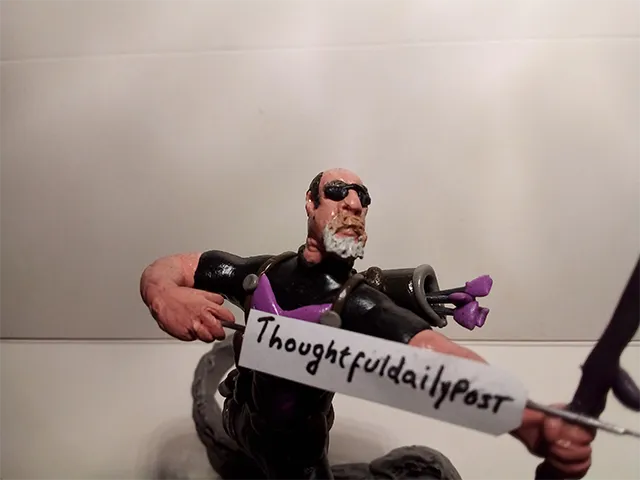
After making several heads for the figure, creating and damaging one after another, I finally managed to make one that I liked and it is the one I show below:
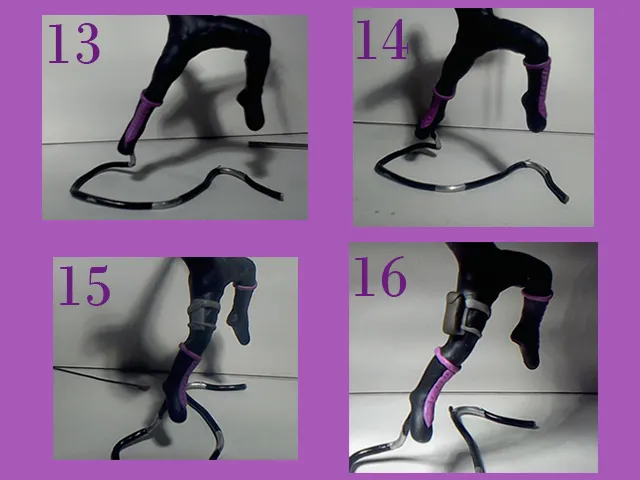
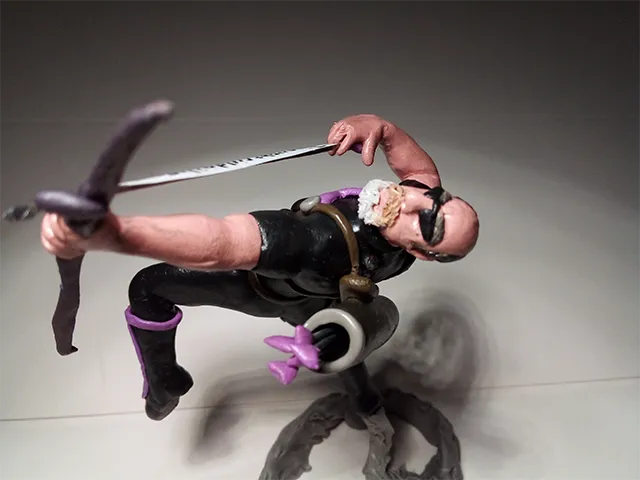
There I used a pin for the arrow and once the whole body of the figure was done, it was time for the accessories. The first thing was the boots, to which I put purple plasticine details. First one leg (13) and then the other (14).
I also made something similar to a case attached to his leg. I started with what would be the strings (15), followed by the case, made with brown plasticine (16).
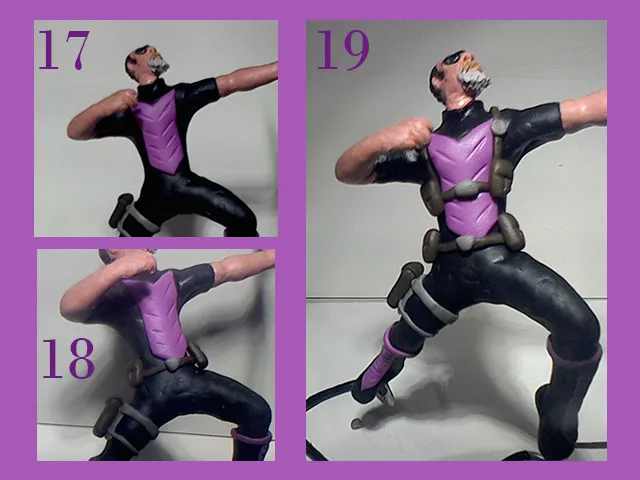
To be able to work well the chest accessories I had to remove the arrow and then I made a purple plate with triangular shapes above and below (17). I helped myself with a needle to finish the details. Next I made a belt with more pouches (18), and another one attached with straps on the chest and shoulders (19).
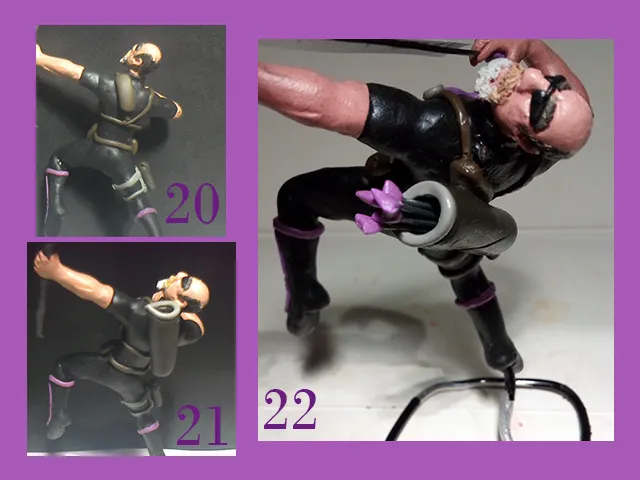
On the back I placed other straps (20), and made the quiver for the arrows (21). Obviously, I also made arrows (22).
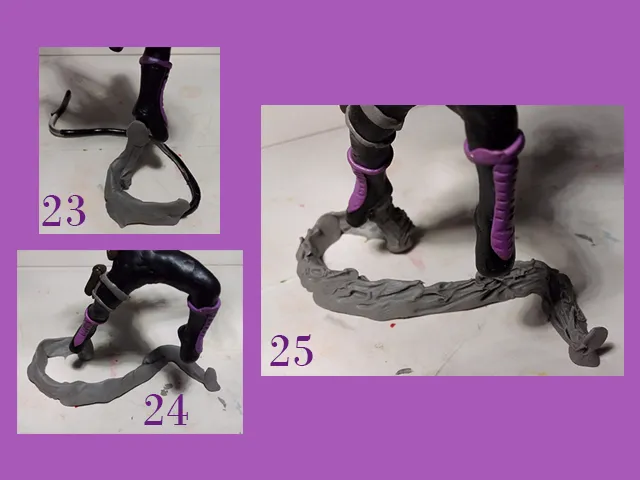
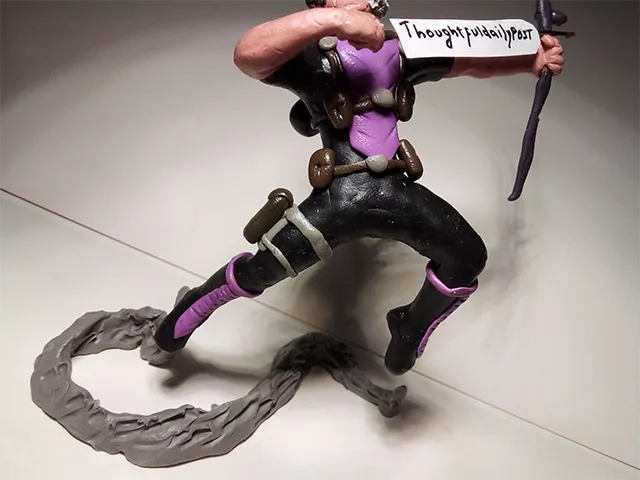
Something I left almost for the end was the decoration of the base of the figure. Which I did at the beginning just for a test, but I had to mold the wire in another way to give it better support, so in the end I had to put this gray plasticine to simulate something similar to the dust raised by the Hawk-Wes jump.
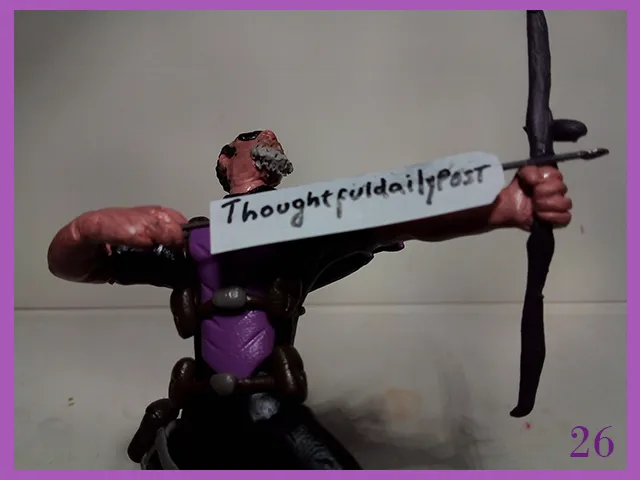
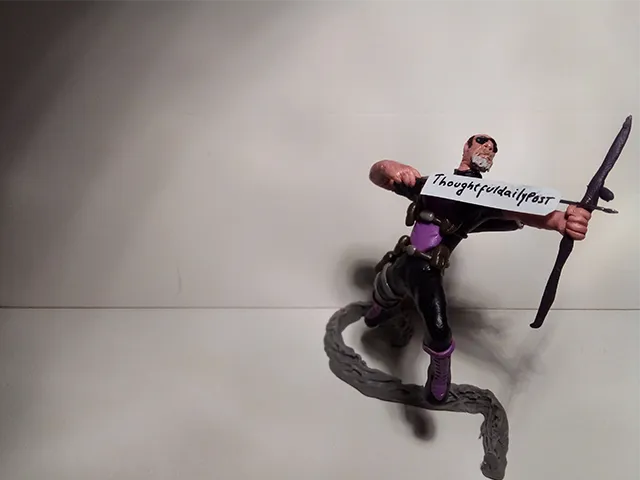
As many know, @wesphilbin is an administrator of the @thoughtfulposts movement, an initiative that invites us to use the tag #thoughtfuldailypost, for all those posts that invite us to think, reflect and transmit good vibes here on the blockchain. I personally use this tag and have the Thoughtful Poster badge, a badge that I appreciate very much.
That is why it seemed right to me to place the words of this movement in the arrows of our figure, which are not arrows to hurt, but are arrows to convey good feelings, nice thoughts and, as Wes often says, build bridges between users.
I take this post to send a big shout out to my friend Mr. @wesphilbin , who was very supportive along with the whole TheTerminal team when I came to HIVE. Wes, thanks for everything, you're great too.
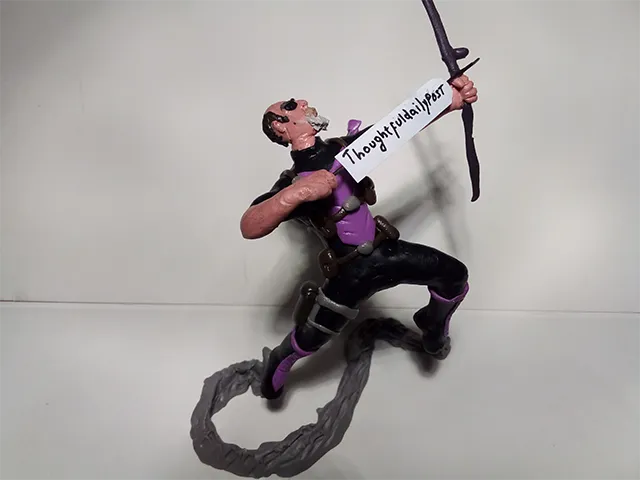
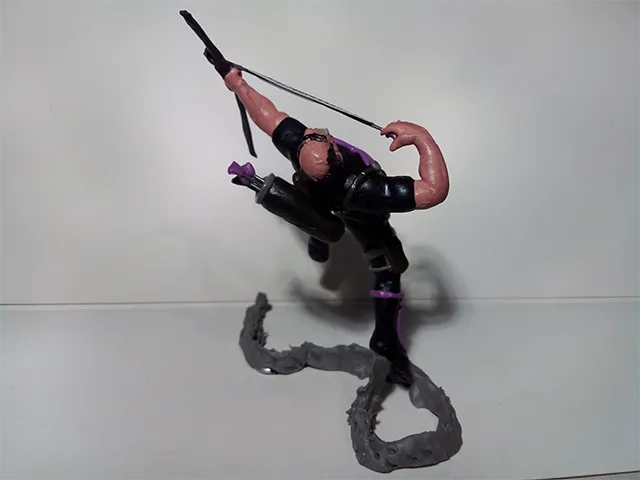
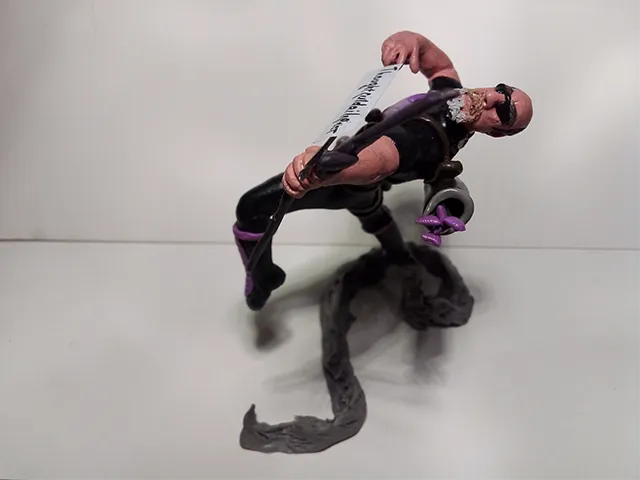
With this last detail the figure of this great all-seeing Hawk-Wes was finished. I will leave you a series of photographs from different angles so that you can appreciate all the details of this representation:

This figure is part of a personal project in which I am making sculptures representative of various blockchain communities. This is the second of several figures that will be part of a larger sculpture representative of The terminal community. As a preview, in the next sculpture of this series I will introduce you to a captain.
What did you think, did you enjoy this publication? If so, I'd love to see what you think or what you think about this post below in the comments. As always, I'll be happy to read them. With nothing more to add, I'll say goodbye then....
See you next time!
*****Versión en español*****
Hace unas cuantas semanas les traje una de las mejores esculturas que he hecho para HIVE. Fue la de Iron Kitty, una escultura inspirada en un miembro del staff de @theterminal , en la gran @thekittygirl.
Pueden ver la realización de esa escultura en esta publicación:
@gaboamc2393/iron-kitty-sculpture-escultura-de-iron-kitty-engesp
En esa ocasión les comenté que haría esculturas de los miembros del staff de dicha comunidad y hoy me gustaría compartir la figura de alguien bastante conocido por ustedes, el PR Moderator de The Terminal, @wesphilbin.
Para la figura de Iron Kitty evidentemente me inspiré en Iron Man; por otra parte, para la figura de Wes me inspiré en Hawkeye, así que llamé a la figura Hawk-Wes.
Lo primero que hice, como siempre, fue preparar la estructura de la figura (1). Moldeé el alambre para darle una forma dinámica, luego la cubrí con papel y cinta adhesiva transparente. Una vez lista la estructura de alambre, comencé a forrar el esqueleto con plastilina negra (2).
Continué cubriendo todo el esqueleto hasta llegar a los bicpes (3), donde no cubrí con más plastilina negra pues deseaba hacerle una camiseta con mangas y el resto de los brazos descubiertos. Lo siguiente sería comenzar con el moldeado de las piernas, los tobillos y los pies (4).
Con toda la plastilina puesta en su lugar, me ayudé de la aguja para continuar moldeando toda la anatomía, luego coloqué uno de los brazos (5). Con el brazo en su lugar, moldeé los hombros y el cuello con la proporción adecuada de todo lo demás (6 y 7).
Al terminar el brazo izquierdo, continué con el derecho, cubriendo con plastilina rosa el alambre dispuesto para el brazo derecho (8). Tuve que moldear los músculos del brazo y las manos, no sin antes dar un leve doblés a la punta del alambre del brazo derecho (9). Esta punta de alambre doblado serviría de base para el arco de la figura.
En la imagen a continuación pueden ver la construcción del arco. Simplemente es clavar un palillo delgado de madera en medio de la mano, como si lo estuviese tomando (10), luego lo cubrí completamente con plastilina morada. También hice la mano que sostendrá la flecha con ayuda de una aguja y una hojilla (11).
Tras hacer varias cabezas para la figura, creando y dañando una tras otra, finalmente logré hacer una que me gustó y es la que muestro a continuación:
Allí usé un alfiler para la flecha y una vez todo el cuerpo de la figura, llegó el momento de los accesorios. Lo primero fueron las botas, a las cuales coloqué detalles de plastilina morada. Primero una pierna (13) y luego la otra (14).
También hice algo similar a un estuche sujeto a su pierna. Comencé con lo que serían las cuerdas (15), seguido por el estuche, hecho con plastilina color marrón (16).
Para poder trabajar bien los accesorios del pecho tuve que quitar la flecha y entonces hice una placa purpura con formas triangulares arriba y abajo (17). Me ayudé con una aguja para terminar los detalles. Lo siguiente fue hacerle un cinturón con más estuches (18), y otro más sujeto con correas en el pecho y los hombros (19).
En la parte de la espalda coloqué otras correas (20), e hice la aljaba para las flechas (21). Evidentemente, también le hice flechas (22).
Algo que deje casi para el final fue el decorado de la base de la figura. El cual hice al comienzo solo para una prueba, pero tuve que moldear el alambre de otra manera para darle mejor soporte, así que al final tuve que colocarle esta plastilina gris para simular algo parecido al polvo levantado por el salto de Hawk-Wes.
Como muchos saben, @wesphilbin es administrador del movimiento @thoughtfulposts, una iniciativa que nos invita a usar la etiqueta #thoughtfuldailypost, para todos aquellas publicaciones de reflexiones que nos invitan a pensar, reflexionar y transmitir buenas vibras aquí en la blockchain. Yo personalmente uso esta etiqueta y me he ganado la insignia de Thoughtful Poster, una insignia que aprecio mucho.
Es por ello que me pareció correcto colocar las palabras de este movimiento en las flechas de nuestra figura, que no son flechas para herir, sino que son flechas para transmitir buenos sentimientos, pensamientos agradables y, como Wes suele decir, contruir puentes entre los usuarios.
Aprovecho esta publicación para enviar un gran saludo a mi amigo el señor @wesphilbin , quien me apoyó mucho junto con todo el equipo de TheTerminal cuando llegué a HIVE. Wes, gracias por todo, también eres genial.
Con este último detalle quedó terminada la figura de este gran Hawk-Wes que todo lo ve. Les dejaré una serie de fotografías desde distintos ángulos para que aprecien todos los detalles de esta representación:
Esta figura es parte de un proyecto personal en el que estoy haciendo esculturas representativas de diversas comunidades de la blockchain. Esta es la segunda de varias figuras que serán parte de una escultura más grande y representativa de la comunidad The terminal. Como adelanto, en la siguiente escultura de esta serie les presentaré a una capitana.
¿Qué les pareció? ¿Disfrutaron de esta publicación? Si fue el caso, me encantaría ver lo que piensan o lo que opinan sobre esta publicación abajo en los comentarios. Como siempre, estaré encantado de leerles. Sin mas que agregar, me despido entonces...
¡Hasta la próxima!

Imagenes editadas con Photoshop
Traducido con DeepL
Photos edited with Photoshop
Translated with DeepL
Últimos tres post/Last three posts:
Memories of old partners
Probando habilidades de fotografía y diseño
Learn with Gabo #4 / Aprende con Gabo #4