
♔ Entrenamiento de Ajedrez 4: Resolución de problemas sobre la clavada absoluta
(Versión en español | Spanish Version)
Introducción
Hemos dicho que el ajedrez como todo otro deporte requiere de entrenamiento, especialmente cuando nos estamos dedicando seriamente a él y queremos conseguir resultados competitivos. ¿Cómo llevarlo a cabo? Me he propuesto emprender esta serie de videos y de posts sobre entrenamiento de ajedrez, mediante la cual, en mi calidad de entrenador, compartiré algunos consejos para que el lector y audiencia interesada puedan beneficiarse. Analizaremos partidas y posiciones, ejercitaremos distintas habilidades, enseñaremos conceptos ajedrecísticos, usaremos diferentes métodos, y nos orientaremos a todo tipo de jugadores (principiantes, intermedios y avanzados). Espero les agrade.
Comencemos el entrenamiento
En esta ocasión utilizaremos el Método de resolución de problemas. Este es posiblemente el segundo mejor método después del análisis de partidas propias en lo que se refiere a entrenamiento de ajedrez. Con él podemos ejercitar muchas habilidades ajedrecísticas, tales como el cálculo y la comprensión posicional.
Nos enfocaremos en resolver problemas por conjuntos. En este caso, la demostración es de un conjunto de cinco problemas, pero eso puede variar en el momento del entrenamiento. En cuanto al nivel del conjunto seleccionado corresponde al nivel principiante para esta ocasión, de modo que es accesible para todos. Sin embargo, los rasgos metodológicos son válidos para cualquier nivel.
En cuanto a la temática de los problemas (el contenido), será la clavada. En caso de que no lo conozcas, una clavada es:
Situación producida en la partida de ajedrez cuando una pieza no puede o no debería moverse debido a que de hacerlo su bando quedaría en jaque o perdería la pieza de mayor valor que esté detrás. De allí que la pieza inmovilizada se dice que está clavada. Es un motivo táctico o motivo de combinación (definición propia).
Sin embargo, siendo más específicos, nos enfocaremos en la clavada absoluta, la cual es:
Aquella donde la pieza está clavada contra el rey de su bando, de modo que sería ilegal mover la pieza clavada. Es, entonces, absoluta, puesto que es imposible moverla (definición propia).
Por supuesto, el vídeo cubre todo el ejercicio, por lo cual te recomiendo verlo. Sin embargo, también he seleccionado las posiciones, por si quieres darles una mirada fresca. Una vez haya hecho tu análisis, entonces compara tus respuestas con las soluciones provistas más abajo.
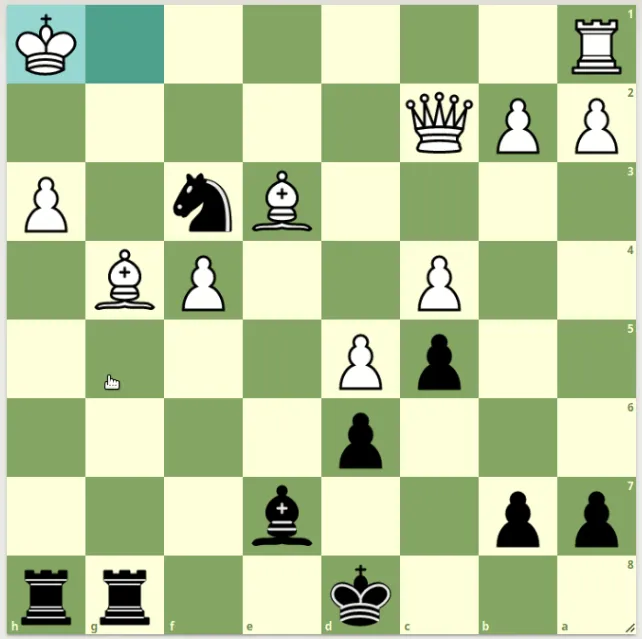
Posición 1: Juegan negras. A primera vista parece que las negras se las ven mal acá, pero las apariencias engañan. Valora la posición y calcula la solución (encuentra la solución más abajo o en el vídeo).
Posición 2: Juegan negras. El segundo jugador se sale con las suyas con una idea más bien típica. Valora la posición y calcula la solución (encuentra la solución más abajo o en el vídeo).
Posición 3: Juegan blancas. Esto se ve complicado pero no irresoluble. Nota que las blancas van hacia arriba. Valora la posición y calcula la solución (encuentra la solución más abajo o en el vídeo).
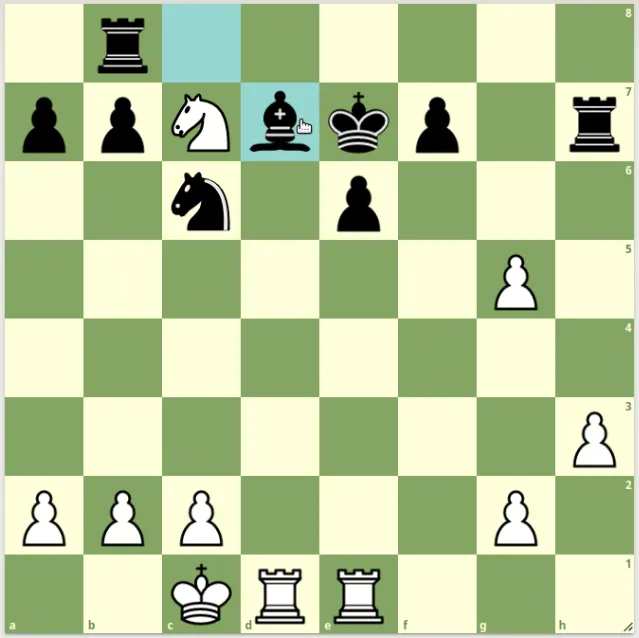
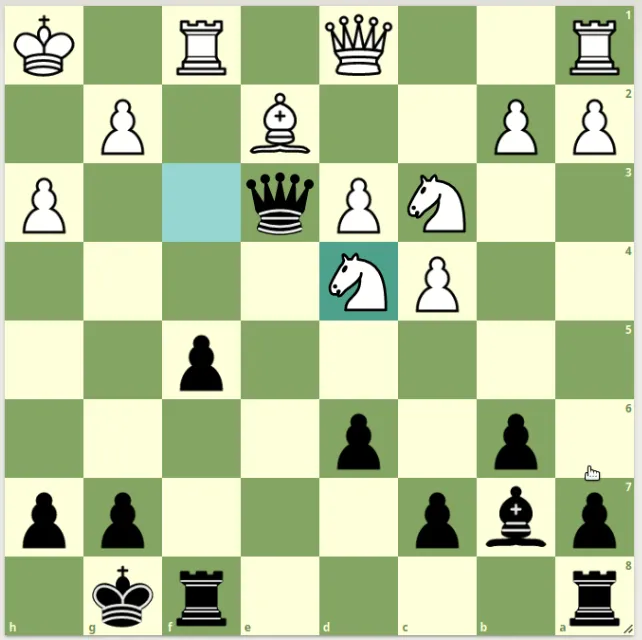
Posición 4: Juegan blancas. Las negras se arrepentirán de no haber enrocado. Valora la posición y calcula la solución (encuentra la solución más abajo o en el vídeo).
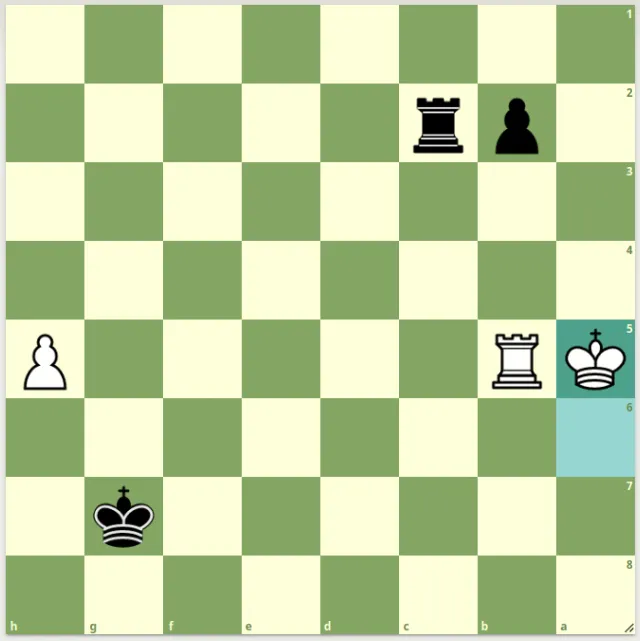
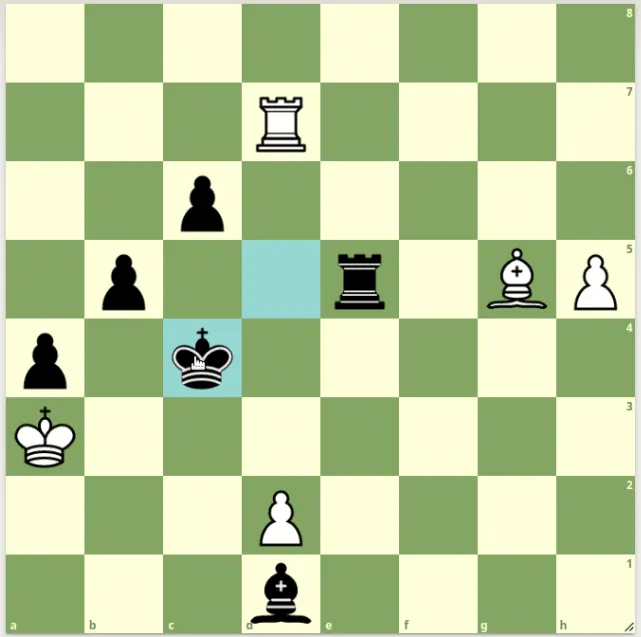
Posición 5: Un final nada soso y con bonitos recursos. Valora la posición y calcula la solución (encuentra la solución más abajo o en el vídeo).
Discusión de las posiciones planteadas
⚠️ Atención (alerta de spoiler): ¿Ya has seguido las indicaciones planteadas en las posiciones? En ese caso, compara tu respuesta con el siguiente análisis.
Posición 1:Las negras parecen perdidas, pues las blancas tienen una dama por la torre y eso es mucho. No conforme con ello amenazan al caballo de f3 y también la mortal jugada Df5. Sin embargo, las negras poseen demasiada actividad y el rey blanco está muy expuesto. Ahora mismo el tema de la clavada en conjunción con una eventual red de mate fuerza los asuntos.
Así que la jugada es 1... Txg4! El alfil colgaba, pues el peón de h3 está absolutamente clavado, por lo cual no protege nada. Pero las blancas están mucho peor y tras la inminente amenaza de mate en h3 no les queda más remedio que sacrificar la dama con 2. Dg2 y ahora son las negras las que poseen ventaja material decisiva sin sorpresas del contrario.
Posición 2: Las negras nuevamente están mal materialmente. Se les propone retomar la pieza en d4 con 1... Dxd4?, pero seguirán con una pieza de menos. Una inspección más cercana revelará las alternativas y buscar jaques suele ser una buena pista de ideas candidatas. De modo que tras 1... Dxh3! (explotando la clavada en g2, gracias al alfil de b7), las negras pueden repartir mate en la próxima jugada.
Posición 3: Esta posición luce enredada y puede confundir con respecto a la orientación del tablero, pero lo cierto es que juegan las blancas y van hacia arriba, de tal manera que el negro acaba de jugar Rc4. Las blancas ganan esto de milagro, pues los factores estáticos dictan que las negras deberían estar mejor: peón de más, cadena de peones conectada, rey activo, piezas activas amenazando las debilidades, etc.
Pues bien, esto es una notable excepción, una posición límite y tras la fuerte jugada 1. d3! las negras se ven impotente. No importan a donde se mueva su majestad, o pierde su torre por un doblete de peón o la pierde por una clavada del alfil blanco en f6.
Posición 4: Esto ilustra los problemas de tener el rey en el centro. A pesar de tratarse de un final, relativamente, las negras están descoordinadas y les falta recursos defensivos. Las blancas se aprovechan de eso para igualar el material y con interés tras la fortícima 1. Cd5! (explotando la clavada absoluta) seguido de Cf6 y algo va a caer en el territorio enemigo, dejando una posición ganadora para el blanco.
Posición 5: Este es un bonito final que ilustra una típica idea para forzar la coronación. Tras 1... Tc5!! las blancas clavan a la torre enemiga y se aseguran de convertir a su peón en dama. El final resultante, sin embargo, no es tan fácil. Sería interesante consultarlo con la tablebase (base de datos de finales) para saber cuál es la solución más óptima para dar mate (si es que la hay). El asunto es que en un juego entre seres humanos esto no fácil de defender.
Bien, esto ha sido una demostración del método de entrenamiento. En futuras ocasiones analizaremos más casos y daremos más consejos. Si tienes algo que aportar o debatir, puedes dejarlo en los comentarios.

Sobre el autor:
Soy Oniel Revilla (@eniolw), un ajedrecista venezolano con título de Candidate Master otorgado por la Federación Internacional de Ajedrez (FIDE) en 2016. Poseo más de 20 años de experiencia como deportista y más de 10 años de experiencia como instructor y entrenador de ajedrez. También soy profesor en la Universidad Nacional Experimental Francisco de Miranda. Puedes aprender más sobre mi faceta ajedrecística en esta publicación.
Nota: A menos que se haya indicado lo contrario, las imágenes y vídeos en este post son del autor.

♔ Chess Coaching 3: Problem Solving about the Absolute Pin
(English Version | Versión en inglés)
Introduction
(Note: The video that this post features is in Spanish. I don't have a video covering its specific content in English yet, but that might change in the future :)
We've said that chess like any other sport requires training, especially when we are dedicating ourselves seriously to it and we want to achieve competitive results. How to do it though? I have proposed to undertake this series of videos and posts on chess training/coaching, through which I will share as a coach some tips so that the reader and interested audience can benefit from them. We will analyze games and positions, exercise different skills, teach chess concepts, use different methods, and orient the coaching to all types of players (beginners, intermediate and advanced). I hope you enjoy it.
Let's start the training
This time we will use the Problem Solving Method. This is possibly the second best method after own game analysis when it comes to chess training. With it we can exercise many chess skills, such as calculation and positional understanding.
We will focus on solving set problems. In this case, the demonstration is of a set of five problems, but this may vary at the time of training. As for the level of the set selected, it corresponds to the beginner level for this occasion, so it is accessible to everyone. However, the methodological features are valid for any level.
As for the theme of the problems (the content), it will be the pin. In case you don't know it, a pin is:
A situation produced in the game of chess when a piece cannot or should not move because if it does so its side would be in check or would lose the piece of higher value behind it. Hence the immobilized piece is said to be pinned. It is a tactical motive or combination motive (own definition).
However, being more specific, we will focus on the absolute pin, which is:
One where the piece is pinned against the king of its side, so that it would be illegal to move the pinned piece. It is, then, absolute, since it is impossible to move it (own definition).
Of course, the video covers the whole exercise, so I recommend you watch it. However, I have also selected the positions, in case you want to take a fresh look at them. Once you have done your analysis, then compare your answers with the solutions provided below.
Position 1: Black to play. At first glance it seems that Black looks bad here, but appearances can be deceiving. Evaluate the position and calculate the solution (find the solution below or in the video).
Position 2: Black to play. The second player gets away with a rather typical idea. Evaluate the position and calculate the solution (find the solution below or in the video).
Position 3: White to play. This looks complicated but not unsolvable. Note that white goes up. Evaluate the position and calculate the solution (find the solution below or in the video).
Position 4: White to play. Black will regret not having castled. Evaluate the position and calculate the solution (find the solution below or in the video).
Position 5: Black to play. An endgame that is not at all dull and with nice resources. Evaluate the position and calculate the solution (find the solution below or in the video).
Discussion of the positions presented
⚠️ Warning (Spoiler Alert): Have you already followed the indications given in the positions? If so, compare your answer with the following analysis.
Position 1: Black seems lost, as white has a queen for the rook and that is a lot. Not content with that they threaten the knight on f3 and also the deadly move Qf5. However, black possesses too much activity and the white king is very exposed. Right now the theme of the pin in conjunction with an eventual mate net forces matters.
So, the move is 1... Rxg4! The bishop hangs, as the h3 pawn is absolutely pinned, so it protects nothing. But white is much worse off, and after the imminent threat of mate on h3, the player has no choice but to sacrifice the queen with 2. Qg2 and now black has a decisive material advantage with no surprises from the opponent.
Position 2: Black is again materially bad. It is proposed to retake the piece on d4 with 1... Qxd4?, but he will still be one piece down. Closer inspection will reveal the alternatives, and looking for checks is often a good clue to candidate ideas. So after 1... Qxh3! (exploiting the pin on g2, thanks to the bishop on b7), black can deliver mate on the next move.
Position 3: This position looks messy and can be confusing with respect to the orientation of the board, but the truth is that white plays and goes up, so that black has just played Kc4. White wins this by a miracle, as static factors dictate that Black should be better off: they have extra pawn, connected pawn chain, active king, active pieces threatening weaknesses, etc.
Well, this is a notable exception, a borderline position, and after the strong move 1. d3! black looks powerless. No matter where his majesty moves, he either loses his rook to a pawn fork or loses it to a pin by the white bishop on f6.
Position 4: This illustrates the problems of having the king in the center. Despite being an endgame, relatively speaking, black is uncoordinated and lacks defensive resources. White takes advantage of that to equalize the material and with interest after the strong 1. Nd5! (exploiting the absolute pin) followed by Nf6 and something is going to fall into enemy territory, leaving a winning position for white.
Position 5: This is a nice ending that illustrates a typical idea to force the promotion. After 1... Rc5! white pins the enemy rook and makes sure to turn his pawn into a queen. The resulting ending, however, is not so easy. It would be interesting to consult with the tablebase (endgame database) to find out what is the most optimal solution to give mate (if any). The thing is that in a game between humans this not easy to defend.
Well, this has been a demonstration of the training method. In the future we will analyze more cases and give more advice. If you have anything to contribute or discuss, feel free to leave it in the comments.
About the author:
I am Oniel Revilla (@eniolw), a Venezuelan chess player with the title of Candidate Master awarded by the International Chess Federation (FIDE) in 2016. I have over 20 years of experience as a professional chess player and over 10 years of experience as a chess teacher and coach. I am also a professor at the Universidad Nacional Experimental Francisco de Miranda. You can learn more about my chess facet in this post.
Note: Unless otherwise noted, the images and videos in this post belong to the author.
▶️ 3Speak