LMAC School - What are the principles of light and shadow in a picture?
Collages can be made in different levels of detail. How much the artist wants to go into detail depends entirely on the artist and his intention. But sometimes you want to make your collage very realistic and therefor you want to pay attention to light and shadow, of course.
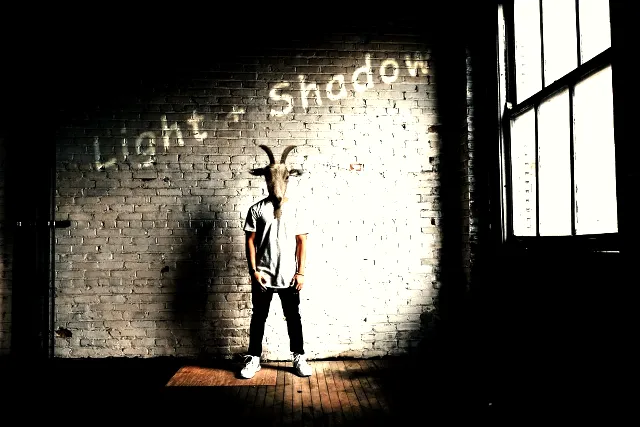
Every photograph, regardless of whether it was taken in a house or in nature, has its own lighting properties. The direction of the light determines the position and length of the shadows. The direction of the light even determines the color effects on objects. Because surfaces reflect lights and the reflections also transfer the colors of the objects to one another, more or less.
In this tutorial I will show you how to determine the direction of the light on an LMAC template (photo). In addition, I will also tell you what highlights, lights, reflections and shadows and drop shadows are and why this knowledge is useful if you want to realistically illuminate your own objects in photo collages.
But above all, I would like to encourage you to take a closer look at the photo template of your collage. Because what you're able to recognize, you are also able to depict.
With a little practice, your collage can even turn into a photomontage that most people wouldn't easily figure out that it isn't a real scene.
Light - The ruler of the shadows
Shadows are where there is no light. But where there is no light, there can't be shadows.
A shadow is the area behind or underneath an illuminated object into which less or no light can reach. Such an area is unlit to a certain extent, depending on the scattering ambient light.
The higher the light shines over an object, the shorter the shadow. The lower the light shines over an object, the longer the shadow.
For example, if the sun is over a tree, the tree's shadow on the ground is short. Just before the sun goes down, the tree casts a long shadow in the opposite direction to the sun. So exactly in the direction in which the light photons fly. At this point the sun is low over or behind the tree.
Conversely, on a photo you can determine the direction of the light source from the direction and length of the shadow. This is useful when you cannot see the light source directly in the photo.
On the GIF above, you can see very well not only how the shadow length depends on the angle of the light, but also how the angle influences the illumination of the object.
More precisely, shadows, drop shadows, lights, highlights and reflections on the surface of the object are likewise affected.
The next animation shows what these terms mean and how we will use them in this tutorial.
An illuminated object surface has the following main lighting properties:
- Highlights
Disturbing reflections from reflective surfaces, such as water droplets and highly reflective areas, are referred to as highlights. No color information is contained in these image areas. - Lights
Lights, also known as halftones, represent the bright side of an object. The halftone areas can depict an infinite number of variations in brightness. - Shadows
Shadows does not mean the drop shadow in this case. This term refers to the darkened areas of an object surface, into which the light penetrates less. It is the selfshadow. - Drop shadows
The drop shadow is cast in the opposite direction to the light source. How long the shadow is cast depends on the angle of incidence of the light.
A shadow has actually two parts even it not always clearly visible. There is the umbra. It is the darkest part of a shadow behind an opaque object. And there is the penumbra, the lighter part of a shadow.
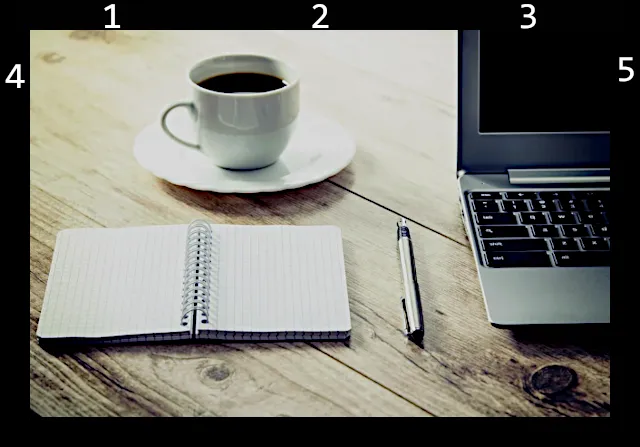
If you take a closer look on things around you, you can see a lot more on some object surfaces.
Just look at your coffee cup on the breakfast table when the ceiling lamp is on and the egg cup, cereal box is reflected in it and when shadows from other objects are depicted on it. The same goes for the cereal box, which does not have a highly reflective surface, but has a glimmer of the blue Termos jug.
The complexity of the appearance of an object surface depends on its reflective nature.
In addition to directive lighting, a shiny object surface can depict various reflections of its surroundings. Additionally what is being reflected depend on the amount of lights and the environment lights.
The illustration below shows how reflections are depict even on less reflective surfaces. But you will also see that a drop shadow is not just a drop shadow.

Reflection is what makes up many visible details. Without them everything would look dull and boring.
Reflections even have an effect on the shadows, as can be seen in the illustration above. While the umbra (core of the shadow) is deeply dark, the outer area of the shadow is slightly brightened by light reflections from the surroundings.
But why is that actually the case?
Light is not absorbed by the objects it shines on. Rather, the light is bouncing from surface to surface and changes its properties more or less such as color and intensity with each bounce.
The illustration below shows this principle in a simple way.

Exercises
You can test your knowledge in the following exercises.
To verify that your answers are correct, see the "Correct Answers" section below this section.
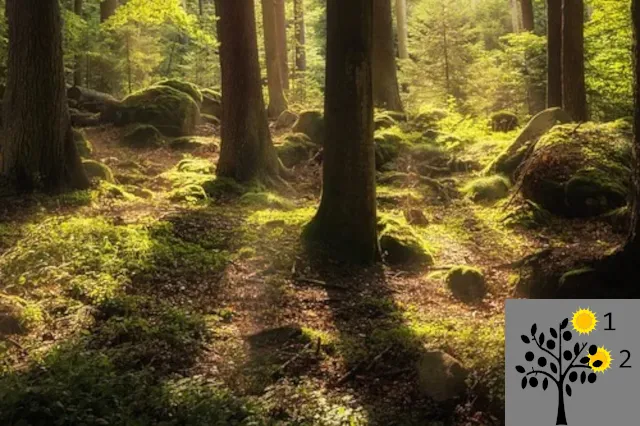
A) From where does the light come from?
From which of the following directions (numbers) is the main light approximately coming from?
B) Is the sun low or high?
Is the sun above or behind the trees (Low or high)?
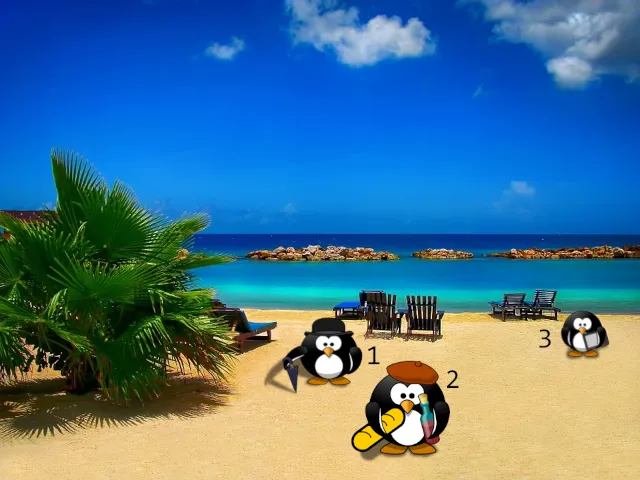
C) Where is the wrong shadow?
Which penguin has a completely wrongly placed shadow in this collage, depending on the sun position?
Correct answers
A) Position 1. The shadow is cast in a southeast direction. The light source must therefore be northwest. The light source is always in the opposite direction in which the shadow is cast.
B) Position 2. A low sun casts long shadows. Try it yourself with a flashlight and an object on a table in a darkened room.
C) Position 1. At the shadow of the plant on the left in the picture, you can clearly see that the shadow is short and is completely beneath the plant on the ground. The same applies to the sun loungers. All shadows tell us that the sun is very high, directly above the objects. So all objects in this scene should have their shadows directly underneath.
Example
This example shows how knowledge about the lighting conditions in a photo can help create more realistic collages / photo montages.
Step by step, I add shadows, reflections, and lights to an object I've added to a photo.
The light source is behind the dwarf in the cup. Therefore, his shadow is thrown forward and the lighter areas on his body are higher up towards the light source and actually on his backside.

Result:

Everything about the practical implementation of the knowledge acquired in this tutorial will soon be covered in suitable topics of the LMAC School.
If you have any questions, I'll be happy to try to answer it in the comment section. If necessary, I can go deeper into the topic in another tutorial.
Best regards
QuantumG
PS: You will have noticed that I am not a native English speaker. Therefore, there are probably a few linguistic bumps in my texts. If there are any passages that could trigger accidently a world war or something similar, please let me know so I can change it. :-)
🎨 The LMAC | 🏠 Our Community | 🚂 The LMAC Curation Trail | 🏅 The LMAC Contributor Badge | 🎓 The LMAC School