LMAC School - How to add clouds or smoke
Clouds, smoke and haze - these fluffy, fragile and seemingly complex structures are an indispensable part of some pictures. They give atmosphere to a scene, not only in the literal but also in the artistic and occasionally in a philosophical meaning.
There is no fire without smoke, hardly any sky without clouds. Some morning scenes look romantic only because of the haze, some creepy scenes would not be creepy without a fog.
Yes, at first glance these structures look very complex. But creating them is not very complicated. I'll prove that in this post and show you how to easily create fog, clouds, haze and smoke in GIMP.
1. Requirements
You may need the GIMP software to understand this tutorial. GIMP is a free, open source tool for image processing of all kinds. Lots of people say GIMP is the open source Photoshop. I agree with this statement at least for the functionality I personally need.
You can download GIMP here: Click
I created this tutorial for GIMP version 2.10.20 (and higher).
We will work with layers in this tutorial. If you do not know how to work with layers, just take a look into the LMAC School - How to work with layers post.
Since the objects in this article are things from reality, the LMAC School article about light&shadow could also be helpful for gaining better results.
Since this tutorial is for advanced users in the GIMP, I won't explain every tool in the examples.
2. Basics
2.1. Many roads lead to Rome
In fact, there is more than one way of depicting clouds, haze, smoke and such structures in a picture. This section describes some of these ways and in the "Examples" section I show you how to put them into practice. When I talk about clouds in the further sections of this tutorial, I mean all types of clouds. Also clouds of steam, clouds of smoke, fog and so on.
Because all these structures have a lot in common. In example, they all are clouds of tiny more or less reflective particles.
2.1.1. Painting with a standard brush
Of course you can paint clouds with the normal, standard brushes in GIMP. But regardless of whether you use a standard brush or a special cloud brush, painting more or less realistic clouds takes a little preparation.
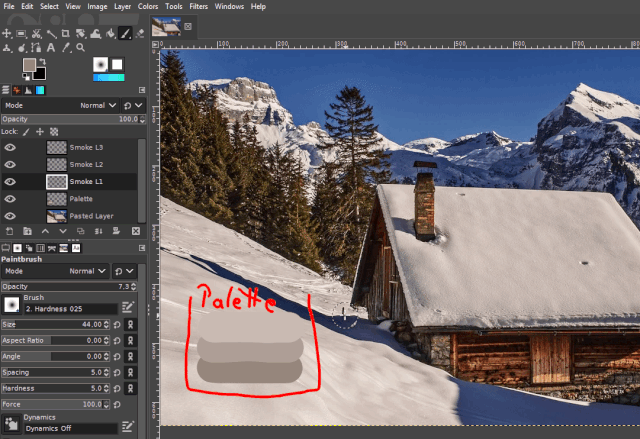
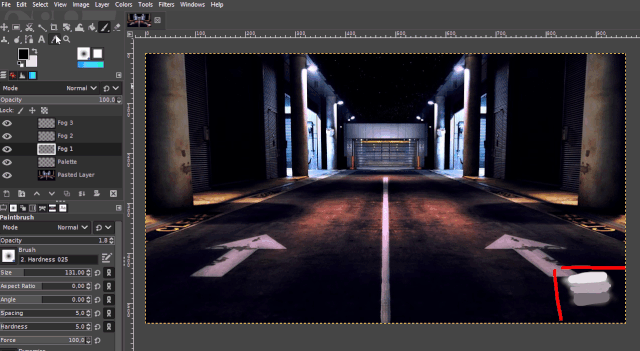
The most important thing is a color palette of at least three color gradations for the clouds.
We need a darker color for the cloud areas that are barely lit, one color for the poorly lit areas and one color for the areas that are directly lit.
We begin to paint with the color that, from the viewer's point of view, lies in the background of the clouds. If the light is coming from behind the clouds, that color is typically the lightest in the cloud color palette and we have to use the colors from painting step to painting step from the lightest to the darkest color of the palette.
Whenever the light falls on the front of clouds from the viewers point of view (the sun is behind the viewer), it is typically the darkest color of the palette and we have to use the colors from painting step to painting step from the darkest to the lightest color.
The following illustration shows this principle layer by layer.
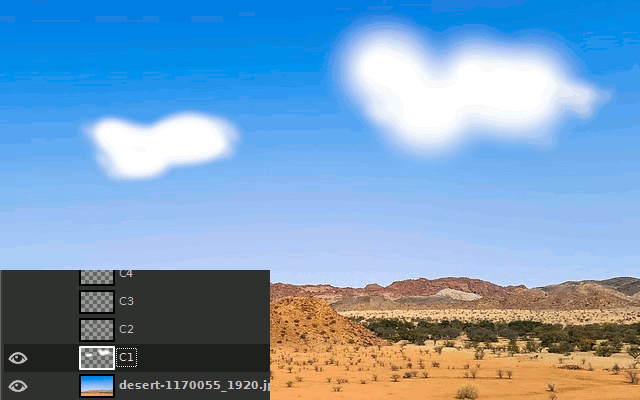
Result:
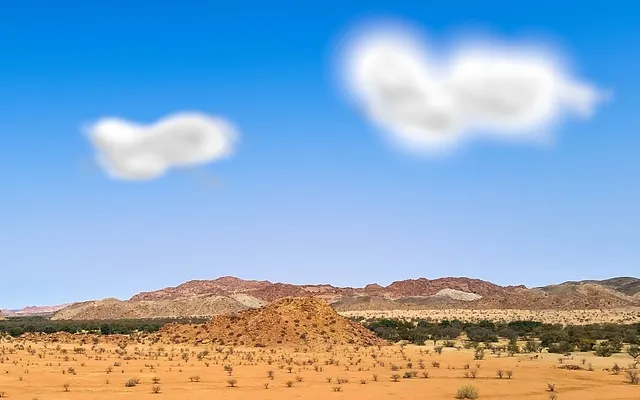
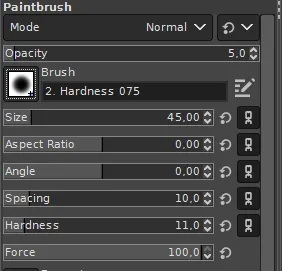
I used a soft round standard brush with hardness 11 and opacity 5 to paint the individual layers and I chose a brush size of 45 for the large cloud and a brush size of 20 for the small, more distant cloud.
The basic shapes of the clouds weren't difficult to paint. A few random, curved painting movements on the first layer already led to a nice result. Accidents were very welcome to me. Because as Bob Ross already taught, it is precisely the happy little accidents that give the viewer a realistic picture.
Note:
There is no such thing as perfection in nature, because chaos is constantly fighting against nature. Everything is in the process of decay because chaos wants back what nature has cheekily ordered.
Little accidents are the only way to portray the struggle of order against chaos, the clash of opposing strivings. In fact it is on this battlefield where the happy little accidents of reality occur.
Since all other cloud layers only simulate the different gradde of brightness in the clouds, I only had to align the darker brushstrokes a little according to the direction of the light (top right). So I painted the darker areas primarily in the lower left areas of the clouds where should be less light. I also tried to make these brushstrokes as curvy as possible.
After I had painted the basic shapes of the clouds, I used the smudge tool to imitate wisps of cloud with carefully executed painting movements.
I carried out the painting movements from the inside of a cloud to the outside and did this on each individual cloud layer.
The smudge tool is only suitable for windy cloud scenes. After all, only when there is wind, parts of a cloud will blow away.
By choosing the appropriate standard brush, we can control how our clouds are structured in detail.
I have had very good experiences with the following brushes.
| Standard brush | Use |
|---|---|
| Round brush | For fluffy, very homogeneous structures. Ideal for windless but wet weather. |
| Acrylic 01-05 | For structures with small wisps of cloud. Ideal for windy weather. |
| Pencil 01-03 | For structures with lots of wisps of cloud. Ideal for windy weather or for light structures. |
You can also use different brushes for different areas of your structures. The more effort and variance in the use of brushes, brush size and hardness you put in, the more beautiful particle structures of any kind become.
2.1.2. Painting with a special brush
There are quite a few pre-made clouds for clouds in the sky, smoke, and steam as brushes for the paintbrush tool in GIMP. Often they are Photoshop brushes that can be downloaded for free and also used in the GIMP.
But please be careful when using the brushes in images that you plan to publish. Because some free brush sets have non-free licenses!
Brush sources:
https://www.deviantart.com/aarongriffinart/art/BRUSHES-609357781 (+ cloud brushes)
https://github.com/SenlinOS/SLOS-GIMPainter (+ smoke brushes)
https://www.deviantart.com/xresch/art/22-Normal-Smoke-Brushes-197982419
https://daviesmediadesign.com/the-best-free-brushes-for-gimp-in-2020/
It's easy as pie to paint a cloud with a cloud shaped brush. The brush only has to be pressed onto the canvas.
The blatant disadvantage of the prefabricated cloud shape brushes is that light and shadow are fixed.
2.1.2.1. Installing a new brush in GIMP
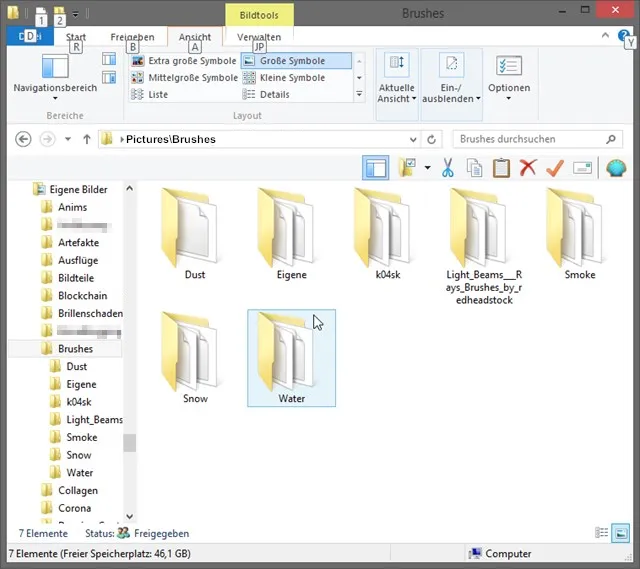
GIMP can load brushes from a folder that you have defined yourself. Just create a new folder on a preferred space on your hard disk. I've created my Brush Folder inside the Pictures Folder.
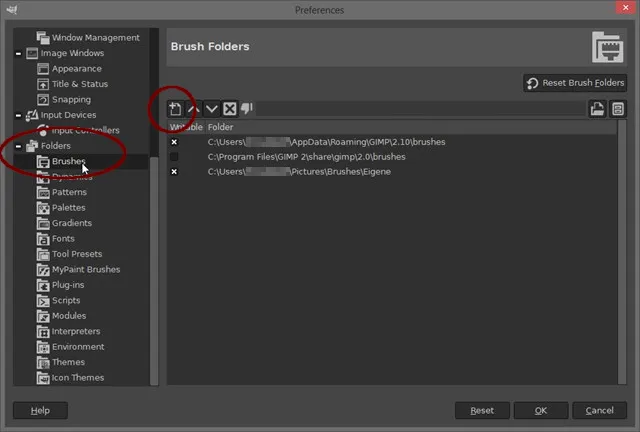
Then open the configuration dialog window in GIMP and navigate to the section "Folders/Brushes".
By clicking the "New" icon you can add the folder path of your Brush Folder. GIMP then can automatically load brushes from there and will display them in the Brush selection pane.
To add new Brushes you can simply download it into your Brush Folder.
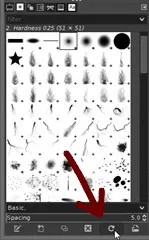
GIMP will load it at next start. But you can also hit the "Refresh brushes" button below the selection grid on the Brush selection pane.
2.1.3. Overlay
The most efficient but also most realistic way to create especially clouds in the sky is to steel them from other images. I use the underlaying technique not very often in my pictures, because it has the same problem like the Special Brush way. Clouds from other images has always fixed light&shadow. So they could easily break the realism of the whole scene.
The underlaying technique of overlaying clouds from other images is just to create a layer with the other image and earasing carefully the surroundings of the clouds in it by using Layer Masks.
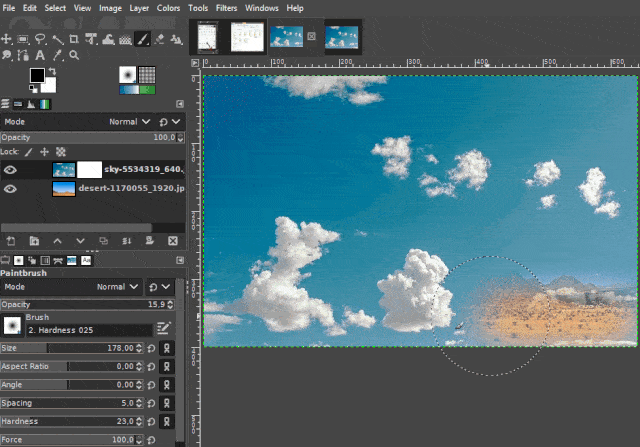
I used a round standard brush with hardness 23, opacity 15.9 to erase the areas around the clouds.
You can learn more about doing this by studying our LMAC School - How to work with masks tutorial.
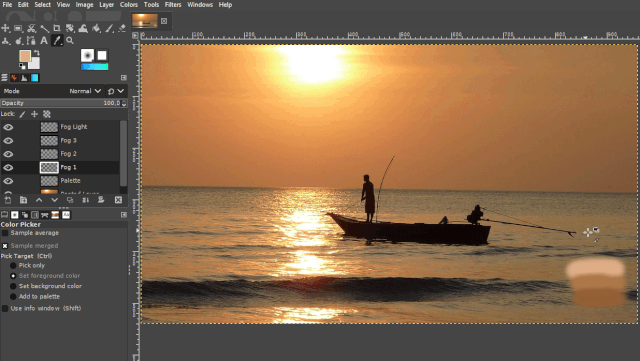
2.2. Lighting
As you probably already know, most of the time, clouds aren't just a mix of white and gray colors. Light matters a lot. A rising sun often colors directly illuminated clouds and parts of clouds in different colors of its refracted light.
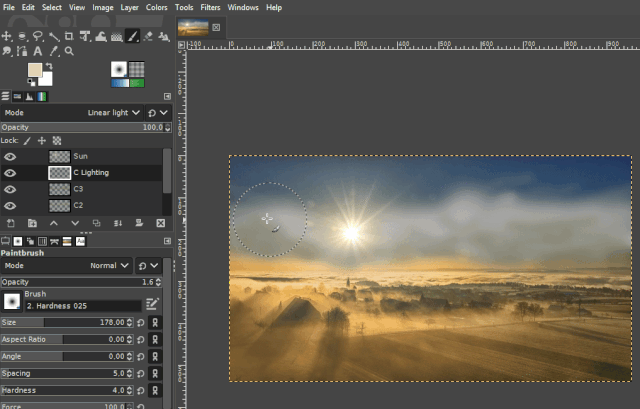
We can see the same effect on smoke rising from a fire.
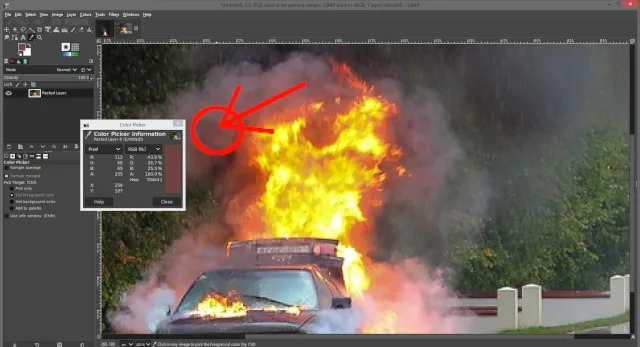

You can take the colors you need to paint the cloud lighting with the color picker directly from the sun's rays or the wreath around the sun disk. If there is no sun in the picture, you can also find the right colors on directly illuminated bright areas of the picture.
In the example above I created another layer for painting the lighting. Then I set the blend mode of this layer to "Linear Light". The layer's Opacity slider can help to adjust the lighting intensity later.
In any case, clouds and other particle structures aren't really a mix of white and gray.
If we take a closer look at clouds in the sky, it is noticeable that it is often more blue tones that shape the clouds.
The color of the fog in the morning also depends on the ambience. It is often reddish colored structures.

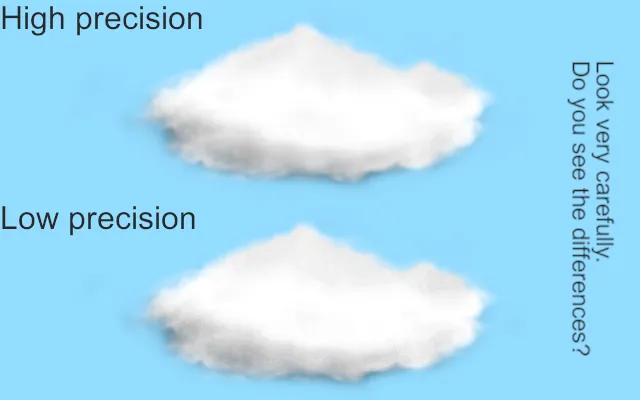
2.3. Bit depth / Precision
Cloudy structures usually have fine gradual transitions between the differently colored areas. To make these transitions as smooth as possible, the image needs a palette with many shades of each color represented in the picture.
By-default, GIMP creates 8-bit images. 8-bit integer values are clipped to the range between 0 and 255, which is 256 values per color channel (RGBA(Red, green, blue, alpha)). 1-Bit can have two integer values. 256 color values = 2⁸ = 8-Bit.
That's not a lot. But we can easily solve this problem by just creating the image with a higher precision. A precision of 32-bit enables very good results, because 32-bit integer values are clipped to the range between 0 and 4294967295. So we have then 4294967296 color values per color channel. (I hope I haven't miscalculated. :-D)
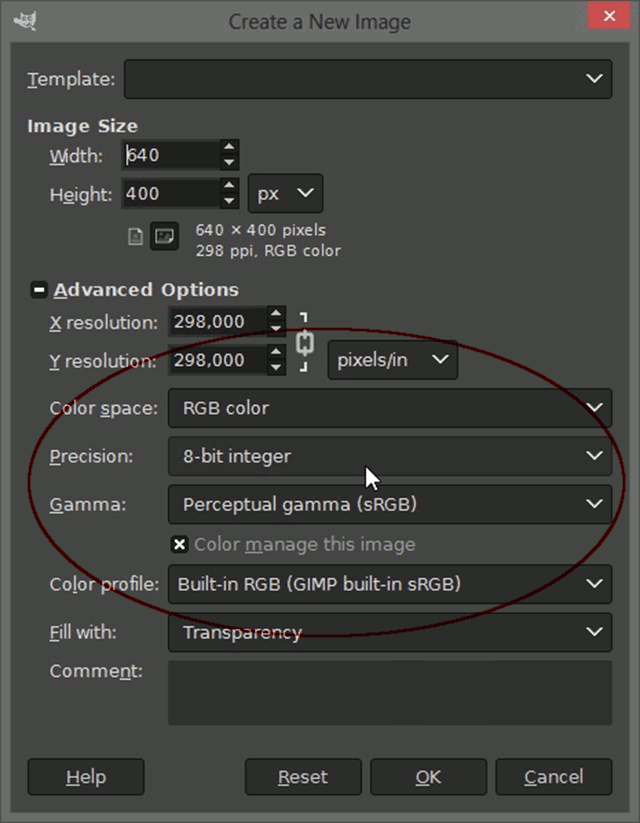
Do you see the differences?
3. Examples
These examples show step by step how different particle structures can be made, by taking into account the realizations described above.
Please also pay attention to the settings of the GIMP tools that I use in the examples (tool property pane) and the use of layers (layer list pane) on the left side in the example clips.
3.1 Cloud
3.2 Smoke
Note: I took the colors for the palette from different shadow and light area of the snow.
3.3 Haze and fog
Best regards
QuantumG
PS: 33% of the rewards for this post go to LMAC as beneficiary ( #supportlmac ).
You will have noticed that I am not a native English speaker. Therefore, there are probably a few linguistic bumps in my texts. If there are any passages that could trigger accidently a world war or something similar, please let me know so I can change it. :-)
Of course, I am also interested in making the text easier to understand if it is partially necessary.