English version
Some time ago I realized that there are some HIVE users who don't know how the Hive Engine works. On more than one occasion I have seen in various discord communities questions like "Where can I see the tokens I have earned?" or "What can I do with those tokens?". Usually, those asking these questions don't know what Hive Engine is either, and if they don't know what it is, they don't know how to use it either.
I have been on the platform for a short time, but I have been using Hive Engine since the short time I have been around here, so I thought it would be a good idea to leave a guide for those users who do not know how this platform works. I remember that when I came to Hive I had to learn how to use Hive Engine on my own and I confess that it was a little difficult to understand it, so I would like to present this guide based on my experience, dedicated to those users who, like me, are starting on the platform.

Considerations: In the text of this guide, reference will be made to screenshots that will be listed in the images below the text. These numerical references should be followed to understand the topic being discussed..
The Wallet
Note. For this case I will use the peakd.com interface.
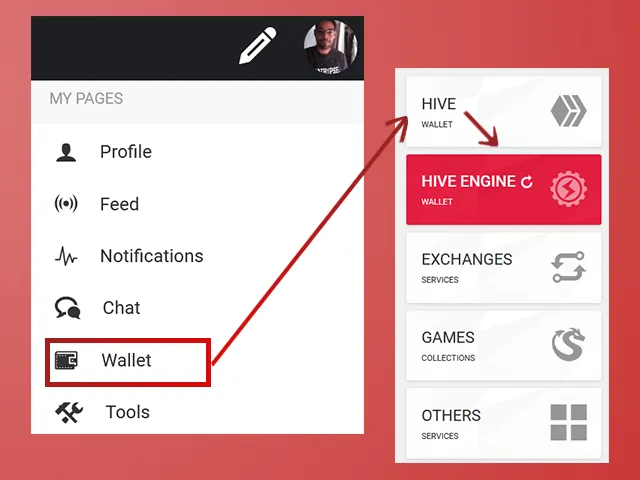
One of the easiest ways to find our tokens is to take a look at the Hive Engine section in our Wallet. To do this you must open your profile menu and click on "Wallet". Once you are in your Wallet you will see several tabs, such as "Hive Wallet", "Hive Engine", "Exchanges", "Games" and "Others". For the topic at hand we will concentrate on the "Hive Engine" tab, so click on this tab to log in, as shown in the image below:
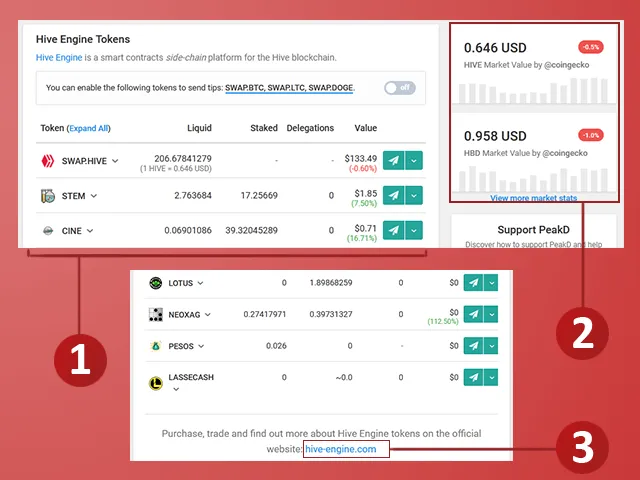
Once inside the Hive Engine tab we can see the tokens we have earned, without much detail of course (1). It is likely that some users have seen them but do not know what they are or what to do with them, but I will explain later.
Here we can also see the market value that HIVE and HBD (2) have, being 0.646 USD for HIVE and 0.958 for HBD at the time I made this capture.
Below we will also find a link to the Hive Engine (3) page. We must click on that link to enter and see in detail our tokens and the market, where we can not only sell the ones we already have, but also buy other tokens we need.
Hive-engine.com
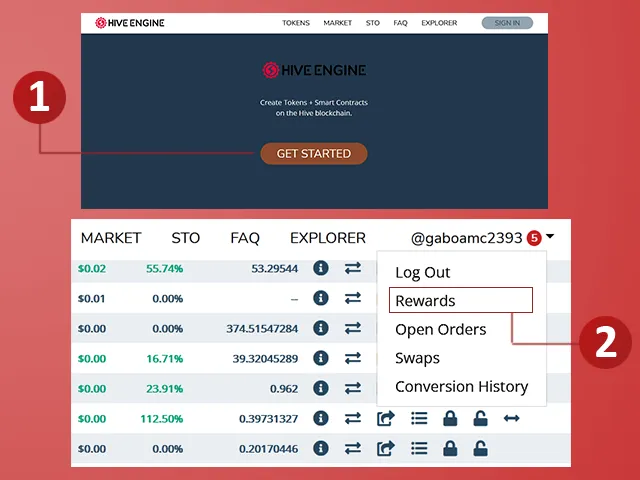
After clicking on the hive-engine.com link we saw in the previous step, the Hive Engine page will appear. The process for logging in is pretty much the same as for logging into HIVE. You simply click on "GET STARTED" (1) and use the Keychain to confirm your credentials. It is a very simple process, as I said it is similar to logging into HIVE.
Once you are logged in you will see a similar view to the Hive Engine tab in the Hive Wallet, except that here you can see more details.
Before we dive in further, you will see that at the top there is a menu and to the right is your username. You will probably see a red circle with a number, this means that there are tokens that you need to claim. To claim them you must click on your username, then a menu will pop up where you will click on "Rewards" (2).
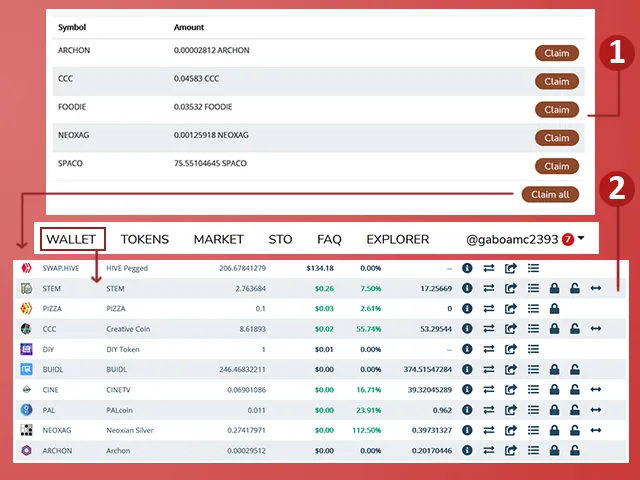
On the screen you will see the tokens you have not yet claimed. You can claim several at once by clicking on the "Claim all" button or you can claim them one by one by clicking on the "Claim" button to the right of each token (1).
To view the tokens you have just claimed, click on the "Wallet" option in the top menu. The screen you saw at the beginning will be displayed, where all the tokens you have at your disposal are listed (2).
What to do in Hive Engine?
You have probably noticed that in this table, where all your tokens are located, there are many columns and buttons with specific functions. On the left are the symbols and names of the tokens and on the right are the buttons with functions mentioned above. I will tell you a little bit about those buttons.
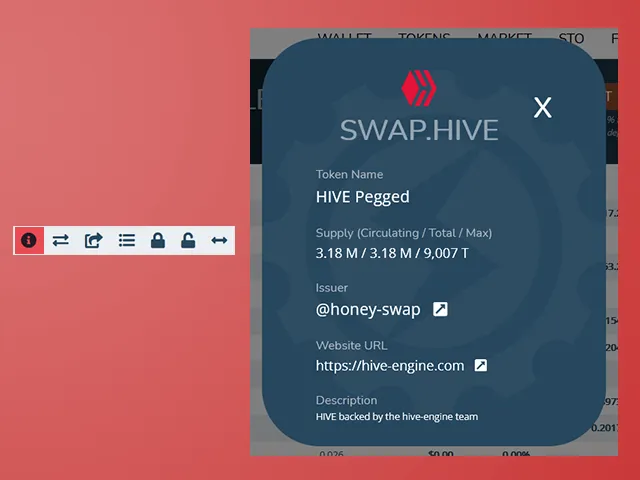
Token Information
This button provides information about the token. It is the first of the buttons to the right of the rows of each token.
Token Market
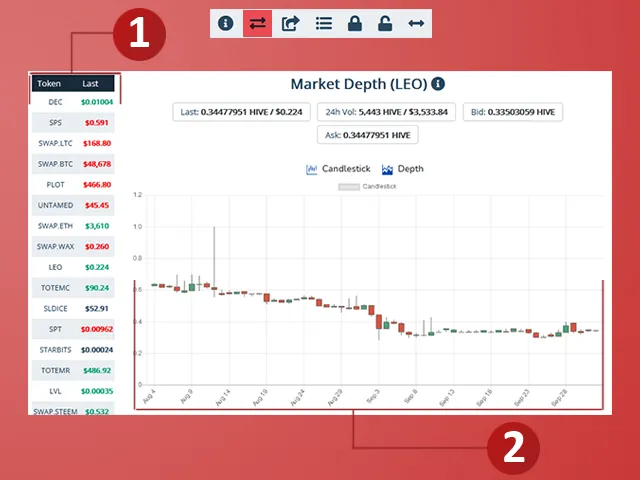
Clicking on this button (which is a little arrow pointing to the right and one to the left) will take us to the token market. Remember that these buttons are at the end of a row corresponding to a token, so if we click on this button in the row of the LEO token, it will take us to the LEO market.
On this screen we will of course be able to see the other tokens there (1) and the token's statistics over the months (2).
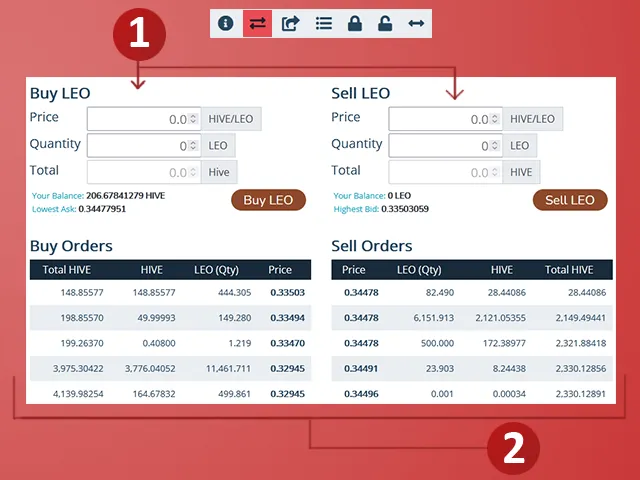
In this same screen, a little further down, you will find the options to buy or sell the token in question, LEO for this example (1). Below the buy and sell forms, we can see the "Buy Orders"/"Sell Orders" (2). These are buy/sell orders placed by other users. They serve as a reference to know the last buy price of the token (on the left) and the last sell price (on the right).
Buy Token
If we want to buy the token in question, we must position ourselves on the Buy "Token" form, or Buy LEO for this example (1). We can buy it at any price we want, but if we want to buy the token quickly we must buy it at a price equal to or higher than the last purchase price. In this case the last purchase price is 0.33503 a unit. If we want our purchase order to be before the last purchase price, we can buy the token with the price of 0.33504, as shown in the image below.
After defining the price and the amount we want to buy, the amount we will pay in our purchase order will appear in "Total". It is important to be aware of our Balance, in order not to spend more than we have available. Once everything is verified, we click on the "Buy LEO" button, then a confirmation message will appear in which we must make sure that everything is correct (2).
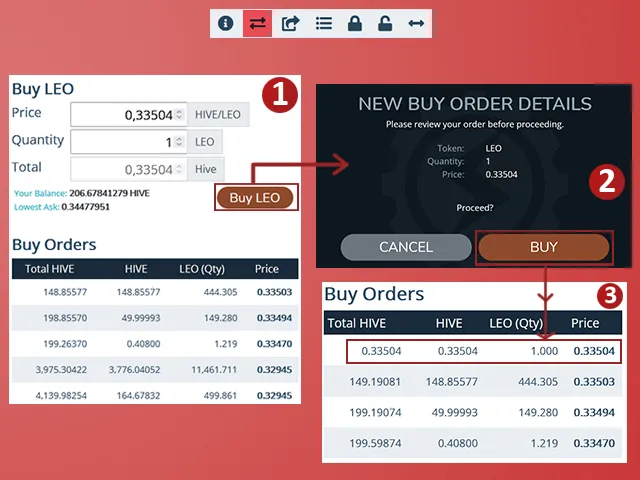
We confirm the purchase by clicking on the (Buy) button, in this way our purchase order will appear first, as shown in the image above (3). This does not guarantee that we will buy the token quickly, as someone else may buy token with a better offer than ours. It is a market where everyone is buying and selling tokens at the same time.
Sell Token
We cannot follow the guide with the LEO token because we have no tokens available. We can only sell the tokens we have, so we will follow the guide with the Creative Coin token (CCC). As seen in the image below, we have 8,61893 units available.
To sell is the same process as to buy. We define the selling price and the amount of tokens to sell. In "Your Balance" is the amount of CCC we have available for sale, so in this case we can only sell 8,61893.
Now, the selling price is debatable in these cases. Two things are clear, if you sell at a price lower than the price you bought it at, you lose money; if you sell it at a price higher than you bought it at, then there is some profit.
If you are looking to make something on the sale of your token, you can sell it at a price that is well below the last sale price (1), as long as it is not lower than your purchase price; but you can also sell it at a price just below that last price, say one decimal point lower (2).
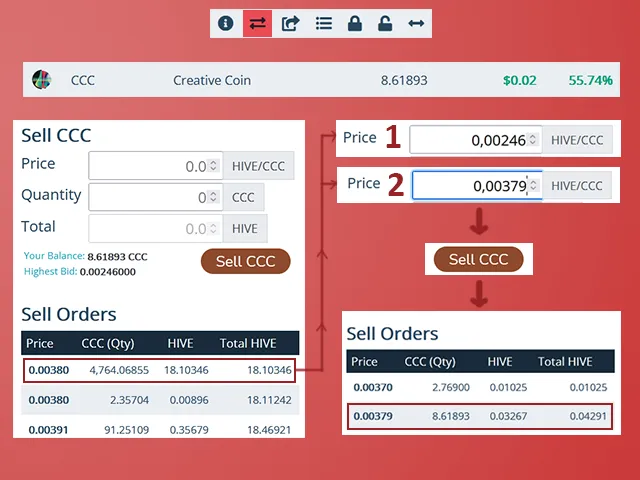
In any case, to validate our sale we follow the same process as for buying: click on "Sell CCC", confirm and that's it. Our sell order should appear first if we sold at a price lower than the last sale price. However, as you can see in the image above, our buy order was not first, but second, because someone sold the token at a lower price than us.
As I said, it is a very busy market.
Send Token
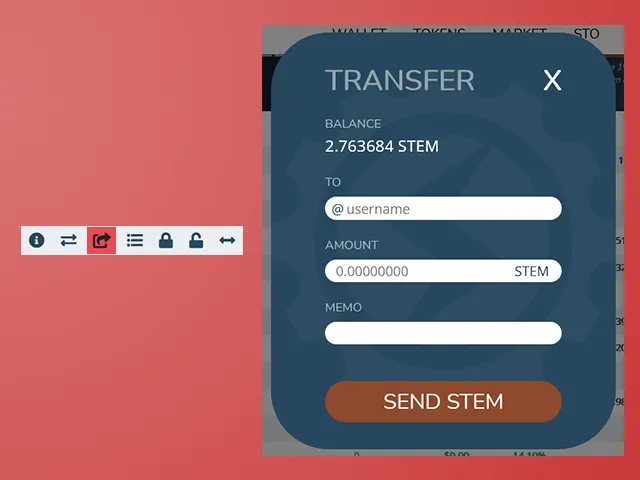
This third button gives us the option to transfer tokens directly to another user. For this example we select the STEM token, of which we have 2,763684 units.
To complete the process we must enter the username of the person to whom we want to send the token, then the amount and finally the memo, if necessary. The next thing is to click on the "Send Token" button, confirm the operation and that's it.
Show token history
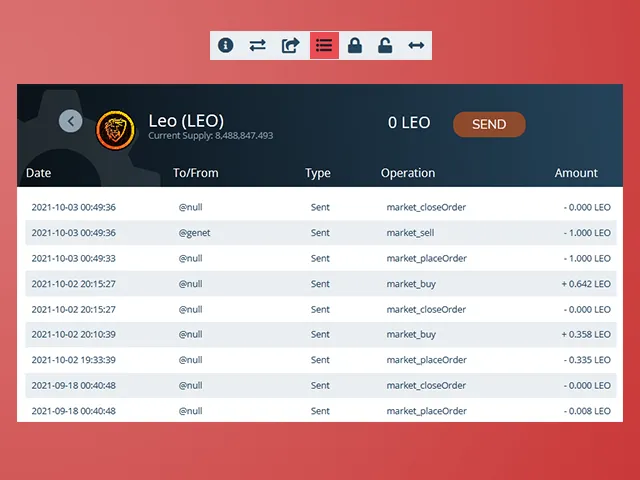
This button is quite interesting, because it allows us to visualize all the operations we have done with each token. We can select the token and see what we have done, including the mistakes we have made, of which I have several...
Withdraw and deposit of funds
As in HIVE, in Hive Engine we can deposit and withdraw funds as well. The currency we have in Hive Engine is the SWAP.HIVE, which is equivalent to the HIVE we have in our wallet.
Withdraw
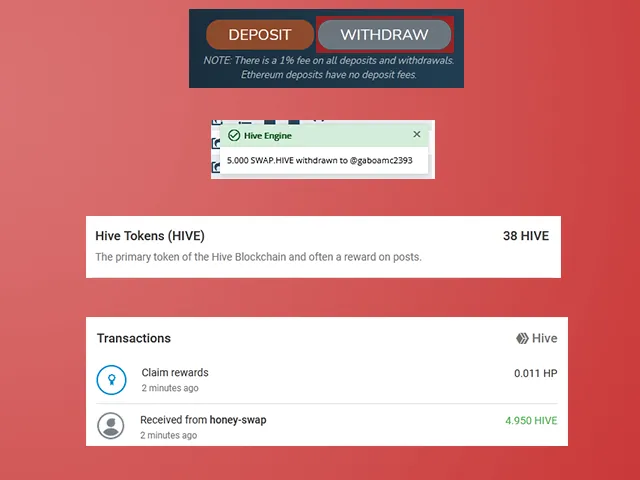
To withdraw funds, we must click on the "WITHDRAW" button, a button that is at the top of our screen, under the top menu. There we can read a note that says that for each withdrawal a 1% commission will be deducted. If we withdraw a SWAP.HIVE you will receive 0.999 HIVE.
When you click on the button mentioned above, a form will be displayed. It is a simple form. In the first form we must leave it as it is "Hive(HIVE)" in "WITHDRAW AMOUNT" we write the amount we want to withdraw, above is what we have available. In "WITHDRAW ADDRESS" appears by default our HIVE name, something that does not change. Finally there is the memo, this is a note that will appear in the wallet along with the transaction.
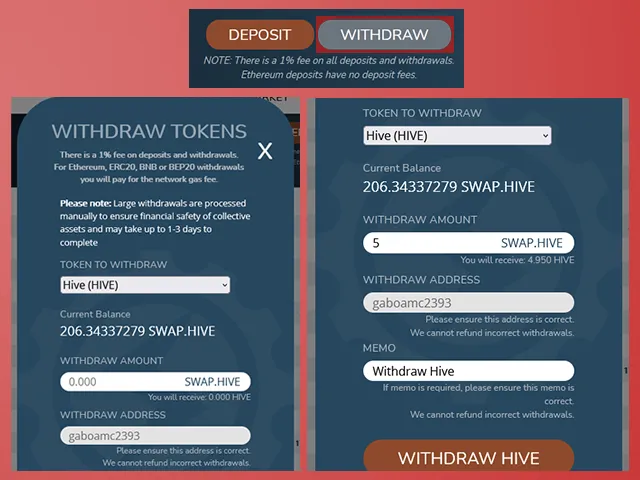
As an important note, large withdrawals may take 1 to 3 days to ensure that the operation is successful.
After confirming everything, the message shown in the image below will appear. You can even check in your wallet that the HIVE will appear added to the ones you already had and the record of the transaction, as you can see in the image below is this transaction "Recieved from honey-swap" for an amount of 4,950. We withdrew 5 but when subtracting the 1% commission the amount remains that way.
Deposit
To make deposits to Hive Engine is almost the same process as above, but in reverse. Click on the "DEPOSIT" button next to the "WITHDRAW" button.
A form will be displayed with additional information and a form that we must leave as it is: Hive (1). In this one we must click on "GET DEPOSIT INFO" and it will take us to another form. There it shows us the balance of our HIVE wallet and our balance in Hive Engine. Below is the form where we must write the amount to deposit (2).
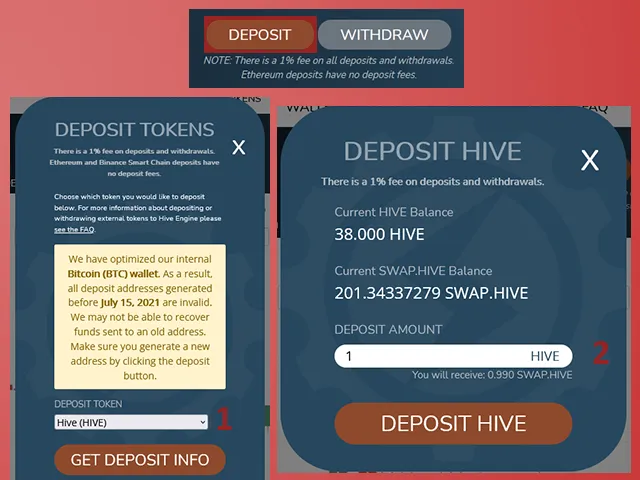
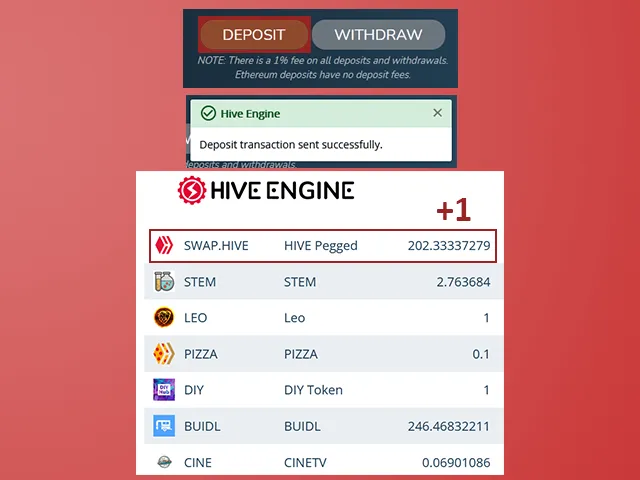
After clicking on the "DEPOSIT HIVE" button, a small confirmation message will appear. We will also be able to see in the Hive Engine "Wallet" menu that our balance in "SWAP.HIVE" has increased from 201 to 202, confirming that the deposit was successful.
Well friends, these are some basic details that you should know about Hive Engine, other more advanced details can be learned later, when you have mastered these points that I explain in this post.
When I was new I would have loved to have a Hive Engine post like this one. At the time I didn't find it, maybe because I didn't search well, but here I share this one and I hope it will be useful for everyone.
If you like you can leave your opinions below in the comments, I will be happy to read them. With nothing more to add, I will say goodbye then...
See you next time!
Versión en español
Desde hace cierto tiempo me di cuenta de que hay algunos usuarios de HIVE que no conocen el funcionamiento de Hive Engine. En mas de una ocasión he visto en diversas comunidades de discord preguntas como "¿Donde puedo ver los tokens que he ganado?" o "¿Qué puedo hacer con esos tokens?". Por lo general, quienes hacen estas preguntas tampoco saben qué es Hive Engine, y si no saben qué es, tampoco saben cómo usarlo.
Llevo poco tiempo en la plataforma, pero he usado Hive Engine desde el poco tiempo que he estado por acá, así que me pareció una buena idea dejar una guía para aquellos usuarios que desconocen el funcionamiento de esta plataforma. Recuerdo que cuando llegué a Hive tuve aprender a usar Hive Engine por mi cuenta y confieso que me costó un poco entenderlo, así que me gustaría presentarles esta guía basada en mi experiencia, dedicada a aquellos usuarios que, como yo, estan comenzando en la plataforma.
Consideraciones: En el texto de esta guía se hará referencia a captures de pantalla que estarán enumeradas en las imágenes debajo del texto. Se deben seguir estas referencias numéricas para entender el tema del que se está hablando.
La Wallet
Nota. Para este caso usaré la interface de peakd.com.
Una de las maneras más sencillas de encontrar nuestros tokens es dando un vistazo al apartado de Hive Engine que hay en nuestra Wallet. Para ello debes abrir el menú de tu perfil y hacer clic en "Wallet". Una vez que estes en tu Wallet veras varias pestañas, tales como "Hive Wallet", "Hive Engine" "Exchanges", "Games" y "Others". Para el tema en cuestión nos concentraremos en la pestaña "Hive Engine", así que hay que hacer clic en esta pestaña para ingresar, tal como se muestra en la imagen a continuación:
Una vez dentro de la pestaña de Hive Engine podemos ver los tokens que hemos ganado, sin mucho detalle desde luego (1). Es probable que algunos usuarios los hayan visto pero no sepan que son o qué hacer con ellos, pero ya lo explicaré más adelante.
Aquí también podemos ver el valor en el mercado que tiene el HIVE y el HBD (2), siendo 0,646 USD el HIVE y 0,958 el HBD al momento en que hice esta capture.
Más abajo también encontraremos un enlace a la página de Hive Engine (3). Debemos hacer clic en ese enlace para ingresar y ver en detalle nuestros tokens y el mercado, donde podremos no solo vender los que ya tenemos, sino comprar otros tokens que necesitemos.
Hive-engine.com
Tras hacer clic en el enlace hive-engine.com que vimos en el paso anterior, aparecerá la página de Hive Engine. El proceso para ingresar es prácticamente el mismo que para entrar en HIVE. Simplemente debes hacer clic en "GET STARTED" (1) y usar la Keychain para confirmar tus credenciales. Es un proceso muy simple, como dije es parecido a iniciar sesión en HIVE.
Una vez que haz iniciado sessión podrás ver una vista similar a la de la pestaña Hive Engine, en la Wallet de Hive, con la diferencia de que aquí puedes ver más detalles.
Antes de adentrarnos más en el tema, verás que en la parte superior hay un menú y a la derecha está su nombre de usuario. Es probable que veas un círculo rojo con un número, esto significa que hay tokens que debes reclamar. Para reclamarlos debes hacer clic en tu nombre de usuario, luego se desplegará un menú en donde harás clic en "Rewards" (2).
En la pantalla podrás ver los Tokens que aún no has reclamado. Puedes reclamar varios a la vez haciendo clic en el botón "Claim all" o bien puedes hacerlo uno por uno haciendo clic en el botón "Claim" a la derecha de cada Token (1).
Para ver los tokens que acabas de reclamar, debes hacer clic en la opción "Wallet" en el menú superior. Se desplegará la pantalla que viste al comienzo, donde están todos los tokens que tienes a tu disposición (2).
¿Qué hacer en Hive Engine?
Seguramente te has dado cuenta que en esta tabla, donde están todos tus tokens, hay muchas columnas y botónes con funciones específicas. A la izquierda están los símbolos y nombres de los tokens y a la derecha están los botones con funciones antes mencionados. Les hablaré un poco de esos botones.
Token Information
Este botón nos proporciona información del token. Es el primero de los botones que están a la derecha de las filas de cada token.
Token Market
Al hacer clic en este botón (que es una flechita apuntando a la derecha y otra a la izquierda), nos llevará al mercado de tokens. Recuerden que estos botones se encuentran al final de una fila correspondiente a un token, así que si hacemos clic en este botón en la fila del token LEO, nos llevará al mercado de LEO.
En esta pantalla podremos ver, desde luego, los otros tokens que hay (1) y las estadisticas del token a lo largo de los meses (2).
En esta misma pantalla, un poco más abajo, se encuentras las opciones para comprar o vender el token en cuestión, LEO para este ejemplo (1). Más abajo de los formularios de compra y venta, podemos ver las "Buy Orders"/"Sell Orders" (2). Estas son ordenes de compra/venta hechas por otros usuarios. Nos sirve de referencia para saber el último precio de compra del token (a la izquierda) y el último precio de venta (a la derecha).
Buy Token
Si deseamos comprar el token en cuestión, debemos posicionarnos sobre el formulario Buy "Token", o Buy LEO para este ejemplo (1). Lo podemos comprar al precio que queramos, pero si queremos comprar el token rápidamente debemos comprarlo a un precio igual o mayor al último precio de compra. En este caso el último precio de compra es 0,33503 la unidad. Si queremos que nuestra órden de compra esté antes que esa última, podemos comprar el token con el precio de 0,33504, tal como se observa en la imagen de abajo.
Tras definir el precio y la cantidad que deseamos comprar, aparecerá en "Total" el monto que pagaremos en nuestra órden de compra. Hay que estar prendiente de nuestro Balance, para no gastar más de lo que tenemos disponible. Una vez todo verificado, hacemos clic en el botón "Buy LEO", luego aparecerá un mensaje de confirmación en el que debemos asegurarnos de que todo este correcto (2).
Confirmamos la compra haciendo clic en el botón (Buy), de esta manera nuestra orden de compra aparecerá de primera, como se observa en la imagen de arriba (3). Esto no garantiza que compraremos el token rápidamente, pues otro puede llegar a comprar token con una oferta mejor a la nuestra. Es un mercado donde todos estan comprando y vendiento tokens al mismo tiempo.
Sell Token
No podemos seguir la guía con el token LEO porque no tenemos tokens disponibles. Solo podemos vender los tokens que tenemos, así seguiremos la guía con el token Creative Coin (CCC). Como se observa en la imagen de abajo, tenemos a disposición 8,61893 unidades disponibles.
Para vender es el mismo proceso que para comprar. Definimos el precio de venta y la cantidad de tokens a vender. En "Your Balance" está la cantidad de CCC que tenemos disponibles para la venta, así que en este caso solo podemos vender 8,61893.
Ahora bien, el precio de venta es discutible en estos casos. Dos cosas son claras, si vendes a un precio menor que al precio en que lo compraste, pierdes dinero; si lo vendes a un precio más alto al que lo compraste, entonces hay algo de ganancia.
Si buscas ganar algo con la venta de tu token, puedes venderlo a un precio que esté muy por debajo del último precio de venta (1), siempre y cuando no sea menor a tu precio de compra; pero también puedes venderlo a un precio apenas menor a ese último precio, digamos un decimal más abajo 2.
En cualquier caso, para validar nuestra venta seguimos el mismo proceso que para comprar: clic en "Sell CCC", confirmamos y listo. Nuestra órden de venta debería aparecer de primera si vendimos a un precio menor al último precio de venta. Sin embargo, como pueden observar en la imagen de arriba, nuestra órden de compra no quedó de primera, sino de segunda, pues alguien vendió el token a un precio menor que nosotros.
Como dije, es un mercado bastante movido.
Send Token
Este tercer botón nos da la opción de transferir tokens directamente a otro usuario. Para este ejemplo seleccionamos el token STEM, del cual tenemos 2,763684 unidades.
Para completar el proceso hay que ingresar el username de la persona a la que deseamos enviarle el token, luego la cantidad y por último el memo, en caso de ser necesario. Lo siguiente es hacer clic en el botón "Send Token", se confirma la operación y listo.
Show token history
Este botón es bastante interesante, porque nos permite visualizar todas las operaciones que hemos hecho con cada token. Podemos seleccionar el token y ver qué hemos hecho, incluso las equivocaciones que hemos cometido, de las cuales tengo varias...
Retiro y depósito de fondos
Tal como en HIVE, en Hive Engine podemos depositar fondos y retirar también. La moneda que tenemos en Hive Engine es el SWAP.HIVE, el cual es equivalente a los HIVE que tenemos en nuestra wallet.
Retiro
Para retirar fondos, debemos hacer clic en el botón "WITHDRAW", un botón que está en la parte superior de nuestra pantalla, bajo el menú superior. Allí podemos leer una nota que dice que por cada retiro se descontará un 1% de comisión. Si retiramos un SWAP.HIVE recibirás 0,999 HIVE.
Al hacer clic en el botón mencionado, se desplegará un formulario. Es un formulario sencillo. En el primer formulario debemos dejarlo tal como está "Hive(HIVE)" en "WITHDRAW AMOUNT" escribimos el monto que deseamos retirar, arriba está lo que tenemos disponible. En "WITHDRAW ADDRESS" aparece por defecto nuestro nombre de HIVE, algo que no cambia. Finalmente está el memo, esto es una nota que aparecerá en la wallet junto con la transacción.
Como nota importante, si se hacen retiros grandes estos pueden tardar de 1 a 3 días para asegurarse de que la operación salga bien.
Después de confirmar todo, aparecerá el mensaje que aparece en la imagen de abajo. Pueden incluso revisar en su wallet que aparecerán los HIVE sumados a los que ya tenían y el registro de la transacción, como se aprecia en la imagen de abajo está esta transacción "Recieved from honey-swap" por un monto de 4,950. Retiramos 5 pero al restar el 1% de comisión el monto queda de esa manera.
Depósito
Para hacer depósitos a Hive Engine es casi el mismo proceso anterior, pero a la inversa. Hacemos clic en el botón "DEPOSIT" que está junto al de "WITHDRAW".
Se desplegará un formulario con información adicional y un formulario que debemos dejar tal como está: Hive (1). En este debemos hacer clic en "GET DEPOSIT INFO" y nos llevará a otro formulario. Allí nos muestra el balance de nuestra wallet de HIVE y nuestro balance en Hive Engine. Abajo está el formulario donde debemos escribir el monto a despositar (2).
Tras hacer clic en el botón "DEPOSIT HIVE" aparecerá un pequeño mensaje de confirmación. También podremos visualizar en el menú "Wallet" de Hive Engine que nuestro balance en "SWAP.HIVE" ha aumentado de 201 a 202. Confirmando que el depósito se efectuó correctamente.
Bien amigos, estos son unos detalles básicos que deben saber con respecto a Hive Engine, otros detalles más avanzados se pueden ir aprendiendo más adelante, cuando ya dominen estos puntos que explico en esta publicación.
Cuando era nuevo me habría encantado tener un post de Hive Engine como este. En su momento no lo encontré, quizás por no buscar bien, pero aquí les comparto este y espero que sea de utilidad para todos.
Si gustan pueden dejar sus opiniones abajo en los comentarios, yo estaré encantado de leerlos. Sin más que agregar, me despido entonces...
¡Hasta la próxima!

Imagenes editadas con Photoshop
Traducido con DeepL
Photos edited with Photoshop
Translated with DeepL
Gabo Power UP Day: October 2021
Gabo Play Bomberman
Super Mario 64 Sculpture