
This is the first blog post in this series about setting up my homelab as a selfhosted hub for my Web2.0 activity, including selfhosting software to replace Google, Apple, Facebook, Amazon, and Microsoft ( #gafam ) in my online life. In this post I will be downloading the operating system that I will use, and burning it to a µSD-card.
ℹ️ Throughout this step-by-step guide, the red text indicates commands which are to be entered in the terminal, by the user.
- Stage: Deploy test-fmds.noho.st
- Milestone: YunoHost v4.3.4.2 is fully installed on test-fmds.noho.st
- Task: Deploying YunoHost v4.1.7.2 onto the µSD-card

Deploying YunoHost v4.1.7.2 onto the µSD-card.
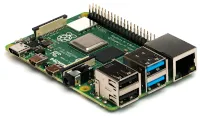
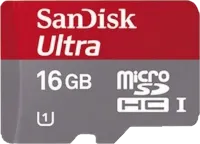
Hardware that I'll be using for this task.


How it all begins.
I'm at my laptop, logged in to the operating system, which is currently still running Ubuntu 20.04 LTS (Focal Fossa) for now. The first thing that I reach for is my µSD-card and the card reader. I know that there will be some crap on it from the last time I used it, but I am diligent with my backups, so I'm unafraid to blank the card and start again. The first command I issue from the command line terminal will do just that. First, I need to ensure that I'm working on the correct drive. I'd hate to wipe out my booting system!
user@laptop:~$
Okay, so it looks like I am after the sdb drive, in my case. If you are following along, it is important that you get this right for your own environment!
user@laptop:~$
⚠️ Can anyone spot the mistake that I have made already? In my case, it isn't a major issue, and I can carry on. But for you, this might be a disaster! Hint: compare the capacity of the µSD-card that I just blanked out.
Now that my µSD-card is completely blank, it is time to put the operating system onto it. I will be using the  YunoHost v4.1.7.2 distribution initially, and then I will upgrade it to YunoHost v4.3.4.2 later. The reason that I'm installing v4.1.7.2 initially here is that it is the latest bundled version for the Raspberry Pi 4+ at present. If you are reading this in the future and following these step-by-step instructions, it is always best to use which ever installation package is the latest for your hardware platform. At present, the YunoHost maintainers haven't packaged the latest (v4.3.4.2) bundle for the Raspberry Pi yet, so it is an upgrade option only for me, once I have v4.1.7.2 installed.
Before we begin downloading, we need to find a place to put everything on the local computer, in my case, on my laptop. I have pre-created a folder for this purpose, and I will just change to it now...
user@laptop:~$
Next we are going to get the installation package itself. You can, of course, do this all from the Web, but I prefer to use the terminal for this, as it is self-documenting, I can just copy and paste the output from the terminal.
user@laptop:~$
Now we will get the checksum file for that installation package...
user@laptop:~$
...and get the GPG signature for the installation package...
user@laptop:~$
Now that we have everything we need to get started, we can proceed with the checking and then burning the operating system onto the µSD-card.
Verifying and validating.
The next two steps are vitally important for making sure that the package we downloaded in the previous step is both internally consistent (eg. the file downloaded correctly), and that it has not been modified in any way since it was published by the package maintainers. This involves both verifying and validating the downloaded package. Most people will know how to verify a package using a checksum. However, what happens if, after the package was released, some nefarious person has modified the code, re-uploaded it, with a new checksum? This is where validating comes in to play.
To verify our downloaded package, we simply use the sha256sum command...
user@laptop:~$
That was quick and easy. The next step is a little more involved. We will now validate our downloaded package. To achieve this, we will first need to know where the YunoHost package maintainers official public key is kept. I had trouble finding this initially, but in this post on the YunoHost forums I was given the correct location, of https://forge.yunohost.org/yunohost.asc. Now we can download the package maintainers' official public key, with the command...
user@laptop:~$
Now that we have the public key as a file, let's go ahead and add it to our GPG keychain, using the command...
user@laptop:~$
As we now have the proper key in our GPG keychain, we can verify the key file and the package itself that we downloaded earlier, by using the command...
user@laptop:~$
That is it! We are ready now to burn the YunoHost v4.1.7.2 package onto our µSD-card itself!
Getting YunoHost onto the µSD-card.
Now that we have downloaded, verified, and validated our operating system, it is time to put it onto the µSD-card, so that we can boot it up. We'll be using the same dd tool that we used earlier for blanking the µSD-card, but this time we'll use it to put data onto the card, instead. First, let's extract the zip file that we have downloaded, using the command...user@laptop:~$
Now, as a final step here, we will be burning the extracted file onto our µSD-card. Make absolutely sure that we are writing to the correct device, with the lsblk command again, if need be. Then use the command...
user@laptop:~$
We should now have a bootable µSD-card containing YunoHost v4.1.7.2 on it, ready to be put into our  Raspberry Pi and booted up for the first time! That will be the subject of my next blog post in this series. In the meantime, if you have any questions or comments about this procedure so far, please leave me a comment on this post. If you have come here from the YunoHost user community and don't yet have a
  HIVE account, you can get one here.
Image Credits
- post-head.png – Remix created by @frittro, using elements by @pantone801; an image from Pixabay by @perezvcking; and various "fair use" icons and logos.
- Various "fair use" organisation and company logos, including Hive, Raspberry Pi, YunoHost, etc.
- File:Raspberry Pi 4 Model B - Side.jpg. (2022, January 9). Wikimedia Commons, the free media repository. Retrieved 08:17, January 18, 2022 from Wikipedia.
- sd-card.png, reader.png, and laptop.png – Original photos by @frittro.
- maori-divider.png – Original image by @pantone801. Remix created by @frittro.
- frittro-maori-footer.png – Remix created by @frittro, using elements by @pantone801.
