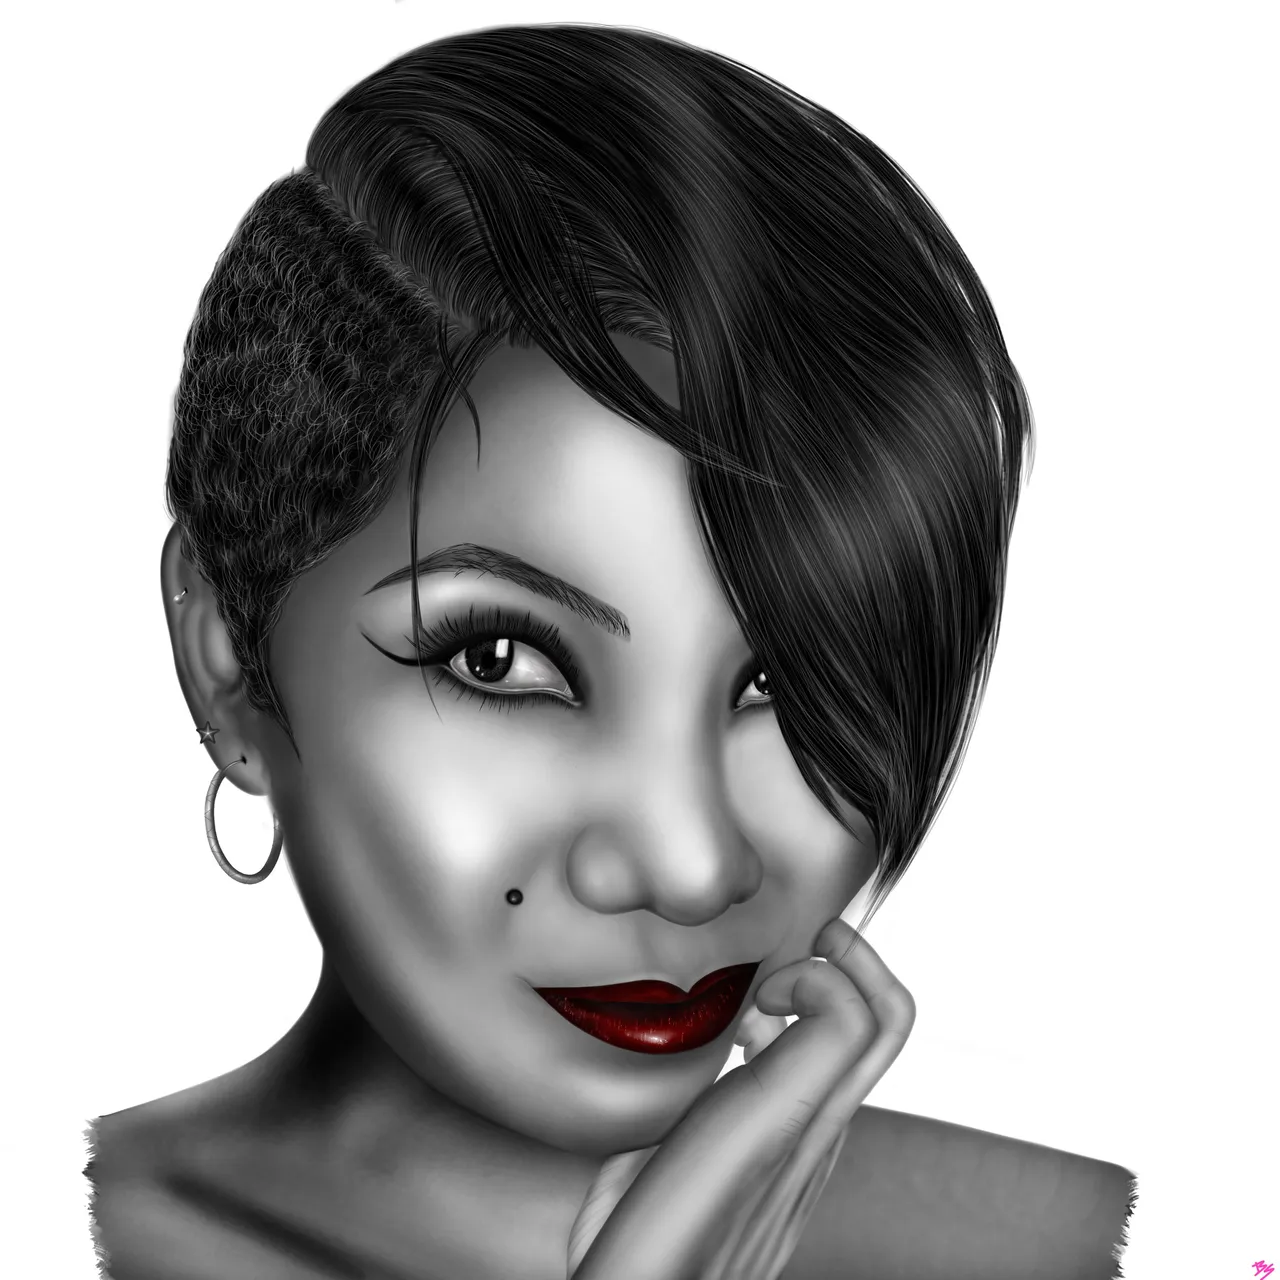
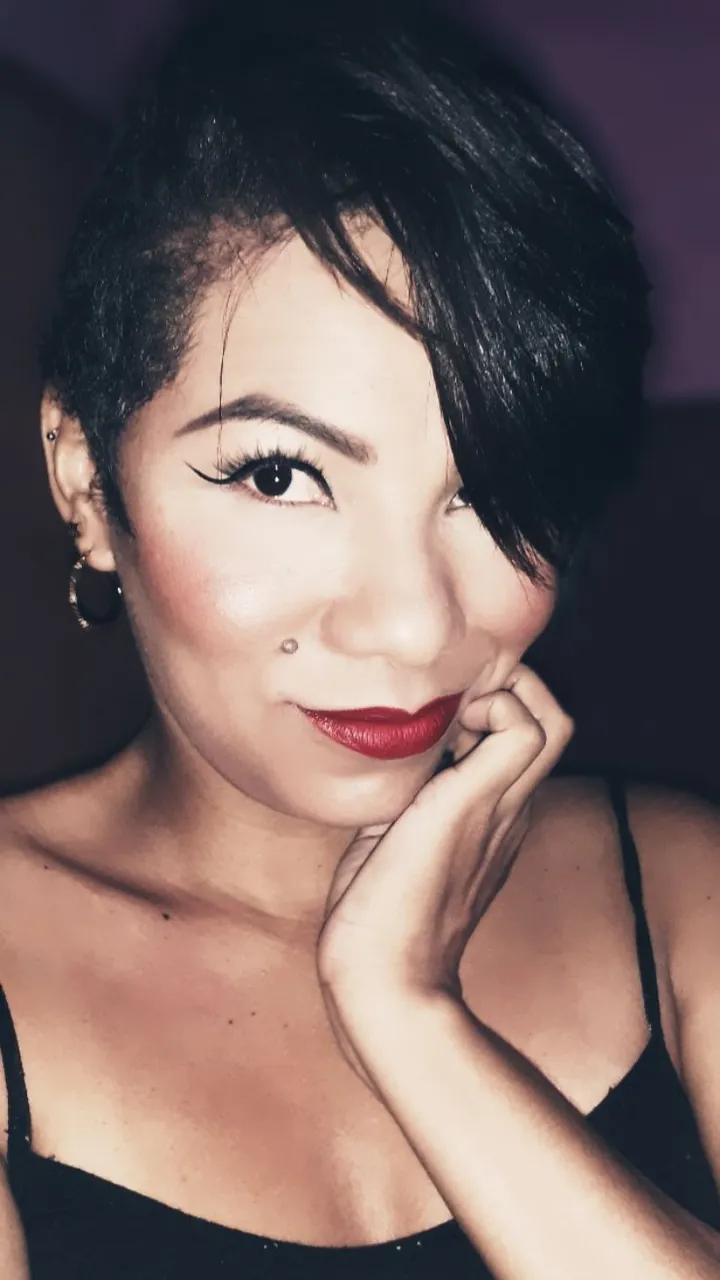
De niña me gustaba dibujar pero nunca me visualice como una artista, sin embargo desde que emprendí este viaje en el mundo artístico hace 11 meses atrás práctico diariamente, veo constantemente tutoriales sobre diferentes tipos de arte para mejorar y aprender nuevas técnicas. Por eso cuando vi el concurso de @luisdraw Concurso de dibujo - Temática Realismo quería participar pero me sentía intimidada ya que aún estoy en proceso de aprendizaje y el realismo no es precisamente mi fuerte. Sin embargo finalmente decidí participar, me dije a mi misma ¿que es lo peor que puede pasar? 🤷♀ nada que mi trabajo quedé terrible y yo pase pena😅 teniendo esto presente decidí intentarlo conmigo misma, un autorretrato ya que si quedaba fatal no quería que nadie pasara un momento incómodo.
As a child I liked to draw but I never visualized myself as an artist, however since I started this journey in the artistic world 11 months ago I practice daily, I constantly watch tutorials on different types of art to improve and learn new techniques. That's why when I saw @luisdraw's contest Drawing Contest - Realism Theme I wanted to participate but I felt intimidated since I'm still in the process of learning and realism is not exactly my forte. However I finally decided to participate, I said to myself what's the worst that can happen? 🤷♀ nothing that my work would look terrible and I would be embarrassed😅 keeping this in mind I decided to try it with myself, a self-portrait because if it looked terrible I didn't want anyone to have an uncomfortable moment.
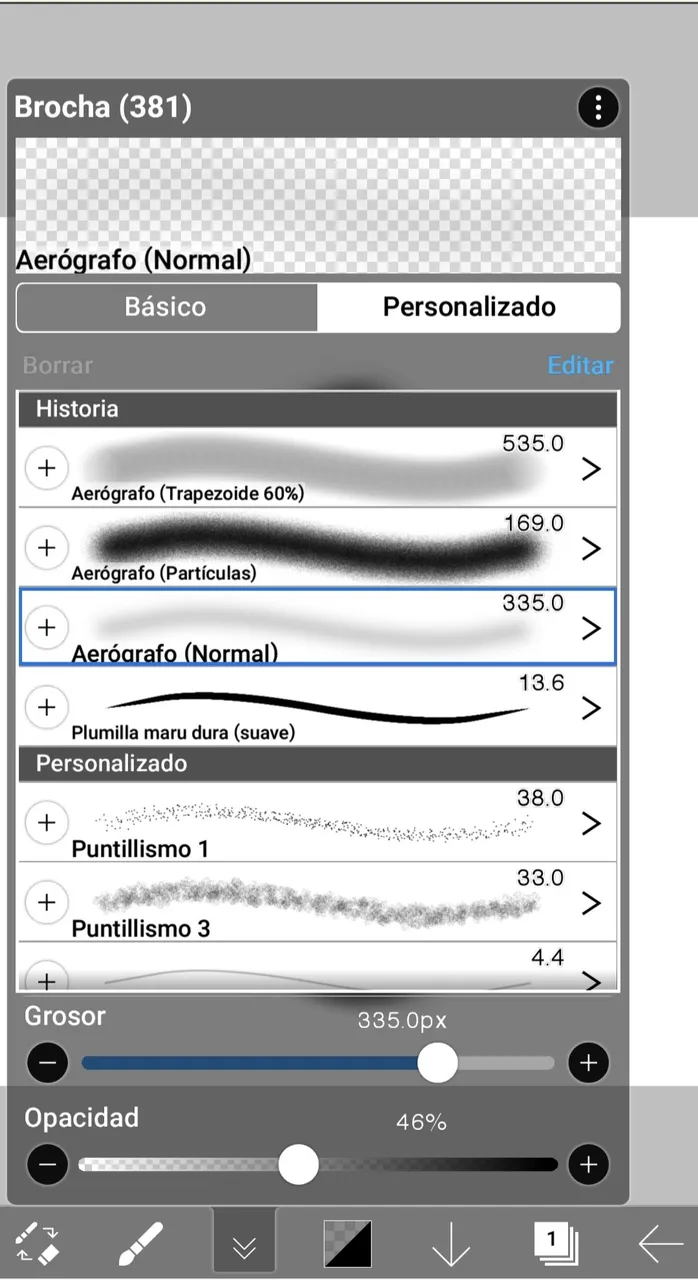
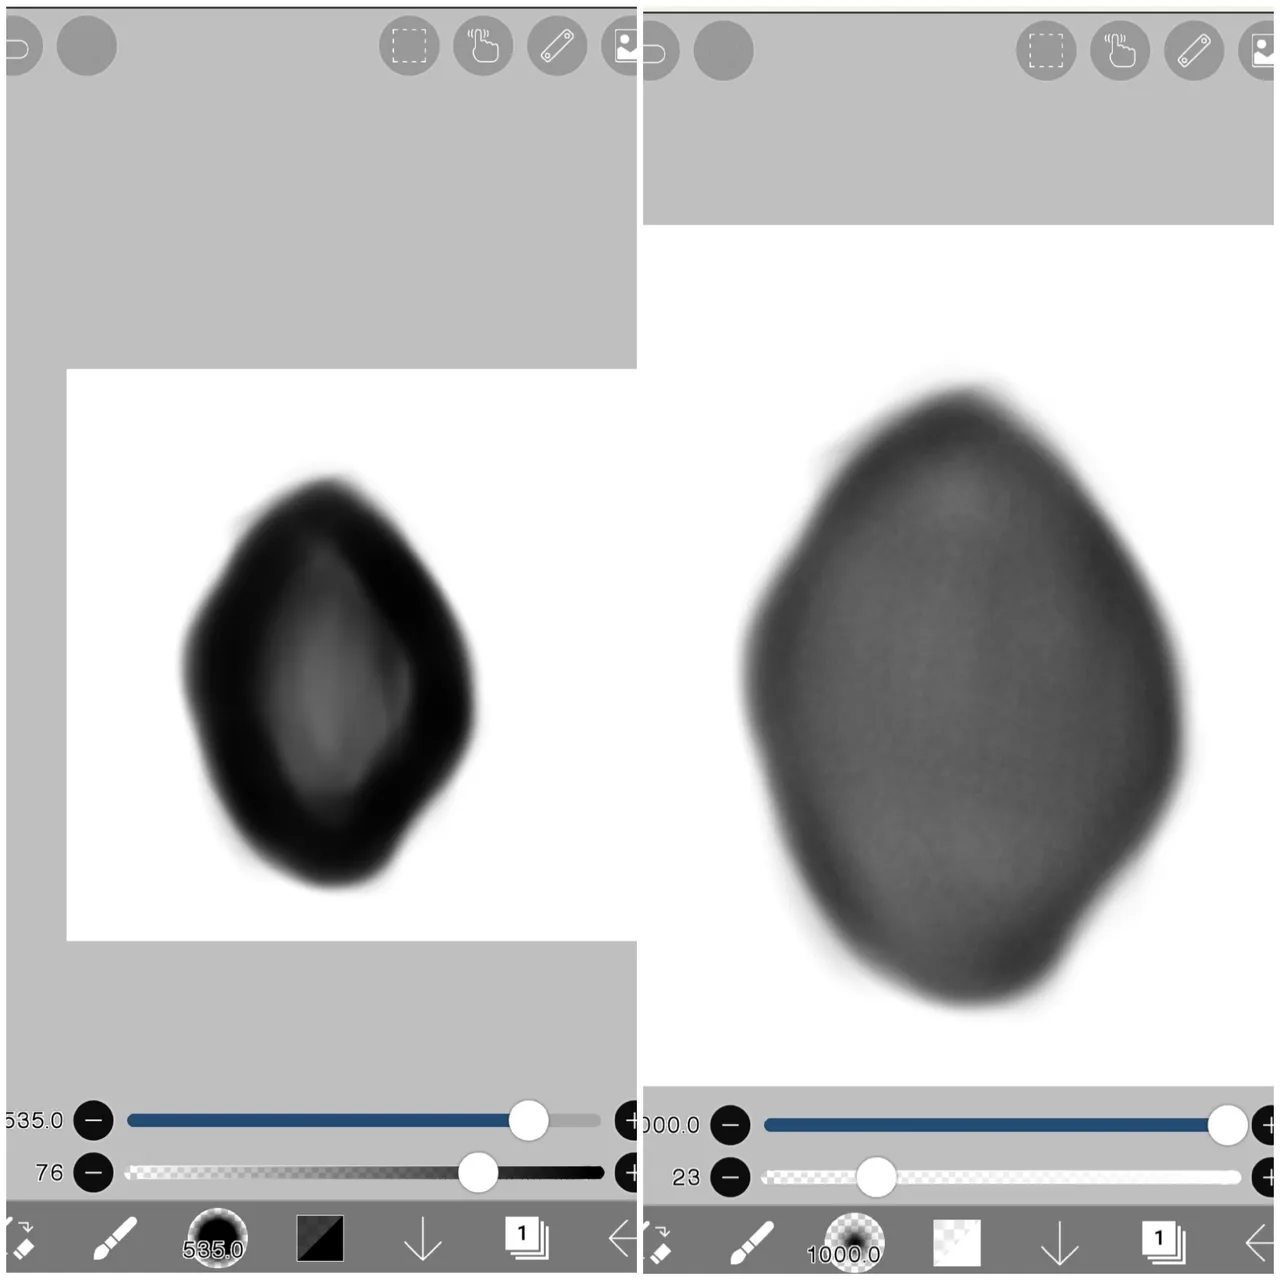
Lo primero que hice fue escoger mi fotografía, luego exportarla, hacer el lineart y después dibujar el fondo de mi imagen. Tengo como costumbre hacer un fondo sólido con el pincel Aerógrafo de 60 (Trapezoide) al 100% del color, seguido a esto uso el Aerógrafo normal con degradación menor a 50% para difuminar en un tono gris, al hacerlo así obtengo un efecto de aspecto poroso que da la impresión de que es piel real.
The first thing I did was to choose my photograph, then export it, make the lineart and then draw the background of my image. I have the habit of making a solid background with the Airbrush brush from 60 (Trapezoid) to 100% of the color, followed by using the normal Airbrush with degradation less than 50% to blur in a gray tone, doing it this way I get a porous looking effect that gives the impression that it is real skin.
Ya con mi base lista difuminada empiezo por la nariz ¿la razón? aún tengo problemas para dibujar narices así que empiezo por lo más difícil para mi, después seguí con los labios, luego pasé a una de las partes que más amo dibujar: los ojos.
With my base already blurred I start with the nose, the reason? I still have trouble drawing noses so I start with the most difficult thing for me, then I continued with the lips, then I moved on to one of the parts I love to draw the most: the eyes.
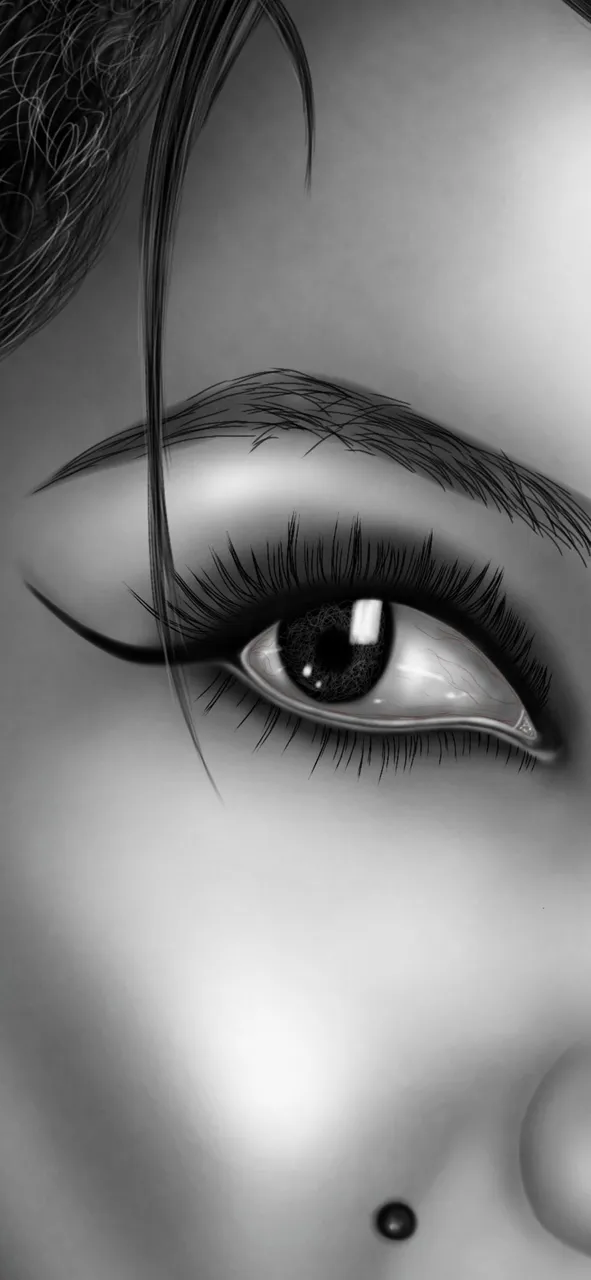
He estado practicando como hacer ojos realista, he aprendido que para dar ese efecto húmedo de los ojos el brillo y las sombras juegan un papel vital, además aprendí a nunca pintar el globo ocular completamente blanco sino en un tono gris para poder hacer degradación del color añadir y brillo que es lo que dará el efecto húmedo del ojo.
I have been practicing how to make realistic eyes, I have learned that to give that wet eye effect the shimmer and shadows play a vital role, also I learned to never paint the eyeball completely white but in a gray tone to be able to make color degradation add and shimmer which is what will give the wet eye effect.
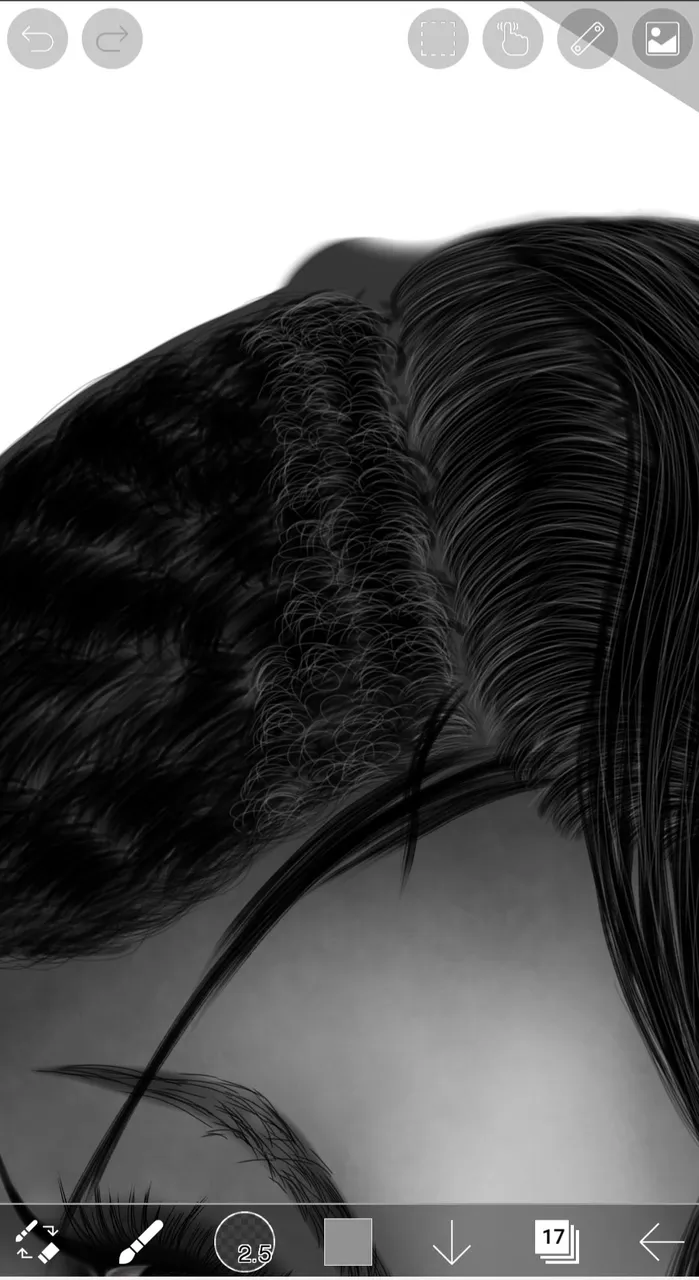
Después de finalizar con los ojos me fui a otra parte que disfrutó mucho hacer: el cabello. El proceso es un poco tedioso ya que después de dibujar el cabello usando el pincel para pelo al 100% de grosor y 100% de saturación de color (ojo es el de pelo no el de cabello) utilizo el pincel lápiz difuminado al 2.5 de grosor 100% de color en un tono gris para hacer contraste y empiezo a dibujar hebra por hebra de cabello. En ese proceso paso unas 3 horas aproximadamente. Finalmente cuando ya tengo todas las líneas del cabello listo procedo a aplicar un poco de luz en algunas zonas del cabello para darle el efecto de brillo al cabello.
After finishing with the eyes I went to another part that I really enjoyed doing: the hair. The process is a little tedious because after drawing the hair using the hair brush at 100% thickness and 100% color saturation (eye is the hair brush not the hair one) I use the pencil brush blurred at 2.5 thickness 100% color in a gray tone to make contrast and start drawing strand by strand of hair. In this process I spend about 3 hours approximately. Finally when I have all the lines of the hair ready I proceed to apply a little light in some areas of the hair to give the effect of brightness to the hair.
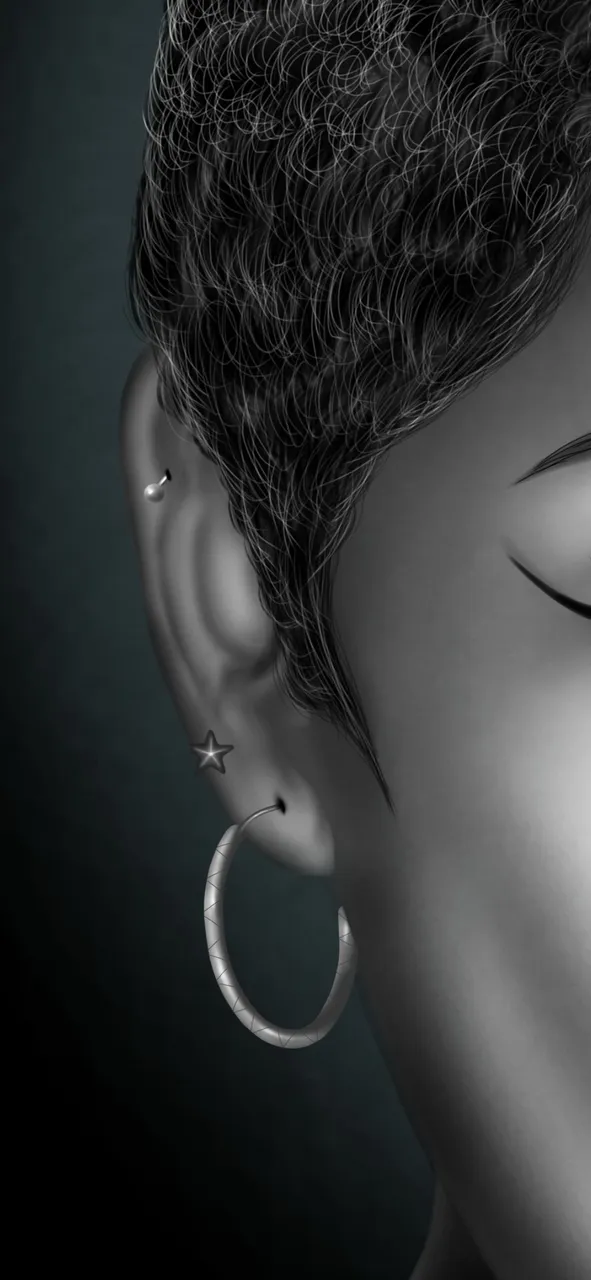
Después dibuje la oreja con sus respectivos accesorios luego pasé a pintar la mano y finalmente el cuello y el fondo. Según yo ya estaba lista sin embargo amo los labios rojos he visto muchas fotografías que le aplican un filtro en blanco y negro con labios rojos, así que me dije ¿por qué no? Agregue otras 2 capas una para cada labio, pinte de rojo y finalmente utilice la herramienta de superposición de capas para que se mezclarán entre sí y poder tener ese hermoso color rojo.
Then I drew the ear with its respective accessories, then I painted the hand and finally the neck and the background. According to me I was ready but I love red lips, I have seen many pictures that apply a black and white filter with red lips, so I said to myself why not? I added another 2 layers one for each lip, painted red and finally used the layer overlay tool to blend them together to get that beautiful red color.
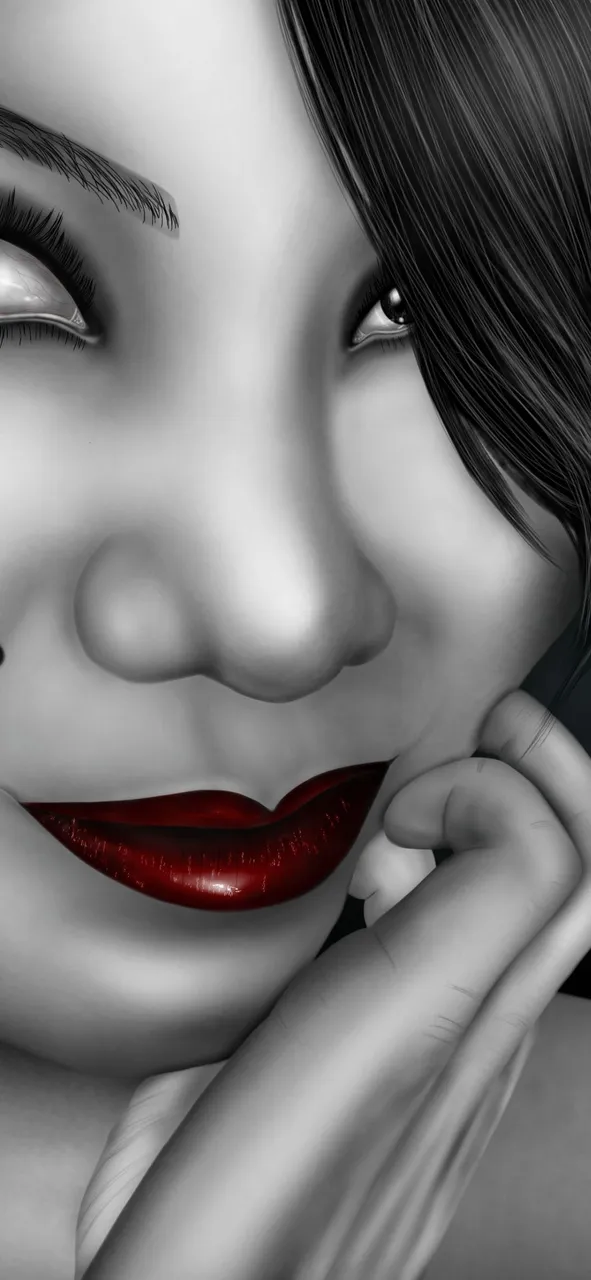
Este fue un trabajo de 24 horas con 32 minutos repartido en 2 días. Creo que trabaje relativamente rápido haciendo este retrato, si soy honesta me sorprendió el resultado a mi parecer se ve bastante realista y me gustó mucho, no se que opinan ustedes.
This was a 24 hours and 32 minutes job spread over 2 days. I think I worked relatively fast doing this portrait, if I'm honest I was surprised by the result in my opinion it looks quite realistic and I liked it a lot, I don't know what you think.
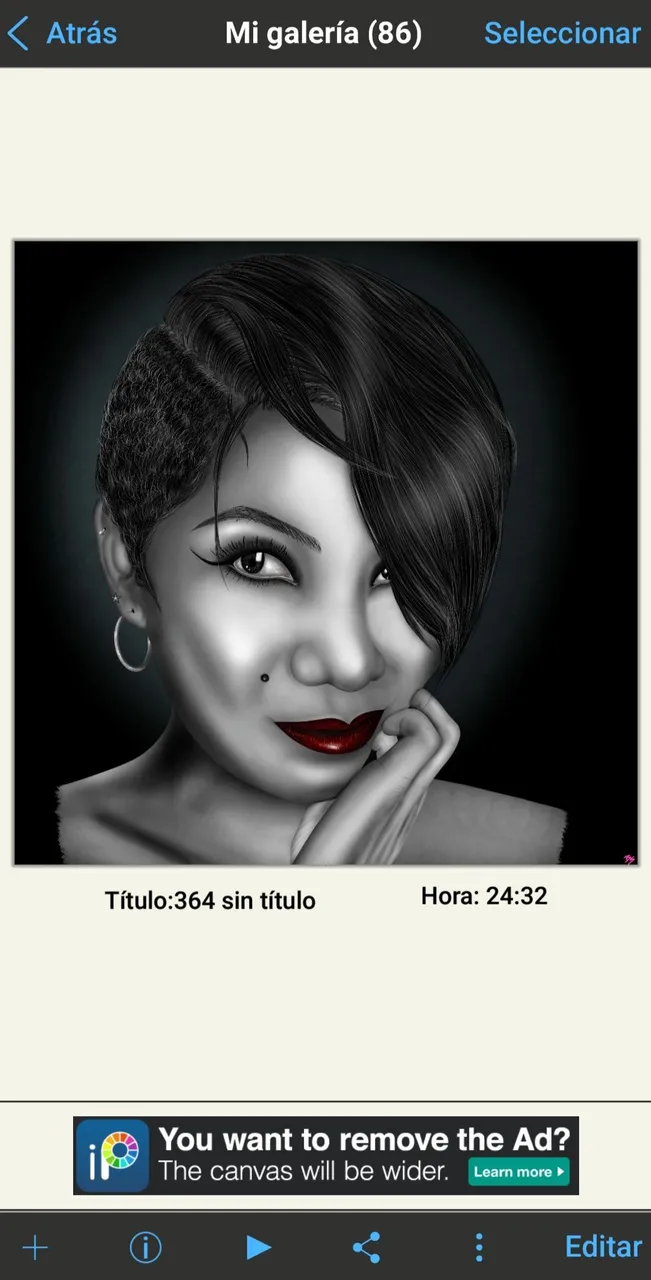
Me siento muy feliz de haberme atrevido a participar en esta iniciativa además de haber salido de mi zona de confort ya que normalmente suelo dibujar piezas surrealistas, espero seguir practicando el realismo y ponerlo en práctica en mis trabajos de arte, agradezco a @luisdraw por crear esta iniciativa y a ustedes por llegar hasta aquí, espero les haya gustado el trabajo de hoy. Gracias por visitar mi blog nos vemos pronto.💋
I feel very happy to have dared to participate in this initiative besides having gone out of my comfort zone since I usually usually draw surrealist pieces, I hope to continue practicing realism and put it into practice in my artwork, I thank @luisdraw for creating this initiative and you for getting here, I hope you liked today's work. Thanks for visiting my blog see you soon.💋

NFT Showroom
CRIPTOART
GHOSTMARKET