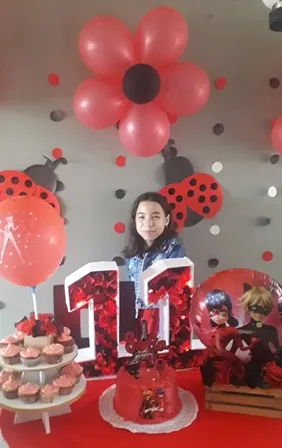
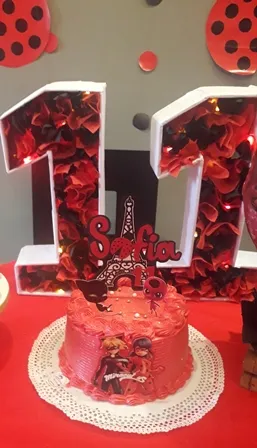
Hola a todos mis amigos de esta querida comunidad de @hive, que gusto que estén por acá por este rinconcito donde se realizan manualidades con mucho cariño ya que se hacen desde el corazón, los meses de Agosto y Septiembre son de celebración en mi hogar, ya que toso cumplimos prácticamente juntos en estos dos meses solo con muy pocos días de diferencia, pues imagínense que mi hija Sophia y mi esposo cumplen el mismo día! Bien es sabido por ustedes a mi me encantan las Manualidades y por supuesto no podía dejar pasar esta oportunidad para hacer lo que me gusta y quise hacerle unos números 3D para celebrar el cumple #!11 de mi hija, a ella le encantan las Aventuras de Lady Bug y esa fue la temática, en el post de hoy les muestro como hice el numero 3D!
Hello to all my friends of this dear community @hive, what a pleasure to have you here in this little corner where crafts are made with love because they are made from the heart, the months of August and September are of celebration in my home, since we all meet practically together in these two months only a few days apart, just imagine that my daughter Sophia and my husband have the same birthday! It is well known that I love crafts and of course I could not miss this opportunity to do what I like and I wanted to make some 3D numbers to celebrate my daughter's 11th birthday, she loves the Adventures of Lady Bug and that was the theme, in today's post I show you how I made the 3D number!
Materiales:
- Cartón reciclado
- Hojas blancas recicladas
- Papel crepe de los colores de tu elección
- Silicón en barra
- Pistola de silicón
- Luces de navidad
- Regla
- Lápiz
- Exacto
Materials:
- Recycled cardboard
- Recycled white sheets
- Crepe paper of your choice of colors
- Silicone stick
- Silicone gun
- Christmas lights
- Ruler
- Pencil
- Pencil
Elaboración:
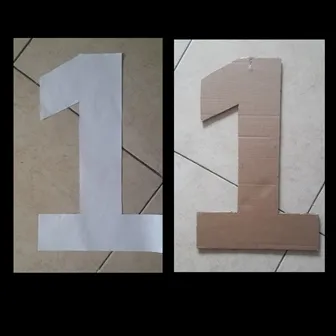
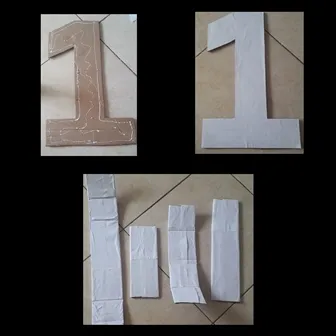
- Comenzamos haciendo un molde en hojas blancas de numero que queremos elaborar, en mi caso era el numero 1 ya que mi hija cumplió 11 años, seguidamente trasladamos este molde al cartón y lo cortamos con la ayuda de un exacto.
Elaboration:
- We start by making a mold in white sheets of number we want to elaborate, in my case it was number 1 since my daughter turned 11 years old, we transfer this mold to the cardboard and cut it with the help of an exacto.
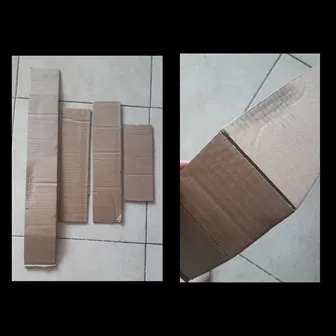
- Luego procedemos a cortar los bordes del numero que serán los que le darán profundidad, tu los puedes hacer con la profundidad que quieras pero yo lo hice de unos 9 cts, cortaras todo el contorno del numero y en cada dobles has un pequeño corte no muy profundo que te permita doblar el cartón y poderlo pegar alrededor del número.
- Then proceed to cut the edges of the number that will give it depth, you can make them with the depth you want but I did it about 9 cts, cut the entire contour of the number and in each double make a small cut not too deep that allows you to fold the cardboard and paste it around the number.
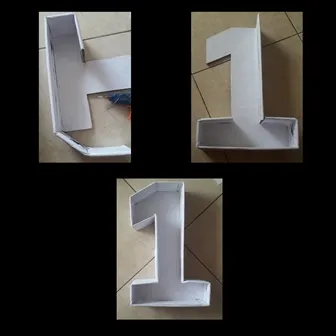
- Seguidamente procedemos a forrar las piezas de cartón que ya cortamos, yo lo hice con hojas recicladas que siempre es la mejor opción , tu lo puedes hacer con el papel y el color que prefieras.
- Next we proceed to cover the pieces of cardboard that we already cut, I did it with recycled leaves which is always the best option, you can do it with the paper and the color you prefer.
- Una vez que tengamos todas las piezas forradas, procedemos a pegar los laterales por todo el contorno del numero como se muestra en la foto.
- Once we have all the pieces lined, we proceed to glue the sides all around the number as shown in the photo.
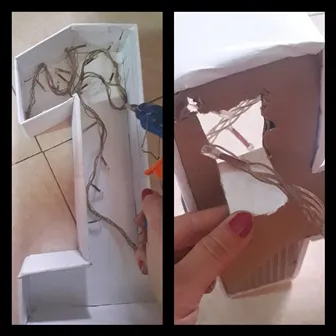
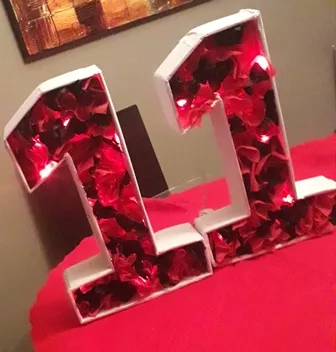
- El siguiente paso es colocarle las luces que alumbraran nuestros números y lo hacemos abriendo un orificio en la parte de abajo y teniendo en cuenta que meteremos las luces y una vez que las hayamos distribuido en todo el número y pegado con la ayuda del silicón ella saldrán nuevamente por el mismo orificio.
- The next step is to place the lights that will illuminate our numbers and we do it by opening a hole in the bottom and taking into account that we will put the lights and once we have distributed them throughout the number and glued with the help of silicone they will come out again through the same hole.
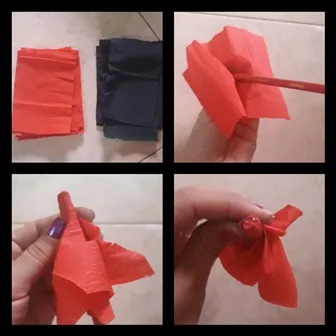
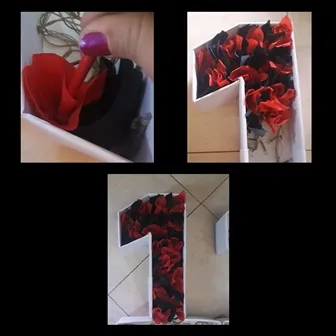
- Ahora procedemos al relleno de nuestro numero, existen diferentes opciones para este paso, yo me decidí por el papel crepe pero tu puedes escoger entre globos, dulces, lo que se te ocurra lo dejo a tu imaginación, para hacer esto cortamos cuadrados de aproximadamente 10x10 cts de los colores de tu elección, los cuales con la ayuda de un lápiz que colocaremos en el centro del papel. el cual giraremos para que el papel de enrolle parcialmente y tome esa forma, colocamos un poco de silicón en la parte de abajo y los pegaremos en todo el numero hasta que ya no queden espacios vacíos.
- Now we proceed to the filling of our number, there are different options for this step, I decided for the crepe paper but you can choose between balloons, candy, whatever you can think of I leave it to your imagination, to do this we cut squares of approximately 10x10 cts of the colors of your choice, which with the help of a pencil that we will place in the center of the paper. We will turn it so that the paper partially rolls up and takes that shape, we put a little silicone on the bottom and glue them all over the number until there are no more empty spaces.
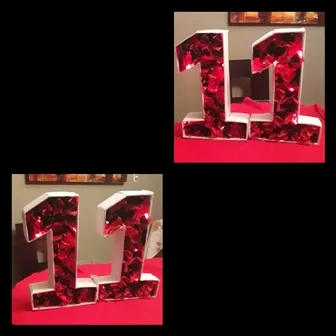
Y así quedan nuestros hermoso números en 3D, ideales para celebraciones de cumpleaños, aniversarios, etc, etc, etc, la celebración la dejo a tu gusto! Solo alta encenderlos y veras lo lindos que quedan y lo hermosa que se vera esta fiesta con este toque especial!
And so are our beautiful 3D numbers, ideal for birthday celebrations, anniversaries, etc, etc, etc, etc, I leave the celebration to your taste! Just turn them on and you will see how nice they are and how beautiful this party will look with this special touch!
Es una manualidad muy fácil de hacer y el resultado es hermoso, no necesitas materiales costosos ya que gran parte de ellos son reciclados. Anímate y prepara estos maravillosos y hermosos números en 3D que le darán ese toque personal y diferente a tu celebración y lo mejor de todo es que los hiciste con tus propias manos.
Gracias por haber visitado mi blog y los espero en una próxima publicación, ya que aquí seguiremos trabajando con Manualidades las cuales hacemos desde el corazón porque es lo que nos gusta!
It is a very easy craft to do and the result is beautiful, you don't need expensive materials since most of them are recycled. Cheer up and prepare these wonderful and beautiful 3D numbers that will give that personal and different touch to your celebration and best of all is that you made them with your own hands.
Thank you for visiting my blog and I hope to see you in a future publication, because here we will continue working with crafts which we do from the heart because that's what we like!