Holaa amigos blogueros!!! para todos aquellos que no saben, hoy les ensañaré como hacer sus propios divisores personalizados para que sus post queden más lindos y se visualice tu nombre por todo tu post. Espero les guste!!!
Hello blogger friends !!! For all those who do not know, today I will teach you how to make your own custom dividers so that your post is more beautiful and your name is displayed throughout your post. I hope you like it!!!

Nuestro 1er paso sería ir para el programa Illustrator desde mi persona suelo realizar mis divisores en este programa, elegimos una anchura de 500mm y una altura de 100mm con una orientación horizontal como se muestra en la imagen.
Our 1st step would be to go to the Illustrator program since I usually make my dividers in this program, we choose a width of 500mm and a height of 100mm with a horizontal orientation as shown in the image.

Nos dirigimos a la opción de HERRAMIENTA DE TEXTO (T). Luego de esto nos iremos al menú donde dice CARÁCTER en la parte inferior derecho, aplicamos el tipo de fuente que más nos guste, el tamaño de letra que desees y el color que más te identifique, En mi caso apliqué la fuente
“Minion Variable Concept”. “Tamaño 72”. Color negro para la fuente y rosado para las líneas.
We go to the TEXT TOOL (T) option. After this we will go to the menu where it says CHARACTER in the lower right part, we apply the type of font that we like the most, the font size you want and the color that most identifies you, In my case I applied the font
"Minion Variable Concept". "Size 72". Black for the font and pink for the lines.

Ahora si, ya estamos finalizando con nuestro trabajo, seleccionamos la HERRAMIENTA SEGMENTO DE LÍNEA (<) y colocar las líneas de extremo a extremo que estén coordenadas entre sí, y nos dirigimos al menú derecho inferior donde primeramente deberemos dar CLICK a la línea que seleccionamos y nos vamos a donde dice TRAZO con un tamaño de 4 y elegimos el color de nuestra preferencia.
Now, we are finished with our work, we select the LINE SEGMENT TOOL (<) and place the end-to-end lines that are coordinated with each other, and we go to the lower right menu where we must first CLICK on the line that we select and we go to where it says TRAZO with a size of 4 and we choose the color of our preference.
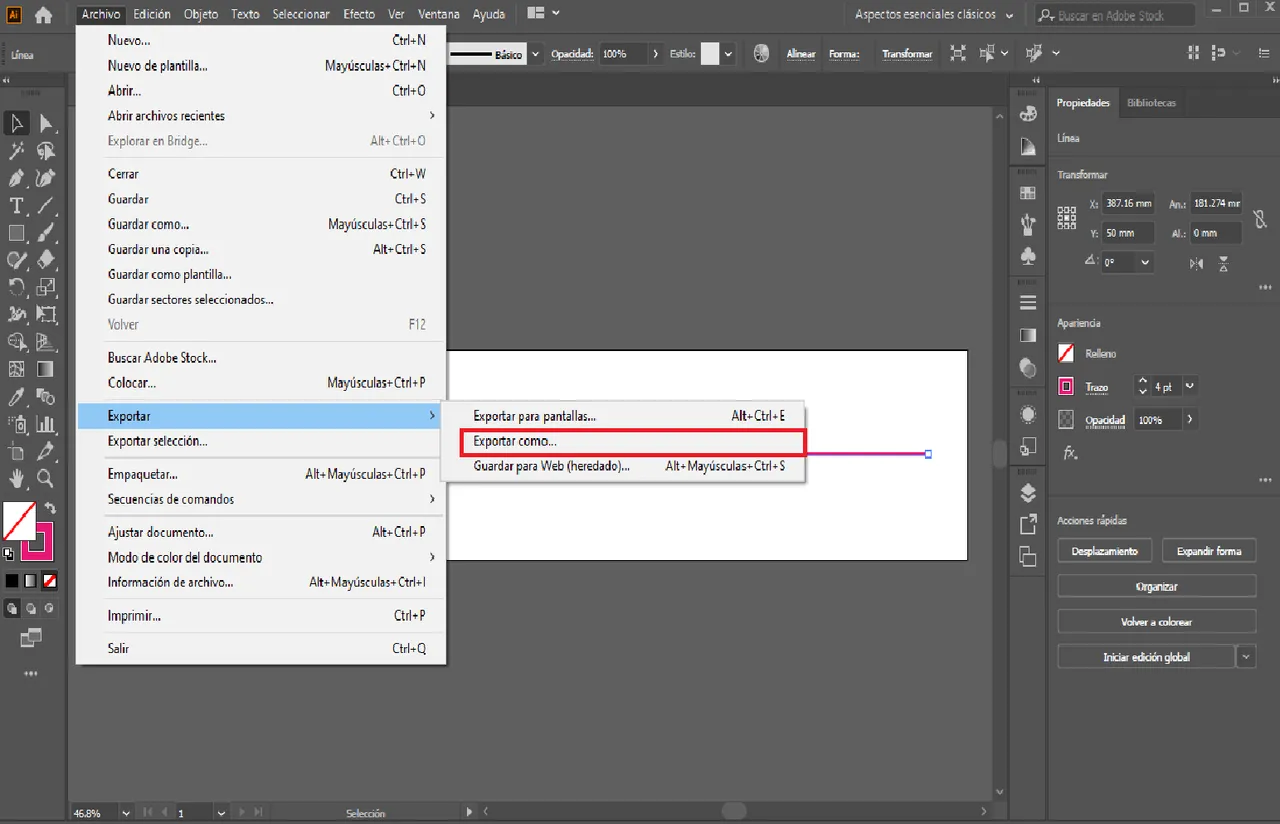
Finalmente, le damos en la opción ARCHIVO en la parte superior izquierda, nos dirigimos a la parte de EXPORTAR-EXPORTAR COMO, seguidamente lo guardamos como una imagen JPG y listo. Podremos utilizar nuestro divisor tranquilamente para nuestro post en hive.
Finalmente, le damos en la opción ARCHIVO en la parte superior izquierda, nos dirigimos a la parte de EXPORTAR-EXPORTAR COMO, seguidamente lo guardamos como una imagen JPG y listo. Podremos utilizar nuestro divisor tranquilamente para nuestro post en hive./div>