Introduction
Now that you know the basics of Hive as well as claiming your earnings from the previous guides, let us make sure you attract more readers with your blog post! The simplest way to do this is by making your blog look clean and elegant by using some additions to your article. For this purpose, we will be some markdown and HTML markup for our formatting.

Now you might be wondering “But wait!? What is markdown?! Is that programming?!”
It might seem complex but trust me. We will make it simple and easy to follow. By using PeakD website, we can make some formatting simpler and intuitive. Just as if you are using MS Word. But! There are some things that we should learn. It might seem complex but after using it twice or thrice, you will be able to remember it quite well. This guide will be going step-by-step from “basic formatting”, “intermediate formatting”, then to “stand-out quality post”.
First we should remember these symbols:
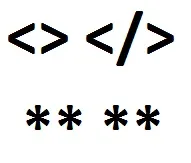
The symbols angle bracket "<>" and asterisk "**" are the bread and butter of formatting in Hive. There are other symbols we will be using later on. But we will be seeing more of these symbols as well so be sure to remember them.

Using PeakD
For this guide, we will be using PeakD as our main interface. Creating posts here are simpler and more user-friendly.

What we can see when we make a post in PeakD:
1 – Easily choose which Hive Community you want to post the article
2 – PeakD Toolbar
3 – Quick button to reblog your post to your own blog
4 – Body or Content of the Article
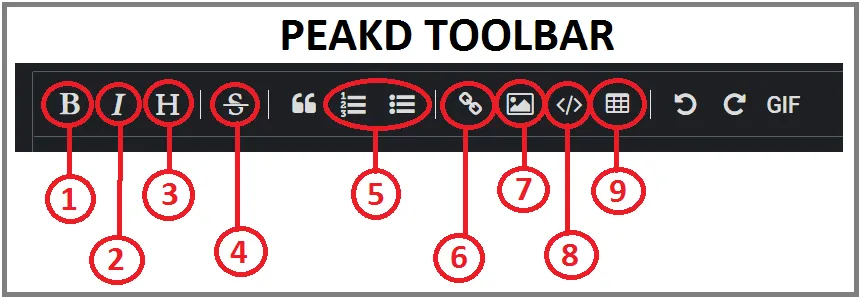
So how do we use the PeakD toolbar? Simple, just highlight a keyword then format it by pressing the button. Remind you of word processors like MS Word right? The following are the things you can do using the toolbar:
1 – Bold – Highlight the words then click the button to make it Bigger. You could also press CTRL+B using PeakD
2 – Italic – Makes highlighted words look slanted and fancy. CTRL+I also works here.
3 - Header – Use this for making Titles, Headers, Sub-headers
4 – Strikethrough – Use this when you want words to look crossed out
5 – Bullets – You can use this to make numbered or bulleted list
6 – Link – Highlight the word you wish to turn into a link
7 – Image - Add a picture from your computer or add the link to the image
8 – Codes – Type in HTML codes which can be seen in the blog post
9 – Tables – Creates a 3x2 Table. You can still add more rows or columns by editing the format
To apply these formating options simply select the piece of text you want to be changed, and click on the desired option (1-9). Now you can format your article without remembering how to use markdown or HTML codes. But wait! Sometimes we need to learn how markdown and HTML is used. Learning this will help us format faster! Aside from that, there are some tools that are not in the toolbar such as alignment. So keep on reading!
Basic Formatting
Now we are finally starting on how to code like a pro format our articles! The following are the simplest ways to format your articles and even memes.
BOLD & ITALIC ,
You might be thinking, “But we already know how to use bold using the toolbar, right?”. But have you noticed, when you click the Bold button, it creates two(2) asterisks(*) sandwiching your highlighted word!? It’s that simple! It will look like this when you type it:
**BOLD**
Then will produce something like this:
BOLD
Aside from BOLD, by using one(1) asterisk(*) on both sides of the highlighted word, you are able to format the word into ITALIC. The syntax is almost the same as BOLD. It will look like this:
*ITALIC*
It will look like this:
ITALIC
We could combine both BOLD and ITALIC by simply combinig the two. Which means 2 + 1 = 3! Use three(3) asterisks(*) to sandwich a word to use both BOLD and ITALIC.
***BOLD AND ITALIC***
It will look like this:
BOLD AND ITALIC
Now we can put emphasis on words using BOLD. While we can use ITALICS to show that we are using our local language. All of this using asterisks (*)!
CENTER
Now we can highlight some words and make them fancy for translations using BOLD and ITALIC. But why does your article seems messy? Aha! You need to Align it. By default, the words you input are in left-aligned. One basic alignment tool is to use CENTER. You can use center on words as well as images. You can use this by using this format:
<center>CENTER</center>
This will show us this output:
CENTER
Now we have finally used another basic symbol for formatting, angle brackets “<></>”. When using HTML markup codes, we input our “command” inside the angle brackets “<>”. Furthermore, we sandwich the words or object using two of these just like when we use asterisk(*) for BOLD and ITALIC. But we add a slash symbol “/” inside the second angle bracket “</>”. Apart from words, center can be used to align any other type of content like images, gifs, videos, etc. To apply it, simply paste or drag-and-drop your desired piece of content in the center command.
Header
We can finally format our articles properly! But wait! We forgot about headers! Headers are important since we will be using this for our titles, headers, and sub-headers. Without this, our readers will feel lost while reading. Plus, headers create a “Post Outline” in the left side of the website when using PeakD. Post Outline is like a quick navigation tool to go from one Header of the article to another.
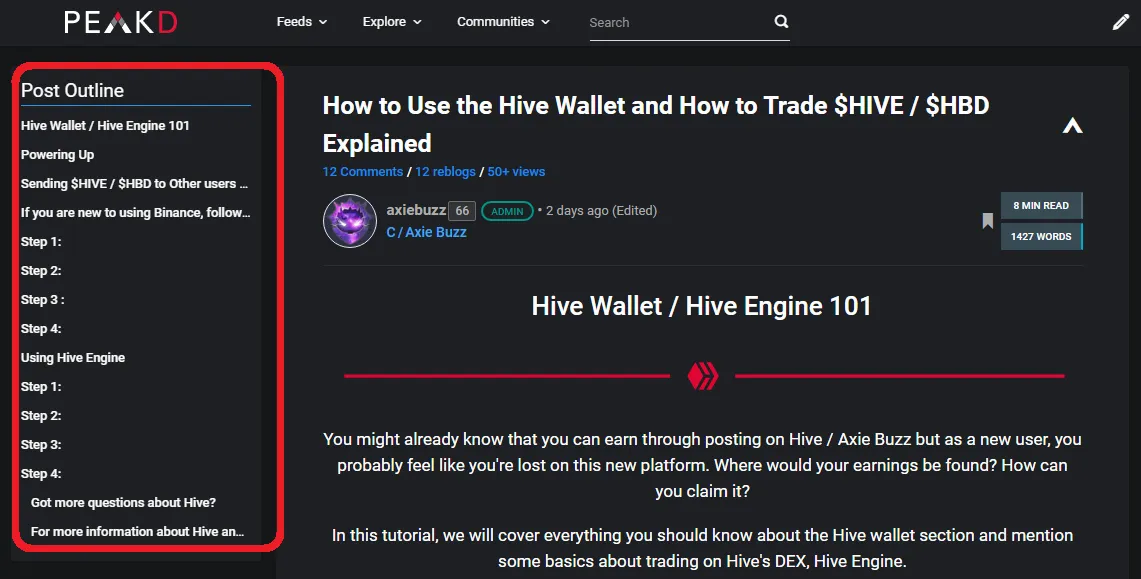 Post outline of the Hive Wallet Article
Now to use Headers we will be using this number symbol, “#”. Using one of these symbols will give us the biggest text while increasing it will make a smaller text. We can use up to six(6) number sign(#) . To use the header we type it like this:
# Header 1
## Header 2
### Header 3
#### Header 4
##### Header 5
###### Header 6
This will give us the following results:
Header 1
Header 2
Header 3
Header 4
Header 5
Header 6
With these tools, you can now make a cleaner, more reader-friendly, post! But wait there’s more.
INTERMEDIATE FORMATTING
Now we will go to more complicated formatting! It might seem hard a first but by saving it in a notepad to copy and paste using it repeatedly, we can learn it quite easily. For this section we will show you how to Pull-Left, Pull-Right, add Links, as well as Line Breaks.
PULL-LEFT & PULL-RIGHT
Now we go to Pull left and right. This can be used to create two columns of text, wrap text around an image or to get two images side by side. We can also create an image with an explanation on its side by using this. We will be using this image as an example:

source
The syntax is as follows:
<div class="pull-left">https://files.peakd.com/file/peakd-hive/grenfunkel/241QgGv4nC1xb3gbMzh6AQeWxqKgVkY9omEYQ3ruJ9S2DEqFjoNSmNkHjLQMyPmMDPxpb.jpg
<div class="pull-right">https://files.peakd.com/file/peakd-hive/grenfunkel/241QgGv4nC1xb3gbMzh6AQeWxqKgVkY9omEYQ3ruJ9S2DEqFjoNSmNkHjLQMyPmMDPxpb.jpg
Now it will look like this:
Links
Anyone can copy and paste links into their article. But it is also possible to make it look cleaner and simpler by creating a Hyperlink. A hyperlink is a highlighted word that when clicked, will bring you to another website. We will be using the link of Axie Buzz community as an example.
The syntax will look like this:
[Axie Buzz - PeakD](https://peakd.com/c/hive-143402/created)
This is how it will look like
It is possible to use the link button in PeakD as well. But using the square bracket "[]" as well as the parentheses "()" is quicker based on my experience.
Line Breaks
Line breaks help give the distance from one object or paragraph to another. It makes the article looks more “spacious” and less constricting. We can use either “br” or “nbsp” to make the line break or space. “nbsp” makes a smaller space compared to “br” so try which one suits you better.
The syntax is like this:
<br>
It will look like this:
Hello this will use BR.
Second sentence.
Or by using “nbsp”
Hello this will use nbsp.
Second sentence.
As you can see, "BR" creates a wider space than "nbsp". Try both when making an article to determine which one is a better fit for you.
STAND-OUT QUALITY POST
Now you know how to format your blog post into something clean, easy to read, and organized. It is now time to make it stand out! Make it your own! Make it unique! We will share a few tips on how to do that.
Thumbnail
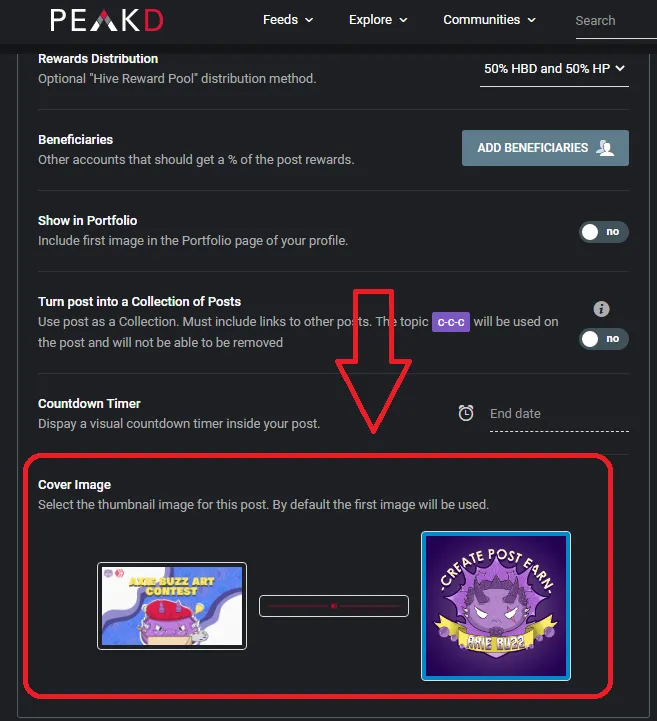
The thumbnail image is the first thing one will see in their post. This will attract more readers. The first image uploaded in the blog post is the default thumbnail that will be used for your post. The easiest way to use a thumbnail is to put the image in the top-most portion of your post. I will be using PeakD for this example. To pick an image as a thumbnail, we do the following steps:
While creating your post, go to the lower portion of the interface then click “Advanced”.
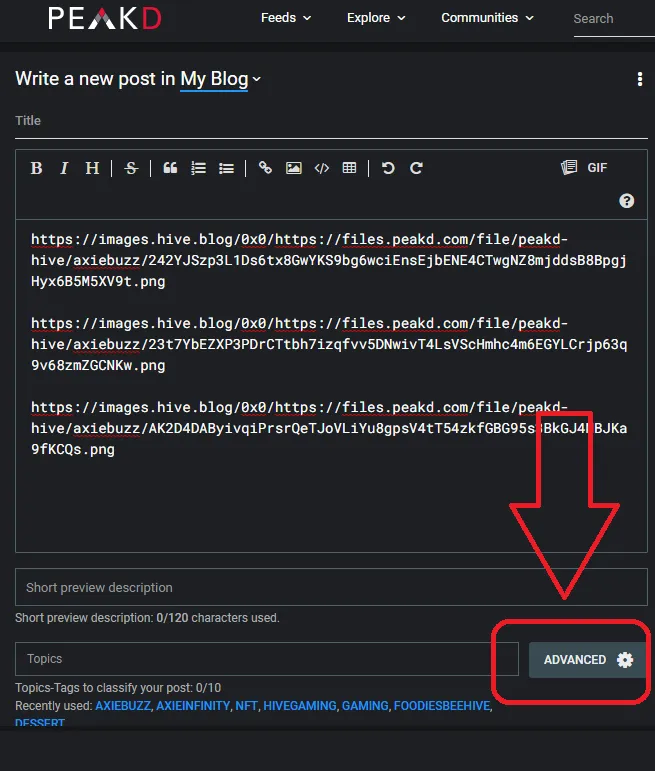
Scroll down the “Advanced” settings to the bottom-most area. Select from the images available. The images you can select are from the images you have uploaded as the content of your post.
Line Dividers
Line Dividers make articles more organized and beautiful. Some may be basic images while others might be animated as GIF. There are lots of Line Dividers that are free in the Hive blogs, just copy the link address then paste it while creating your post. Here is a link to one of the Line Dividers created by @thepeakstudio. Do send a tip if you are capable of doing so to support the creator. It is also possible to create your own if you are creative enough.
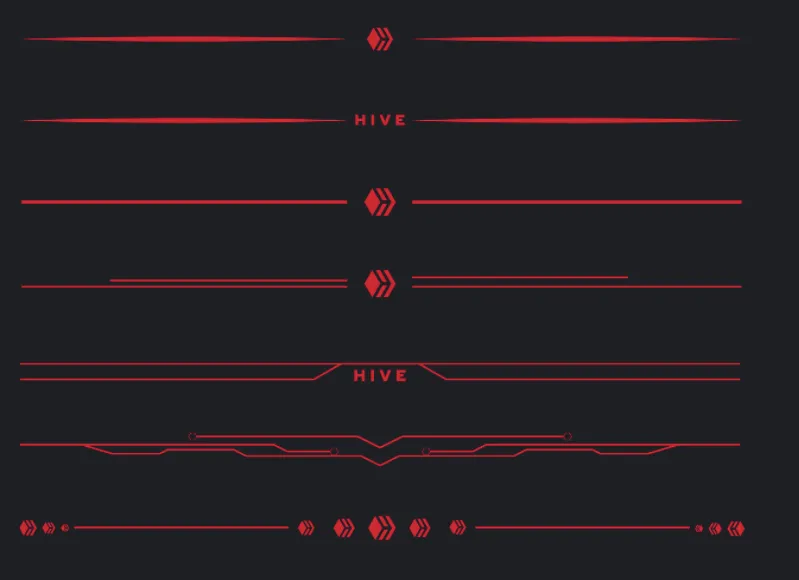
While you have been reading the article you might have seen two of the line dividers being used. One is the in-build line while the other is an image created by @thepeakstudio.
To use the in-built line divider, use this syntax
---
This will create a thin line like this:
To use an image line divider, just copy and paste the image wherever you need it in your article.
Animated Gifs and Banners
You might have uploaded an image but did you know that it is possible to upload an animated image?! That’s right you could even use it as your thumbnail! How cool is that! Be sure to create your own animated image or give credit to the author! Did you know that you could also use Canva to create animated gifs and banners? Now you do!

CONCLUSION
Now that you are armed with new tools and techniques in making your posts better, be sure to make some cool content to share and utilize these tips and tricks we shared with you! We created this guide for the purpose of helping new members be able to join us create and earn in the HIVE environment. Grow with us! Make original content! Buzz on!
