« I try not to make any decisions that I'm not excited about »

✦ What do you think of my new cover? 💕 This week I've been practicing making dynamic covers from my cell phone! ✦

Si eres Crafter/Artista/Creador de Contenido quisiera saber, ¿cuál es la fuente de inspiración para tus proyectos?, ¿qué experiencias influencian el tema de tus trabajos? ✧٩(•́⌄•́๑)و ✧
« En mi caso, el 80% de mis proyectos está profundamente conectado a recuerdos y gustos de mi infancia y adolescencia »
Aunque la apariencia no sea de completa similitud, este proyecto (especialmente su paleta de colores) está inspirado en una línea de juguetes que fue mi favorita cuando era niña:
✦ Preciosos Pin & Pon de los años 80´s! ✦
El diseño de este proyecto comenzó específicamente inspirado en uno de mis set favoritos de todo el catálogo de Pin & Pon, “el carrito de helados” 🍨
Mi idea original era hacer una réplica de 40 cm de alto, pero en el proceso de elaboración decidí hacer algo más contemporáneo.
If you are Crafter/Artist/Content Creator I would like to know, what is the source of inspiration for your projects, what experiences influence the subject matter of your works? ✧٩(•́⌄•́๑)و ✧
« In my case, 80% of my projects are deeply connected to memories and tastes from my childhood and adolescence »
Although the appearance may not be of complete similarity, this project (especially its color palette) is inspired by a toy line that was a favorite of mine as a child:
✦ Gorgeous 80's Pin & Pon! ✦
The design of this project began specifically inspired by one of my favorite sets in the entire Pin & Pon catalog, "the ice cream cart" 🍨
My original idea was to make a 40 cm tall replica, but in the process of making it I decided to do something more contemporary.
• 𝐂 𝐎 𝐌 𝐏 𝐋 𝐄 𝐓 𝐄 • 𝐓 𝐔 𝐓 𝐎 𝐑 𝐈 𝐀 𝐋 •
« 𝑴𝒊𝒏𝒊 𝑪𝒂𝒏𝒅𝒚 𝑩𝒂𝒓 𝒘𝒊𝒕𝒉 𝑺𝒆𝒄𝒓𝒆𝒕 𝑪𝒐𝒎𝒑𝒂𝒓𝒕𝒎𝒆𝒏𝒕 »

✦ Al final de esta publicación encontraras la lista completa de todos los materiales necesarios para elaborar este Mini Candy Bar, junto a las medidas finales / At the end of this tutorial you will find the complete list of all the materials needed to make this Mini Candy Bar, along with the final measurements ✦

Este es hoy un objeto popular en las tendencias de decoración para fiestas infantiles y cuartos para niñas (también para habitaciones con decoración “Pastel Cute”) (●>ω<●)
Su función es la de exhibir y ofrecer dulces bellamente acomodados en su interior, aunque también sirve para acomodar accesorios o artículos de maquillaje.
This is today a popular object in decorating trends for children's parties and girls' rooms (also for rooms with "Pastel Cute" decoration) (●>ω<●)
Its function is to display and offer sweets bellly accommodated inside, although it also serves to accommodate accessories or makeup items.
« STEP N° 1 »
• Cutting of all parts for main structure •


« STEP N° 2 »
• Main box and roof construction •
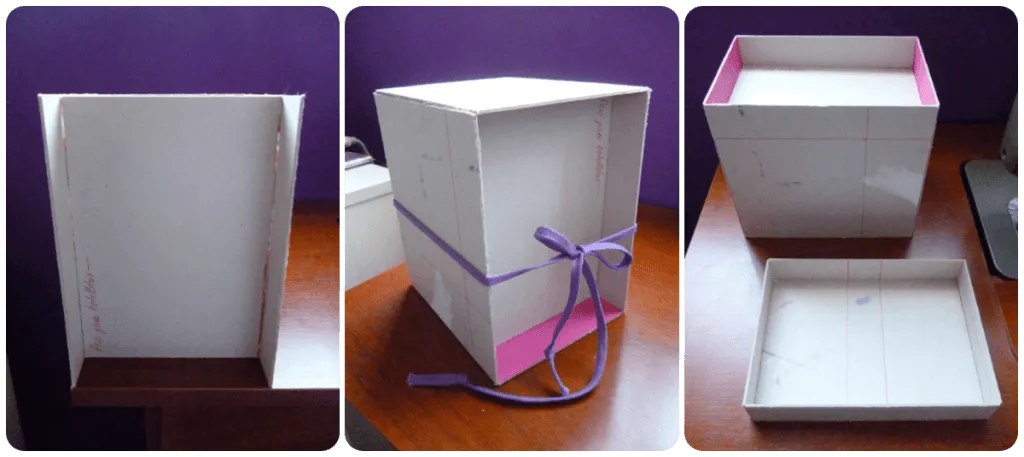
El primer paso es ensamblar la caja principal de nuestro Mini Candy Bar, aplicando una cantidad moderada de pegamento, sujetando fuertemente con un cordón (como indica la imagen) para que no se deforme mientras el pegamento se seca.
The first step is to assemble the main box of our Mini Candy Bar, applying a moderate amount of glue, holding tightly with a string (as indicated in the image) so that it does not deform while the glue dries.

✦ Yes, I like to sand small things in the sink. And when it comes to big pieces I get in the shower because it's easy to clean all the dirt off at the end. DON'T JUDGE ME ✦
Cuando ambas piezas estén totalmente fijas, vamos a lijar todas las esquinas para lograr un aspecto redondeado y suave.
When both pieces are completely fixed, we will sand all the corners to achieve a rounded and smooth appearance.

Para lograr un extra de resistencia, aplicaremos una capa de pegamento escolar o pegamento de madera, y dejaremos secar durante las siguientes 24 horas.
For extra strength, apply a coat of school glue or wood glue, and let dry for the next 24 hours.

Pasado ese tiempo, aplicaremos 2 capas más de pegamento con un pincel de paleta, y dejaremos secar otras 24 horas.
Este paso no solo hace más resistente la pieza si no que prepara mejor la superficie para captar la pintura.
After that time, we will apply 2 more coats of glue with a trowel brush, and let dry another 24 hours.
This step not only makes the piece more resistant but also prepares the surface better to receive the paint.
« STEP N° 3 »
• Construction of internal drawers and base •

| A) 1 pieza de polietileno de 17 x 12 cm. | A) 1 pieza de cartulina de 10 x 59 cm. |
| B) 1 pieza de polietileno de 11,5 x 6 cm. | B) 1 pieza de cartulina de 10 x 37 cm. |
| C) 1 pieza de polietileno de 11,5 x 10,5 cm. | C) 1 pieza de cartulina de 10 x 46 cm. |
| A) 1 piece of polyethylene 17 x 12 cm. | A) 1 piece of cardboard 10 x 59 cm. |
| B) 1 piece of polyethylene 11.5 x 6 cm. | B) 1 piece of cardboard 10 x 37 cm. |
| C) 1 piece of polyethylene 11.5 x 10.5 cm. | C) 1 piece of cardboard 10 x 46 cm. |

La pieza principal de la base (y compartimiento secreto) es bastante espaciosa, y su fondo de material grueso lo hará resistente para contener mucho peso.
The main part of the base (and secret compartment) is quite spacious, and its bottom of thick material will make it resistant to hold a lot of weight.

Las piezas de cartulina deben ser dobladas previamente para adaptarse a cada cara de sus correspondientes piezas base.
The cardboard pieces must be pre-folded to fit each side of their corresponding base pieces.
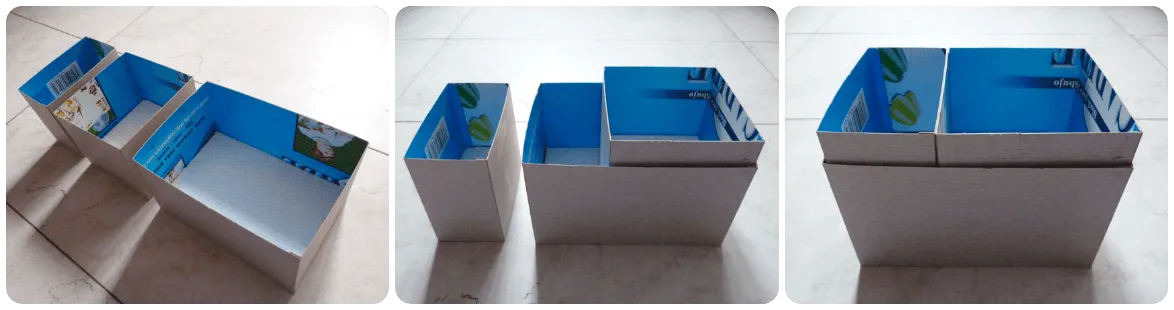
Una vez completamente pegadas y secas, podemos comprobar que encajan perfectamente entre sí (deberían entrar y salir de su lugar suavemente).
Once they are completely glued and dry, we can check that they fit perfectly together (they should go in and out of place smoothly).

Para lograr una terminación hermosa y limpia, necesitamos cortar 4 piezas de madera de balsa que sean acordes a los lados de la caja interior base.
To achieve a beautiful, clean finish, we need to cut 4 pieces of balsa wood to match the sides of the base inner box.
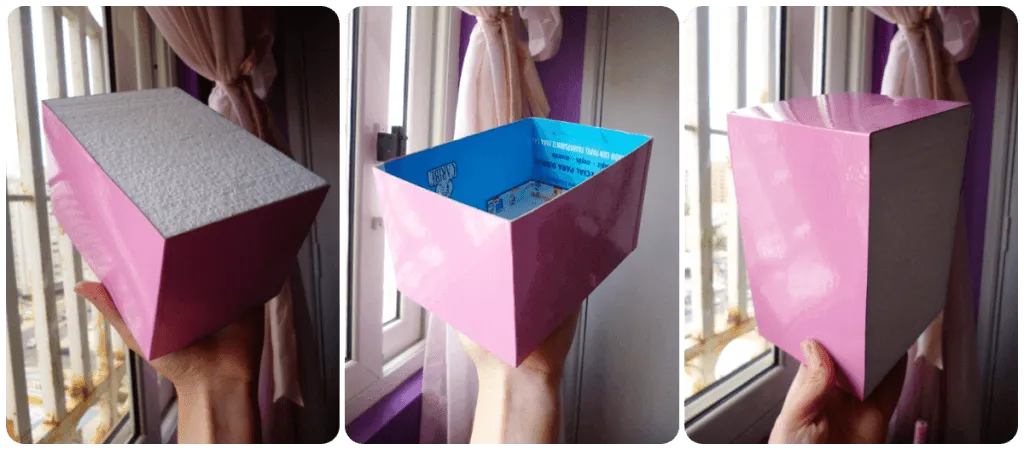
Antes de fijar con pegamento los bordes de madera, vamos a forrar con vinil todo el exterior de la caja interior base.
Before gluing the wooden edges, we will line the entire outside of the base inner box with vinyl.

Recomiendo utilizar silicón frío porque tiene mejor adherencia contra los materiales plásticos como el vinilo.
I recommend using cold silicone because it has better adhesion against plastic materials such as vinyl.

Finalmente, forraremos el interior y exterior de las cajas secundarias con papel de regalo estampado y pegamento escolar, y para el fondo de las 3 piezas, haremos pequeñas alfombras de fieltro.
Finally, we will line the inside and outside of the secondary boxes with patterned wrapping paper and school glue, and for the bottom of the 3 pieces, we will make small felt mats.
« STEP N° 4 »
• First test of all parts •

Antes de continuar, comprobaremos que todas las piezas coinciden: Base secreta, cajón principal, pilares y techo deben verse alineados y no tambalearse.
Before proceeding, check that all parts match: Secret base, main drawer, pillars and roof must be aligned and not wobble.

Hay que prestar especial atención a que los pilares estén bien alineador con las esquinas tanto de la parte inferior como del techo. Si observamos alguna irregularidad, este es el momento para corregir.
Special attention should be paid to ensure that the pillars are well aligned with the corners of both the bottom and the roof. If any irregularities are observed, this is the time to correct.
« STEP N° 5 »
• Pillar painting •

Estas son las piezas principales que me inspiraron para materializar este diseño:
✨ ¡Pequeños y hermosos tubos de cartón resistente perfumado! ✨
Puedes conseguirlos en el interior de los empaques de incienso, casi todos los traen y son de buena calidad, perfectos para manualidades.
These are the main pieces that inspired me to materialize this design:
✨ Small and beautiful scented sturdy cardboard tubes! ✨
You can get them inside incense packaging, almost all of them bring them and they are of good quality, perfect for crafts.

Estos pilares pueden dejarse en color sólido o decorarse a gusto. Yo escogí hacer un diseño en espiral con cinta de bies color oro; después, elaboré pequeñas rosas de fieltro rosa y blanco de 3 tamaños diferentes, y reservé para más adelante.
These pillars can be left solid colored or decorated as desired. I chose to do a swirl design with gold colored bias tape; then, I crafted small pink and white felt roses in 3 different sizes, and saved for later.
« STEP N° 6 »
• Painting of main drawer and ceiling •

Para el diseño a rayas del cajón principal y el techo, marqué líneas de 2 cm en todo su largo con lápiz suave, y resguarde cada sección con cinta para floristería.
For the striped design of the main drawer and roof, I marked 2 cm lines along their entire length with a soft pencil, and protected each section with florist's tape.

Para lograr este efecto nítido y ahorrar pintura, la mejor opción es pintar una base de color blanco en todas las piezas.
To achieve this crisp effect and save paint, the best option is to paint a white base color on all pieces.

Ambos fondos de techo y cajón principal deben tener un color claro o reflectante para conseguir un bonito efecto espejo y sensación de amplitud (en este caso, sería blanco o dorado).
Both ceiling and main drawer bottoms should have a light or reflective color to achieve a nice mirror effect and feeling of spaciousness (in this case, it would be white or gold).
« STEP N° 7 »
• Fixing of the pillars and edge trimming with pearls and gold bias binding •

Para pegar los pilares en su respectivo lugar, recomiendo utilizar silicón caliente o frío, y aplicarlo en las esquinas/paredes, no en la base de la pieza.
To glue the pillars in place, I recommend using hot or cold silicone, and apply it on the corners/walls, not on the base of the piece.
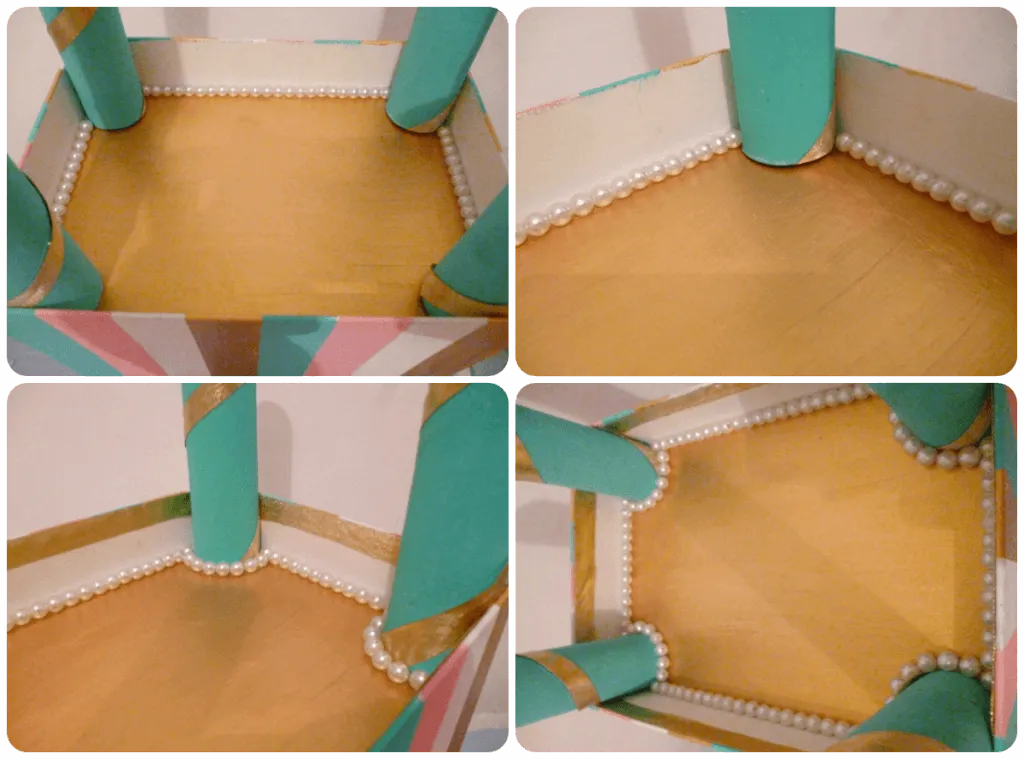
Para el borde interno superior necesitamos 2 piezas de 8 cm y 2 piezas de 13 cm de bies color oro.
Para el borde interno inferior necesitamos perlas plásticas de 0,5 cm, que pegaremos 1 a 1 alrededor de todo el borde y de la base de los pilares.
For the upper inner border we need 2 pieces of 8 cm and 2 pieces of 13 cm of gold bias binding.
For the lower inner border we need 0.5 cm plastic beads, which we will glue 1 by 1 around the entire border and the base of the pillars.

✨ ¡En esta etapa por fin podemos fijar el techo, y admirar la estructura completa! ✨
✨ At this stage we can finally fix the roof, and admire the whole structure! ✨
« STEP N° 8 »
• Last minute extra details (wooden pennants!) •

A último momento, recordé que tenía pestañas de madera sobrantes de un proyecto inconcluso (estas son las pestañas de madera que traen los lienzos para instalar en sus esquinas, la mayoría de las personas no los usa y los tira a la basura. ¡NO HAGAN ESO!) 😱 🙌
También conseguí estrellas de cartulina holográfica dorada, y pedacitos de cadena de metal pesado.
At the last minute, I remembered I had wooden tabs left over from an unfinished project (these are the wooden tabs that the canvases come with to install in their corners, most people don't use them and throw them away. DON'T DO THAT!) 😱 🙌
I also got gold holographic cardboard stars, and bits of heavy metal chain.

Estos preciosos banderines son el PLUS que necesitaba para hacer este proyecto especial. Sus medidas son 5,5 x 4 cm.
Para instalar las cadenitas, con ayuda de las pinzas separé los eslabones (6) y los cerré con fuerza en las esquinas de cada banderín.
These beautiful pennants are the PLUS I needed to make this special project. They measure 5.5 x 4 cm.
To install the chains, I used the pliers to separate the links (6) and closed them tightly at the corners of each pennant.

Para instalar los banderines en el techo del Mini Candy Bar, hice marcas con el lápiz coincidiendo con la distancia donde estaba enganchada la cadenilla a los banderines, NO usen la medida del ancho de los banderines porque quedara demasiado abierto.
To install the pennants on the ceiling of the Mini Candy Bar, I made marks with the pencil coinciding with the distance where the chain was hooked to the pennants, DO NOT use the measurement of the width of the pennants because it will be too open.

En esta etapa del proceso algunos podrían decir que está listo. Todo depende de los gustos personales y la cantidad de materiales que estemos dispuestos a invertir…
… PERO COMO YO SOY YO, NO IBA A DEJAR LA COSA TAN SENCILLA (ง ˙o˙)ว [risa maquiavélica]
At this stage of the process some might say it is ready. It all depends on personal tastes and the amount of materials we are willing to invest....
... BUT AS I AM ME, I WAS NOT GOING TO LEAVE IT SO SIMPLE (ง ˙o˙)ว [evil laught in Spanish]
« STEP N° 9 »
• Extra details for an extra precious look (Felt roses and pearls) •

Para los toques finales, pegue las rosas de fieltro en cada pilar utilizando secuencias diferentes e irregulares (primero las grandes, luego las medianas, y por último las pequeñas).
Para lograr un patrón visual armonioso es necesario dejar espacios vacíos y NO pegar las rosas ni las perlas directamente sobre la línea de la cinta color oro.
For the finishing touches, glue the felt roses to each pillar using different and irregular sequences (first the large ones, then the medium ones, and finally the small ones).
To achieve a harmonious visual pattern it is necessary to leave gaps and NOT glue the roses and pearls directly on the gold ribbon line.

Para un toque extra precioso, pegue perlas (de 3 tamaños distintos) en las uniones y espacios donde coincidían los grupos de rosas, cuidando especialmente que se vieran bien desde todos los ángulos.
For an extra precious touch, I glued pearls (of 3 different sizes) at the joints and spaces where the groups of roses coincided, taking special care to make sure they looked good from all angles.
« 𝐅 𝐈 𝐍 𝐀 𝐋 • 𝐑 𝐄 𝐒 𝐔 𝐋 𝐓 »


𝑻𝒐 𝒎𝒂𝒌𝒆 𝒕𝒉𝒊𝒔 𝒃𝒆𝒂𝒖𝒕𝒊𝒇𝒖𝒍 𝑪𝒂𝒏𝒅𝒚 𝑩𝒂𝒓, 𝒚𝒐𝒖 𝒘𝒊𝒍𝒍 𝒏𝒆𝒆𝒅:


✦ ¡Busca lápiz y papel! Anota todo lo que necesitas para hacer este hermoso Mini Candy Bar ✦

| • Pintura acrílica (colores surtidos) - Acrylic paint (assorted colors). | • Perlas de tamaños diferentes - Pearls of different sizes. |
| • Pega escolar - School glue. | • Papel periódico - Newspaper. |
| • Pega para madera - Wood glue. | • Cutter de distintos tamaños - Cutter of different sizes. |
| • Barras de silicón caliente - Hot silicone bars. | • Pinceles de distintos tamaños - Brushes of different sizes. |
| • Pistola de silicón - Silicone gun. | • Troquel para rosas de fieltro - Cutter for felt roses. |
| • Cinta para floristería - Florist tape. | • Bies de color oro - Gold-colored bias. |
| • Vinil auto-adhesivo - Self-adhesive vinyl. | • Cartón gris - Gray cardboard. |
| • Varas de madera de balsa - Balsa wood rods. | • Cartulina escolar - School cardboard. |
| • Papel de lija (números surtidos) - Sandpaper (assorted numbers). | • Lápiz y borrador - Pencil and eraser. |
| • Papel de regalo estampado - Gift wrapping paper. | • Regla y tijeras - Ruler and scissors. |
| • Fieltro - Felt. | • Cadena fina de metal - Thin metal chain. |
| • Estrellas de cartulina - Cardboard stars. | • Lámina de polietileno - Polyethylene sheet. |
| • Cuerda o cordón - Rope or cord. |
👉 [insert sound of successful Metal Gear Solid mission here] 👈

✦Así crafteamos las Bichotas >;3c ✦
Es hermoso, resistente, ¡Y TIENE COMPARTIMIENTO SECRETO! 👀 💕
En persona nadie me cree cuando les digo que está hecho de cartón reciclado, dicen que parece de madera.
Todo este proceso fue apasionante porque si, aunque este Mini Candy Bar NO se parece a al ´Carrito de Helados de Pin & Pon´, está inspirado en el, y mi niña interior se siente tan feliz y satisfecha 🥰
« Definitivamente, cuando trabajas con auténtica ilusión, es inevitable que las cosas brillen por sí mismas »
Finalmente, algo que re-descubrí con este proyecto es que (todavía) tengo el deseo de enseñar a otras personas a hacer cosas difíciles, de la manera mas fácil y gentil que pueda, con los mejores resultados.
Quiero esforzarme en producir contenido que sea fácil de entender para todos, sin importar su edad o nivel de habilidades. Voy a trabajar duro por eso (๑•́ω•̀๑)
¿Tienes alguna recomendación para mi?, ¿cuál fue tu parte favorita? Me encantaría leer opiniones en los comentarios 😘 👇
It's beautiful, sturdy, AND IT HAS SECRET COMPARTMENT! 👀 💕
In person no one believes me when I tell them it's made of recycled cardboard, they say it looks like wood.
This whole process was exciting because yes, even though this Mini Candy Bar does NOT look like the 'Pin & Pon Ice Cream Cart', it is inspired by it, and my inner girl feels so happy and satisfied 🥰
« Definitely, when you work with genuine illusion, it is inevitable that things shine on their own »
Finally, something I re-discovered with this project is that I (still) have a desire to teach other people to do difficult things, in the easiest and gentlest way I can, with the best results.
I want to strive to produce content that is easy to understand for everyone, regardless of age or skill level. I'm going to work hard for that (๑•́ω•̀๑)
Do you have any recommendations for me, what was your favorite part? I'd love to read feedback in the comments 😘 👇
¡Muchas gracias por leer!
🚨 ¡Por favor no tomes, edites ni re-publiques mi material sin mi permiso! 🚨
📷 Herramientas: Postimages/TinyPNG/Lumix Panasonic DMC-FH2/Smartphone 📷
💌 ¿Deseas ponerte en contacto conmigo? Tesmoforia@Outlook.com 💌
✨ Translation done with Deepl - Separadores: @Vanuzza ✨