
[ENG]
Hello, welcome to my publication.
Today I am going to present you a nice bonsai made in clay, where I will give you a brief tutorial on how to make it.
In this tutorial I will be mentioning each of the techniques and tools to achieve this craft.
I am participating in a community initiative called HiveDiy where the challenge is to create figures of some moldable material, in my case I used clay to participate in this contest, I invite you to participate.

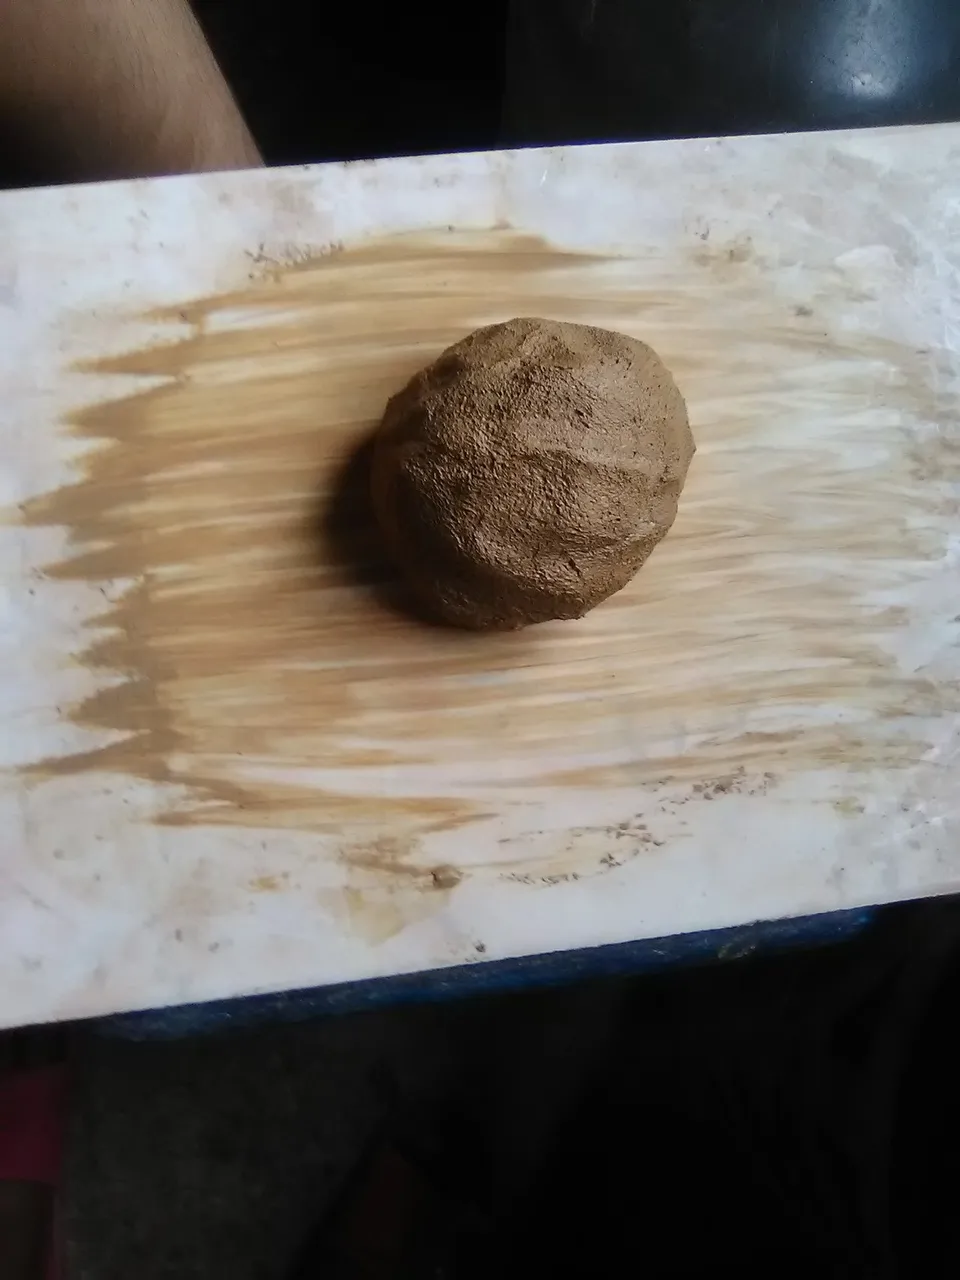

Photo taken with my Alcatel 5044R phone model.
Materials:
-Clay
-Water
-Brochet stick
-Exacto
-Brushes
-Acrylic paints:
-Brown
-Green
-Yellow
-Grey
-White
-Apple green
-Pink
To start making this bonsai you need 250 grams of clay, you must knead the clay very well to start molding your figure, for this you need to wet your hands a little with water, remember, if you add too much water to the clay you can lose the proper contexture.


Photo taken with my Alcatel 5044R phone model.
Once you have the clay well kneaded, you are going to make a kind of tower, then you start with the roots, to later give it anchor at the base of the bonsai, this base must be ready which is very easy to do, because it is like making a ball and then you are going to flatten it a little.


Photo taken with my Alcatel 5044R phone model.
Already with the bonsai on the base, you proceed to bend down the trunk of the bonsai, then with the brochet stick you make some holes and place the branches.

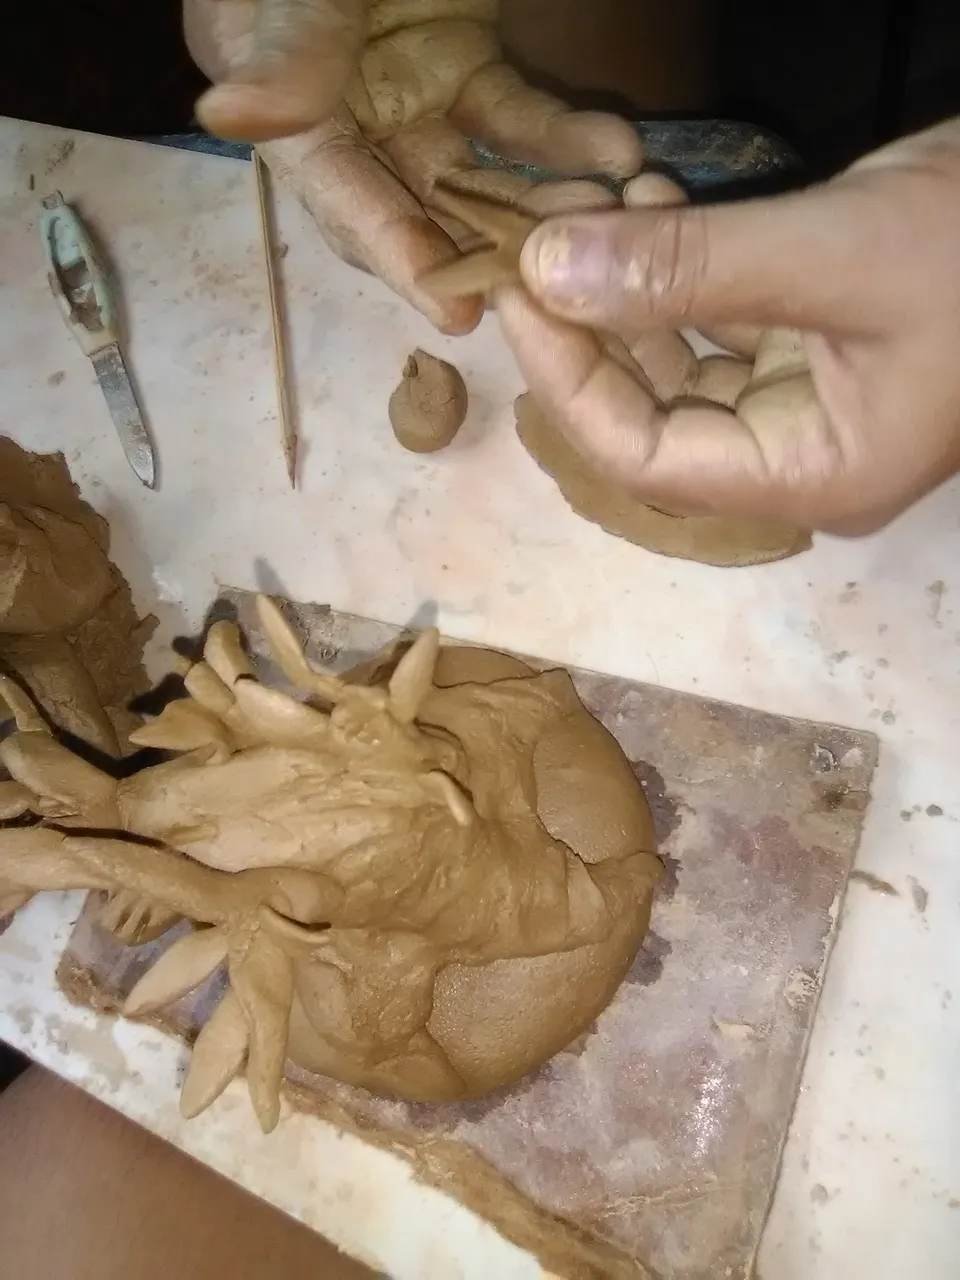
Photo taken with my Alcatel 5044R phone model.
Now you are going to make the leaves, they are very simple to make and you can make them to your creativity, in my case I used simple leaves, just place a piece of clay on your table, flatten it and draw the leaves with the skewer stick, then separate the leaf and give it a little shape with your fingers moistened to later glue them to the branches of the tree.

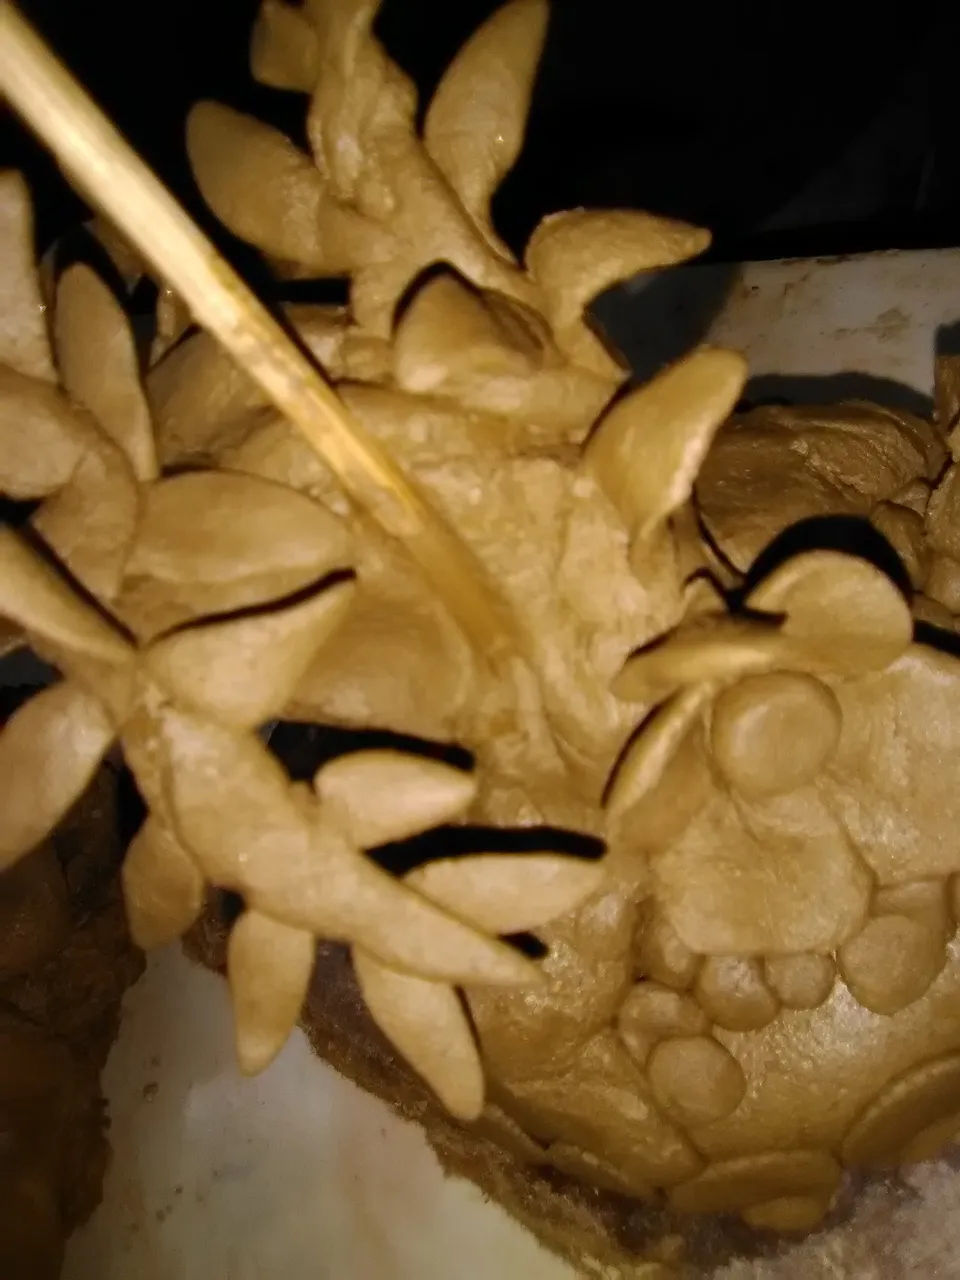
Photo taken with my Alcatel 5044R phone model.
To make the flower you are going to make a ball as you did with the base for the bonsai, only much smaller, once you have the circumference for the flower, you are going to separate the petals with the help of the skewer stick, mark them and cut them to open them and give the rounded shape to the petals, with your fingers moistened with water, so you get the flower, you are going to place a ball of clay in the center of the flower to simulate the pollen.
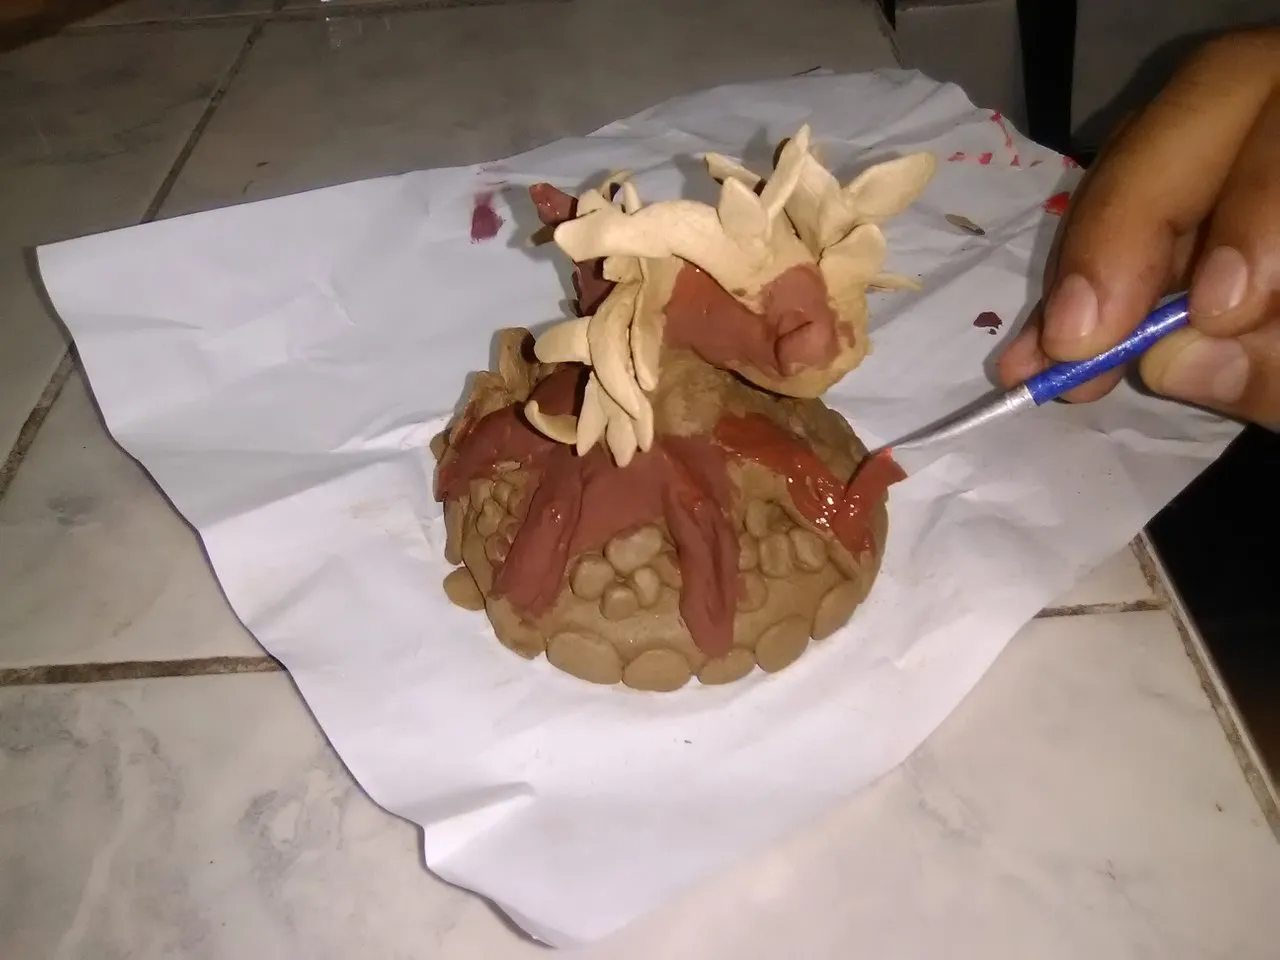
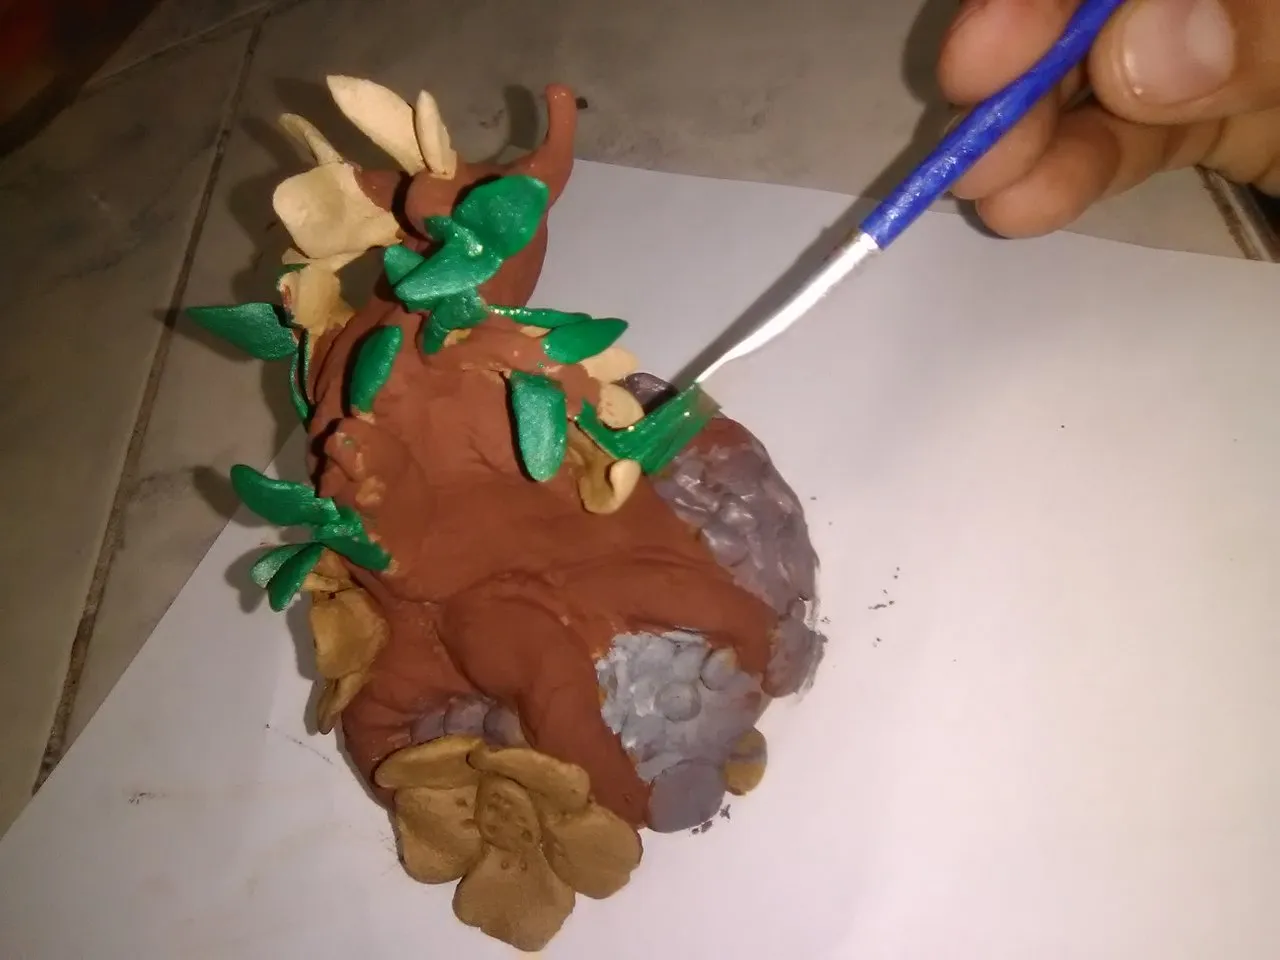
Photo taken with my Alcatel 5044R phone model.
Now you are going to give color to this bonsai starting from the part of the roots going up to the trunk, once you have all the bark painted brown, you are going to proceed to paint the base where the bonsai is anchored, there you can see some stones, they are small circles of clay glued to the base and painted with gray paint.
In case you do not have the gray color you can make a mixture of paints, you add a drop of blue color and a drop of orange color to get the gray color, after painting the stones, with the help of a brush and a little white color paint, you start to blur the stones, so you get that color similar to the stones, already finished the base and the body of the tree you are going to paint the leaves with mint green paint, you blur the leaves with apple green paint to give a little light to the bonsai.

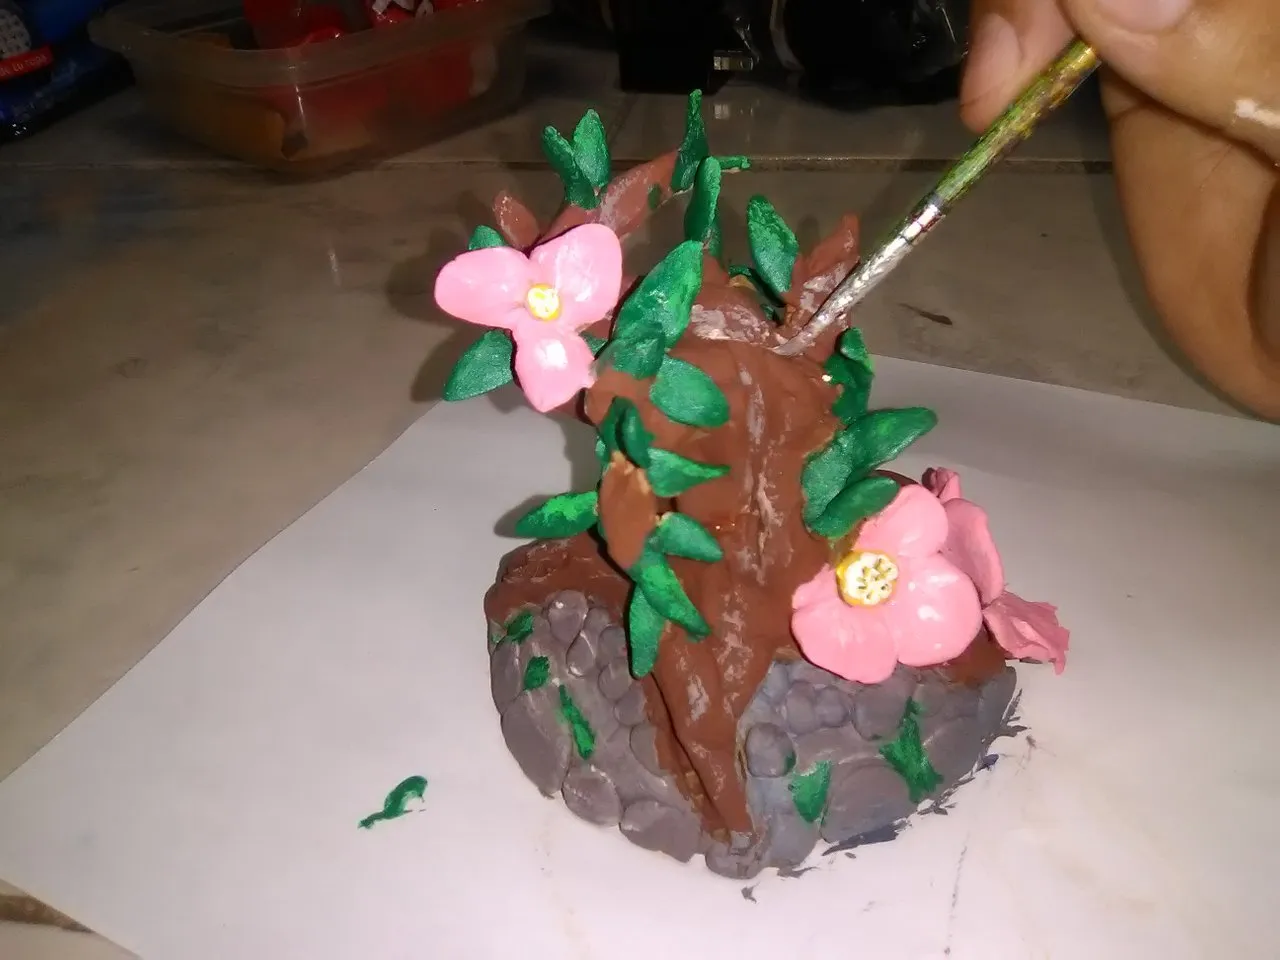
Photo taken with my Alcatel 5044R phone model.
This step shows you the flowers painted in pink color, so it only remains to paint the center, as you can see in the top left photo of this text, the center of the flower was painted in yellow color and are 3 pretty flowers, you can blur them with the brush and a little white color, you are also going to place some white sparkles to the bark as you can notice in the right photo of this text, this is to give a touch of light to this beautiful bonsai tree, and so we finish this nice craft.

Photo taken with my Alcatel 5044R phone model.
Done! We have already completed our beautiful bonsai I hope you like it, it is something new for me because it is the first time I make a bonsai, I am pleased with the result, it has always caught my attention and I wanted to challenge myself with this particular tree.
My social networks.
![]()
![]()
[ESP]
¡Hola! Bienvenidos a mi publicación.
Hoy les voy a presentar un lindo bonsái elaborado en arcilla, en donde les daré un breve tutorial de como elaborarlo.
En este tutorial estaré mencionando cada una de las técnicas y herramientas para lograr esta manualidad.
Estoy participando en una iniciativa de una comunidad llamada HiveDiy en donde el reto consiste en crear figuras de algún material moldeable, en mi caso yo utilice arcilla para participar en este concurso, te invito a participar.
Foto tomada con mi modelo de teléfono Alcatel 5044R.
Materiales:
-Arcilla
-Agua
-Palo de brochet
-Exacto
-pinceles
-Pinturas acrílicas:
-Marrón
-Verde
-Amarillo
-Gris
-Blanco
-Verde manzana
-Rosado
Para iniciar a realizar este bonsái necesitas 250 gramos de arcilla, debes amasar muy bien la arcilla para iniciar a moldear tu figura, para esto necesitas mojarte un poco las manos con agua, recuerda, si agregas mucha agua a la arcilla puedes perder la contextura adecuada.
Foto tomada con mi modelo de teléfono Alcatel 5044R.
Una vez tengas la arcilla bien amasada, vas a hacer una especie de torre, luego inicias con las raíces, para posterior darle anclaje en la base del bonsái, esta base se debe tener lista lo que es muy fácil de hacer, pues es como hacer una pelota y luego la vas a aplanar un poco.
Foto tomada con mi modelo de teléfono Alcatel 5044R.
Ya con el bonsái en la base, se procede a doblar hacia abajo el tronco del mismo, después con el palo de brochet haces unos orificios y coloca las ramas.
Foto tomada con mi modelo de teléfono Alcatel 5044R
Ahora vas a hacer las hojas, son muy simples de hacer y puedes hacerlas a tu creatividad, en mi caso yo usé hojas sencillas, solo colocas un trozo de arcilla en tu mesa, la aplanas y dibujas las hojas con el palo de brochet, luego separa la hoja y le das un poco de forma con los dedos humedecidos para posterior pegarlos a las ramas del árbol.
Foto tomada con mi modelo de teléfono Alcatel 5044R
Para hacer la flor vas a hacer una pelota como hiciste con la base para el bonsái, solo que mucho más pequeña, una vez tengas la circunferencia para la flor, vas a separar los pétalos con la ayuda del palo de brochet, los marcas y los cortas para abrirlos y darle la forma redondeada a los pétalos, con los dedos humedecidos con agua, así logras la flor, le vas a colocar una pelota de arcilla en el centro de la flor para simular el polen.
Foto tomada con mi modelo de teléfono Alcatel 5044R
Ahora le vas a dar color a este bonsái iniciando por la parte de las raíces subiendo hasta el tronco, una vez que tengas toda la corteza pintada de marrón, vas a proceder a pintar la base donde está anclado el bonsái, allí puedes ver unas piedras, son unos círculos pequeños de arcilla pegados a la base y pintados con pintura gris.
En caso de que no tengas el color gris puedes hacer una mezcla de pinturas, agregas una gota de color azul y una gota de color naranja para conseguir el color gris, luego de pintar las piedras, con la ayuda de un pincel y un poco de pintura color blanco,comienzas a difuminar las piedras, así consigues ese color semejante a las piedras, ya terminada la base y el cuerpo del árbol vas a pintar las hojas con pintura verde menta, difuminas las hojas con pintura verde manzana para darle un poco de luz al bonsái.
Foto tomada con mi modelo de teléfono Alcatel 5044R
Este paso te muestra las flores pintadas de color rosado, así que solo falta pintar el centro, como puedes observar en la foto izquierda superior de este texto, el centro de la flor fue pintada de color amarillo y son 3 lindas flores, puedes difuminarlas con el pincel y un poco de color blanco, también le vas a colocar unos destellos blancos a la corteza como lo puedes notar en la foto derecha de este texto, esto es para darle un toque de luz a este hermoso árbol de bonsái, y así finalizamos esta linda manualidad.
Foto tomada con mi modelo de teléfono Alcatel 5044R
Listo! Ya hemos culminado nuestro hermoso bonsái espero les sea de su agrado, es algo nuevo para mí porqué es la primera vez que hago un bonsái, me siento complacida con el resultado, siempre me ha llamado la atención y quise hacerme un reto con este particular árbol.
Mis redes sociales.
![]()
![]()
Traductor Deepl
Translated Deepl
Ediciones Canva
Editions Canva
Separador de textos Freepik
Text separator Freepik
