*****English version*****
(Abajo está la versión en español)
For some time I had considered making a series of basic tutorials for those who want to get started in the world of modeling in plasticine and other materials. With the publication of this post I start this series of tutorials that I will call "Learn with Gabo". I will start from what I consider the most basic to something a little more complicated. The difficulty of each tutorial will be staggered, so that everyone who follows it can make the figurines that we will do here.
If you would like to see some of the figures I have published in HIVE, you can see them by following these links:
-Astronaut:
@gaboamc2393/por-que-me-gusta-discovery-it-mi-escultura-because-i-like-discovery-it-my-sculpture
-Thanos:
@gaboamc2393/thanos-sculpture-sculpture3-escultura-de-thanos-escultura-3
-Old man reading:
@gaboamc2393/sculpture-2-oldman-reading-escultura-senor-leyendo
-Travel companion:
@gaboamc2393/sculpture-4-travel-companion-escultura-4-companero-de-viaje
Although the tutorials are mainly oriented to plasticine modeling, it is also useful for cold ceramic, flexible dough or epoxy plasticine modeling, since they are similar materials. Having said all this, let's start.

The materials we will need for this tutorial are as follows:
- Purple, green, white, white, black and red platiline.
- Scissors or blade.
- The hands.
What we will do in this tutorial will be an eggplant. Why an eggplant? Because I'm looking to show the basic shapes that you need to learn how to make for modeling. Fruits and their basic shapes are perfect for this purpose, so let's go with the first step.
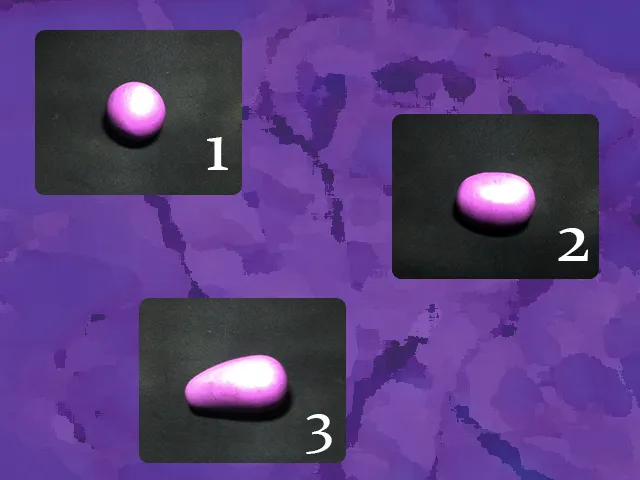
1.- We make a sphere with the purple plasticine.
2.- We roll it on a flat surface until the sphere is a little bit longer.
3.- What we want is to create a conical shape without damaging the round shape of the ends of the plasticine, so we must roll the plasticine on a flat base by pressing on one end to achieve the desired "conical" shape. I said conical shape, but for better understanding, we are looking for the shape of an elongated pear.
4.- Believe it or not, many of the shapes that are made for the figures are born from a sphere. In this case it is no exception. Once we have the desired pear shape, we make a small green sphere.
5.- After we have our green sphere, we flatten it until we make a kind of plasticine tortilla.

6.- 6.- Among the materials we would need, I mentioned scissors or blades. This is at each person's discretion, depending on whether he or she is more comfortable with scissors or blades. I use both, but for this case it seemed more practical to use scissors to cut the green plasticine tortilla to give it a star shape.
7.- Once we have made our star, we place it on the thinner end of our purple plasticine, which in this case would be the top of the eggplant.
8.- Next, fold down the corners of the green plasticine star, as if it were the hat of the figurine.

9.- Again we make another sphere of green plasticine a little smaller than the previous one.
10.- We roll it on a flat surface to give it a tubular shape.

11.- We roll our green plasticine cylinder making a little pressure on one of the ends to make it thinner than the other end.
12.- The next thing would be to place it in the center of the green plasticine star.
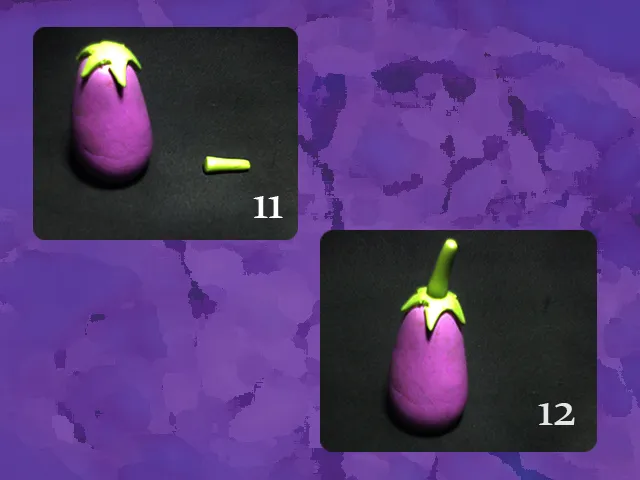
The eggplant is practically ready, but to give it a nicer touch, let's make a face.
13.- Again we make two spheres, this time of white plasticine and much smaller in size than the previous spheres.
14.- Flatten the two spheres to make two white tortillas that will be the eyes.

15.- We will use the black plasticine only to make two tiny spheres that will be the pupils of the figure. Then we will make another red sphere.
16.- We flatten the red sphere to make another tortilla, which will serve to make the mouth of our eggplant.

17.- With the scissors we cut our red plasticine tortilla in half, so the mouth of the figurine will be ready.
18.- It only remains to glue it in the desired place and everything will be ready.

This is how our eggplant turned out.
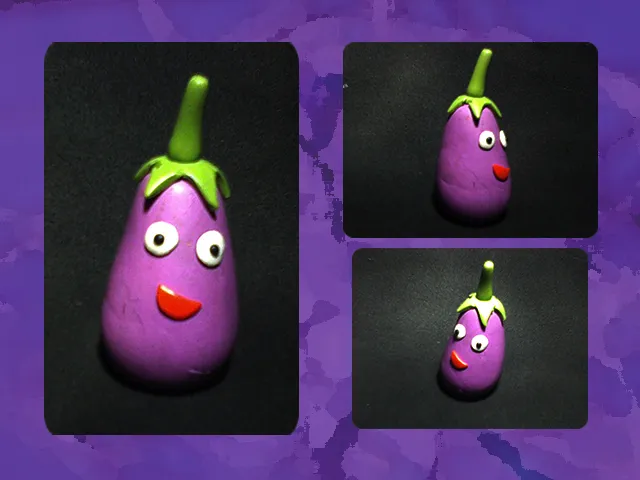
As evidenced throughout the tutorial, all the shapes I made for the figure originated from a sphere. Normally in modeling everything comes from a basic shape and then becomes a much more complicated shape, this is something you must understand, it is something basic.
I share with you a comparative image of a figurine of an eggplant-colored guy and a figurine of an eggplant, literally:

With practice and perseverance you can develop the necessary skills to make figures like this Thanos, but just as I started, you have to start with something simpler like this adorable eggplant.
Well friends, I hope you liked the publication and that you find it useful. I would love you to follow the tutorial and show the result in the comments, so I can make suggestions if necessary or congratulate you for your good work. Without further ado, let's get to work. I'll say goodbye then...
See you next time!
*****Versión en español*****
Desde hace un tiempo me había planteado el hacer una serie de tutoriales básicos para aquellos que quieran iniciarse en el mundo del modelado en plastilina y otros materiales. Con la publicación de este post doy comienzo a esta serie de tutoriales que llamaré "Learn with Gabo" o aprende con Gabo. Comenzaré desde lo que considero lo más básico hasta algo un poco más complicado. La dificultad de cada tutorial será escalonada, de manera que todos los que lo sigan puedan hacer las figuritas que aquí haremos.
Si gustas ver algunas de las figuras que he publicado en HIVE, puedes verla siguiendo estos enlaces:
-Astronauta:
@gaboamc2393/por-que-me-gusta-discovery-it-mi-escultura-because-i-like-discovery-it-my-sculpture
-Thanos:
@gaboamc2393/thanos-sculpture-sculpture3-escultura-de-thanos-escultura-3
-Anciano leyendo:
@gaboamc2393/sculpture-2-oldman-reading-escultura-senor-leyendo
-Compañero de viaje:
@gaboamc2393/sculpture-4-travel-companion-escultura-4-companero-de-viaje
Aunque los tutoriales estan orientados más que todo al modelado en plastilina, también es útil para el modelado de cerámica fría, el de masa flexible o el de plastilina epóxica, ya que son materiales similares. Dicho todo esto, comencemos.
Los materiales que necesitaremos para este tutorial son los siguientes:
- Platilina morada, verde, blanca, negra y roja.
- Tijeras u hojilla.
- Las manos.
Lo que haremos en este tutorial será una berenjena. ¿Por qué una berenjena? Porque busco mostrar las figuras básicas que se deben aprender a hacer para el modelado. Las frutas y sus formas básicas son perfectas para este propósito, así que vamos con el primer paso.
1.- Hacemos una esfera con la plastilina morada.
2.- La hacemos rodar sobre una superficie plana hasta alargar un poco la esfera.
3.- Lo que buscamos es crear una forma cónica sin dañar la forma redonda de los extremos de la plastilina, así que debemos hacer rodar la platilina sobre una base plana haciendo presión en un extremo para lograr la forma "cónica" deseada. Dije forma cónica, pero para que se entienda mejor, buscamos la forma de una pera alargada.
4.- Aunque no lo crean, muchas de las formas que se hacen para las figuras nacen a partir de una esfera. En este caso no es la excepción. Ya que tenemos la forma de pera deseada, hacemos una esfera pequeña de color verde.
5.- Después de tener nuestra esfera verde, la aplastamos hasta hacer una suerte de tortilla de plastilina.
6.- Entre los materiales que necesitaríamos mencioné las tijeras o las hojillas. Esto queda a criterio de cada persona, dependiendo de si se desenvuelve mejor con tijera o con hojilla. Yo uso ambas, pero para este caso me pareció mas práctico usar tijeras para cortar la tortilla verde de plastilina para darle forma de estrella.
7.- Una vez hecha nuestra estrella, la colocamos en el extremo más delgado de nuestra plastilina morada, que en este caso sería la parte superior de la berenjena.
8.- Lo siguiente sería doblar hacia abajo las esquinas de la estrella verde de plastilina, como si fuese el sombrero de la figurita.
9.- Nuevamente hacemos otra esfera de plastilina verde un poco más pequeña que la anterior.
10.- La hacemos rodar sobre una superficie plana hasta darle forma tubular.
11.- Hacemos rodar nuestro cilindro de plastilina verde haciendo un poco de presión sobre uno de los extremos para hacerlo más fino que el otro extremo.
12.- Lo siguiente sería colocarlo en el centro de la estrella de plastilina verde.
Prácticamente la berenjena está lista, pero para darle un toque más agradable, vamos a hacerle cara.
13.- Otra vez hacemos dos esferas, esta vez de plastilina blanca y de tamaño mucho más pequeño que las esferas anteriores.
14.- Aplastamos las dos esferas hasta hacer dos tortillas blancas que serán los ojos.
15.- La plastilina negra la usaremos solamente para hacer dos esferas pequeñitas que serán las pupilas de la figura. Luego haremos otra esfera de color rojo.
16.- Aplastamos la esfera roja para hacer otra tortilla, que servirá para hacer la boca de nuestra berenjena,
17.- Con las tijeras cortamos a la mitad nuestra tortilla de plastilina roja, así estará lista la boca de la figurita.
18.- Solo resta pegarla en el lugar deseado y todo estará listo.
De esta manera quedó nuestra berenjena.
Como se evidencia a lo largo del tutorial, todas las formas que hice para la figura se originaron de una esfera. Normalmente en el modelado todo surge de una forma básica para luego convertirse en una forma mucho más complicada, esto es algo que deben entender, es algo básico.
Comparto con ustedes una imagen comparativa de una figurita de un tipo de color berenjena y una figurita de una berenjena, literalmente:
Con practica y constancia podrán desarrollar las habilidades necesarias para hacer figuras como la de este Thanos, pero tal como comencé yo, hay que iniciar por algo más simple como esta adorable berenjena.
Bien amigos, espero que la publicación les haya gustado y que les sea de utilidad. Me encantaría que siguieran el tutorial y mostraran el resultado en los comentarios, así podré hacer sugerencias de ser necesario o felicitarlos por su buen trabajo. Sin más que agregar, manos a la obra. Me despido entonces...
¡Hasta la próxima!

Imagenes editadas con Photoshop
Fotos tomadas con tablet HP stream 7
Traducido con DeepL
Photos edited with Photoshop
Photos taken with HP stream 7 tablet
Translated with DeepL
Últimos tres post/Last three posts:
My black cat Shuri
Cleanup and recycling weekend
Electronic World: My participation in-the contest - Mechagodzilla