*****English Version*****
(Abajo está la versión en español)
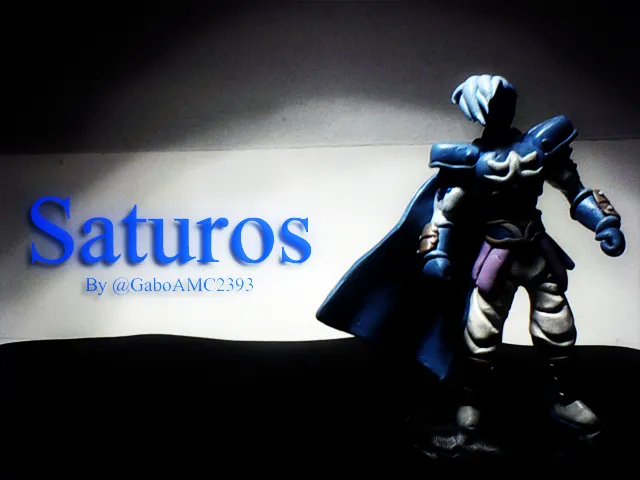
Some time ago I received a suggestion from a fellow community member to make Saturos, a character from the Golden Sun videogame. I did some research on the internet to see who the character was, since I didn't know him and I had no idea who he was, so when I saw the design and the great amount of details he had, I thought it was a good idea to do it and see how it looked like.
I confess that it was a one-day project and I had to damage the figure a couple of times because I didn't like the way it looked. The result I show you was the one I liked the most of the four I made, so I hope you like it and enjoy watching the step by step as much as I enjoyed making the figure. In advance, a greeting to the friend who made this suggestion, he knows who he is so I leave this post as a surprise for him to see that I did use the character he suggested. Best regards, enjoy the publication!
First I will show you the materials I used:
*Colored plastylines.
*Knitting needle.
*Sewing needle.
*Scissors
*Wire for the skeleton of the figure.
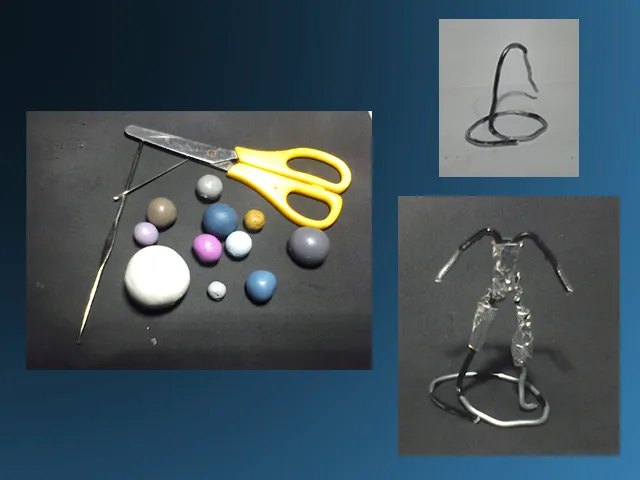
As you can see in the image above, there are several colored plasticine that are not normally found in the original packaging, this is because I had the task of mixing different plasticine to obtain the desired colors. The figure had several types of blues, so blue, white, gray, black and purple were the basic colors I used to get the other colors.
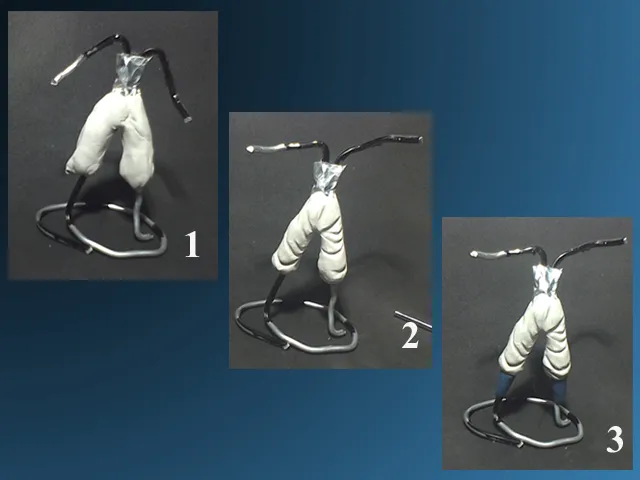
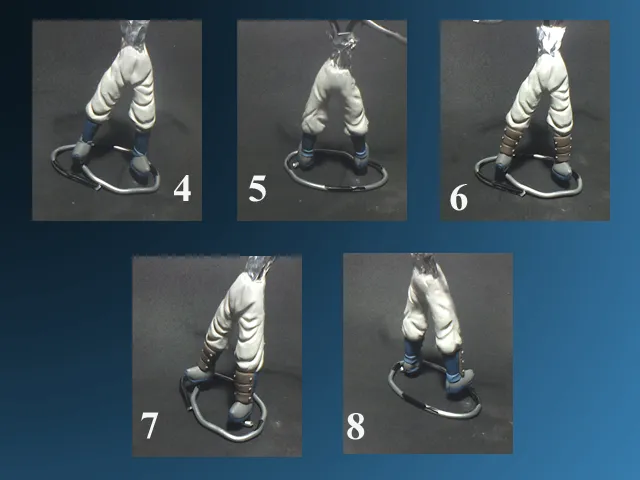
As I always say, better to start with the base, so after assembling the skeleton, I started working on the legs (1). With the help of the knitting needle I started to mold the wrinkles of the clothes until I got the desired result (2); then I used a little blue for the lower part of the legs (3).
Continuing with the lower part of the figure, I made the shoes and some ribbons around the ankles (4 and 5). Later I used light brown plasticine for some protectors and gray for a kind of rivets that join each protector (6, 7 and 8).
At the waist, the figure has like other purple/fuchsia/purple protectors or ornaments (9). Initially I made it as a full sheet, but I didn't like how it turned out so I cut it into individual sheets (10);In addition, I made the purple part of the abdomen. Next I made a blue belt with silver trim (11 and 12).
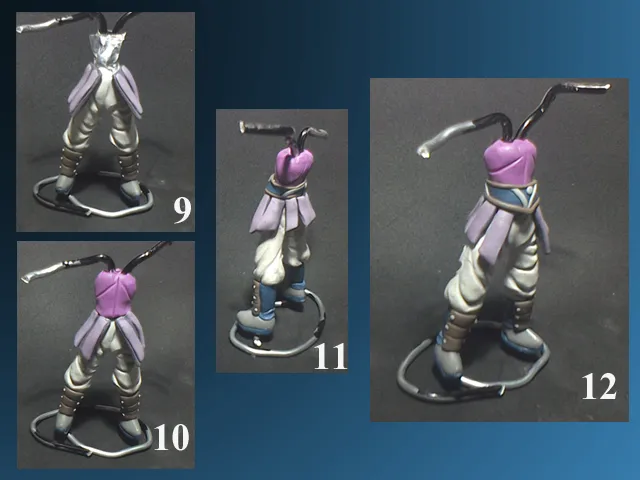
When I finished all the lower part and the waist, I used purple plasticine to shape the chest and continued with the arms. I used a bluish white and molded it until I achieved the desired result, as shown in the image below:
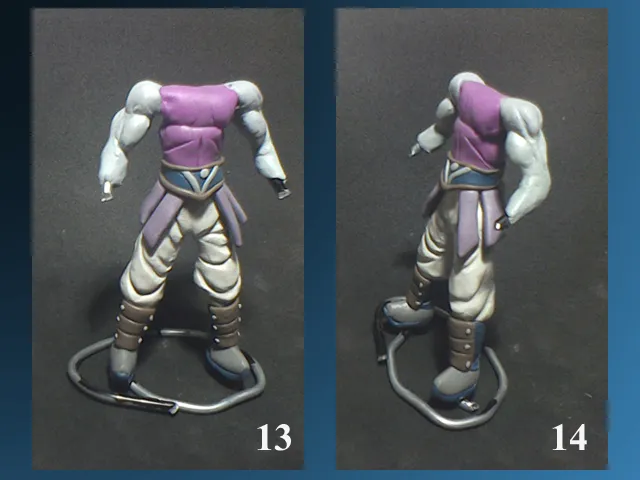
With the arms ready, I covered the whole chest with dark blue plasticine to make the armor (15 and 16), finally I placed the front part of his armor (17).
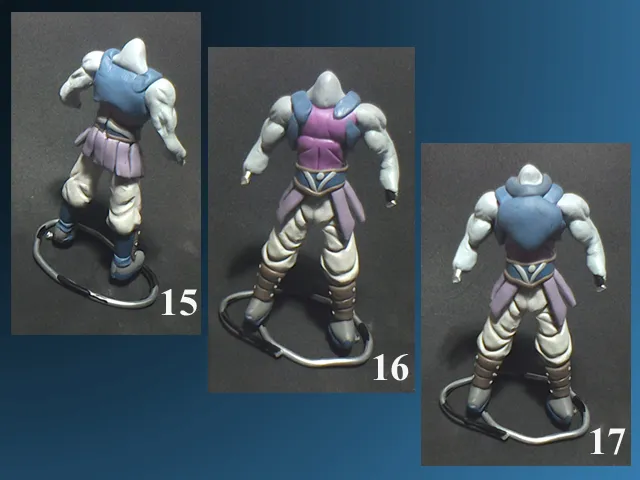
This armor has many details, which I forgot to photograph because I was concentrating so much on the figure. For example, it has shoulder pads, a sheet covering the neck and some blue details on the arms.
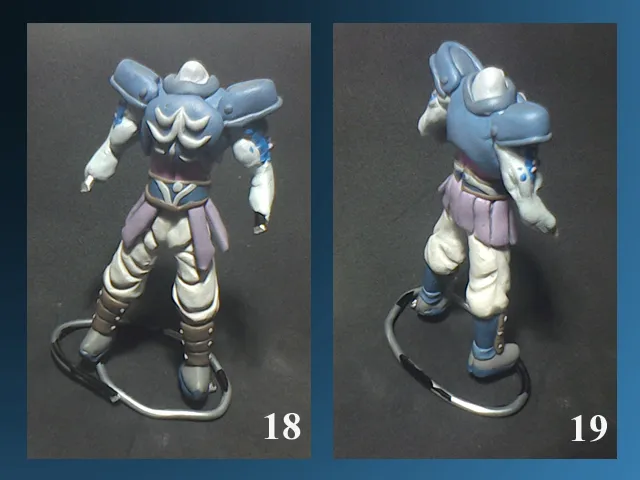
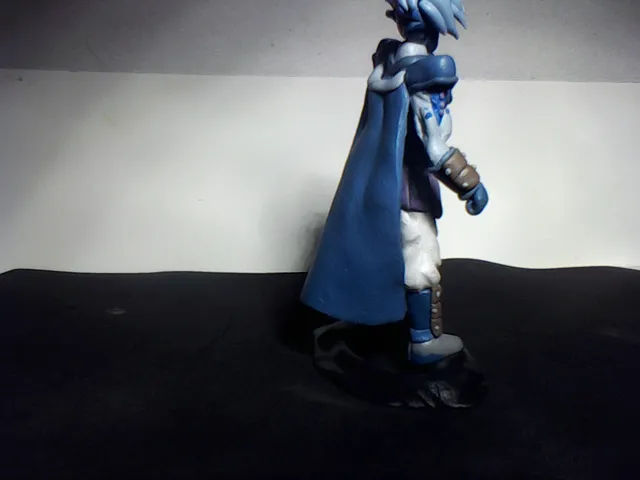
With all this done, I followed with the forearms and cuffs (20) and finally the head and cape (21).
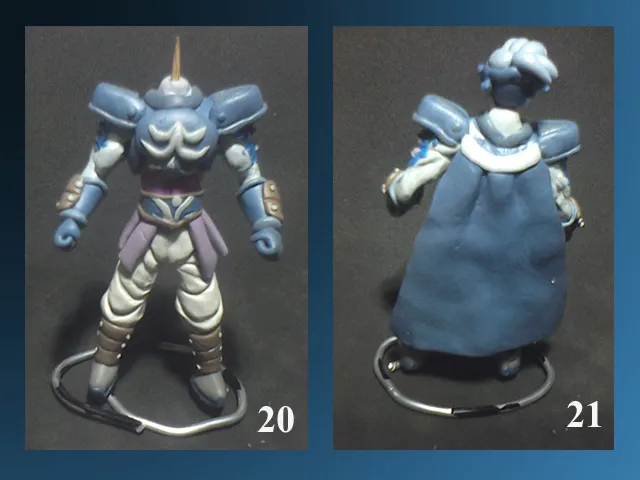
I must confess that it is a bit difficult to work with these figures since they are animated versions and not always the 3D figure is the same as the animation, even so I tried to keep as many details as possible and this was the result:
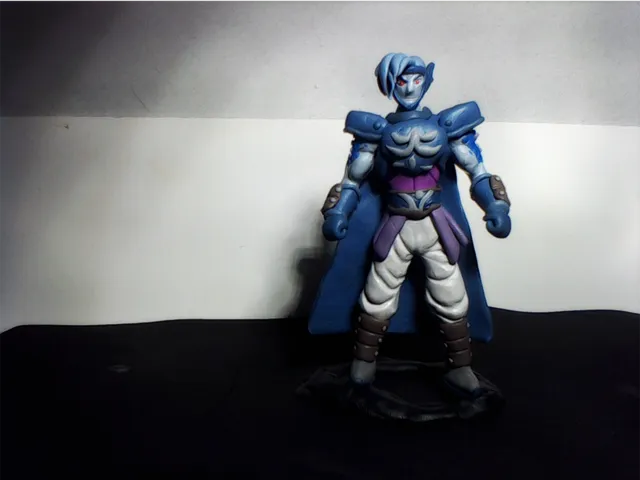
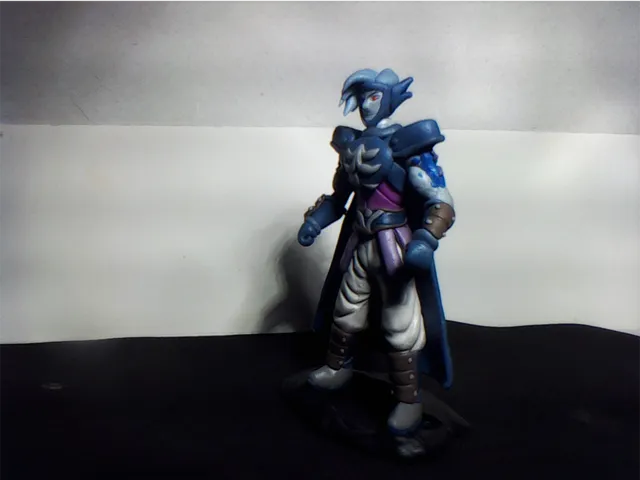

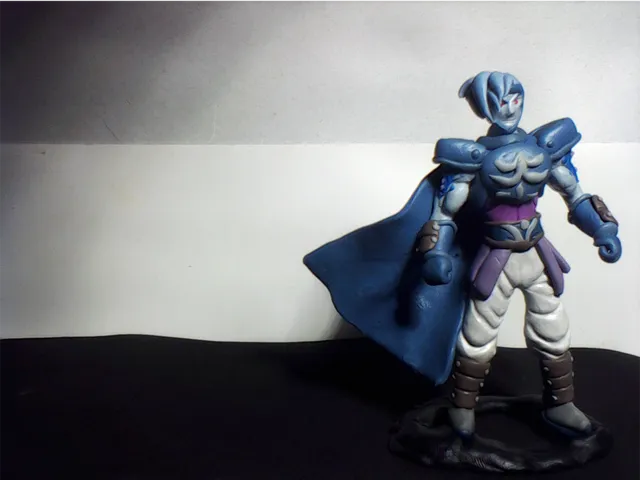
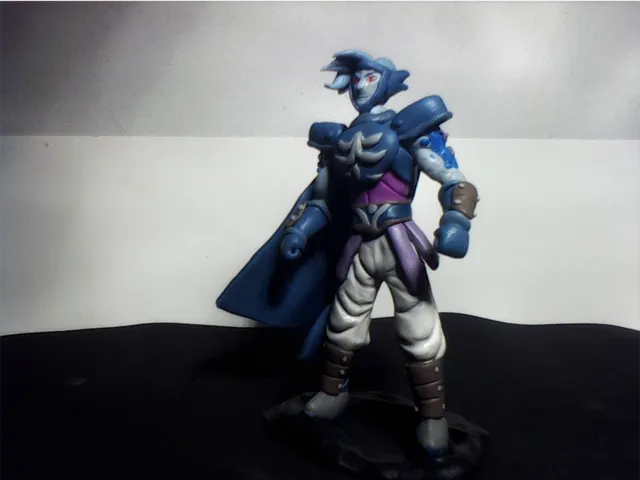
What do you think of the figure? I would love to have a better camera to take better pictures of this kind of figures, as this way many details are lost, but still enough can be appreciated.
I hope you liked the figure. You can leave your opinions, questions or suggestions below in the comments, I will be happy to read them. Without more to add, I'll say goodbye then...
See you next time!
*****Versión en español*****
Hace ya bastante tiempo recibí una sugerencia de un compañero de la comunidad de hacer a Saturos, un personaje del videojuego Golden Sun. Investigué un poco por internet para ver quien era el personaje, ya que no lo conocía y no tenía ni idea de cual era, así que al ver el diseño y la gran cantidad de detalles que tenía, me pareció una buena idea hacerlo a ver que tal me quedaba.
Confieso que fue un proyecto de un solo día y tuve que dañar la figura un par de veces porque no me gustó cómo quedó. El resultado que les muestro fue el que más me gustó de cuatro que hice, así que espero que les guste y disfruten viendo el paso a paso tanto como yo disfruté haciendo la figura. De antemano, un saludo al amigo que hizo esta sugerencia, él sabe quien es así que le dejo este post como sorpresa para que vea que sí use al personaje que me sugirió. Un abrazo, que disfruten la publicación!
Lo primero será mostrarles los materiales que utilicé:
*Plastilinas de colores
*Aguja de tejer.
*Aguja de coser.
*Tijeras
*Alambre para el esqueleto de la figura.
Como se observa en la imagen de arriba, hay varias plastilinas de colores que normalmente no se encuentran en el empaque original, esto es porque me di la tarea de mezclar distintas plastilinas para obtener los colores deseados. La figura tenía varios tipos de azules, así que azul, blanco, gris, negro y morado fueron los colores básicos que usé para obtener los otros colores.
Como siempre digo, mejor comenzar por la base, así que tras armar el esqueleto, comencé a trabajar en las piernas (1). Con ayuda de la aguja de tejer comencé a moldear las arrugas de la ropa hasta obtener el resultado deseado (2); acto seguido, usé un poco de azul para la parte baja de las piernas (3).
Siguiendo con la parte baja de la figura, le hice los zapatos y unas cintas que tiene en los tobillos (4 y 5). Posteriormente usé plastilina marrón claro para unos protectores y gris para una clase de remaches que une cada protector (6, 7 y 8).
En la cintura, la figura tiene como otros protectores o adornos de color purpura/fucsia/morado (9). Inicialmente lo hice como una lámina completa, pero no me gustó como quedó así que lo corté en láminas individuales (10);Además, le hice la parte morada del abdomen. Lo siguiente fue hacer un cinturón azul con adornos plateados (11 y 12).
Al terminar toda la parte baja y la cintura, usé plastilina morada para dar forma al pecho y seguí con los brazos. Usé un blanco azulado y lo moldeé hasta lograr el resultado deseado, tal como se observa en la imagen a continuación:
Con los brazos listos, cubrí todo el pecho con plastilina azul oscuro para hacer la armadura (15 y 16), finalmente le coloqué la parte frontal de su armadura (17).
Esta armadura tiene muchos desatalles, los cuales olvidé fotografiar por concentrarme tanto en la figura. Por ejemplo, tiene hombreras, una lámina que cubre el cuello y unos detalles azules en los brazos.
Con todo esto listo, seguí con los antebrazos y los puños (20) y finalmente con la cabeza y la capa (21).
Debo confesar que es un poco difícil trabajar estas figuras ya que son versiones animadas y no siempre la figura en 3D queda igual que la animación, aún así trate de guardar la mayor cantidad de detalles y este fue el resultado:
¿Qué les ha parecido la figura? Me encantaría tener una mejor cámara para tomar mejores fotos de este tipo de figuras, ya que así se pierden muchos detalles, aún así se aprecian los suficientes.
Espero que la figura haya sido de su agrado. Pueden dejar sus opiniones, preguntas o sugerencias abajo en los comentarios, yo estaré encantado de leerlos. Sin más que agregar, me despido entonces...
¡Hasta la próxima!

Imagenes editadas con Photoshop
Fotos tomadas con tablet HP stream 7
Traducido con DeepL
Photos edited with Photoshop
Photos taken with HP stream 7 tablet
Translated with DeepL
Últimos tres post/Last three posts:
Sprouts weekend / Fin de semana de germinados
Learn with Gabo #2 / Aprende con Gabo #2
My elusive visitor / Mi escurridizo visitante