Bienvenidos Queridos Amantes de la Artes Manuales
Welcome Dear Manual Arts Lovers
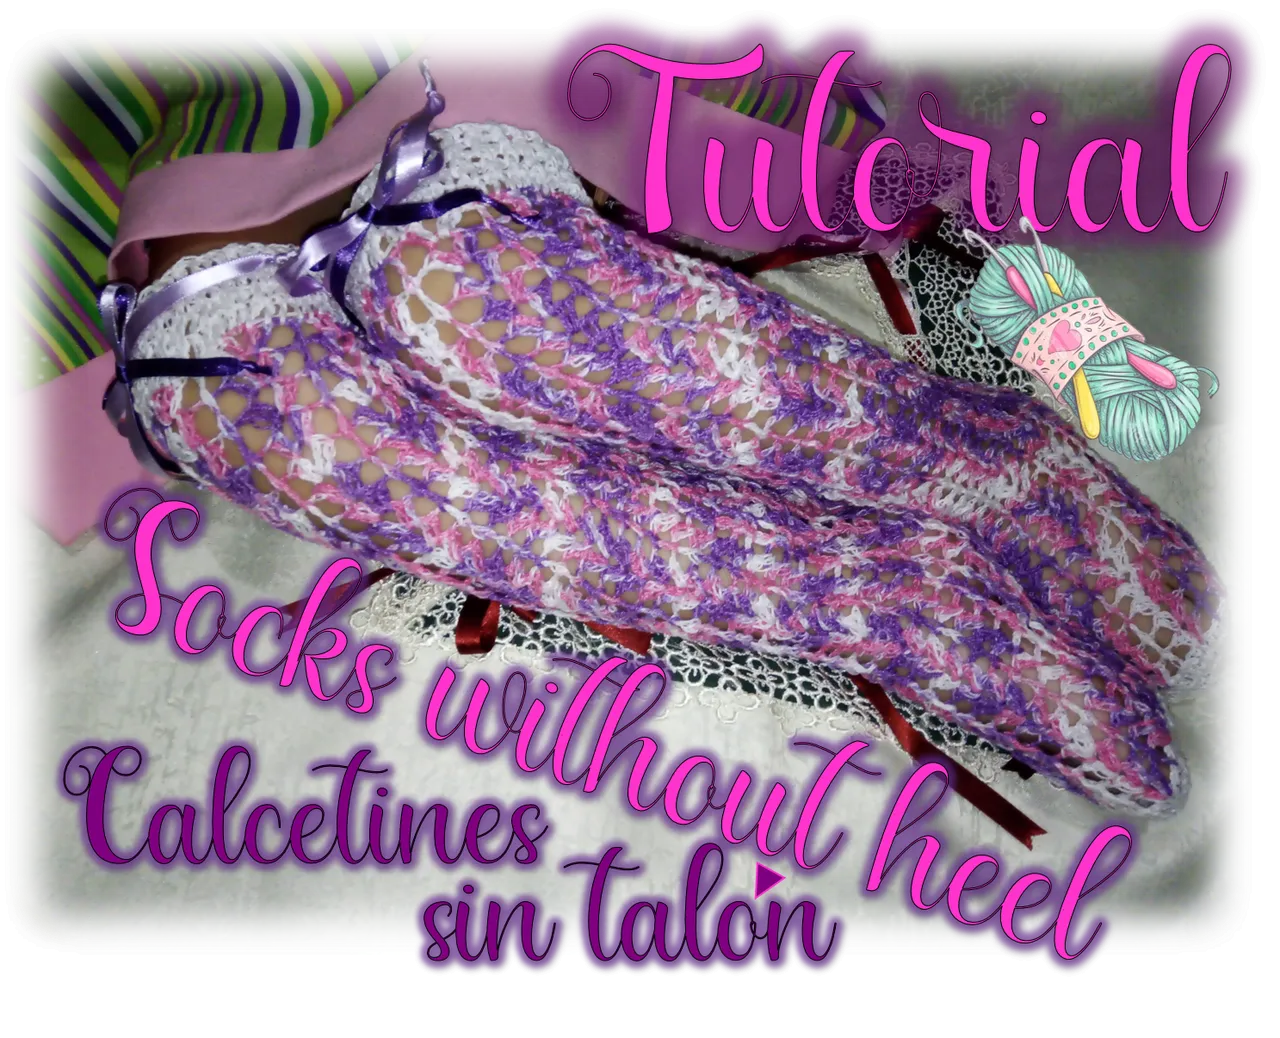
Siempre es un gusto compartir mis creaciones con ustedes y en esta oportunidad, este proyecto resulta muy especial, ya que tenia tiempo queriendo hacerlo. Se tratan de unos calcetines tejidos para mi pequeña hija, a mi siempre me han encantado este tipo de calcetines. Me recuerdan mi infancia, crecí usándolos, hoy en día, al menos aquí en Venezuela no son fáciles de encontrar, ya que, es un arte que se ha perdido un poco, normalmente lo que puedes encontrar, son los escarpines de bebe.
It is always a pleasure to share my creations with you and this time, this project is very special, since I had been wanting to do it for a long time. These are knitted socks for my little daughter; I have always loved this kind of socks. They remind me of my childhood, I grew up wearing them, nowadays, at least here in Venezuela they are not easy to find, since, it is an art that has been lost a little, normally what you can find, are the baby booties.

En el caso de los calcetines para niñas más grandecitas, como mi hija de 5 años son menos frecuente encontrarlos, sin embargo, mis hijas tuvieron la suerte, que mi adorada mami tenía en Carúpano, (ciudad donde nací y ella vivía) conocidas que los hacían para vender. Por supuesto, ella siempre se los compraba a mis hijas, y yo encantada, porque como les dije, a mí me fascina ver a las niñas con sus vestidos y sus medias tejidas. Tristemente, mi querida mami, falleció en febrero de este año, así que, llego el momento de que aprendiera a elaborarlos.
In the case of socks for older girls, like my 5 year old daughter, they are less frequent to find, however, my daughters were lucky enough, that my beloved mommy had in Carúpano, (city where I was born and she lived) acquaintances who made them for sale. Of course, she always bought them for my daughters, and I was delighted, because as I told you, I love to see the girls with their dresses and their knitted socks. Sadly, my dear mom passed away in February of this year, so it was time for me to learn how to make them.
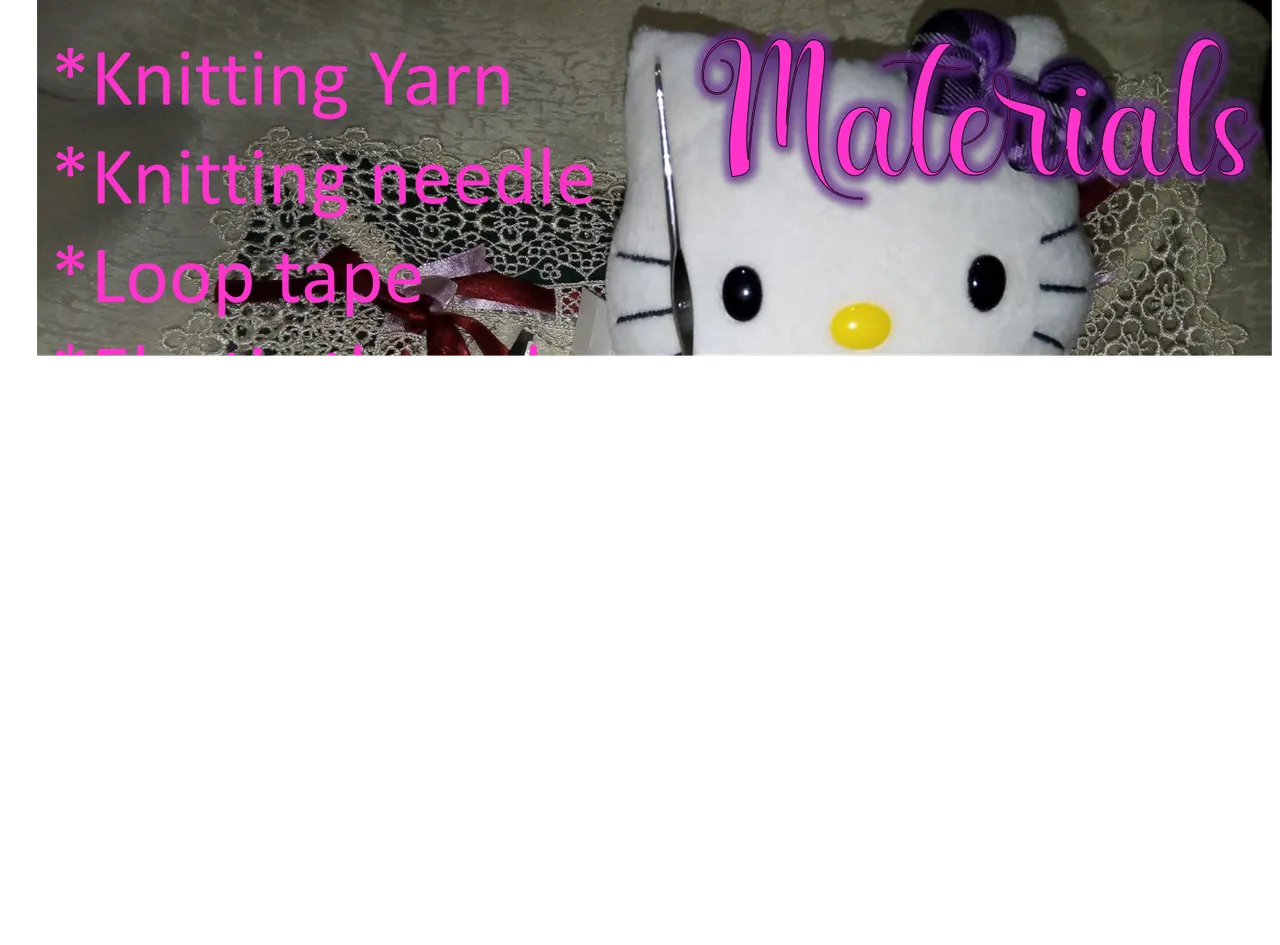
Debo ser sincera, nunca me había atrevido, porque siempre las había visto realizadas en tejido en dos agujas y bueno, aunque he elaborado uno que otro proyecto usando este tipo de tejido. Lo cierto, es que aún no domino completamente la técnica, por ejemplo, nunca he logrado hacer bien las lazadas, así que, muchos patrones decorativos que son muy frecuentes en este tipo de calcetines, no me salen bien. Sin embargo, de un tiempo para acá descubrí que se pueden hacer en tejido crochet y ese estilo, si lo domino bastante bien, por lo que finalmente me decidí a aprender a elaborarlos. En esta ocasión, les mostraré la forma más sencilla de hacerlos y es sin talón, los materiales son muy pocos y se los muestro en la imagen que pudieron ver antes de este párrafo. Ahora, a continuación, les iré describiendo y mostrando paso a paso como los elaboré, espero lo disfruten tanto como yo al hacerlos.
I must be honest, I had never dared, because I had always seen them made in two-needle knitting and well, although I have elaborated one or another project using this type of knitting. The truth is that I still haven't completely mastered the technique, for example, I've never been able to do the loops well, so many decorative patterns that are very common in this type of socks, don't work well. However, some time ago I discovered that they can be made in crochet knitting and that style, if I master it quite well, so I finally decided to learn how to make them. This time, I will show you the easiest way to make them and it is without heel, the materials are very few and I show them in the image that you could see before this paragraph. Now, next, I will be describing and showing you step by step how I made them, I hope you enjoy them as much as I did when I made them.

1era Vuelta
Se inicia con un anillo mágico, seguido se sube con 3 cadenetas y empezamos a realizar puntos altos hasta completar 15 puntos, y terminamos cerrando la vuelta con un punto enano.
1st Lap
We start with a magic ring, then we go up with 3 chains and we begin to make double crochet stitches until we complete 15 stitches, and we finish by closing the row with a dwarf stitch.
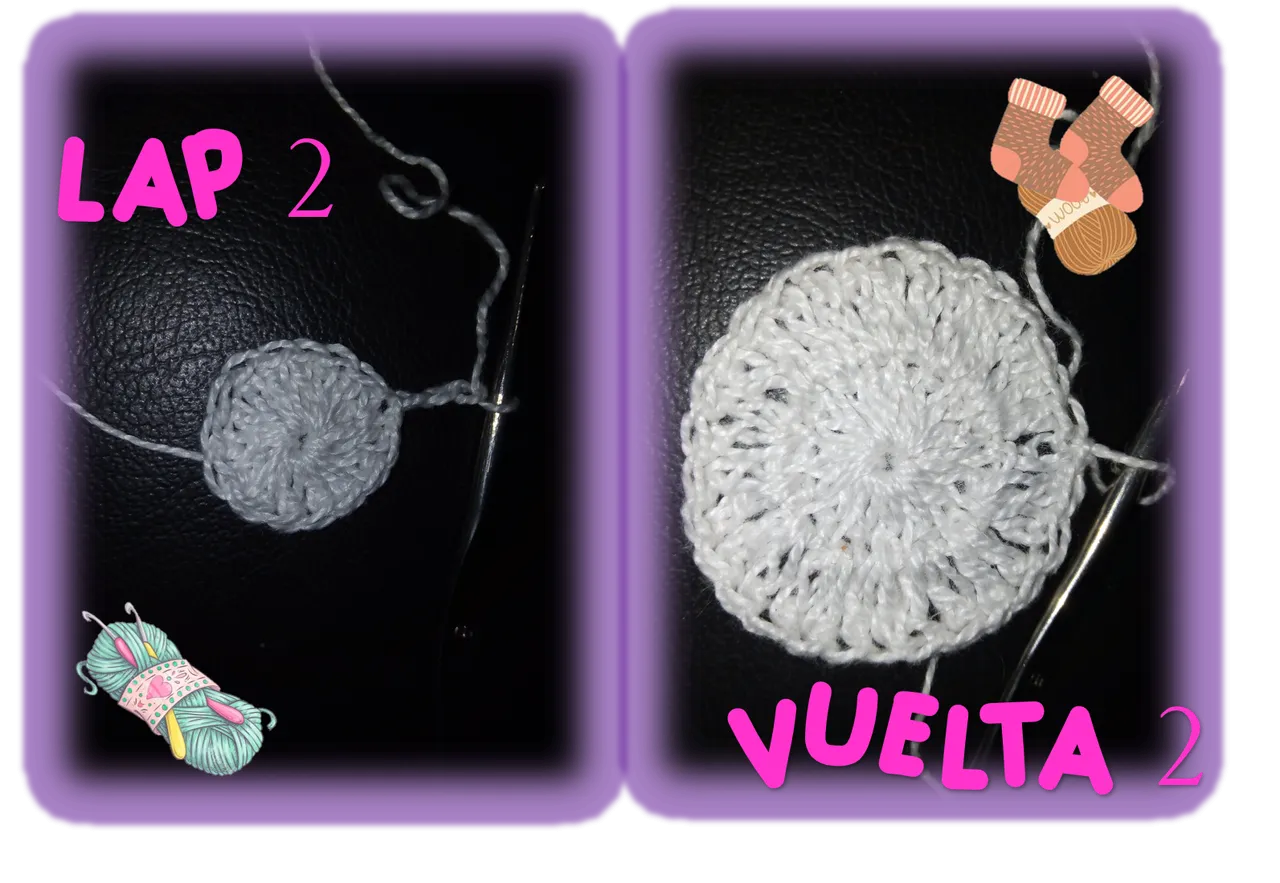
2da Vuelta
Esta nueva vuelta la iniciamos subiendo con 3 cadenetas para realizar un punto alto en el 1er punto de la vuelta anterior. Luego, seguimos haciendo 2 puntos altos en cada punto de la vuelta anterior, con esto duplicaremos los puntos en esta nueva vuelta. Al finalizar, obtendremos 30 puntos altos y cerraremos con un punto enano.
2nd Lap
We start this new row by going up with 3 chains to make a double crochet in the 1st stitch of the previous row. Then, we continue making 2 double crochet stitches in each stitch of the previous row, with this we will double the stitches in this new row. At the end, we will obtain 30 double crochet stitches and we will close with a dwarf stitch.
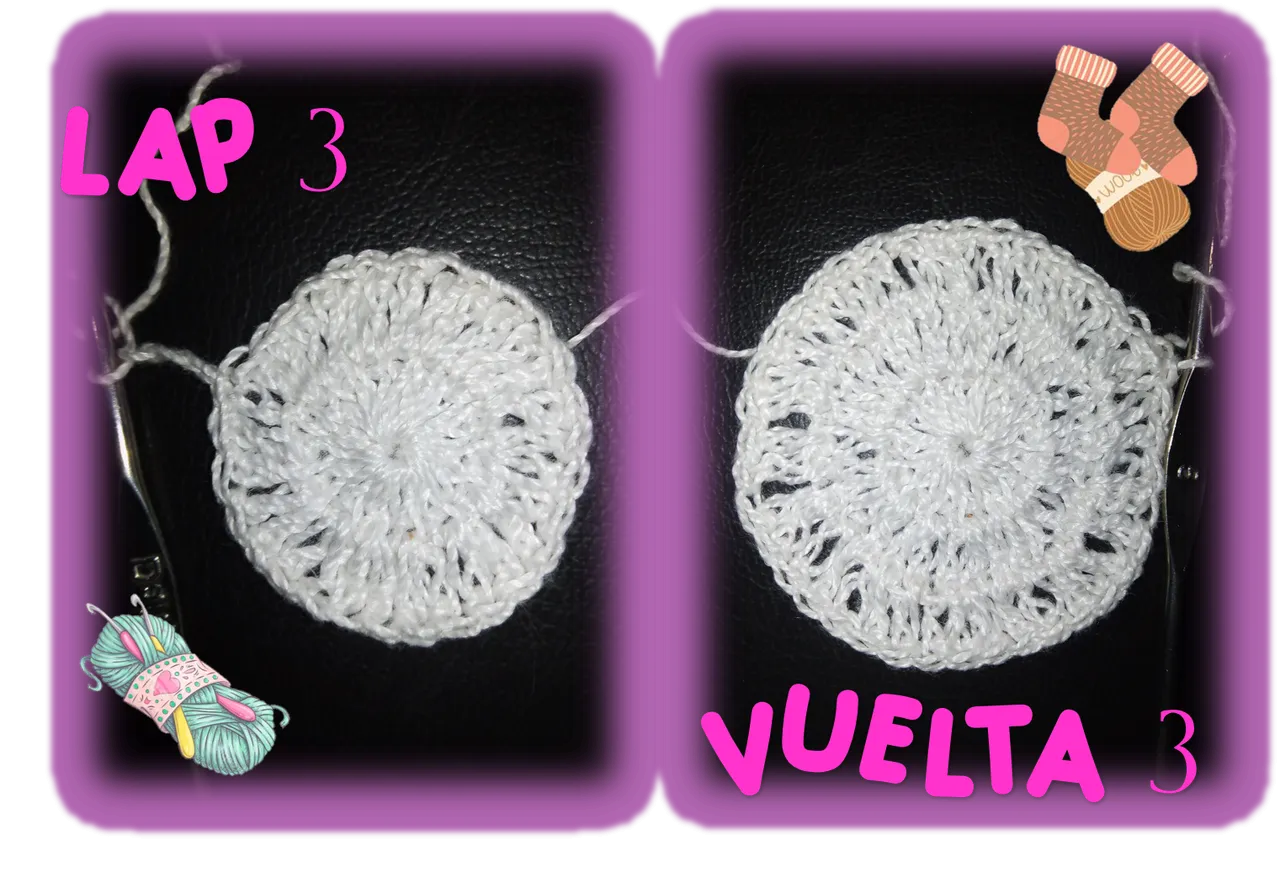
3era Vuelta
Nuevamente iniciamos subiendo con 3 cadenetas, seguido realizamos un punto alto en el mismo punto donde se realizaron las cadenetas, seguidamente, un punto alto en el siguiente punto e igualmente otro punto alto en el subsiguiente punto de la base. A continuación, realizamos 2 puntos altos juntos en el próximo punto de la vuelta anterior. O sea, en resumen, durante esta vuelta seguiremos el patrón, 2 puntos altos en un mismo punto, luego un punto en cada uno de los siguientes dos puntos y así sucesivamente. Al terminar la vuelta habremos realizado en total 40 puntos y cerramos la vuelta con un punto enano.
3rd Lap
Once again, we start with 3 chain stitches, then we make a single crochet in the same stitch where the chain stitches were made, then a single crochet in the next stitch and then another single crochet in the next stitch of the base stitch. Then, we knit 2 double crochet stitches together in the next stitch of the previous row. So, in summary, during this round we will follow the pattern, 2 double crochets in the same stitch, then a double crochet in each of the next two stitches and so on. At the end of the row we will have completed a total of 40 stitches and we close the row with a single crochet.
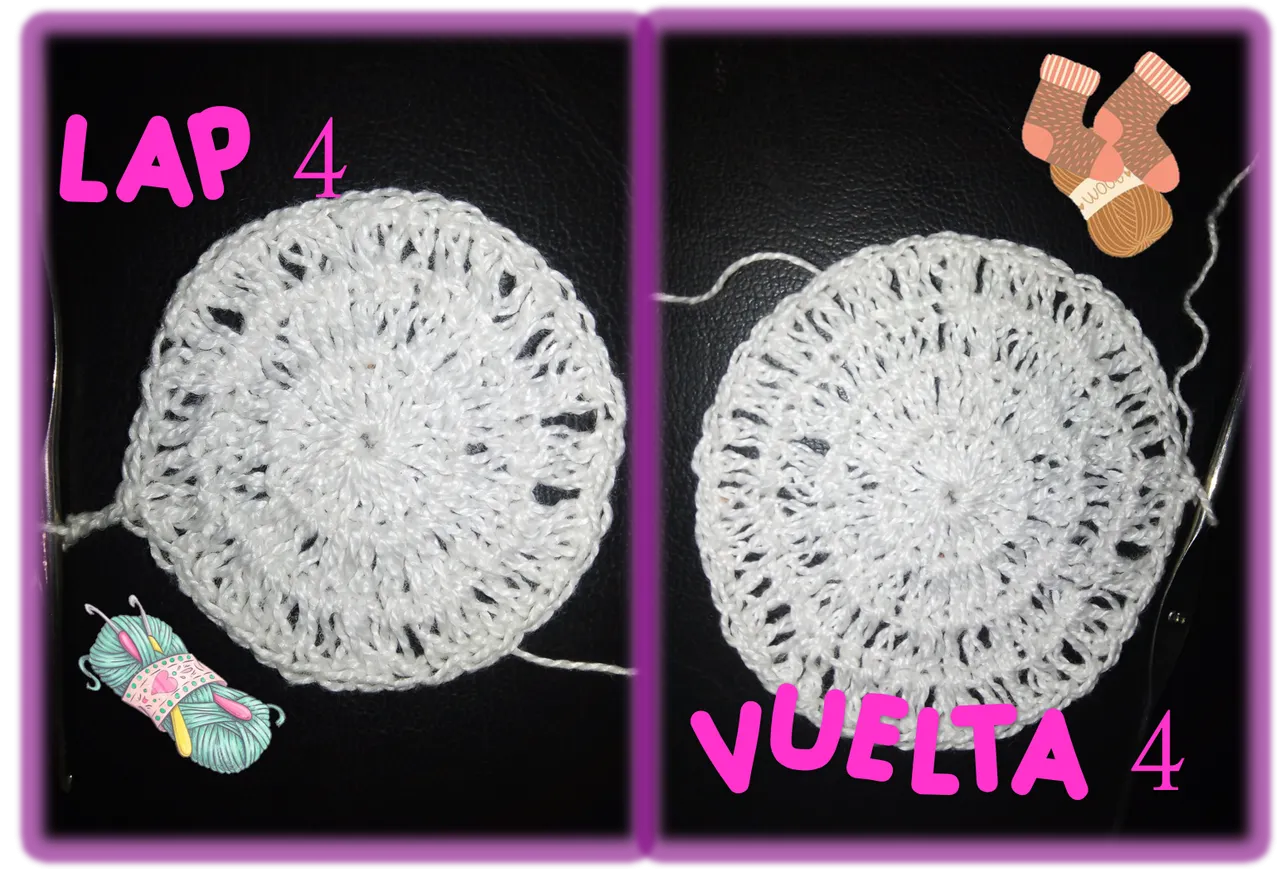
4ta Vuelta
Como hasta ahora, iniciamos con 3 cadenetas para luego hacer un punto alto en el mismo punto de la base donde hicimos las cadenetas. Seguidamente, trabajamos 4 puntos altos continuos en cada punto de la carrera anterior, a continuación, en el punto inmediato de la base, se hacen 2 puntos altos juntos. En esta vuelta, el patrón a seguir es, 2 puntos altos juntos en un mismo punto de la carrera anterior y luego un punto alto en cada uno de los 4 puntos siguientes de la base. Al final deberíamos obtener 48 puntos altos y cerramos con un punto enano.
4th Lap
As before, we start with 3 chain stitches and then make a single crochet in the same stitch of the base where we made the chain stitches. Next, we work 4 continuous double crochets in each stitch of the previous round, then, in the immediate stitch of the base, we make 2 double crochets together. In this lap, the pattern to follow is, 2 high stitches together in the same stitch of the previous race and then a high stitch in each of the next 4 stitches of the base. At the end we should get 48 high stitches and we close with a dwarf stitch.
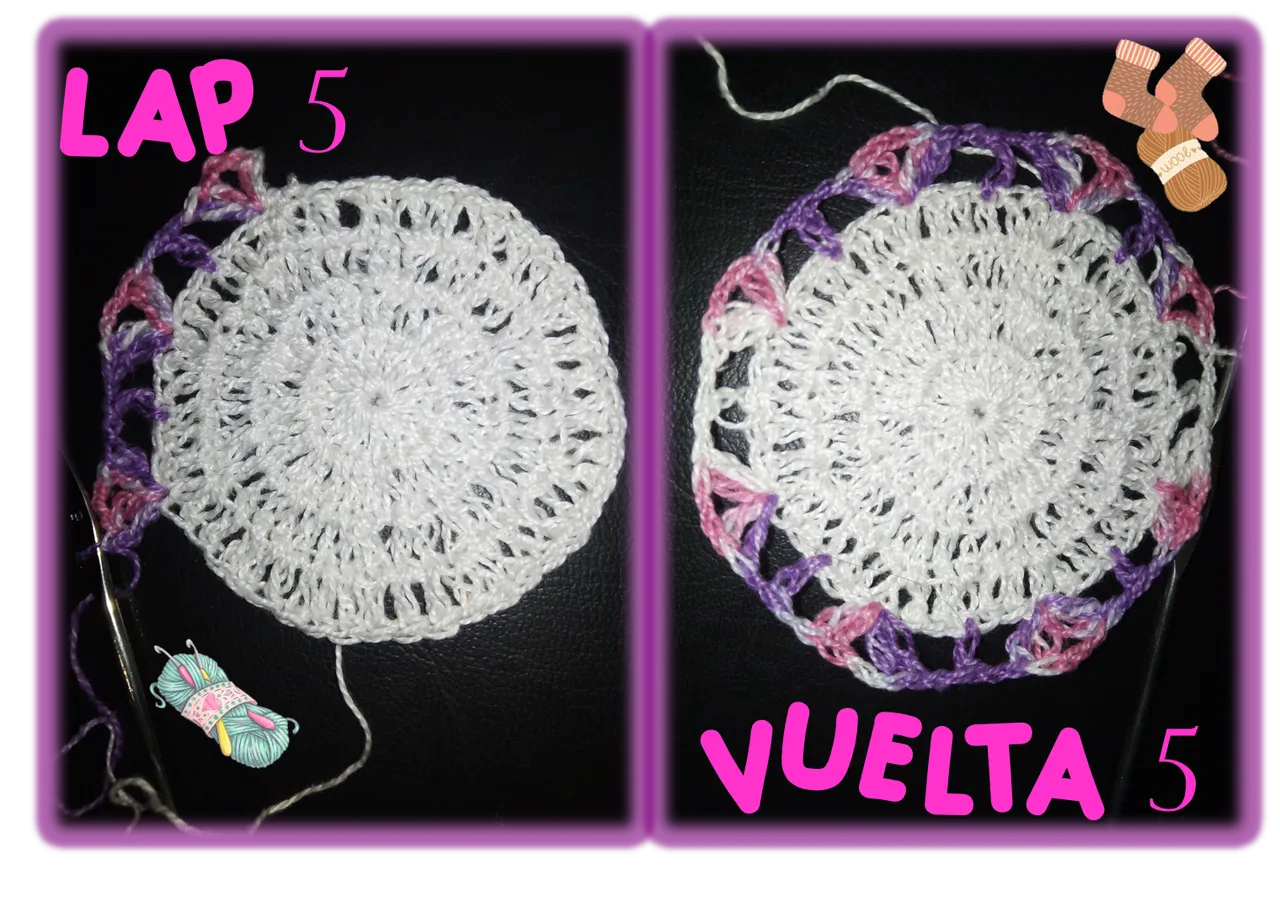
5ta Vuelta (En esta vuelta puede cambiar de color de hilo si lo desea)
Iniciamos nuevamente con las 3 cadenetas y realizamos un punto alto en el mismo punto de la base, e inmediatamente hacemos 2 cadenetas. Después debemos trabajar 2 puntos altos en el mismo punto de la base donde realizamos el anterior punto alto, con ello formaremos un abanico. A continuación, realizamos una cadeneta, una lazada, saltamos los siguientes 2 puntos de la base y en el 3er punto realizamos un punto alto. Ahora, hacemos una cadeneta y nuevamente saltamos 2 puntos de la base, para trabajar en el 3er punto, 2 puntos altos, seguidos por 2 cadenetas y nuevamente 2 puntos altos, con ello obtendremos otro abanico. Repetiremos el patrón anterior hasta terminar la vuelta, donde deberíamos tener al final un total 8 abanicos y cerramos con un punto enano.
5th Lap (In this row you can change the yarn color if you wish)
We start again with the 3 chain stitches and knit a single crochet in the same stitch of the base, and immediately we knit 2 chain stitches. Then we must work 2 high stitches in the same stitch of the base where we made the previous high stitch, with this we will form a fan. Next, we make a chain stitch, a loop, skip the next 2 stitches of the base and in the 3rd stitch we make a double crochet. Now, we make a chain stitch and again skip 2 stitches from the base, to work in the 3rd stitch, 2 double crochet, followed by 2 chain stitches and again 2 double crochet stitches, with this we will obtain another fan. We repeat the previous pattern until the end of the round, where we should have at the end a total of 8 fans and we close with a dwarf stitch.
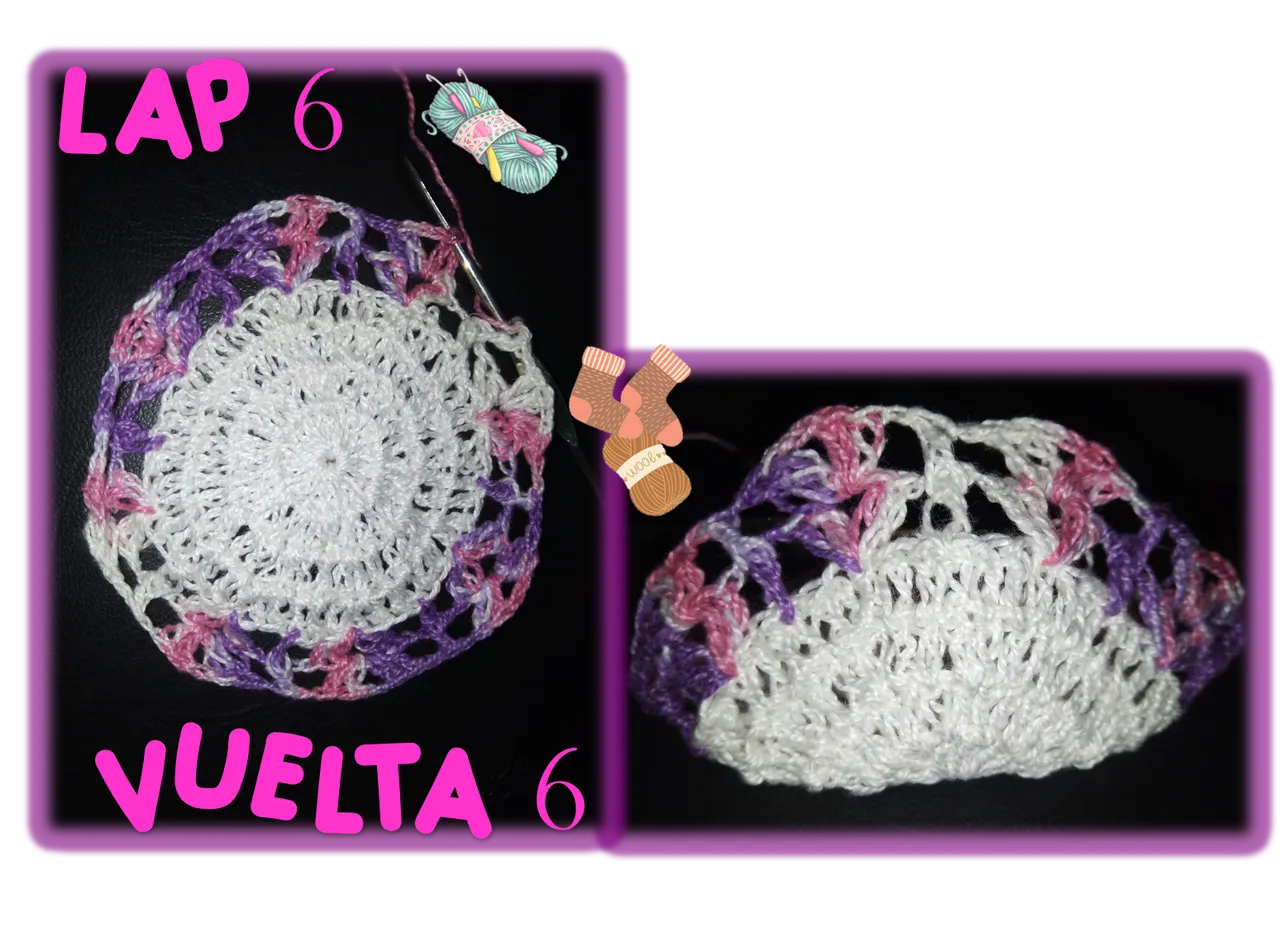
6ta Vuelta
Iniciamos saltando al punto donde se realizaron las 2 cadenetas en la carrera anterior y realizamos un punto bajo, subimos 2 cadenetas y realizamos un punto alto en el mismo lugar. Seguidamente, trabajamos 2 cadenetas y 2 puntos altos dentro de las mismas 2 cadenetas de la carrera anterior, con ello formaremos el primer abanico de esta vuelta. Ahora, debemos realizar una cadeneta, seguido de una lazada y tomamos el siguiente punto de la carrera anterior por detrás, en lugar de como lo hacemos normalmente, con esto obtenemos un punto alto en relieve. Después, realizamos una cadeneta y saltamos al punto de las 2 cadenetas de la vuelta anterior, para realizar en el mismo lugar, 2 puntos altos, seguidos de 2 cadenetas y nuevamente 2 puntos altos, con ello obtendremos nuestro nuevo abanico. En el resto de la carrera, el patrón a repetir será trabajar un abanico una cadeneta, un punto alto en relieve y otra cadeneta, para volver a realizar otro abanico, así continuaremos hasta terminar la vuelta y cerrar con un punto enano.
6th Lap
We start by jumping to the point where the 2 chain stitches were made in the previous row and knit a single crochet, then we go up 2 chain stitches and knit a double crochet in the same place. Next, we work 2 chain stitches and 2 high stitches inside the same 2 chain stitches of the previous run, with this we will form the first fan of this round. Now, we must make a chain stitch, followed by a loop and we take the next stitch of the previous row from behind, instead of how we normally do it, with this we obtain a high stitch in relief. Then, we make a chain stitch and jump to the point of the 2 chain stitches of the previous round, to make in the same place, 2 high stitches, followed by 2 chain stitches and again 2 high stitches, with this we will obtain our new fan. In the rest of the race, the pattern to repeat will be to work a fan, one chain, a high stitch in relief and another chain, to make another fan again, so we will continue until we finish the round and close with a dwarf stitch.
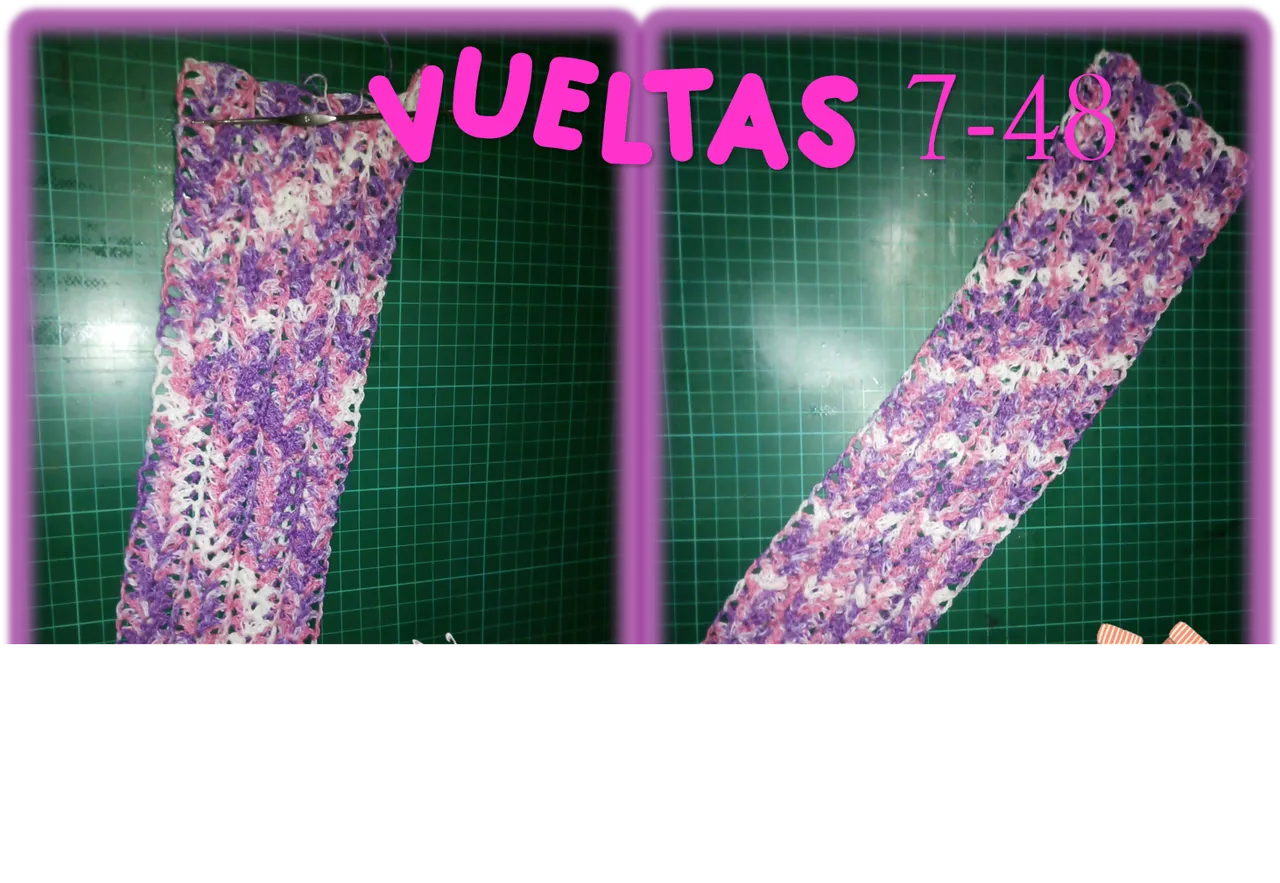
Vueltas 7 a la 48
A partir de la vuelta anterior todas las siguientes serán iguales hasta completar el largo deseado de la media. En mi caso, como era para mi hija de 5 años de edad, realice 42 vueltas más iguales, porque las quería bastante largas.
Laps 7 to 48
Starting from the previous row, all the following rows will be the same until the desired length of the stocking is reached. In my case, as it was for my 5-year-old daughter, I made 42 more equal turns, because I wanted them quite long.
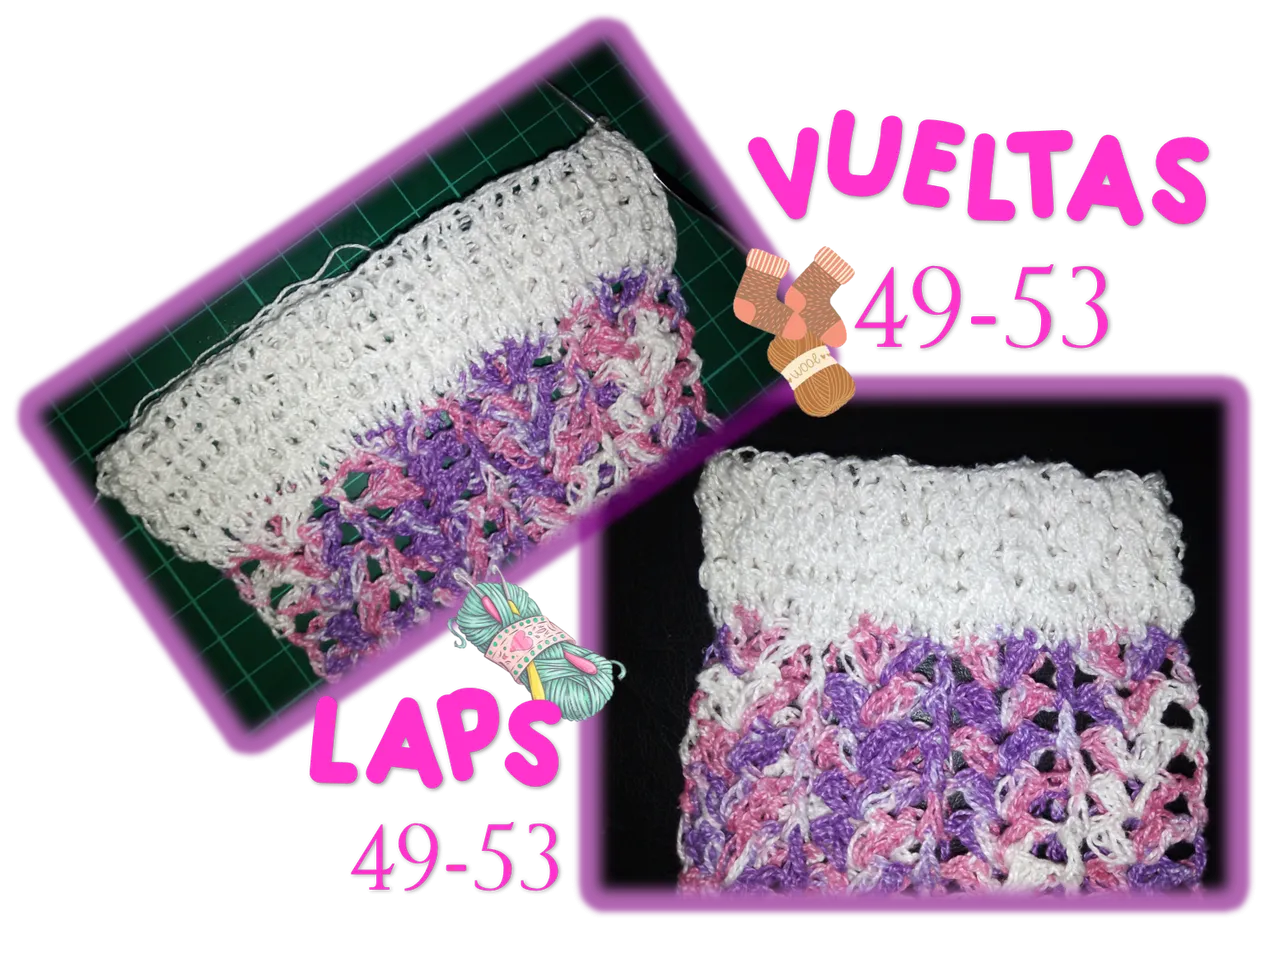
Vuelta 49
En esta vuelta, realicé nuevamente un cambio de color de hilo, usé color blanco, como al principio.
Iniciamos subiendo con 3 cadenetas, para luego hacer un punto alto sobre cada punto alto de la carrera anterior, cuando llegamos al punto de las 2 cadenetas, hacemos un punto alto sobre cada cadeneta. Luego, un punto alto sobre cada uno de los puntos alto siguientes de la base, después hacemos un punto alto en punto de cadeneta subsiguiente y saltamos el punto alto en relieve para hacer otro punto alto en el punto de cadeneta que le sigue. Realizaremos el mismo esquema de puntos hasta culminar la vuelta y cerramos con un punto enano como siempre.
Lap 49
In this row, I changed the yarn color again, I used white, as in the beginning. We start by going up with 3 chain stitches, then we make a single crochet over each of the high stitches of the previous row, when we reach the point of the 2 chain stitches, we make a single crochet over each chain stitch. Then, a single crochet over each of the following high stitches of the base, then we make a high stitch in the next chain stitch and skip the high stitch in relief to make another high stitch in the next chain stitch. We will perform the same stitch pattern until the end of the row and close with a single crochet as usual.
Vueltas 50 a la 53
Comenzamos con 3 cadenetas, luego trabajamos en el siguiente punto alto de la vuelta anterior, un punto alto en relieve, seguidamente se hace un punto alto en el próximo punto alto de la carrera anterior. Durante esta vuelta hasta llegar al final estaremos alternando un punto alto en relieve y luego un punto alto y cerraremos la carrera como siempre con un punto enano. Repetiremos el proceso anterior de igual forma para las vueltas 51 a la 53, deberán quedar cada punto alto en relieve, sobre cada punto en relieve de la carrera anterior. Igualmente, cada punto alto deberá quedar ubicado sobre cada punto alto de la vuelta anterior. Con estas últimas 4 vueltas, formaremos la parte final de la media, donde colocaremos hilo elástico o elástico, pero eso sí muy fino, esto para que la media se ajuste al grosor de la pierna y se mantenga en su lugar.
Laps 50 to 53
We start with 3 chain stitches, then we work in the next high stitch of the previous row, a raised high stitch, then we make a high stitch in the next high stitch of the previous row. During this row until we reach the end, we will be alternating a high stitch in relief and then a high stitch and we will close the row as always with a dwarf stitch. We will repeat the previous process in the same way for the laps 51 to 53, each high relief stitch must be on top of each relief stitch of the previous race. In the same way, each high stitch must be placed over each high stitch of the previous row. With these last 4 rows, we will form the final part of the stocking, where we will place elastic thread or elastic, but very thin, so that the stocking adjusts to the thickness of the leg and stays in place.
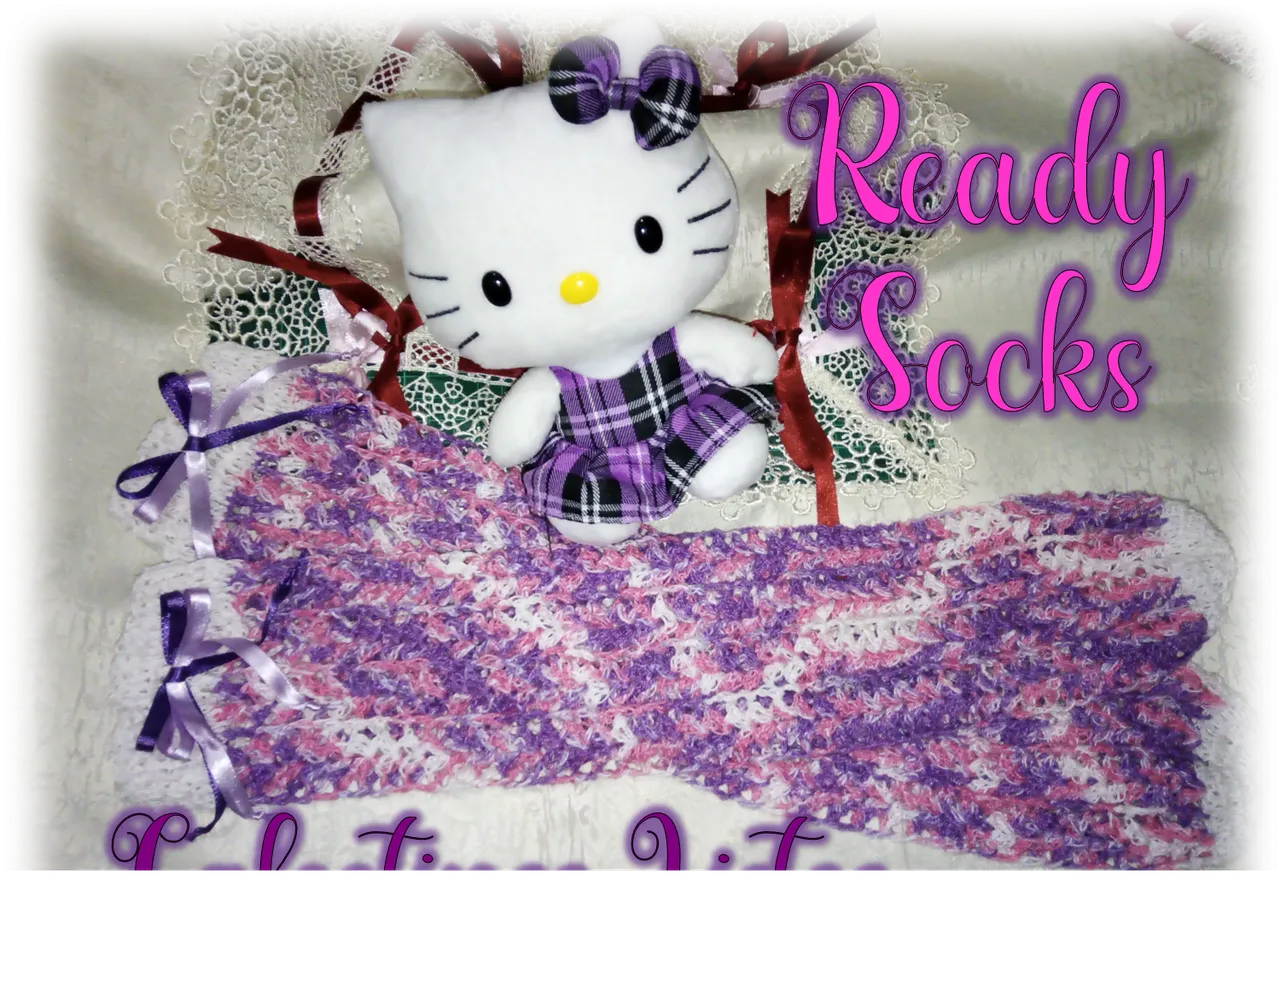
En total realice 52 vueltas y los calcetines terminaron midiendo 48 cm y a mi hija le quedaron por encima de las rodillas. Pero deben tener en cuenta que utilice un hilo de tejer de algodón, delgado, si usted usa un hilo de lana, normalmente es mas grueso y variará el tamaño final. Bueno, no me queda más que despedirme, esperando que les gustara, este nuevo proyecto de tejido, tanto como me gusto a mi realizar estos lindos calcetines para mi pequeña hija, Nadiah. Dios los Bendiga y cuídense mucho y cuiden a los suyos, poniendo en práctica las medidas de bioseguridad.
In total I made 52 loops and the socks ended up measuring 48 cm and my daughter's socks were above her knees. But keep in mind that I used a thin cotton knitting yarn, if you use a wool yarn, it is usually thicker and the final size will vary. Well, I just have to say goodbye, hoping you liked this new knitting project, as much as I liked making these cute socks for my little daughter, Nadiah. God Bless you and take care of yourselves and your loved ones, putting into practice the biosecurity measures.
Contenido y fotografías de mi propiedad intelectual
Información Técnica
| Cámara | Pentax * istDL |
|---|---|
| Lente | * Pentax 18-55 |
| Iluminación | Luz Natural |
| Locación | Barcelona, Estado Anzoátegui, Venezuela |
Content and photographs of my intellectual property
Technical information
| Camera | Pentax * istDL |
|---|---|
| Lens | * Pentax 18-55 |
| Lighting | Natural Light |
| Location | Barcelona, Anzoátegui State, Venezuela |