Bienvenidos Queridos Amantes de la Artes Manuales
Welcome Dear Manual Arts Lovers
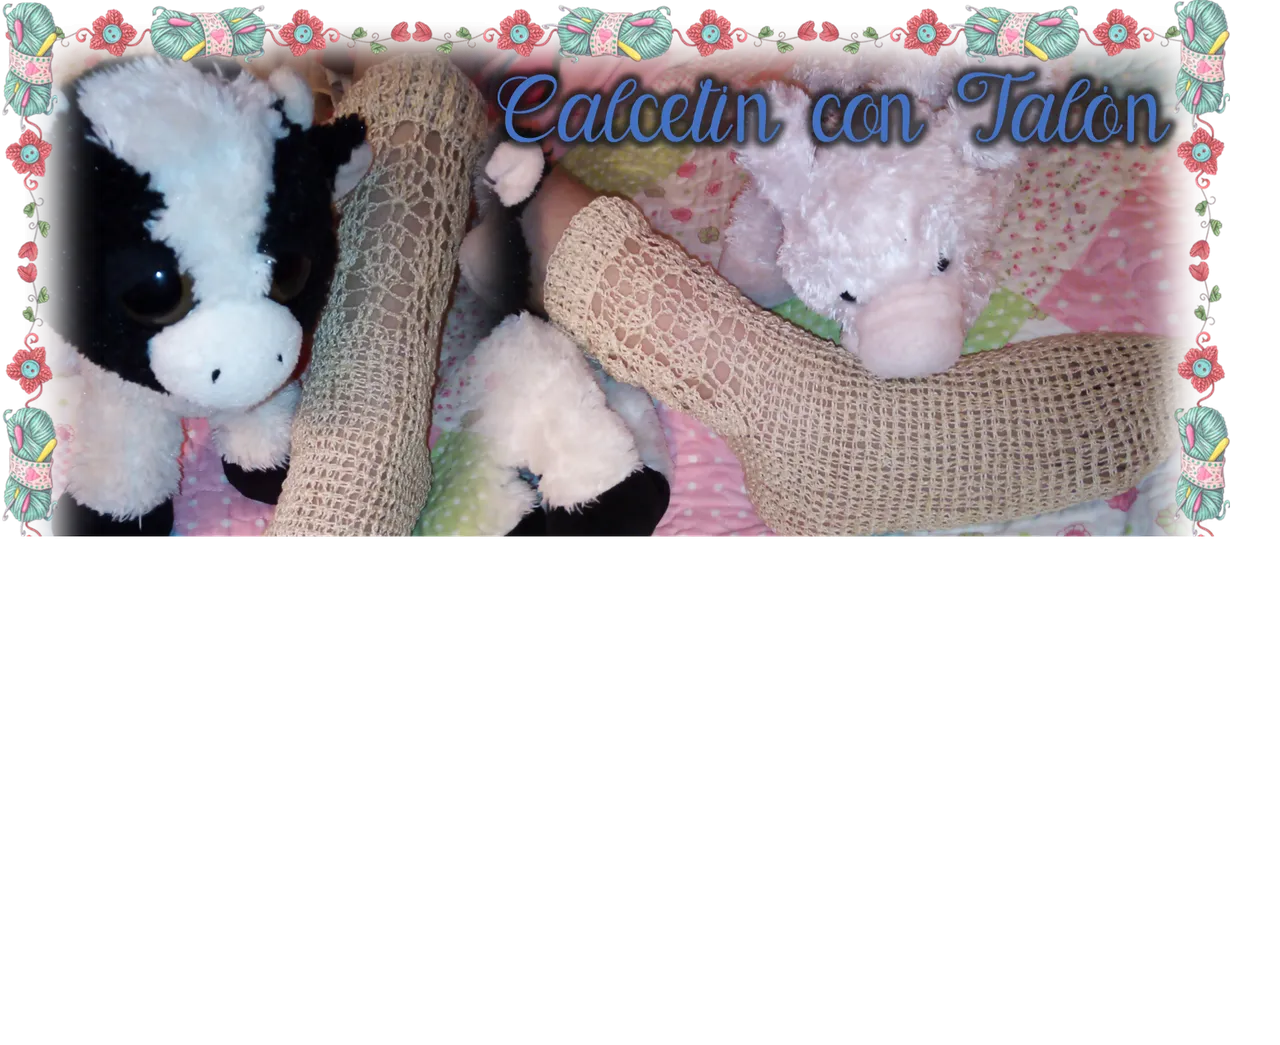
Welcome back to my corner of peace, I tell you that I have been very busy and excited learning how to crochet socks. A few days ago, I made my first pair of socks for my little princess, they were really beautiful, well, at least that's what I thought. But what was really important was that my little girl loved them, she was very excited with her new socks, and my heart was full of pride when I saw the joyful face of my little girl.
Pero, llego el turno de consentir a mi primogénita, sin embargo, decidí en esta ocasión, realizar un modelo, quizás un poco más complicado, ya que, a este se le define el talón. Los primeros que tejí, fueron un modelo completamente recto, pero, en este nuevo modelo si debemos realizar el espacio donde va metido el talón, lo que hace el proceso un poco más complicado. Pero, no se me asusten tampoco es nada del otro mundo, es solo cuestión de practicar y seguro nos saldrá mucho mejor cada vez que los realicemos.
But it was time to spoil my firstborn, however, this time, I decided to make a model, perhaps a little more complicated, since this one has the heel defined. The first ones I knitted were a completely straight model, but in this new model we have to make the space where the heel goes in, which makes the process a little more complicated. But, don't be scared, it's not a big deal either, it's just a matter of practicing and it will surely be much better every time we make them.

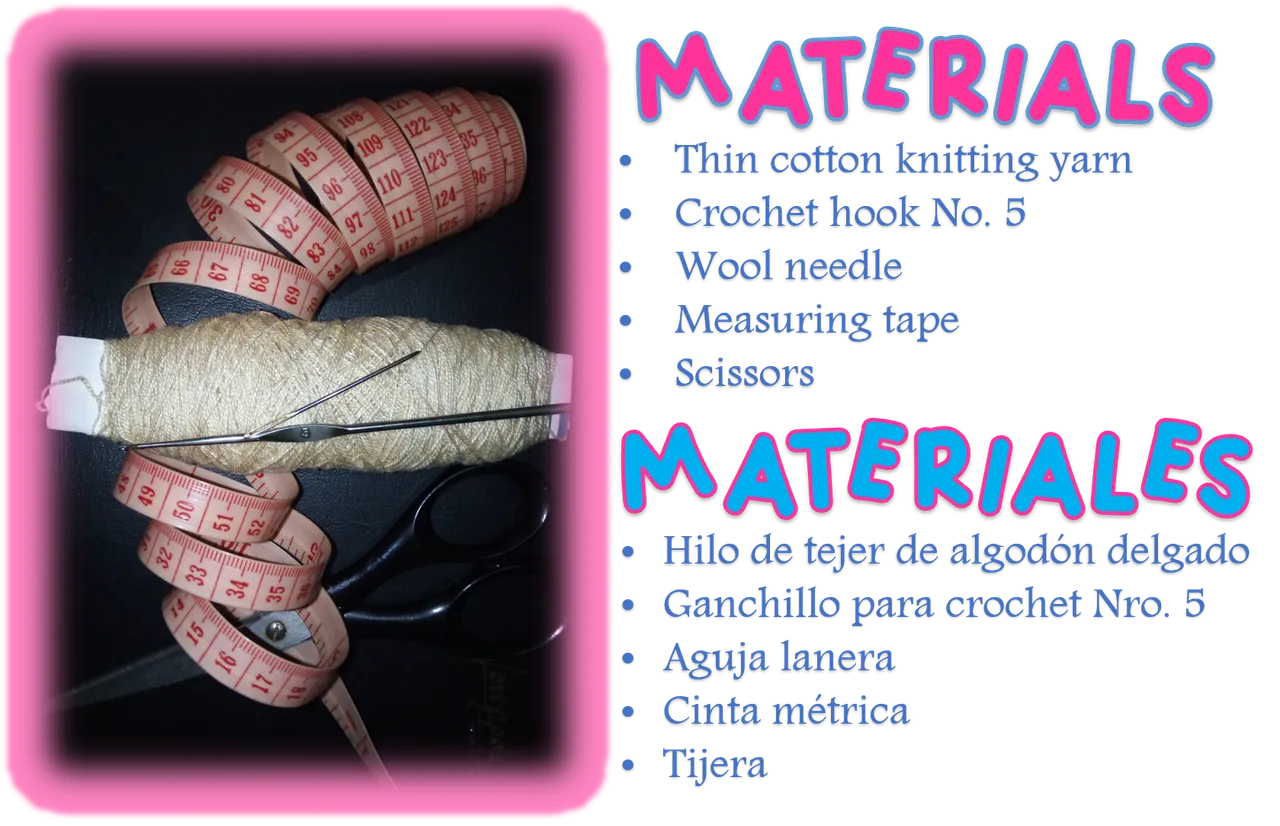
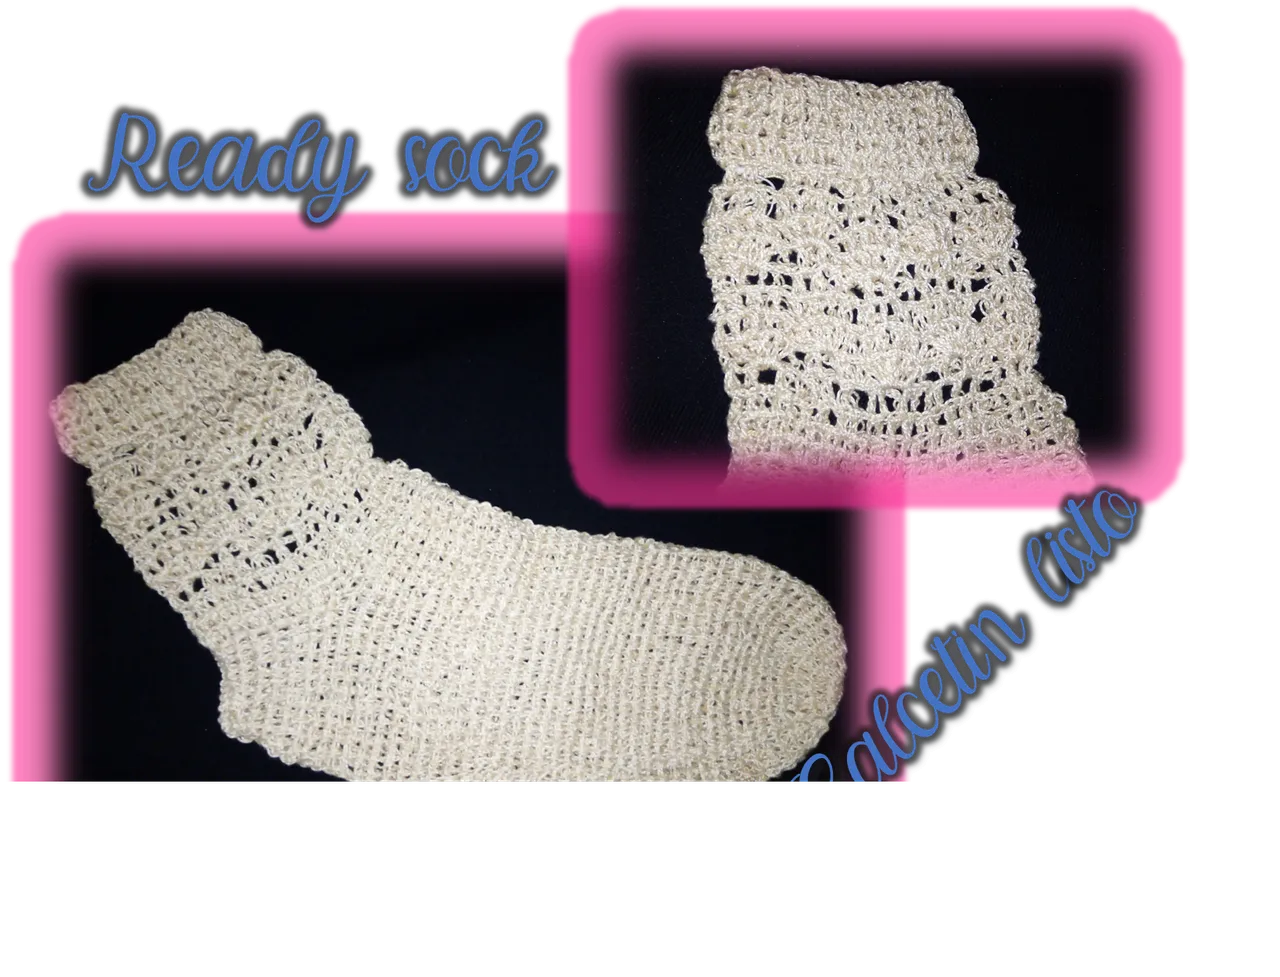
Pero, antes que nada, debemos hablar de materiales, los cuales no fueron muchos, simplemente, utilice un hilo de algodón delgado en color beis, una aguja de tejer #5, una aguja estambrera y tijeras. Eso fue todo en cuanto a los materiales que use para realizar los lindos calcetines que pueden ver en la imagen inicial, espero se animen y pongan en práctica el tutorial que a continuación les compartiré. Amigos, llego el momento de poner manos a la obra, por ello, a partir de aquí, inicio el paso a paso de como elabore estos calcetines con talón.
But, first of all, let's talk about materials, which were not many, simply, I used a thin cotton yarn in beige color, a #5 knitting needle, a stamper needle and scissors. That was all about the materials I used to make the cute socks that you can see in the initial image, I hope you are encouraged and put into practice the tutorial that I will share with you next. Friends, it's time to get down to work, so, from here, I'll start the step by step of how to make these socks with heel.
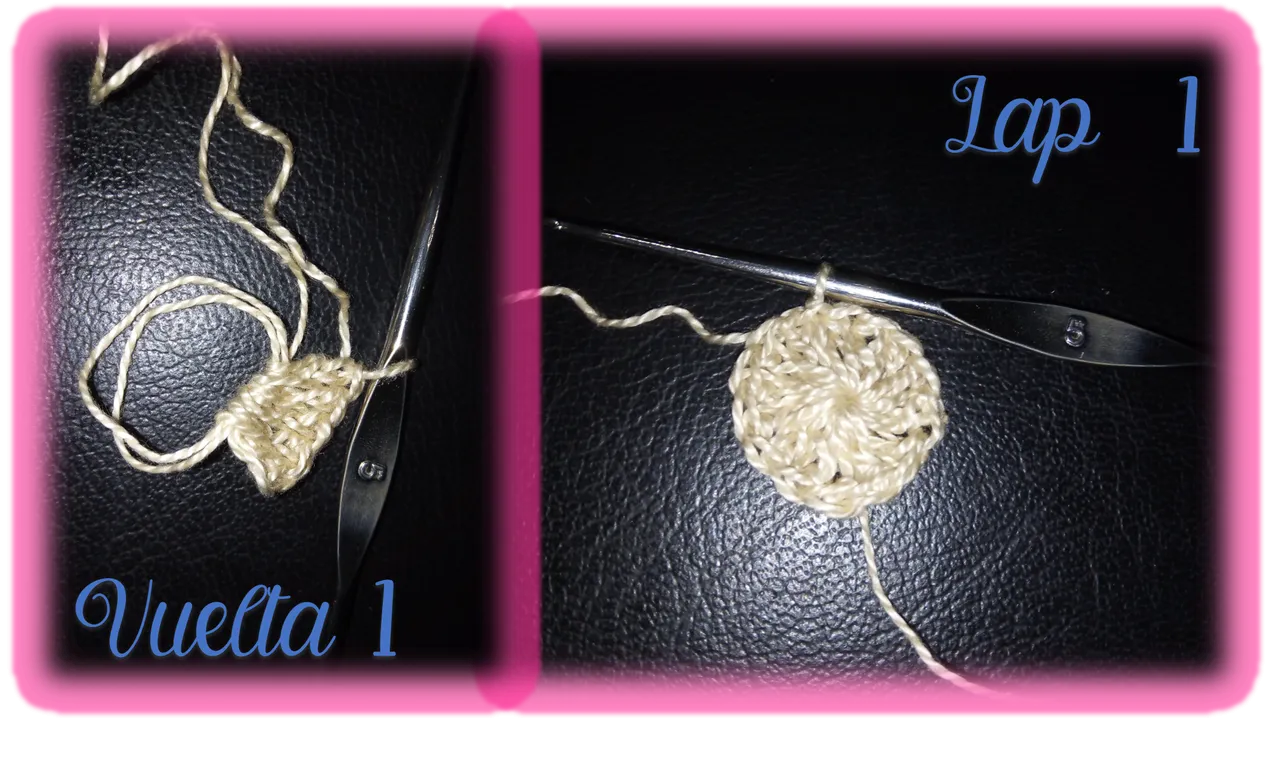
1era Vuelta:
Inicia con un anillo mágico, subimos 3 cadenetas y dentro del anillo tejeremos 14 puntos altos, al terminarlos cerraremos con un punto enano o deslizado sobre el primer punto alto que realizamos. Deben tener en cuenta que las cadenitas de inicio no cuentan como punto.
1st Lap:
Start with a magic ring, we go up 3 chains and inside the ring we will knit 14 high stitches, when we finish them, we will close with a dwarf or slipped stitch over the first high stitch we made. Keep in mind that the beginning chains do not count as stitches.
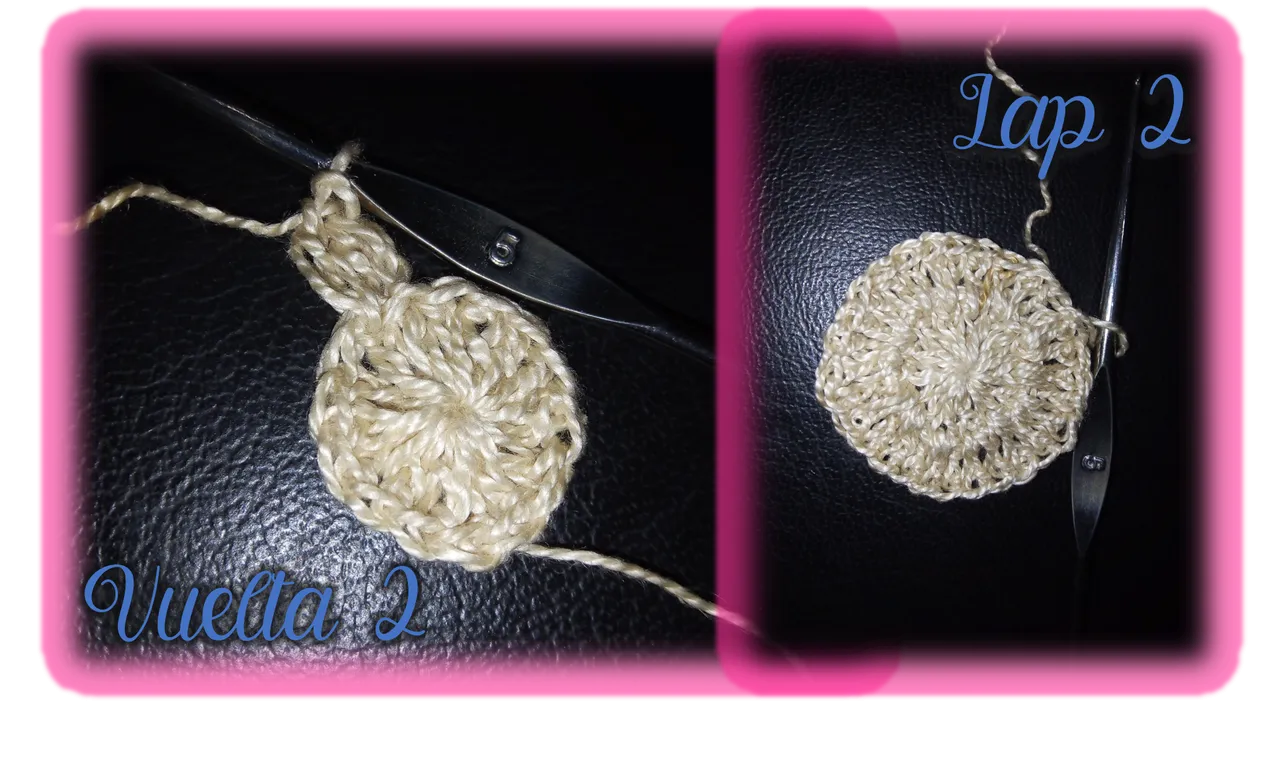
2da Vuelta:
Comenzamos con 3 cadenetas y hacemos un aumento en el primer punto alto de la base, eso implica, realizar 2 puntos altos en un mismo punto. Realizaremos lo mismo durante toda la vuelta, es decir, en cada punto de la base realizaremos 2 puntos altos, a la final tendremos 28 puntos y cerraremos con un punto enano en el 1er punto alto de la vuelta.
2nd Lap:
We start with 3 chain stitches and make an increase in the first high stitch of the base, that implies, make 2 high stitches in the same stitch. We will do the same for the whole round, that is, in each stitch of the base we will make 2 double crochet stitches, at the end we will have 28 stitches and we will close with a dwarf stitch in the 1st double crochet of the round.
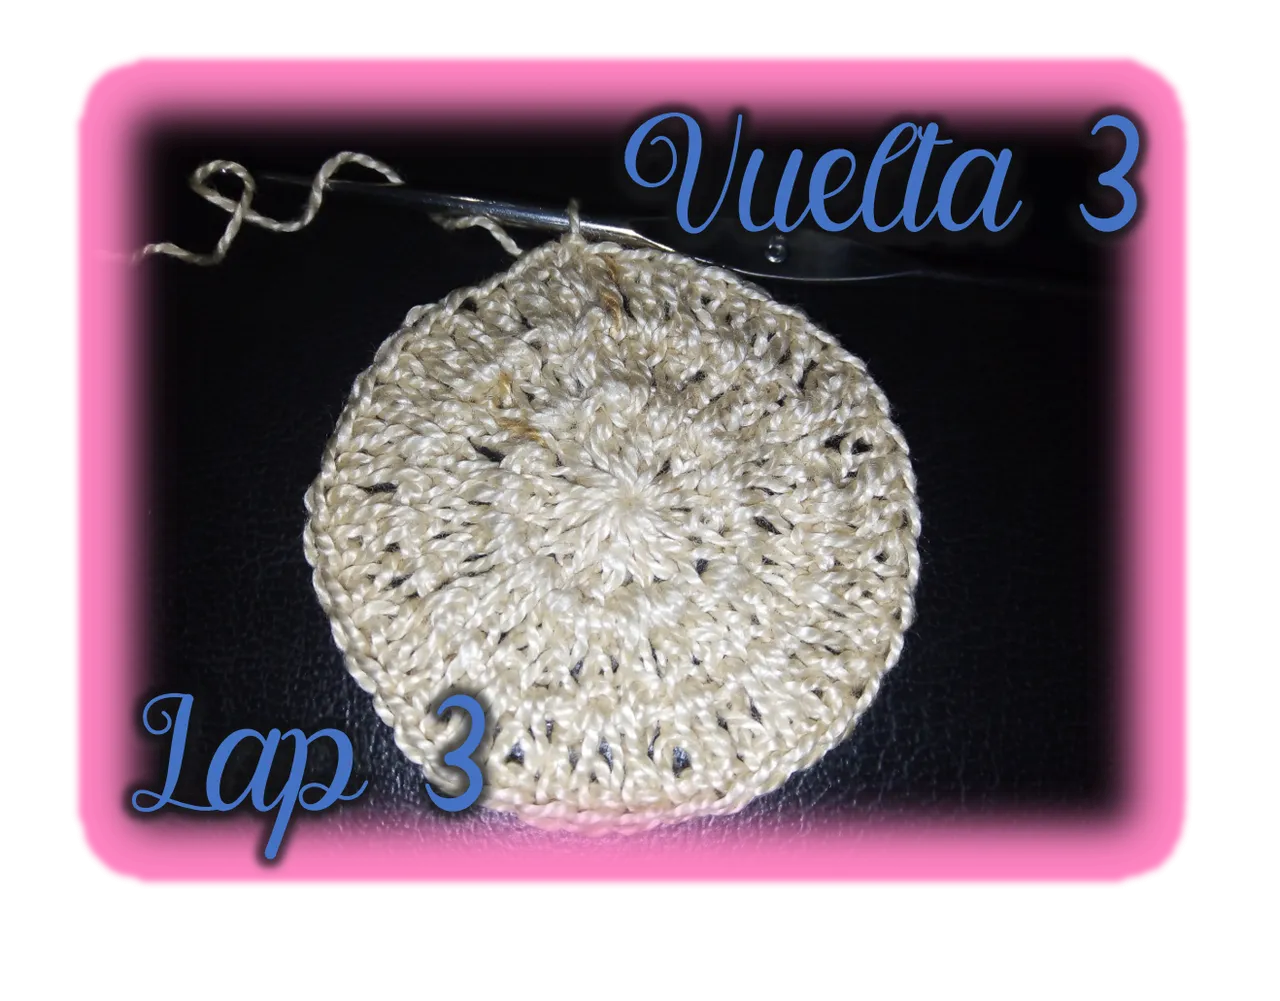
3era Vuelta:
Esta carrera la iniciaremos con las 3 cadenetas, luego realizaremos un aumento en el siguiente punto, en otras palabras, tejeremos 2 puntos altos en ese mismo punto. Después tejeremos un punto alto en el siguiente punto de la base, y así, continuaremos con el mismo patrón hasta terminar la vuelta. O lo que es lo mismo, primero realizaremos un aumento en un punto alto de la base, luego un punto alto en el siguiente punto y así consecutivamente, cuando completemos toda la vuelta tendremos 42 puntos y cerramos con un punto enano.
3rd lap:
We will start this race with the 3 chains, then we will make an increase in the next stitch, in other words, we will knit 2 high stitches in that same stitch. Then we will knit a double crochet in the next stitch of the base, and so on, we will continue with the same pattern until the end of the lap. Or what is the same, first we will make an increase in a high stitch of the base, then a high stitch in the next stitch and so on consecutively, when we complete the whole lap we will have 42 stitches and we close with a dwarf stitch.
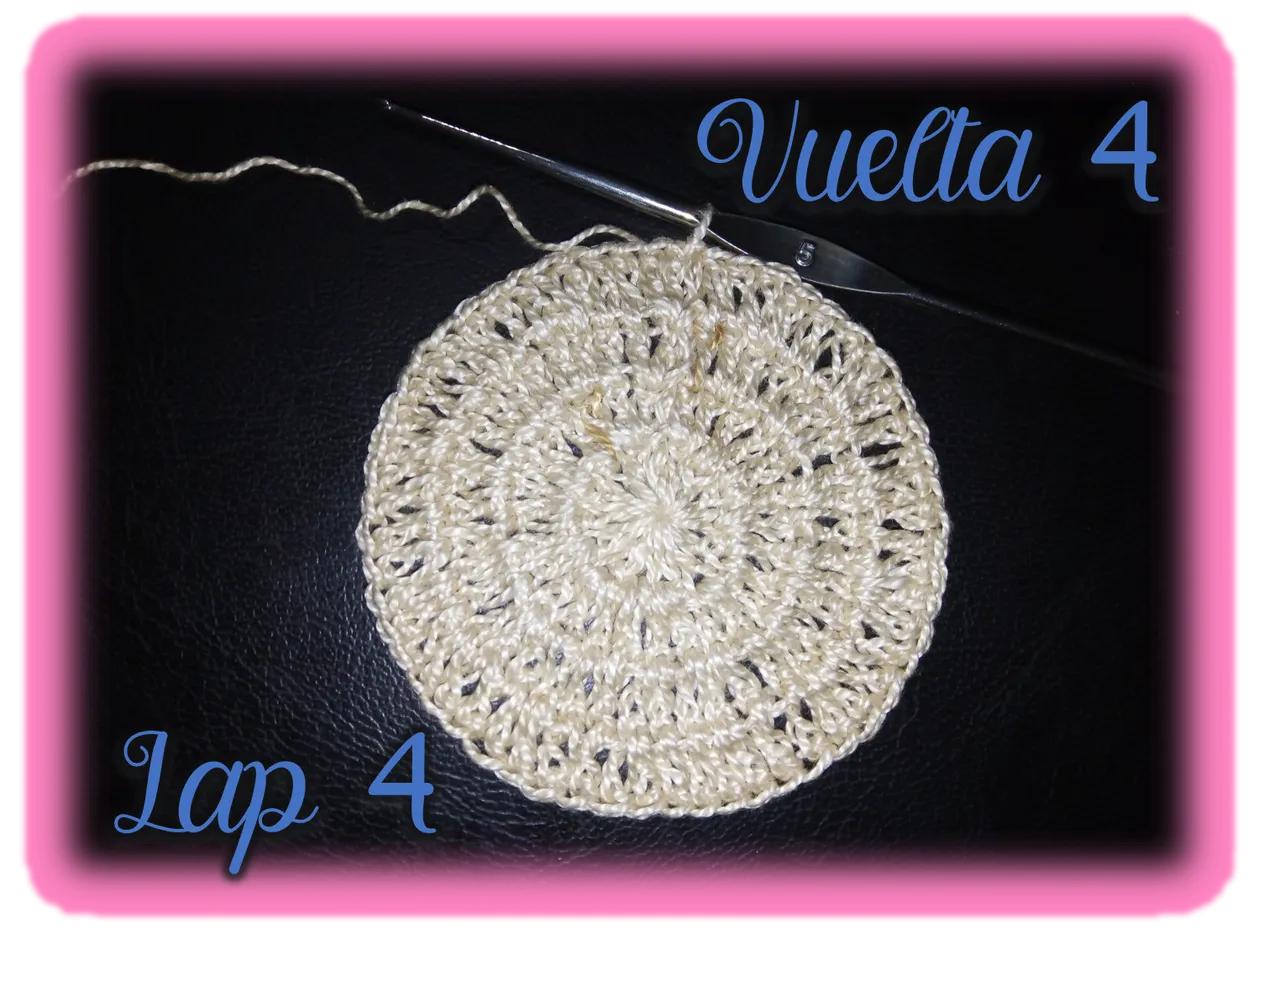
4ta Vuelta:
Iniciamos con 3 cadenitas como siempre, pero, en esta vuelta no realizaremos aumentos, trabajaremos un punto alto en cada uno de los puntos de la base, hasta terminar la vuelta, igual que siempre, cerraremos con un punto enano.
4th Lap:
We start with 3 chains as usual, but in this lap, we will not make increases, we will work a high stitch in each of the base stitches, until we finish the lap, the same as always, we will close with a dwarf stitch.

Vueltas 5 a la 39
Esta vuelta se realizará exactamente igual a la anterior, así continuaremos trabajando hasta llegar a tener en total 39 vueltas. Al final, obtuve 22 centímetro de largo, medido desde el inicio del tejido, claro, estas medidas dependerán del grosor del hilo que usted use, si el hilo es más grueso, por supuesto serán menos vueltas.
Laps 5 to 39
This lap will be done exactly the same as the previous one, so we will continue working until we have a total of 39 laps. At the end, I obtained 22 centimeters long, measured from the beginning of the weaving, of course, these measurements will depend on the thickness of the yarn you use, if the yarn is thicker, of course it will be less laps.
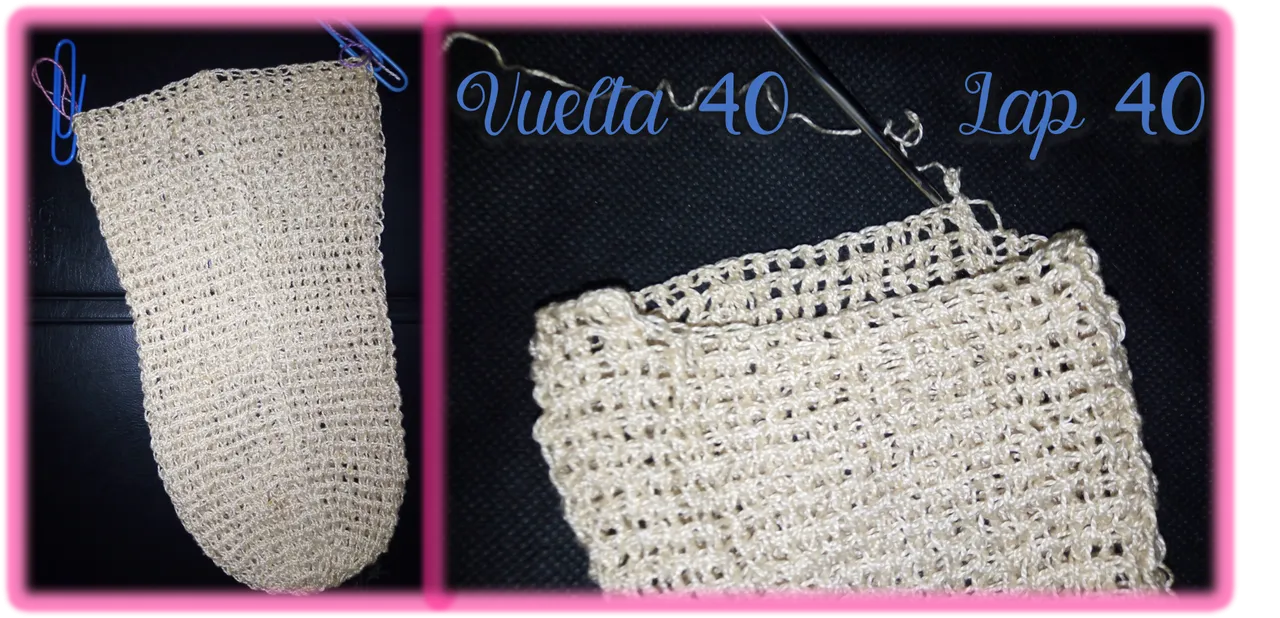
Vuelta 40:
Hasta ahora he realizado 39 vueltas y llego el momento de realizar el talón, para ello, primeramente, ubicamos el lugar donde hemos estado cerrando nuestro tejido en cada vuelta, esa parte, debería ubicarse hacia la parte de debajo del calcetín, es decir, iría hacia la planta del pie. Ubicamos los puntos que corresponden a la mitad de nuestra vuelta anterior y marcamos con un marcador o una hebra de hilo de otro color el punto que corresponde al punto central en cada lado como se muestra en la imagen. A partir de esta vuelta, si queremos podemos cambiar el color del hilo, para diferenciar el talón, yo particularmente, seguiré trabajando con el mismo color. Ahora, mientras tejamos el talón, solo trabajaremos en la mitad que corresponde a la planta del pie, es decir, donde se ubica los distintos puntos de cierre de las vueltas anteriores. Iniciamos subiendo 3 cadenetas en el punto que marcamos como centro, seguidamente, tejeremos un punto alto en cada uno de los puntos de la base, hasta llegar al otro punto que marcamos.
Lap 40:
So far I have made 39 laps and the time has come to make the heel, for this, first of all, we locate the place where we have been closing our knitting in each lap, that part, should be located towards the bottom of the sock, that is to say, it would go towards the sole of the foot. We locate the stitches that correspond to the middle of our previous lap and we mark with a marker or a strand of yarn of another color the stitch that corresponds to the central stitch on each side as shown in the image. From this lap on, if we want, we can change the color of the yarn to differentiate the heel, but I will continue working with the same color. Now, while we knit the heel, we will only work in the half that corresponds to the sole of the foot, that is, where the different closing stitches of the previous laps are located. We start by raising 3 chains in the stitch that we marked as the center, then we will knit a double crochet in each of the stitches of the base, until we reach the other stitch that we marked.
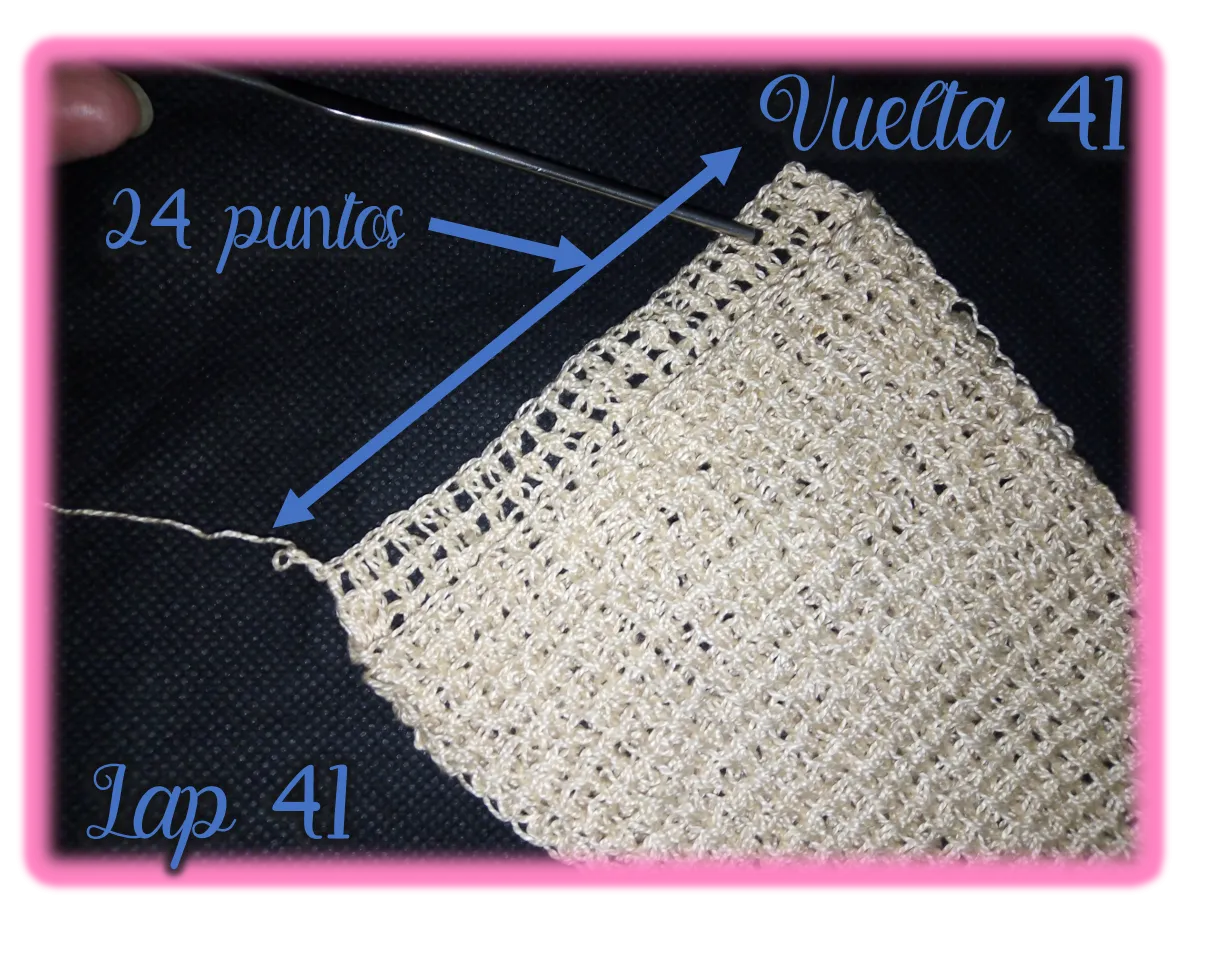
Vuelta 41
En esta siguiente vuelta, nos regresaremos tejiendo sobre los puntos que acabamos de tejer, iniciando subiendo con 3 cadenetas, le damos la vuelta a tejido y nos regresamos realizando un punto alto en cada punto alto de la carrera anterior. Ahora contaremos cuantos puntos tejimos en esta vuelta, en total tenemos 24 puntos, porque esa misma cantidad de puntos deberíamos obtener cuando realicemos el otro calcetín.
Lap 41
In this next lap, we will go back knitting over the stitches we just knitted, starting with 3 chain stitches, we will go around the knitting and we will go back knitting a double crochet in each double crochet of the previous row. Now we will count how many stitches we knitted in this lap, in total we have 24 stitches, because we should get the same amount of stitches when we knit the other sock.
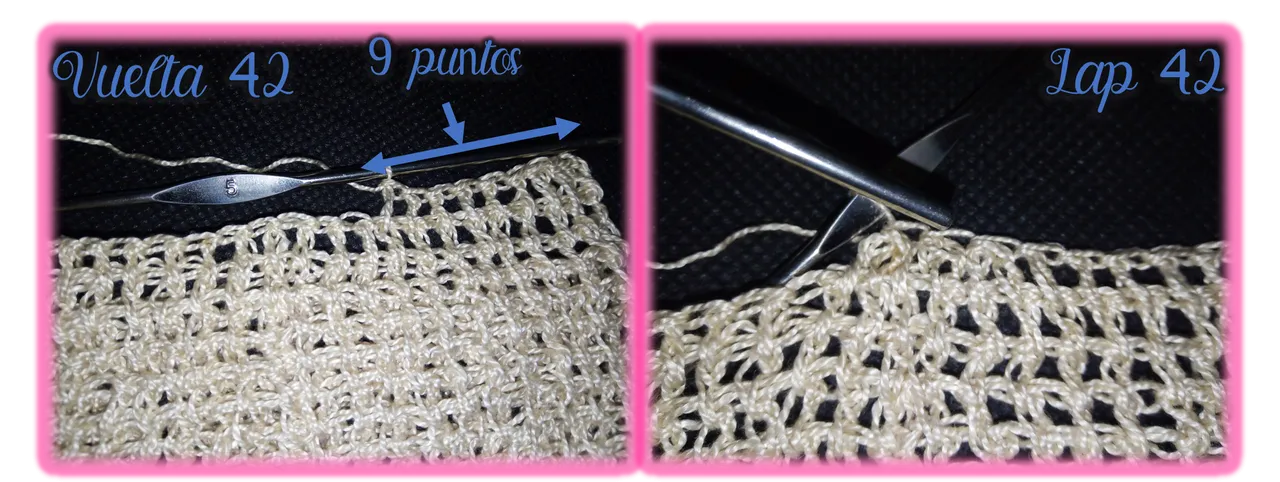
Vuelta 42:
En esta vuelta iniciaremos las disminuciones, se realizarán 3 disminuciones y deberán estar ubicadas en el centro del tejido. En otras palabras, iniciamos tejiendo 9 puntos altos, uno en cada punto de la carrera anterior. Ahora iniciamos las disminuciones, para ello tejemos un punto alto en el siguiente punto alto de la base, pero no lo cerramos y pasamos a tejer otro punto alto en el siguiente punto alto de la base y esta vez, si cerramos los dos puntos altos juntos. De la misma forma realizaremos dos disminuciones más, una vez realizadas, tejeremos 9 puntos altos más uno por punto de la base hasta terminar la vuelta.
Lap 42:
In this lap we will start the decreases, 3 decreases will be made and they must be located in the center of the fabric. In other words, we start by knitting 9 double crochet stitches, one in each stitch of the previous row. Now we start the decreases, for this we knit a high stitch in the next high stitch of the base, but we do not close it and we pass to knit another high stitch in the next high stitch of the base and this time, if we close the two high stitches together. In the same way we will make two more decreases, once done, we will knit 9 high stitches plus one per stitch of the base until we finish the lap.
Vuelta 43
Iniciaremos igualmente con 3 cadenitas, realizamos en cada punto de la base, 8 puntos altos (un numero menos que la vuelta anterior). Seguidamente iniciamos las disminuciones en este caso serán 2, la primera la haremos de los dos siguientes puntos consecutivos de la carrera anterior. Luego hacemos un punto alto en el siguiente punto de la base y seguido trabajamos otra disminución de los dos siguientes puntos de la base. A partir de aquí, tejemos 8 punto alto más, uno por cada uno de los puntos que nos quedan en la base.
Lap 43
We will also start with 3 chains; we make 8 double crochet stitches in each stitch of the base (one number less than the previous lap). Then we start the decreases, in this case there will be 2 decreases, the first one will be from the next two consecutive stitches of the previous row. Then we knit a double crochet in the next stitch of the base and then we work another decrease of the next two stitches of the base. From this point on, we knit 8 more double crochet stitches, one for each of the remaining stitches in the base.
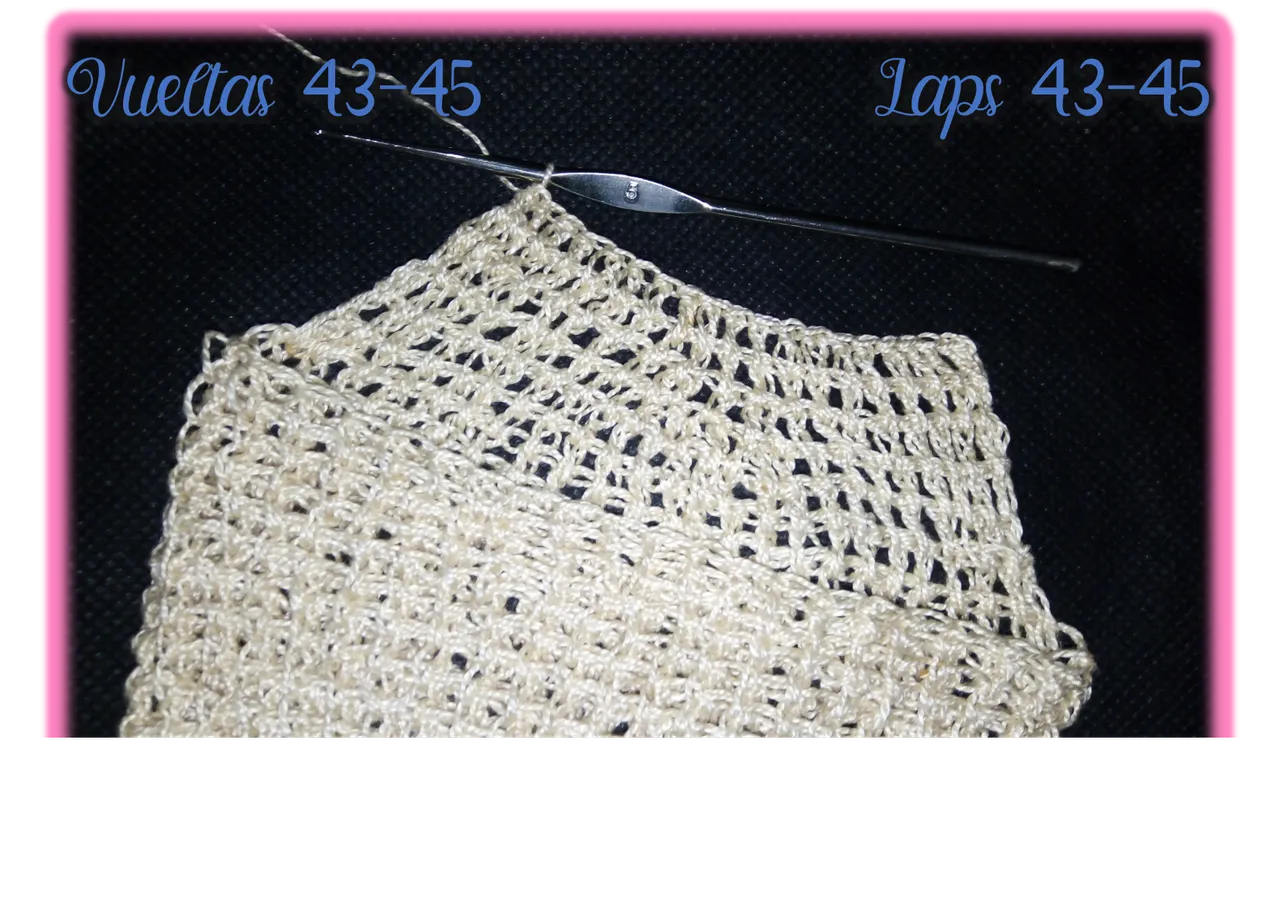
Vueltas 44 y 45:
Estas dos vueltas, serán iguales, por cada punto de la base, realizaremos un punto alto, recordemos que en las vueltas anteriores realizamos reducciones, así que, cada dos puntos de disminución, ahora cuentan por un punto, en total trabajamos 19 puntos, en estas 2 vueltas.
Laps 44 and 45:
These two laps, will be the same, for each stitch of the base, we will make a high stitch, remember that in the previous laps we made reductions, so, every two decrease stitches, now count for one stitch, in total we work 19 stitches, in these 2 laps.
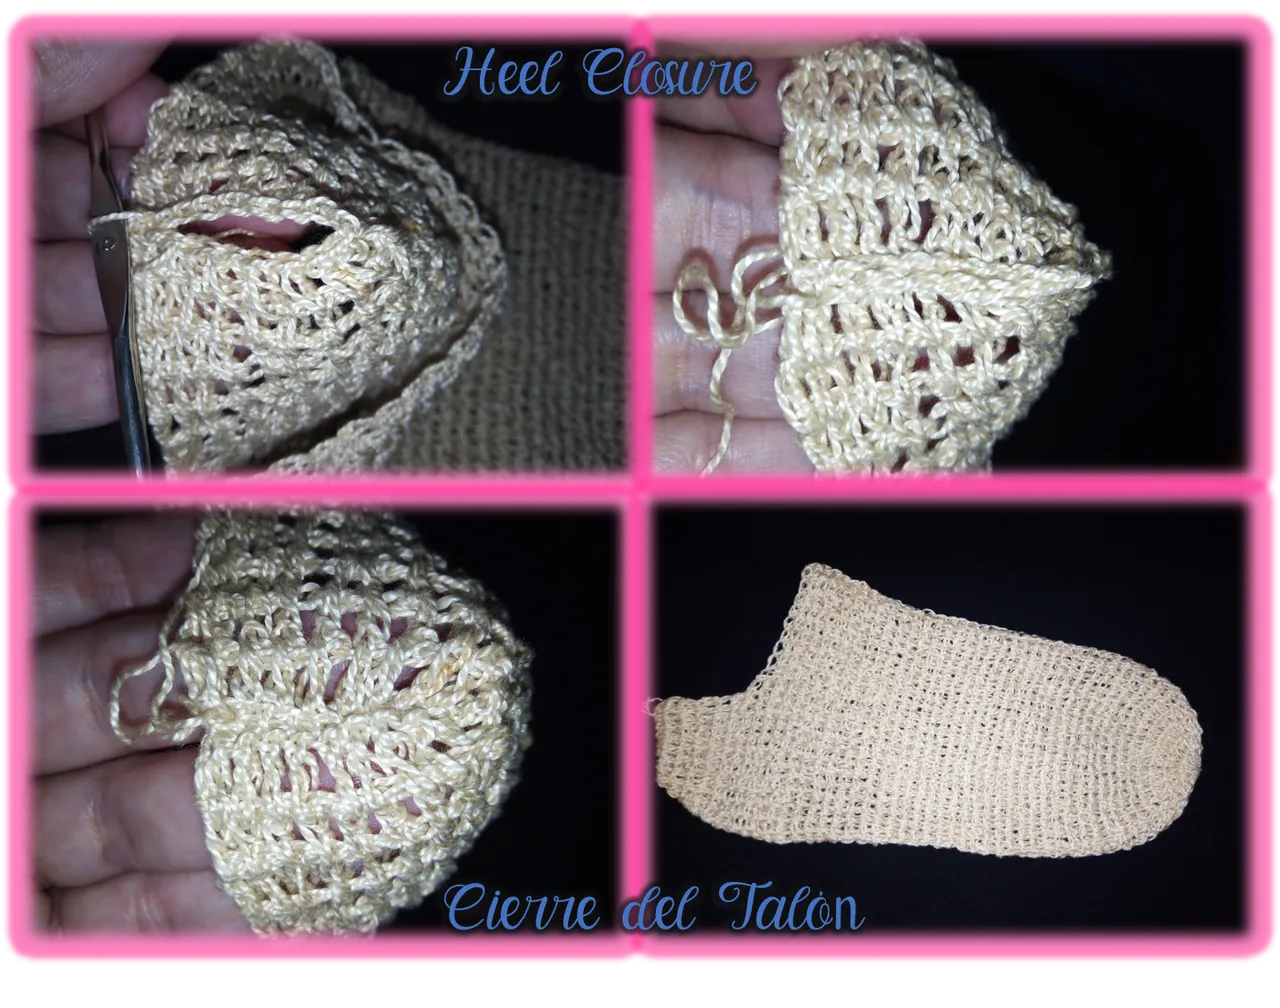
Cierre del Talón:
Para ello doblaremos lo que acabamos de tejer por la mitad e iremos uniendo los bordes con puntos deslizados o puntos enanos tal como se los muestro en la figura anterior. Cuando se termine de cerrar el talón del calcetín, estará terminado.
Closing the heel:
To do this we will fold what we have just knitted in half and we will go joining the edges with slipped stitches or dwarf stitches as I show them in the previous figure. When you finish closing the heel of the sock, it will be finished.
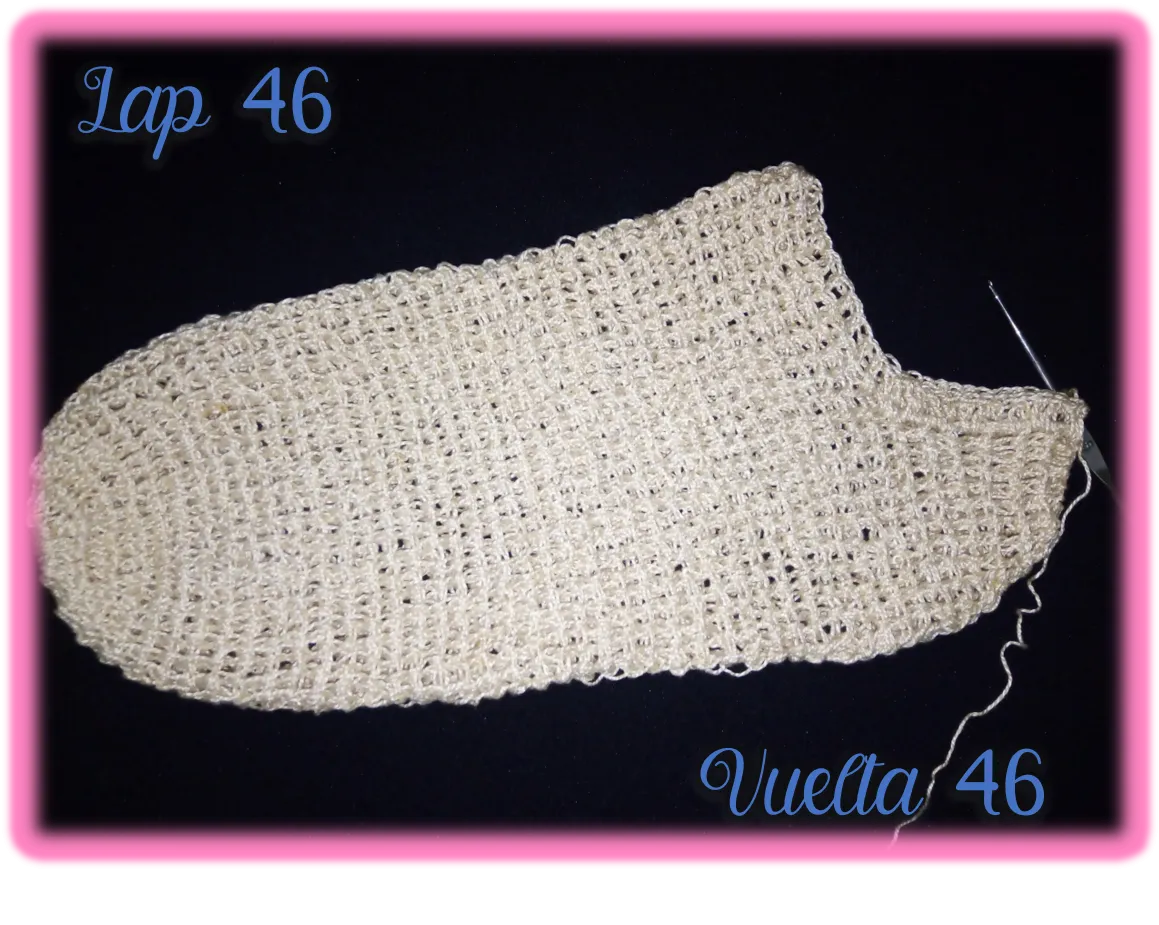
Vuelta 46: Columna del Calcetín
Ahora iniciaremos la columna del calcetín, para ello, si se había cambiado el color del hilo para realizar el talón, primero debemos regresar al color de hilo anterior. Ok, comenzamos con 3 cadenetas partiendo de la parte central del talón, es decir, donde acabamos de cerrar el talón. En la parte del talón nos encontraremos que tenemos puntos altos acostados, entonces, realizaremos dos puntos altos por cada punto alto acostado. Cuando terminamos de tejer los puntos acostado, hacemos un punto alto en el punto donde se une con los puntos en posición normal. Cuando llegamos a la parte donde los puntos de la base están en la posición normal, que en este caso corresponde a la zona del empeine del pie, trabajaremos un punto alto por cada uno de los puntos de la base. Ahora cuando lleguemos nuevamente a los puntos altos acostados, realizaremos un punto alto en el punto de la unión y seguidamente realizamos dos puntos altos por cada punto alto acostado que nos encontremos, hasta completar la vuelta y cerraremos con un punto enano.
Lap 46: Sock column
Now we will start the column of the sock, for this, if the yarn color had been changed to make the heel, we must first go back to the previous yarn color. Ok, we start with 3 chains starting from the central part of the heel, that is, where we just closed the heel. In the heel part of the heel we will find that we have a lying crochet stitch, so we will knit two crochet stitches for each lying crochet stitch. When we finish knitting the lying stitches, we knit a single crochet in the stitch where it joins the stitches in normal position. When we reach the part where the base stitches are in the normal position, which in this case corresponds to the instep area of the foot, we will work a double crochet for each of the base stitches. Now when we get back to the high lying stitches, we will work a high stitch in the joining stitch and then we will work two high stitches for each high lying stitch that we find, until we complete the lap and we will close with a dwarf stitch.
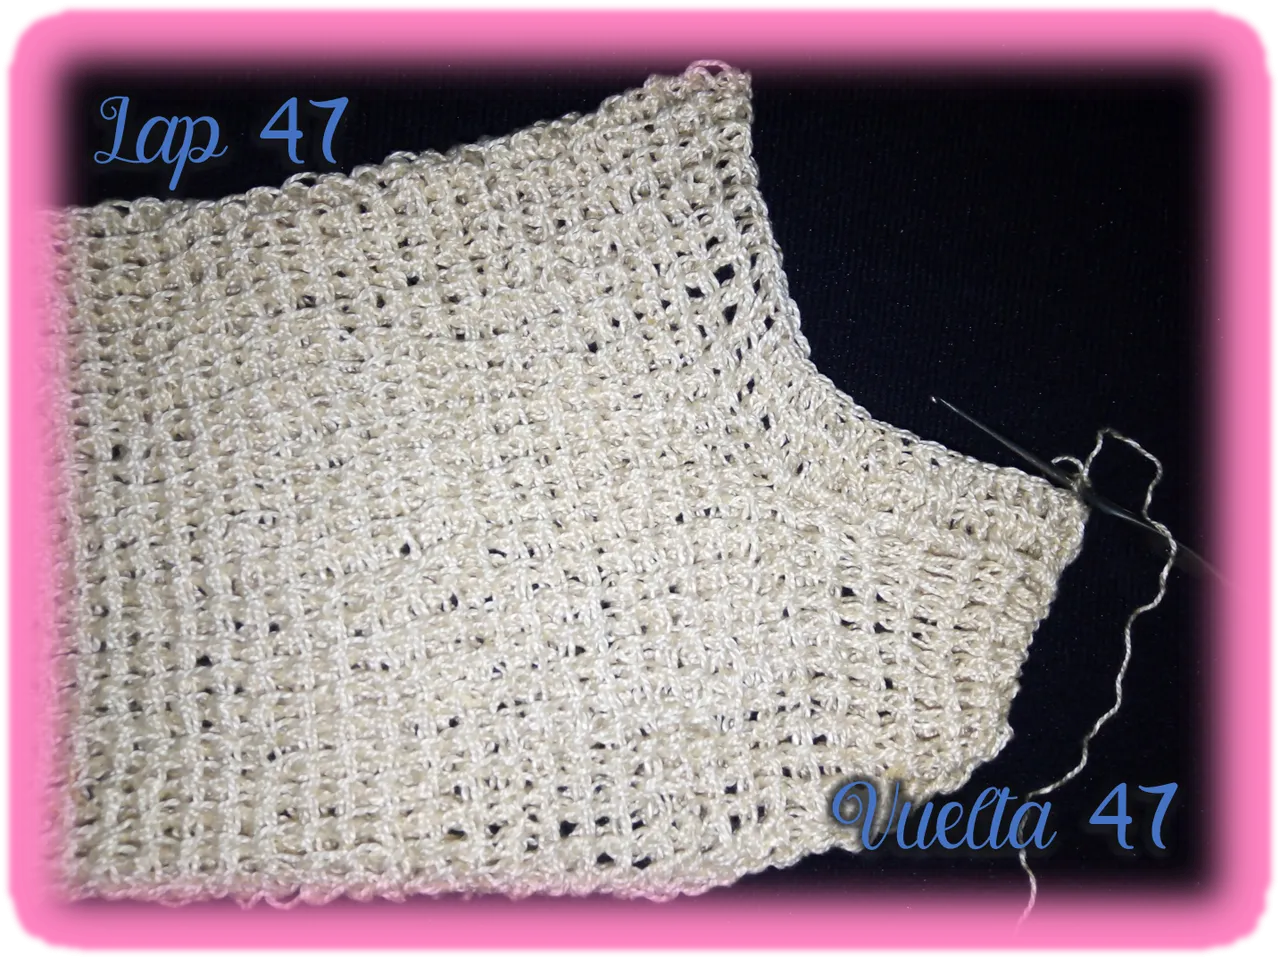
Vuelta 47:
En esta vuelta, iniciamos como siempre y simplemente realizaremos un punto alto en cada uno de los puntos altos de la base, y al finalizar cerramos con un punto enano. Esta vuelta nos servirá como base para iniciar el esquema de tejido que usaremos en la columna del calcetín.
Lap 47:
In this lap, we start as usual and simply knit a single crochet in each of the high stitches of the base, and at the end we close with a single crochet. This lap will serve as a base to start the knitting pattern that we will use in the column of the sock.
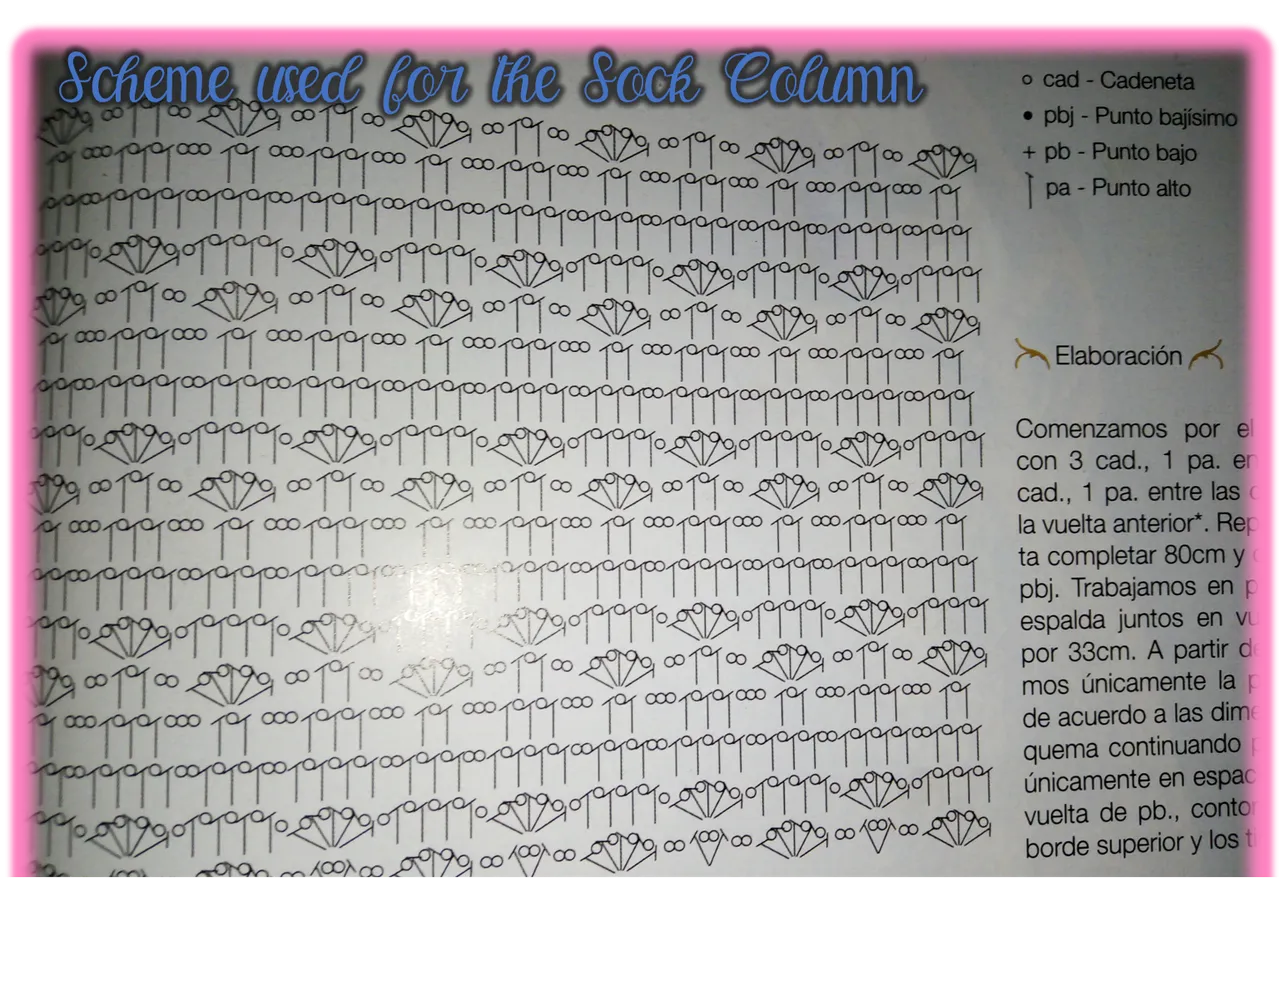
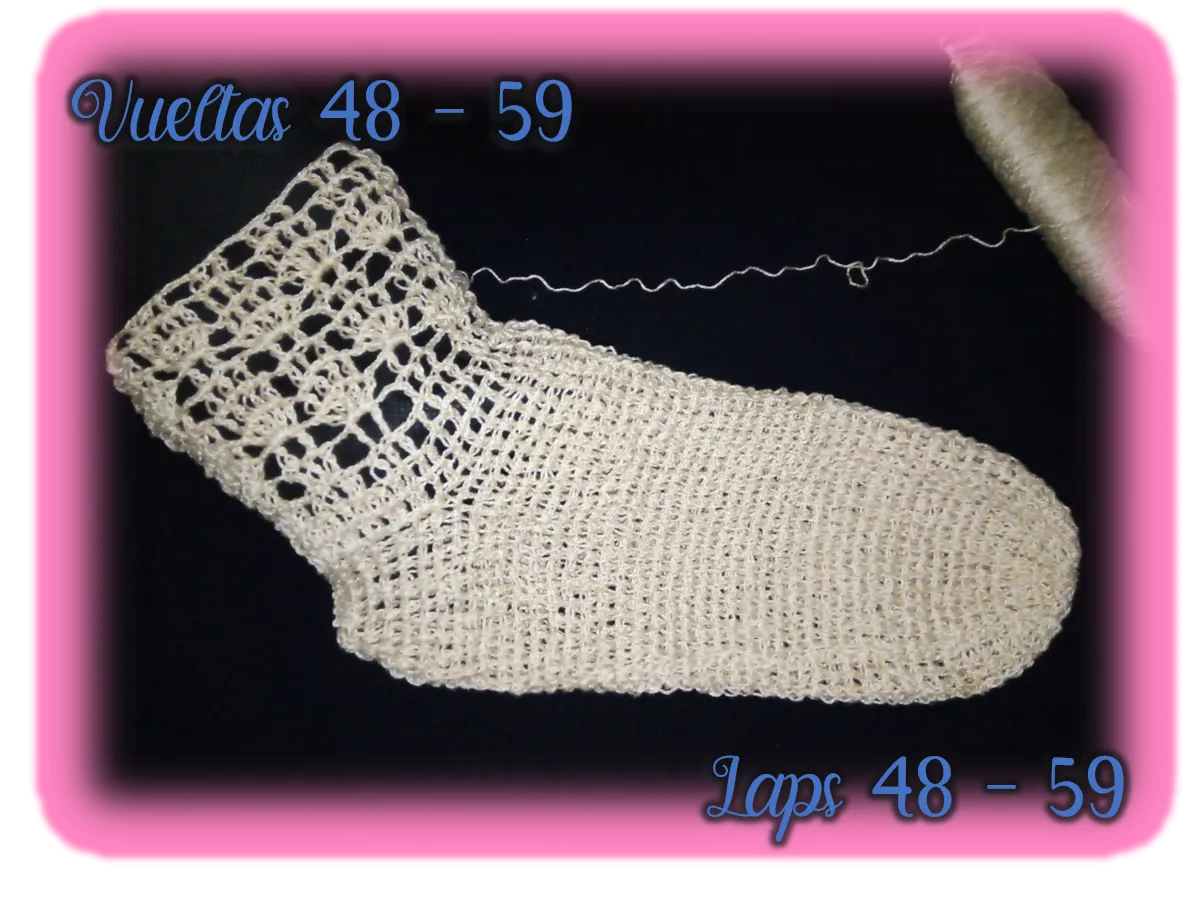
Vueltas 48 a la 59:
La imagen anterior, corresponde al diagrama que utilicé, lo saque de una de mis revistas de tejido, allí lo usaron en una blusa, pero me gusto el diseño y se puede adaptar perfectamente, a la columna del calcetín. A partir de este momento, el número de vueltas dependerán del largo de la media que usted desee, en mi caso yo realice 12 vueltas más.
Laps 48 to 59:
The image above, corresponds to the diagram I used, I took it out of one of my knitting magazines, there they used it in a blouse, but I liked the design and it can be adapted perfectly, to the column of the sock. From this point on, the number of laps will depend on the length of the sock you want, in my case I made 12 more laps.
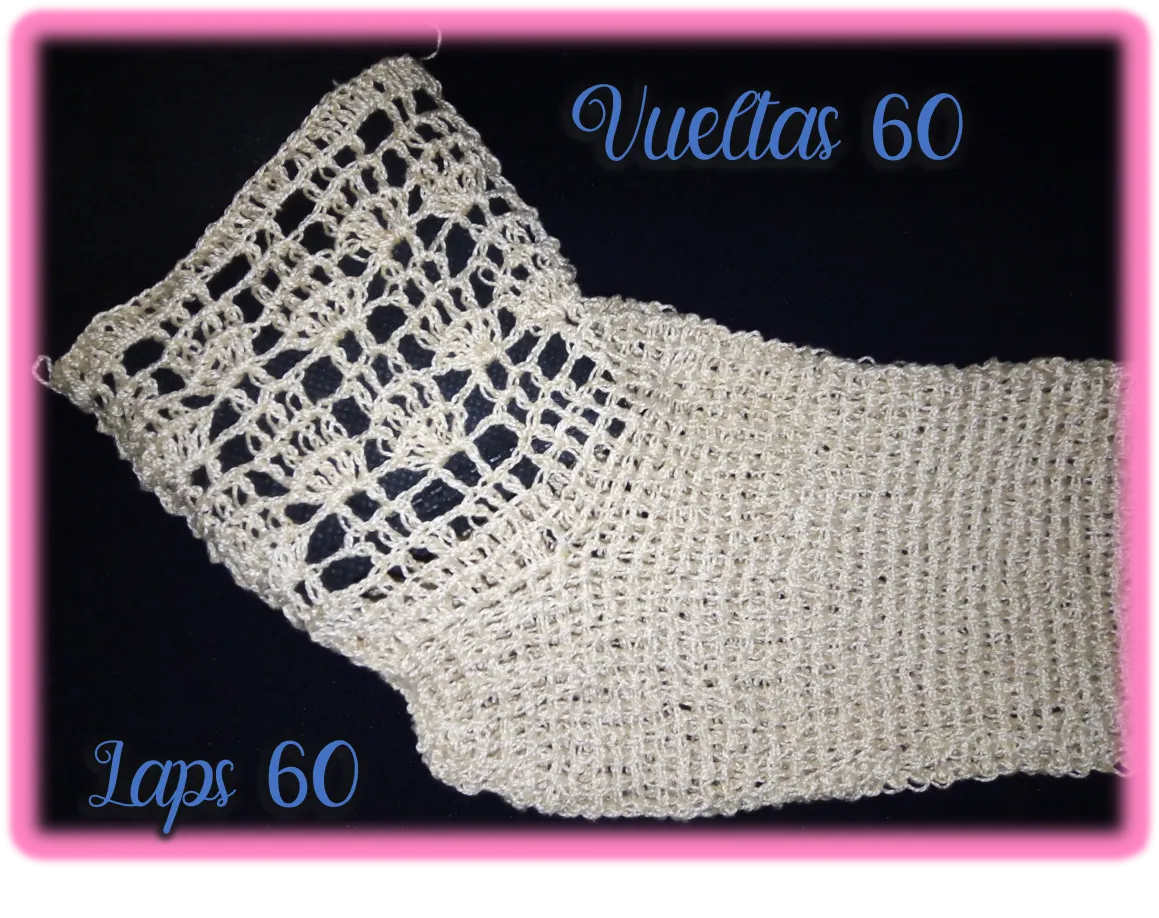
Vuelta 60:
Esta vuelta, es simplemente para tener la base necesaria para comenzar con el punto elástico, realizaremos un punto alto en cada uno de los puntos de nuestra base y cuando terminemos la vuelta igual que siempre cerramos con un punto enano.
Lap 60:
This lap, is simply to have the necessary base to start with the elastic stitch, we will make a high stitch in each of the stitches of our base and when we finish the lap the same as always, we close with a dwarf stitch.
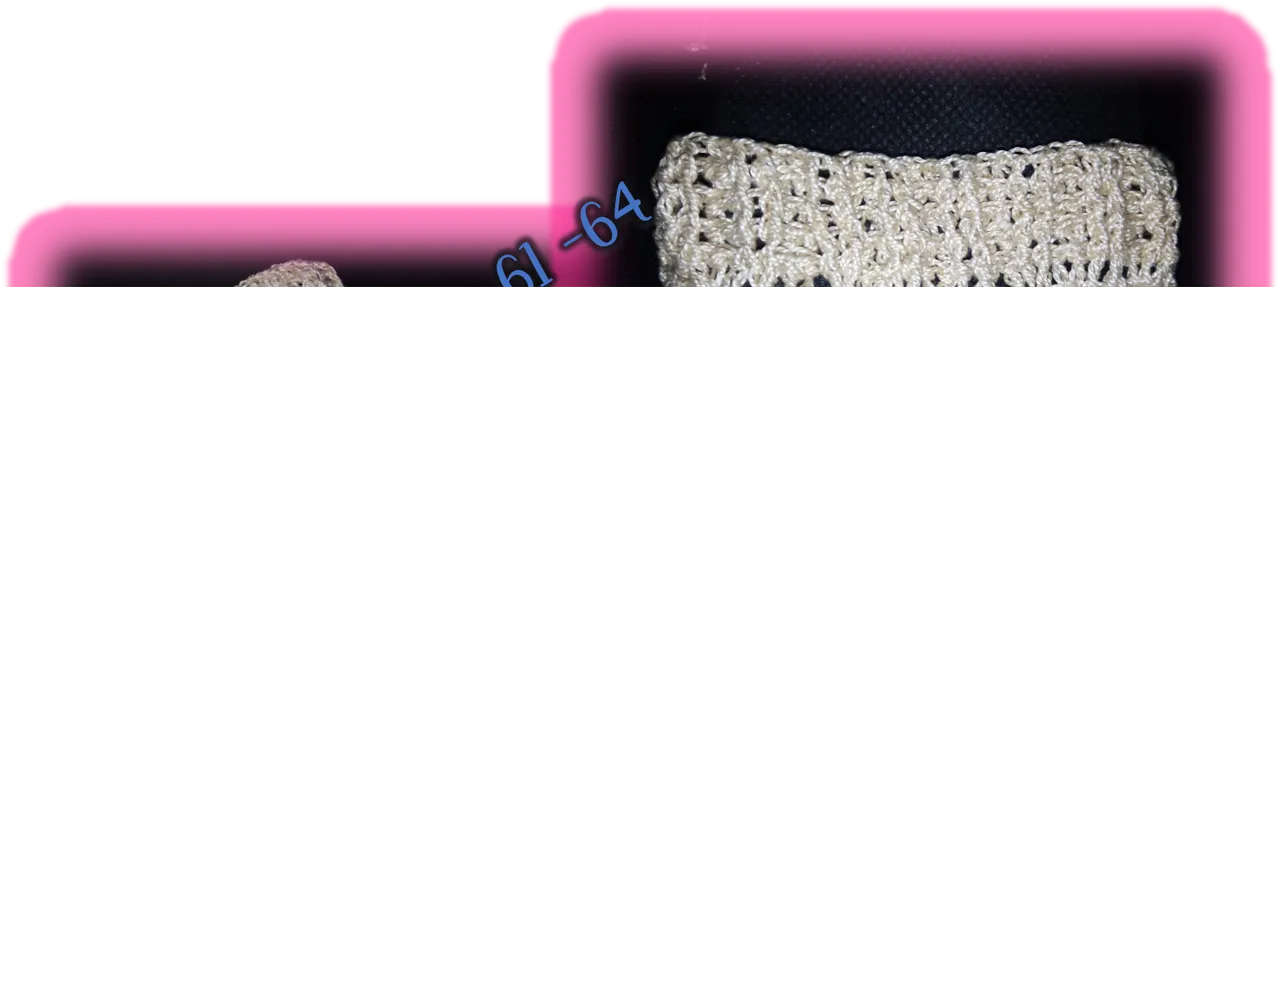
Vueltas 61 a la 64: Punto Elástico
Iniciamos subiendo 3 cadenetas, hacemos una lazada y realizamos un punto en relieve tomando el punto de la base por el derecho para hacer un punto alto en relieve hacia el frente. Luego, hacemos otra lazada y tomamos el siguiente punto alto de la base desde el revés, para realizar un punto alto en relieve hacia la parte interna. Esa misma secuencia la realizaremos hasta terminar la vuelta y cerraremos nuevamente con un punto enano. De la misma forma realizaremos las 3 siguientes vueltas para completar un total de 4 vueltas, con las cuales terminaremos nuestra media. Lo último será agregarle el hilo elástico o elástico para que se ajuste mejor el calcetín y se mantenga en su lugar.
Laps 61 to 64: Ribbing Stitch
We start with 3 chains, knit a loop and knit a relief stitch by picking up the base stitch from the right side to knit a relief stitch towards the front. Then, we make another loop and take the next high stitch of the base stitch from the purl, to make a high relief stitch towards the inside. We will do the same sequence until the end of the lap and we will close again with a dwarf stitch. In the same way we will make the next 3 laps to complete a total of 4 laps, with which we will finish our stocking stitch. The last thing will be to add the elastic thread or elastic to better fit the sock and keep it in place.
Contenido y fotografías de mi propiedad intelectual
Información Técnica
| Cámara | Pentax * istDL |
|---|---|
| Lente | * Pentax 18-55 |
| Iluminación | Luz Natural |
| Locación | Barcelona, Estado Anzoátegui, Venezuela |
Content and photographs of my intellectual property
Technical information
| Camera | Pentax * istDL |
|---|---|
| Lens | * Pentax 18-55 |
| Lighting | Natural Light |
| Location | Barcelona, Anzoátegui State, Venezuela |