Hola, hola mis queridos amigos!.
Ayer y hoy me fué imposible hacer mi publicación ya que el internet no me dejó.
Pero aunque ya es tarde quiero dejar mi participación en el concurso que aún está vigente.
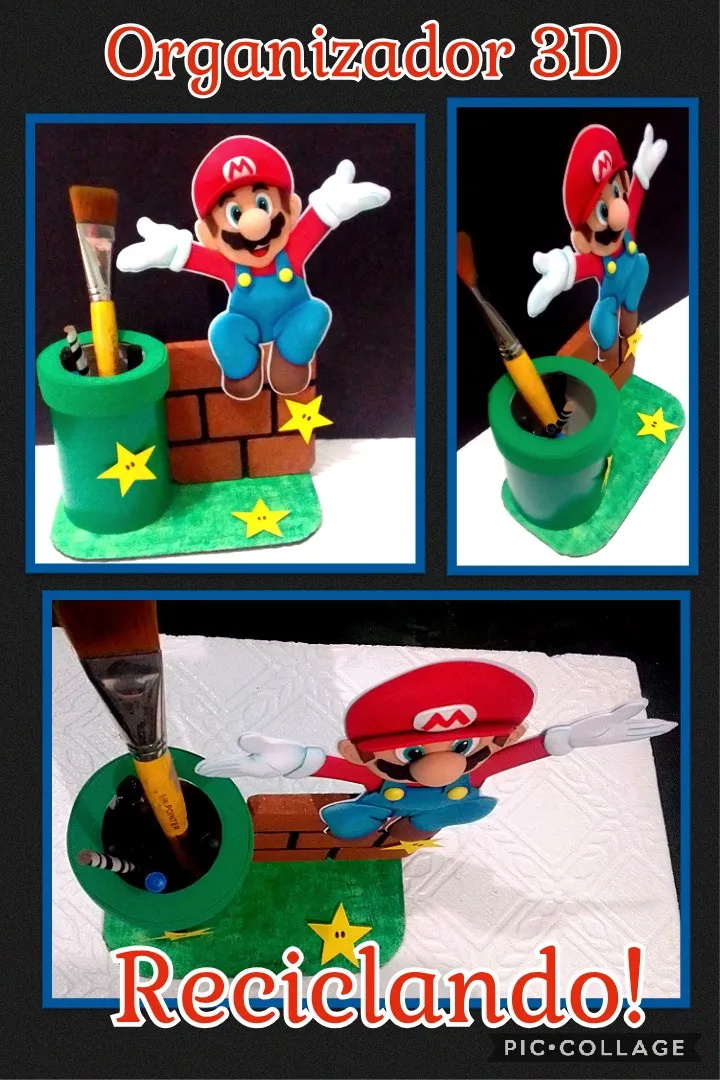
Hoy les voy a compartir un lindo y muy útil paso a paso, es un
Organizador para cuarto de niños con la imágen de Mario Bros, un personaje que a todos les encanta, lo que realicé utilizando materiales reciclables y no reciclables, que puedes conseguir fácilmente.
Para este paso a paso usarás los siguientes materiales:
| Cartulinas | Cartón de caja | Foami de colores | Anime o icopor |
|---|---|---|---|
| Envase plástico | Pinturas | Pinceles | Marcador |
| Tijera | Silicón | Acocador | Goma espuma |
| Lápiz | Dibujo | Regla |
Ahora comienza el procedimiento:

- Remarcar el dibujo con lápiz de mina blanda (b) y transferir colocando el dibujo sobre el color del foami respectivo, frotando con las orejas de la tijera.
- Este procedimiento lo harás con cada una de las piezas que tenga el dibujo.

- Con el pincel húmedo con agua, mojas la punta del pincel y empieza a sombrear todas las partes de la cara, dejas secar y luego empezarás rellenando con un pincel delgado, los ojos y boca, dejar secar y mojar la punta trasera del pincel y rellenar la parte negra del ojo.
- Después empezar y sombrear y delinear todas las piezas.
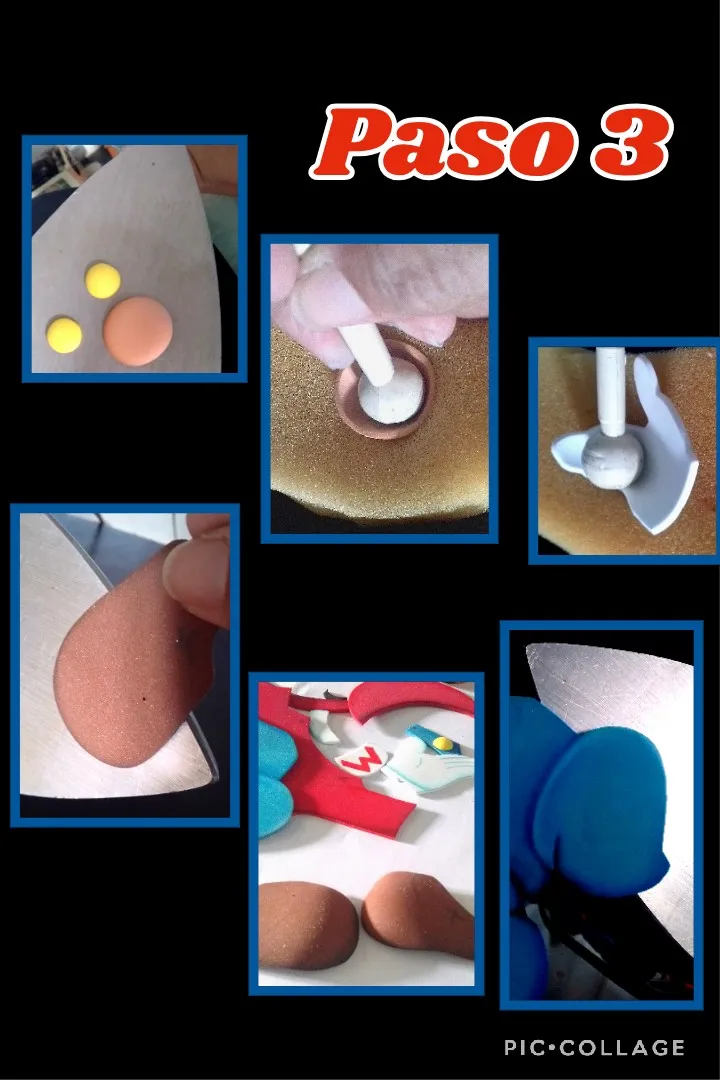
- Calentar un poco la plancha de ropa y colocar la naríz y botones para que tomen volúmen y coloca sobre un pedacito de goma espuma y empieza a darle de manera circular con el acocador, verás que toma mucho volúmen.
- Luego colocarás las puntas de los zapatos y repites el mismo procedimiento, esto lo harás en las partes que lleven más volúmen
manos, rodillas, barriga y gorra.

- Ahora toca unir las piezas: (sólo en las manos pegarás un pedacito de papel y unirás con las mangas de la camisa), dejas secar y recortas con mucho cuidado por detrás y pegas el puño.
- Luego pegas la braga y los botones, y así vas armando toda la pieza, fijando bien cada pieza y pegando con mucho cuidado y poco silicón para que no se ensucie la pieza, recuerda que un buen acabado, siempre es importante.
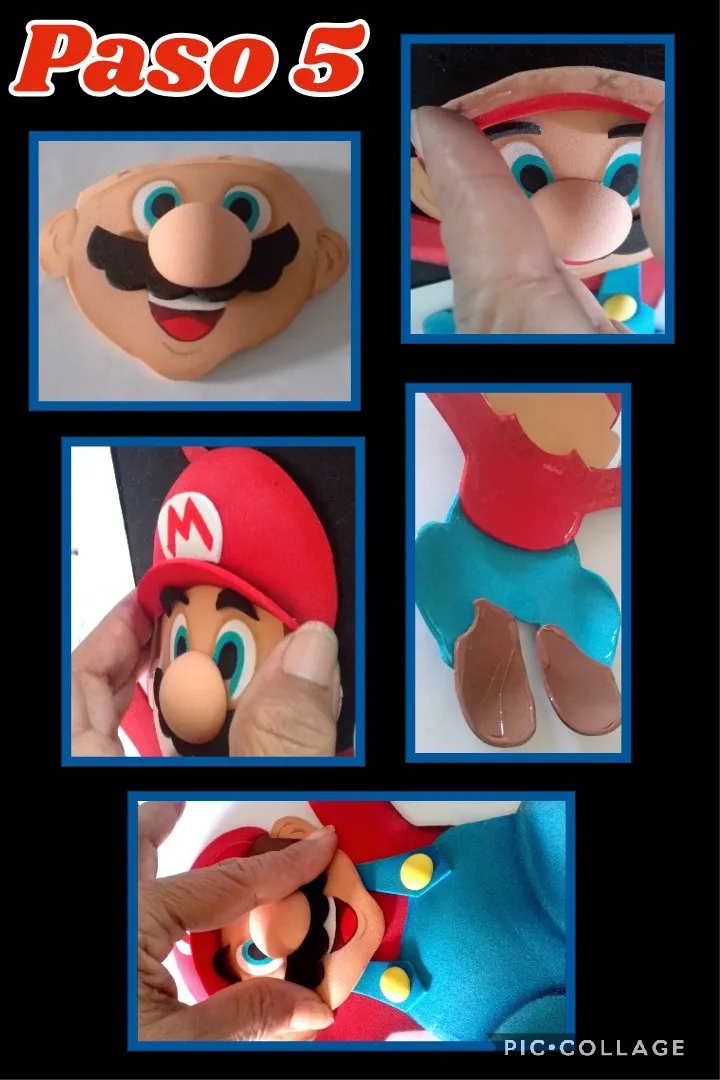
- Pegados la naríz y el bigote, pega con mucho cuidado, aplicando silicón sobre la parte de la frente y pega la visera de la gorra, has un poco de presión hasta que pegue, y después le pegas la parte superior de la gorra.
- Unidas ya las piezas procede a aplicar silicón por todo el borde y pega sobre una cartulina blanca haciendo presión solo por el borde para que no pierda el volumen.
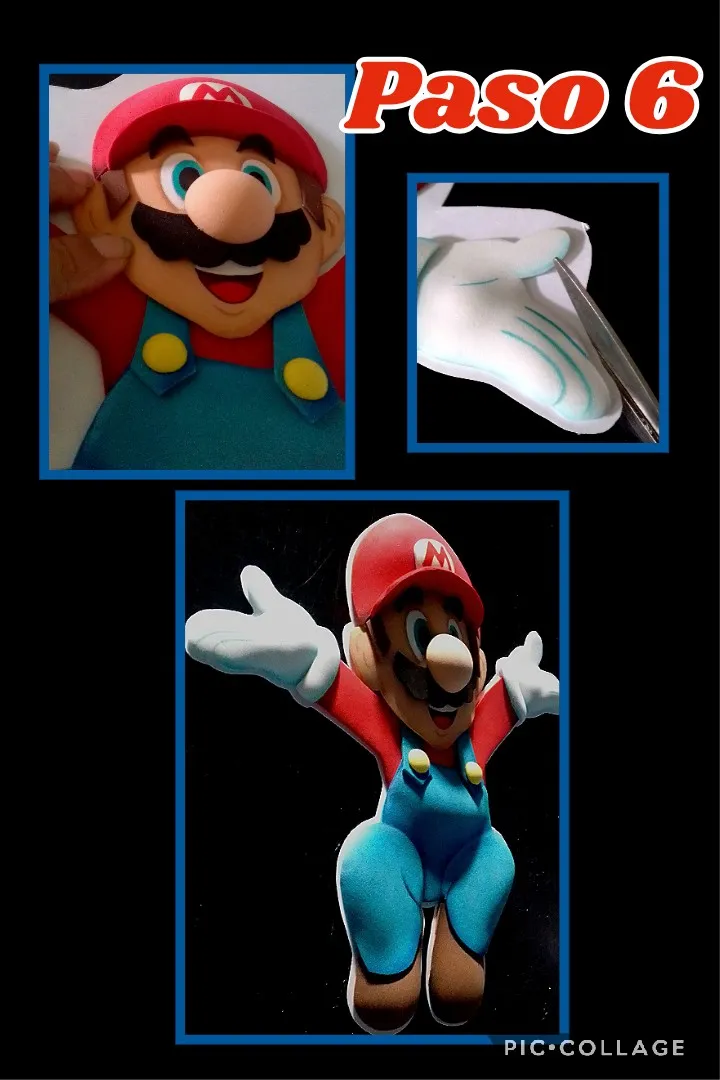
- Deja secar bien y empieza a recortar dejando 2 o 3 milímetros por fuera de la figura.
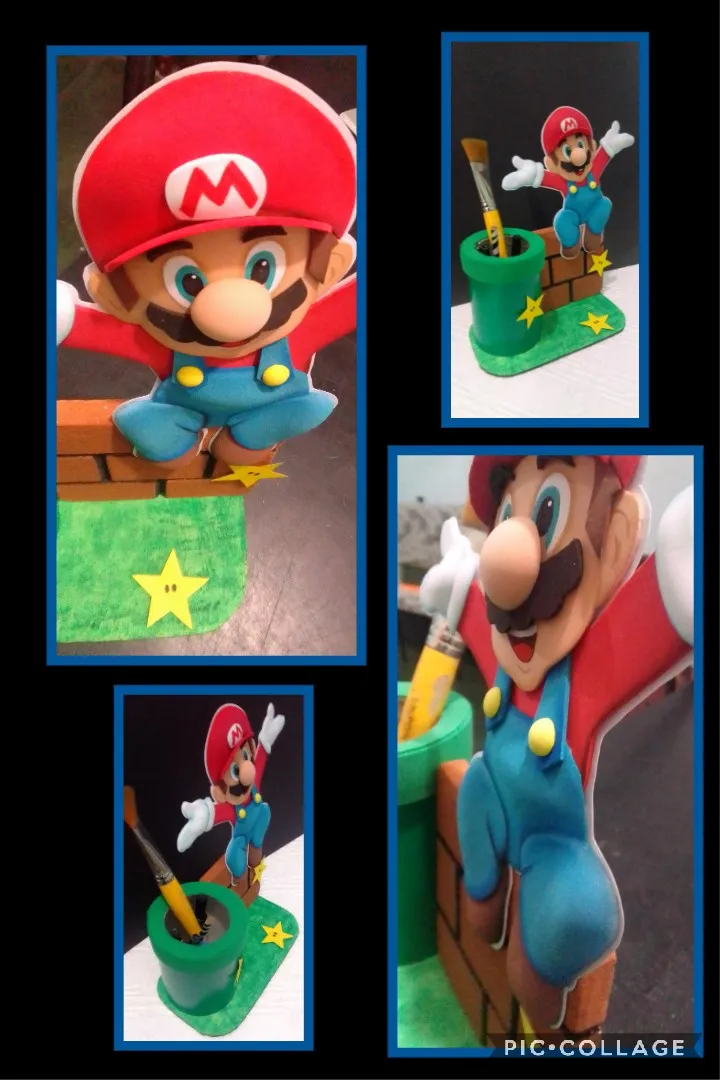
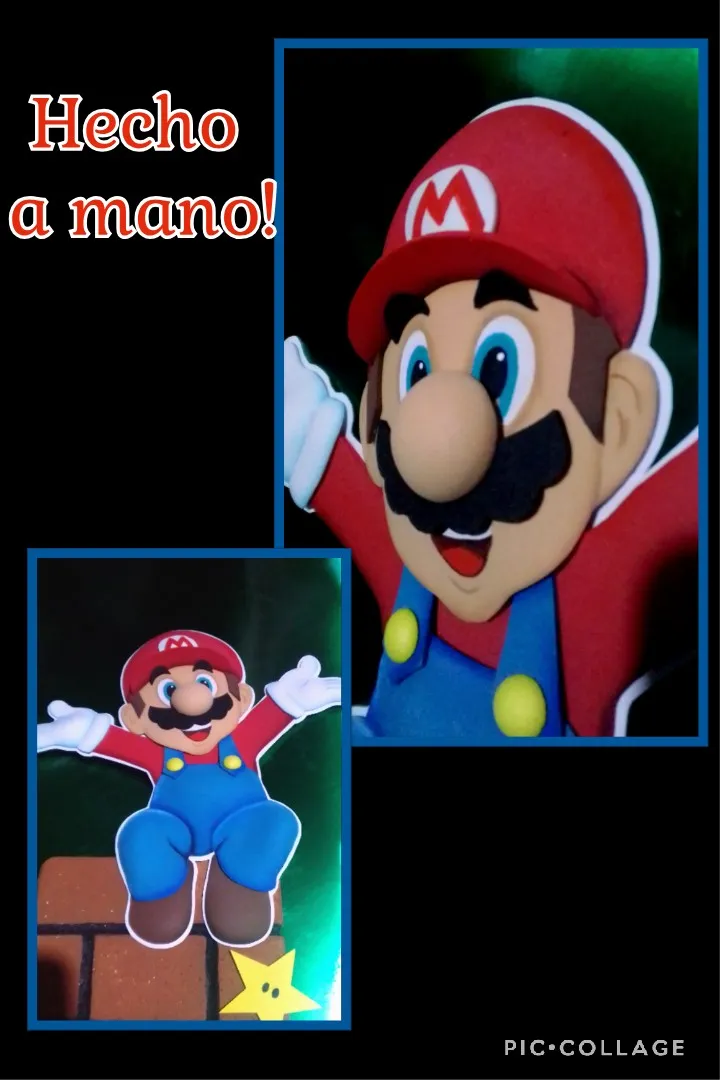
Así te quedará de lindo este Mario!.

Para realizar el tubo verde de Mario Bros:
- Toma las medidas del envase plástico y recorta un rectángulo de ese tamaño, claro aumentando 2 cms más ancho para unir las puntas al pegar con silicón.
- Pegada la cartulina, recortarás una tira de foami 2 cms más ancha que la de cartulina y pega una tira de cartón en la parte de adentro para dar volúmen a la parte de arriba y pega al tubo.
- Aparte recortarás un círculo del ancho de la boca del envase y pegas. (ver foto) Así ya está listo el tubo!
- En cartón de caja, recorta un óvalo o la forma que te agrade y pinta de verde, aplicando 2 manos y luego con pintura verde más oscura, da toquecitos con el pincel acostado, para semejar grama.
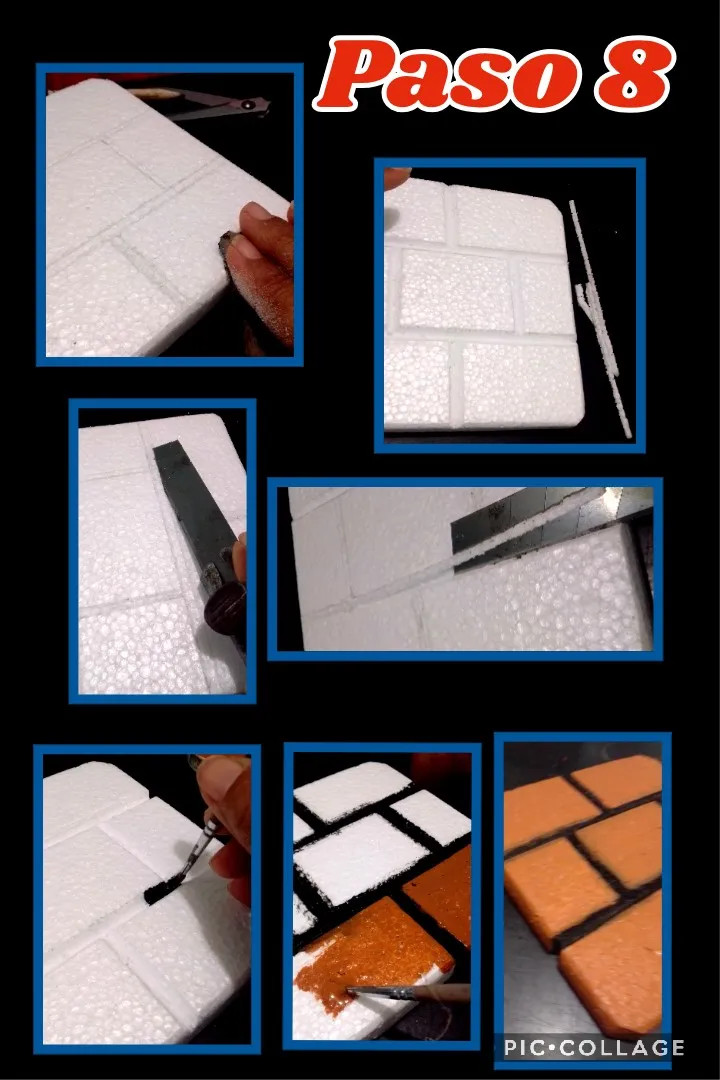
- Toca ahora trabajar con el anime:
- Recorta un cuadrado, marca o dibuja los ladrillos, lija los bordes y luego con una cuchilla empieza a recortar el anime inclinando la cuchilla a ambos lados hasta sacar la ranura.
- Hecho esto, mojarás en pintura negra el pincel y rellenarás las ranuras hechas, dejas secar un poco y empieza a aplicar la pintura marrón a lo que serán los ladrillos y queda listo.

- Para Decorar, recorta unas estrellas en cartulina amarilla, dibuja unos ojos y pega detrás un trocito de silicón y pega donde te guste.
- Aplica silicón en la parte posterior del envase y pega sobre el cartón pintado.
- Luego aplica silicón en un borde del anime y pega al lado del tubo.
- Por último aplica silicón en los zapatos de mario y pega al ladrillo y Ahora ya está terminado este bonito y sencillo organizador.
Espero te guste este lindo paso a paso, hecho para tí, para que te animes y lo hagas tu mismo.
Este tutorial lo traduje con DeepL, usando etiquetas HTML, las fotos fueron capturadas por la cámara de mi Blu G5 y editadas con Pic Collage.
Utilicé la fuente https://www.pinterest.es/pin/476255729353102748/

Ahora me Despido agradecida por tu visita, apoyo y por tu comentario....
Saludos, éxitos y bendiciones para ti.
English
Hello, hello, my dear friends!
Yesterday and today it was impossible for me to make my post since the internet didn't let me.
But even though it's late I want to leave my participation in the contest that is still running.
Today I am going to share with you a nice and very useful step by step, it is a Children's room organizer with the image of Mario Bros, a character that everyone loves, which I made using recyclable and non-recyclable materials that you can easily get.
For this step-by-step you will use the following materials:
| Cardboard | Box cardboard | Colorful foami | Anime or icopor |
|---|---|---|---|
| Plastic container | Paints | Paint brushes | Marker |
| Scissors | Silicone | Acocador | Foam Rubber |
| Pencil | Drawing pencil | Ruler |
Now the procedure begins:
- Outline the drawing with a soft lead pencil (b) and transfer by placing the drawing on the color of the respective foami, rubbing it with the ears of the scissors.
- You will do this procedure with each of the pieces that have the drawing.
- With the brush wet with water, wet the tip of the brush and start shading all the parts of the face, let it dry and then start filling with a thin brush, the eyes and mouth, let it dry and wet the back tip of the brush and fill the black part of the eye.
- Then start shading and outlining all the parts.
- Heat the iron a little bit and place the nose and buttons so that they take volume and place them on a small piece of foam rubber and start to give it in a circular way with the brush, you will see that it takes a lot of volume.
- Then you will place the tips of the shoes and repeat the same procedure, this will be done in the parts that take more volume
hands, knees, belly and cap.
- Now it's time to join the pieces: (only on the hands you will glue a little piece of paper and join with the sleeves of the shirt), let dry and carefully cut out the back and glue the cuff.
- Then you glue the cuff and the buttons, and so you go assembling the whole piece, fixing each piece well and gluing very carefully and with little silicone so that the piece does not get dirty, remember that a good finish is always important.
- Once the nose and the mustache are glued, glue very carefully, applying silicone on the part of the forehead and glue the visor of the cap, press a little until it sticks, and then glue the upper part of the cap.
- Once the pieces are joined, proceed to apply silicone all around the edge and glue on a white cardboard, pressing only on the edge so that it does not lose its volume.
- Let it dry well and start trimming leaving 2 or 3 millimeters outside the figure.
That's how nice this Mario will look!
To make the green Mario Bros tube:
- Take the measurements of the plastic container and cut out a rectangle of that size, of course making it 2 cm wider to join the ends when gluing with silicone.
- Once the cardboard is glued, cut a strip of foami 2 cm wider than the cardboard and glue a strip of cardboard on the inside to give volume to the top and glue it to the tube.
- Cut out a circle the width of the mouth of the container and glue. (see photo) *This is how the tube is ready!
- In cardboard box, cut out an oval or the shape you like and paint green, applying 2 coats and then with darker green paint, dab with the brush lying down, to resemble grass.
- Now it is time to work with the anime:
- Cut out a square, mark or draw the bricks, sand the edges and then with a blade start cutting out the anime by tilting the blade on both sides until you get the groove out.
- Once this is done, dip the brush in black paint and fill in the grooves, let it dry a little and start applying the brown paint to what will be the bricks and you are done.
- To decorate, cut out some stars in yellow cardboard, draw some eyes and paste a small piece of silicone behind them and paste where you like.
- Apply silicone on the back of the container and glue on the painted cardboard.
- Then apply silicone on one edge of the anime and glue to the side of the tube.
- Finally apply silicone on the mario's shoes and glue to the brick and now you have finished this nice and simple organizer.
I hope you like this cute step by step, made for you, so you can do it yourself.
I translated this tutorial with DeepL, using HTML tags, the photos were captured by the camera of my Blu G5 and edited with Pic Collage.
I used the source:
https://www.pinterest.es/pin/476255729353102748/
Now I say goodbye thank you for your visit, support and your comment ....
Greetings, success and blessings to you.