

Hola queridos amigos de esta linda comunidad.
Decidí probar como me quedaría un Cuadro pero, trabajado con Fieltro; de hecho nunca había realizado una pieza con esta técnica y como todo al principio, uno siente el temor de que no quede bien, me arriesgué jajajaja. y....
Les cuento que para ser el primero me encantó como quedó!.
Así que ya es hora de empezar:
Los materiales son:

| Fieltro de colores | Retazo de tela | Icopor -Anime |
|---|---|---|
| Pega blanca | Tijera | Silicon líquido |
| Lima de uñas metálica | Lápiz | Pincel |
| Marcador | Retazo de foami | Papel calcar |
| Cuchilla | Pinturas | Molde o dibujo |
| Algodón | Cinta de tela | Cartulina corrugada. |
Procedimiento:
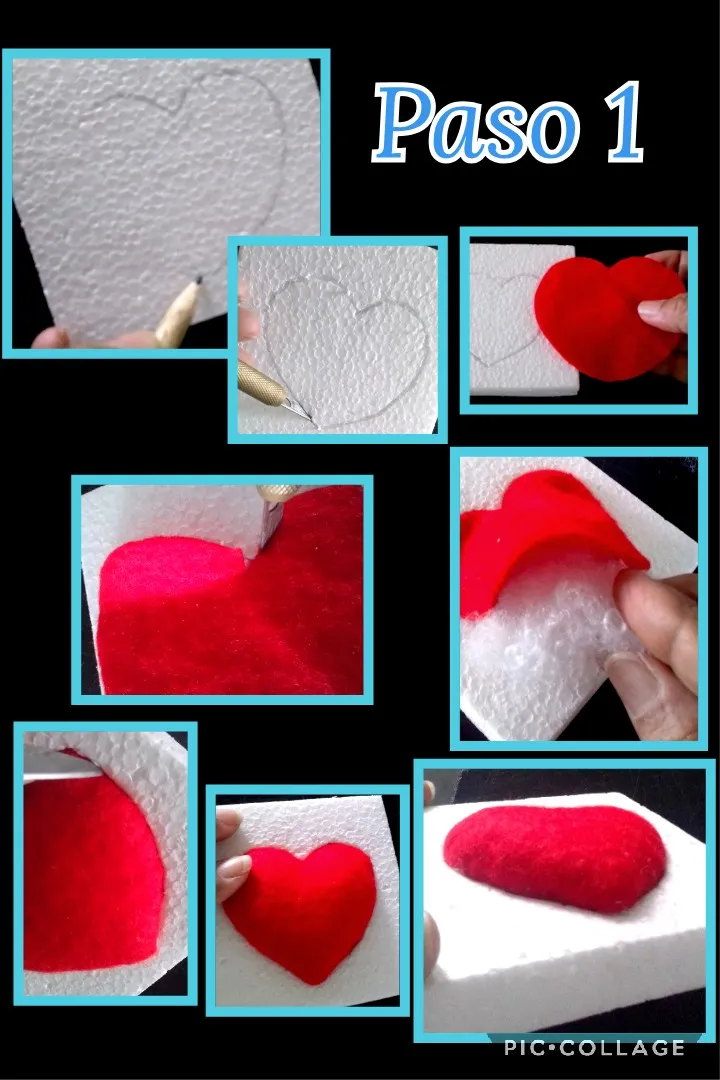
En este paso te enseñaré en que consiste la técnica de Falso Patchwork.
- Marcar el dibujo sobre el anime, luego con un exacto o chuchilla cortar todo el borde haciendo una pequeña incisión.
- Si le vas a dar volúmen, recorta la pieza más grande para poder introducir el algodón.
- Ahora toca introducir el borde del fieltro poco a poco, con la lima o un objeto punzante en el icopor hasta dejar un espacio para rellenar con algodón y seguir el procedimiento hasta introducir todo el borde de la tela.
Nota: El icopor a usar debe ser de buena calidad o sea duro para que al introducir la tela no lo rompa.

- Transfiere el dibujo al icopor con papel de calcar.
- Pasar el exacto o cuchilla por todas las líneas del dibujo.
- Colocar la tela de fondo del cuadro sobre el dibujo y con la ayuda de la lima de uñas, comenzar a introducir la tela.
- Ahora recorta todo el borde de la figura por la parte de adentro y meter los restos de tela. (Ver foto).

- Desglosa el dibujo y saca en fieltro cada una en su color respectivo recortando 1 ó 2 cms más grande que la pieza original.
- Aplica por la orilla un poquito de pega, riegala y comienza a introducir el fieltro con la lima, por la parte media (arriba) bajando de lado y lado, luego introduce el algodón y le vas dando el volumen que quieras a cada pieza.
- Recorta el contorno de los ojos dejando 1 cm para introducir la tela y formar la línea de los ojos.
- Terminada esa parte, vuelve a aplicar pega blanca en la orilla de la trompa.

- Repite el procedimiento con la trompa y los cuernos.
- Aparte recorta las orejas, aplicas en el bordo inferior pegamento e introduce en el borde.
- Ahora toca dibujar cosiendo con punto cadeneta la boca y rematar en la parte de abajo del anime.
- Transfiere al foami blanco, los ojos y dibuja el contorno y centro con un marcador negro, rellenas con pintura azul el iris, luego recorta y dale volumen calentando en la plancha.

- Aplica silicón en el borde de los ojos y pega a la carita de la jirafa.
- Con hilo marrón has un punto cadeneta para hacer los huequitos de la nariz, recorta círculos y pega como manchitas.
Ahora marca a 2 cms de la orilla del cuadro y traza cuatro(4) líneas, con la cuchilla has la incisión y comienza a meter la tela con la ayuda de la lima por todo el borde.

- Terminado este proceso, recorta toda la parte sobrante y introduce dejando sin rastros de tela en la orilla.
- Recorta en Cartulina corrugada una tira de 2cms de ancho y pega por todo el contorno del cuadro formando el marco.
- Y para decorar recorta 3 pedazos de cinta safari y pega 2 a los lados del marco y con la tercera has un lazo de zapatos y pega.
Y ya quedó terminado este lindo cuadro!.
English
Mi publicación está editada con etiquetas HTML, traducida con DeepL, las fotos son mías, capturadas con mi Blu G5 y editadas con Pic Collage.
Fuente utilizada:https://www.freepik.es/fotos-vectores-gratis/jirafa
Espero te guste este paso a paso y me encantaría te atrevas como yo, a realizar un cuadro, caja, carpeta con esa técnica.

Ahora sí, me despido esperando tu comentario.
Gracias por la visita y apoyo...
Hello dear friends of this beautiful community.
I decided to try how I would be a picture, but worked with Felt; in fact I had never made a piece with this technique and as everything at the beginning, one feels the fear that it does not look good, I took a risk hahahaha. y....
I tell you that for being the first one, I loved the way it turned out!
So now it's time to start:
The materials are:
| Colored felt | Piece of fabric | Icopor - Anime |
|---|---|---|
| White glue | Scissors | Liquid silicon |
| Metallic nail file | Pencil | Brush |
| Marker | Foami scraps | tracing paper |
| Knife | Paints | Mold or drawing |
| Cotton |
Procedure:
In this step I will show you what the False Patchwork technique consists of.
- Mark the drawing on the anime, then with an exacto knife cut the entire edge making a small incision.
- If you are going to give it volume, cut the larger piece to be able to introduce the cotton.
- Now it's time to introduce the edge of the felt little by little, with the file or a sharp object in the foam until you leave a space to fill with cotton and follow the procedure until you introduce the entire edge of the fabric.
Note: The icopor to be used must be of good quality or hard so that when the fabric is inserted it does not break.
- Transfer the drawing to the styrofoam with tracing paper.
- Pass the exacto or knife along all the lines of the drawing.
- Place the background fabric of the painting on the drawing and with the help of the nail file, begin to introduce the fabric.
- Now trim the entire edge of the figure on the inside and insert the fabric scraps. (See photo).
- Break down the drawing and cut out each one in its respective color in felt, cutting out 1 or 2 cms larger than the original piece.
- Apply a little bit of glue around the edge, water it and begin to introduce the felt with the file, through the middle part (top) going down from side to side, then introduce the cotton and give the volume you want to each piece.
- Cut out the outline of the eyes leaving 1 cm to introduce the fabric and form the line of the eyes.
- Once this part is finished, apply white glue again on the edge of the trunk.
- Repeat the procedure with the trunk and the horns.
- Cut out the ears, apply glue to the bottom edge and insert it into the border.
- Now it's time to draw the mouth with chain stitch and finish off at the bottom of the anime.
- Transfer to the white foami, the eyes and draw the outline and center with a black marker, fill with blue paint the iris, then cut and give volume by heating in the iron.
- Apply silicone on the edge of the eyes and glue to the giraffe's face.
- With brown thread make a chain stitch to make the nose holes, cut out circles and glue as spots.
Now mark 2 cm from the edge of the square and draw four (4) lines, with the knife make the incision and start to put the fabric with the help of the file all around the edge.
- Once this process is finished, cut off all the excess and insert the fabric leaving no traces of fabric on the edge.
- Cut out a 2 cm wide strip of corrugated cardboard and glue all around the frame.
- And to decorate cut out 3 pieces of safari ribbon and glue 2 of them to the sides of the frame and with the third one make a shoe ribbon and glue.
And now you have finished this beautiful picture.
My post is edited with HTML tags, translated with DeepL, the photos are mine, captured with my Blu G5 and edited with Pic Collage.
Source used:https://www.freepik.es/fotos-vectores-gratis/jirafa
I hope you like this step by step and I would love you to dare like me to make a picture, box, folder with this technique.
Now I say goodbye waiting for your comment.
Thanks for your visit and support...