Buenos tardes mis queridos amigos
Hoy me uno a el Concurso de esta semana que ha propuesto la Comunidad Hive diy, me parece maravillosa y aún más porque es utilizando un material reciclable, es uno de los que tantas personas echan a la basura,(contaminando), sin saber como aprovecharlos. Es por esto que hoy te mostraré un tutorial de como pintar y dar texturas sobre vidrio, así sabrás como decorar y reutilizar los envases de vidrio de una manera fácil y con muy pocos materiales, poniendo a volar toda tu imaginación y creatividad.No cuesta nada intentarlo, así ayudamos a no contaminar más el planeta.
Entonces es hora de empezar!
Los materiales a utilizar son:

| Envase de vidrio | Pinturas al frio | Pinceles |
|---|---|---|
| Alcohol | Algodón o tela | Pega blanca |
| Escarcha | Tijera | Cinta de tela 15 cms |
| Papel crepé o (cualquiera) | Flores y estrellitas para decorar) |
Les comentaré muy brevemente sobre la técnica del craquelado:
En esta técnica el material principal es la cola blanca ya que es quién hará el agrietamiento en la superficie de nuestra pieza, dando textura y semejando muy sutilmente a lo envejecido pero, que a simple vista hace la pieza muy hermosa.
Lo mejor es que podrás usar cualquier color de pintura que te guste o que tengas a la mano; existen muchos líquidos a la venta que hacen esta función, pero aquí usaremos esta, que es la más económica.
Ahora empezamos con el procedimiento:
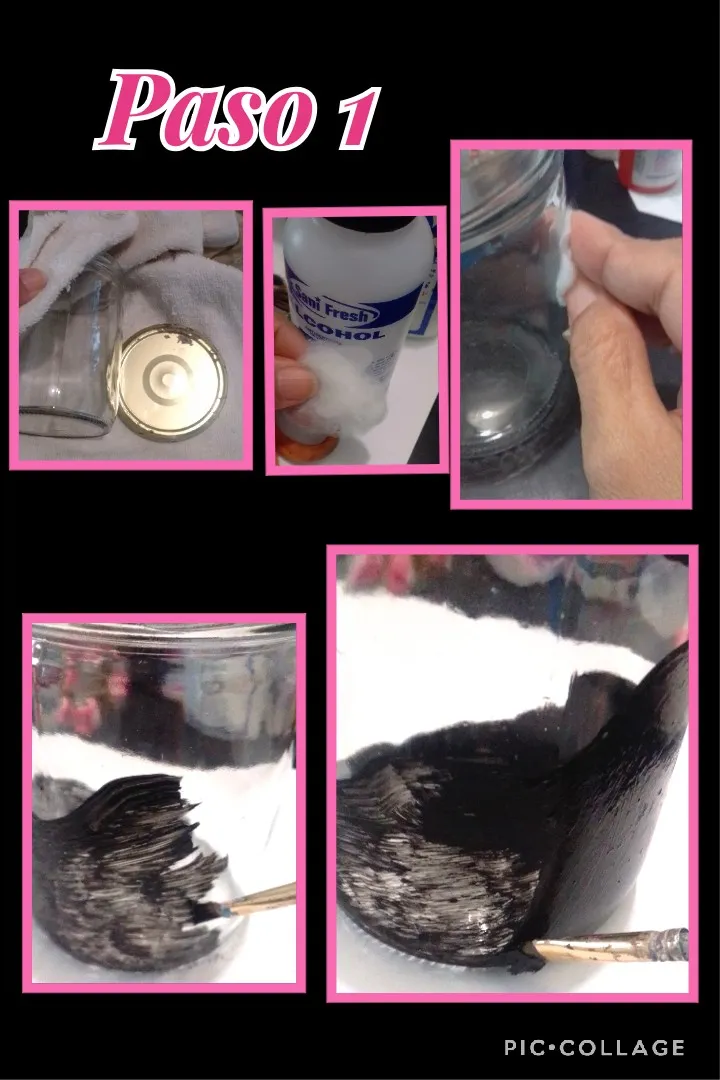
- Lo primero que haremos es lavar y secar el envase o frasco.
- Mojamos un pedazo de algodón con el alcohol y pasamos limpiado el envase para quitar cualquier tipo de sucio o grasa y dejar secar por un momento.
- Empezar a aplicar con un pincel suave o esponja, una mano de pintura, en este caso negra, sin repasar, pintando la forma que quieras y dejar secar.
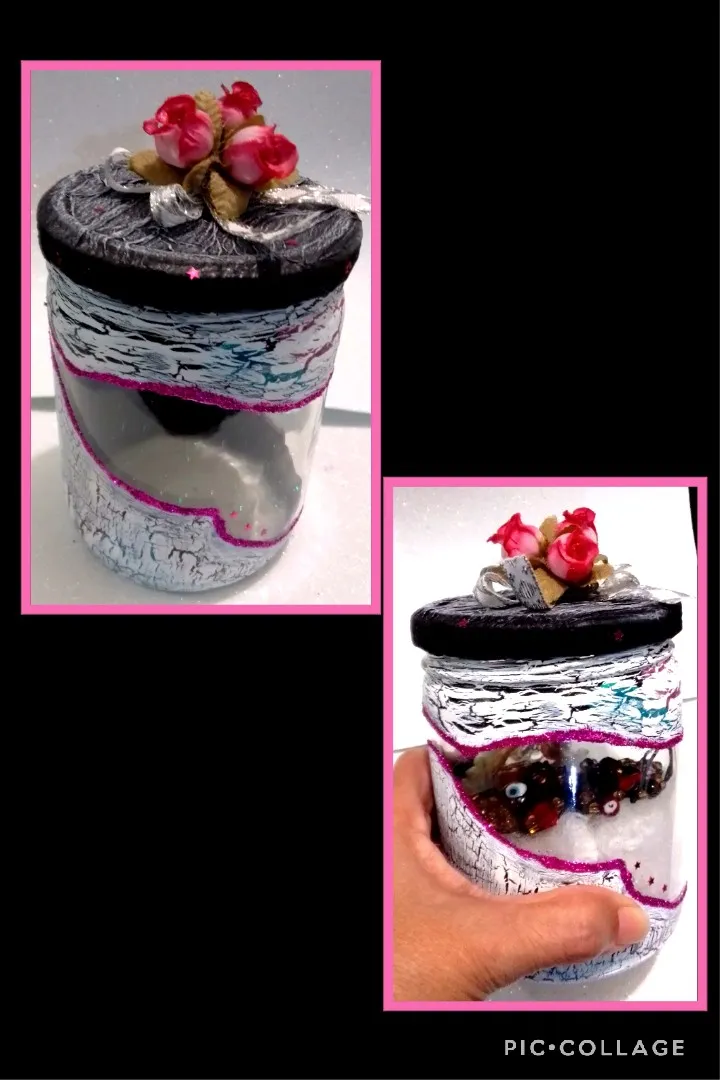
Yo dejé un espacio sin pintar para que se pudiera apreciar lo que está dentro del envase, eso lo dejo a tu imaginación. - Luego aplicar una segunda mano con el mismo procedimiento y dejar secar.

- Puedes aplicar a la pieza varios colores (turquesa y fucsia) sobre la pintura de base, así se verán grietas de colores, esto es (Opcional).
- Después de dejar secar, aplicarás con un pincel suave una mano de cola blanca mientras más espesa esté la cola más grandes serán las grietas (esto lo irás haciendo por partes) ya que no debes dejar que la cola se seque.

- Ya aplicada la pega y veas que se está poniendo como transparente o sientas al tocar que ya está pegostosa, empezarás a aplicar una mano de pintura blanca.
A medida que se vá secando la cola irá haciendo grietas y si quieres un secado rápido puedes usar secador de pelo o ventilador y seguir haciendo este procedimiento hasta terminar toda la pieza. - Como puedes observar ya la pieza está craquelada.
- Luego con la ayuda de un palito de madera irás aplicando cola por todo el borde de la pintura.
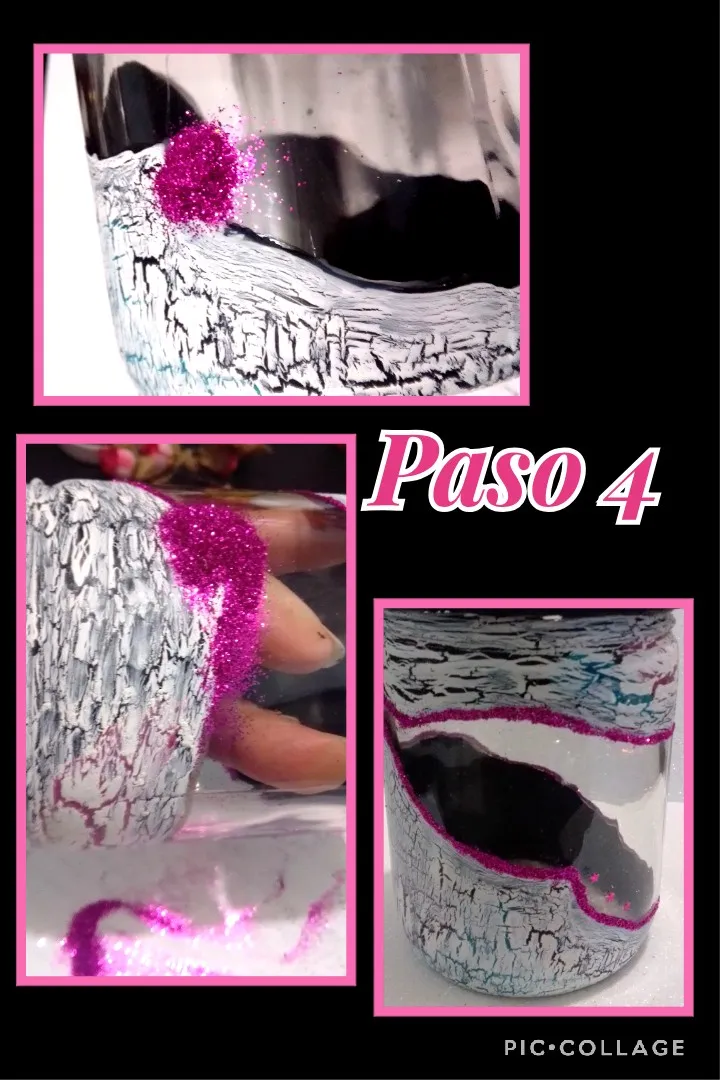
- Ahora vas a ir poniendo o regando escarcha sobre la orilla donde le colocaste la pega hasta bordear todo el envase y dejar secar bien.
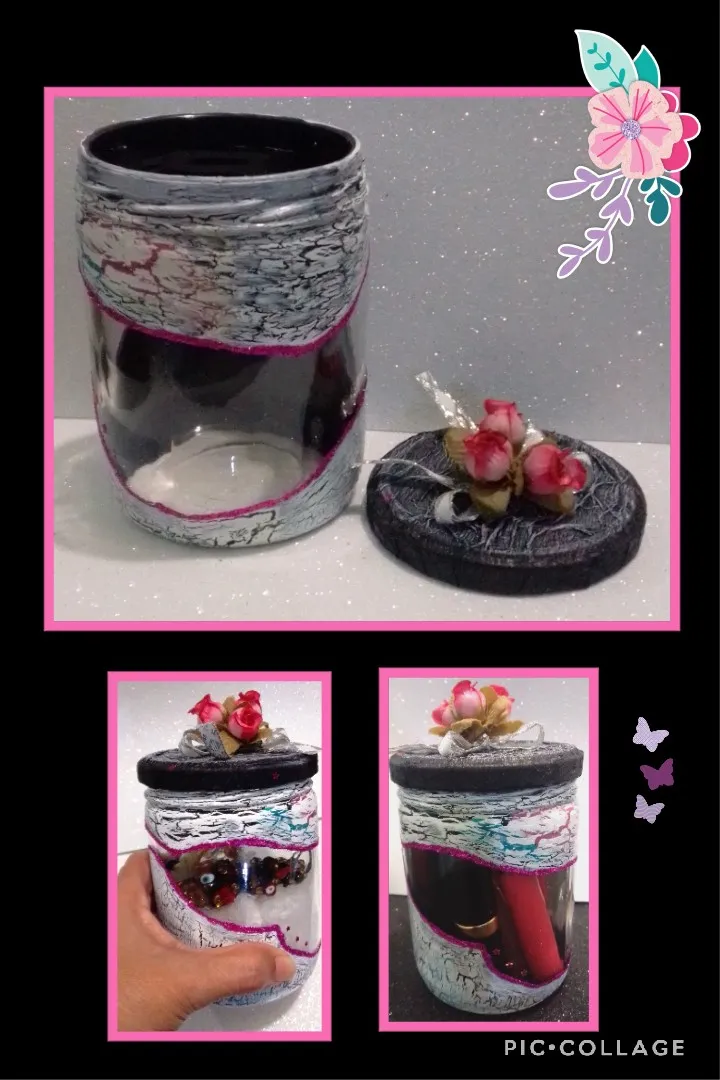
De verdad que me encanta esta técnica, se ve muy lindo el envase.
Ahora le toca a la tapa:
Esta técnica de papel sobre metal, igual la podemos aplicar sobre vidrio.
La puedes hacer utilizando cualquier tipo de papel (crepé, papel de cocina, servilletas, periódicos, revistas, etc.)
Consiste en aplicar pega o cola blanca sobre la base a usar e ir pegando el papel haciendo arrugas o rasgando con las manos en cuadros o tiras y pegar una o varias capas, dejando secar una de otra.
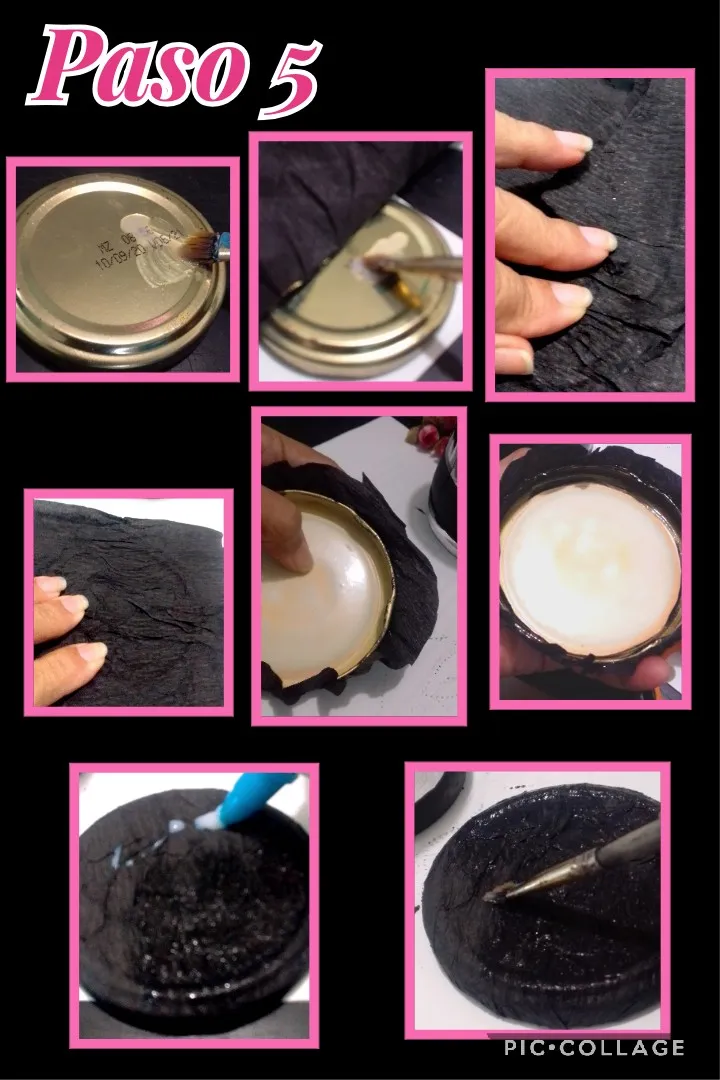
- Aplicar cola con un pincel o con el dedo sobre la tapa y sin dejar secar colocar el papel y hacerle arrugas para dar textura.
- Dejar secar.
- Luego aplicar nuevamente cola por los lados de la tapa y recortar el papel en forma circular dejas secar bien y después aplicas pega por el lado de adentro de la tapa y pegar sin dejar muchos pliegues para que cierre bien al momento de cerrar el envase.
- Ahora aplicamos una mano de cola sobre la tapa para que quede como plastificado, también puedes usar brillo al agua o barniz.
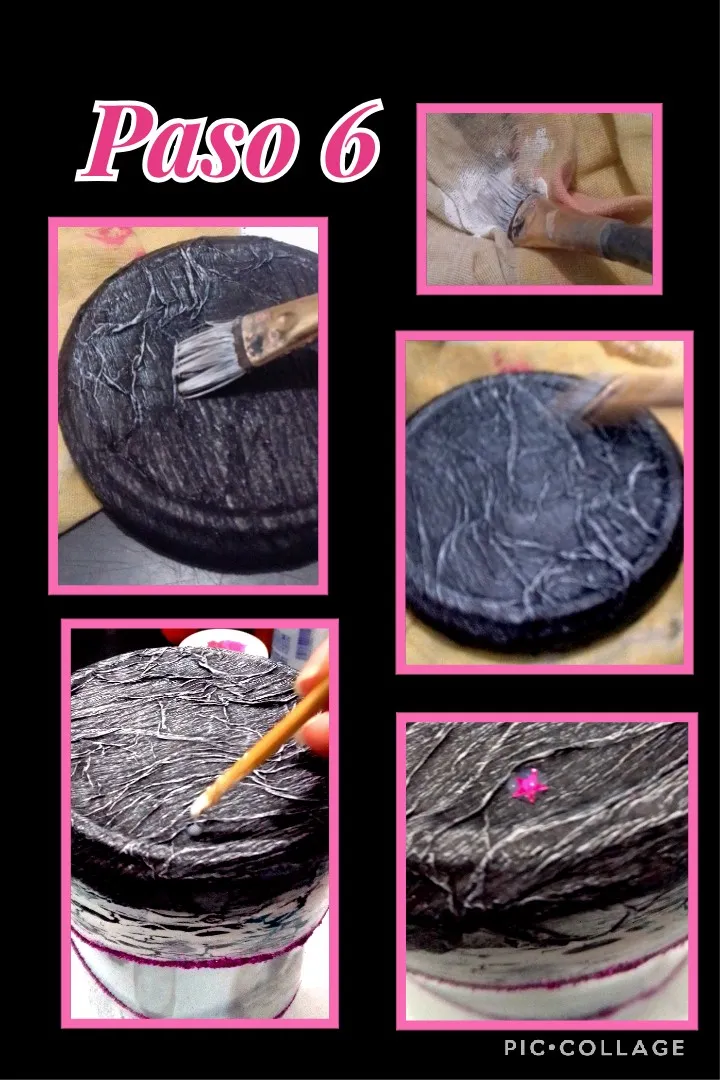
- Para pintar la tapa, mojamos un pincel en pintura blanca y secar bien en un trapo, tratando de quitar toda la pintura esta técnica se llama pincel al seco.
- Pasar el pincel a lo contrario de las formas de las arrugas para que se marquen. Le puedes pasar solo una mano, pero si quieres que se vean más pronunciadas dejas secar y aplicas la segunda.
De verdad me parece se ven muy bonitas. - Y para combinar con el color de la escarcha y darle un toque de brillo a la pieza, poner unos punticos de cola y pegar unas mini estrellitas.
- Ya casi terminado nuestro envase unirás la cola con un poco de agua para hacerla más líquida y le aplicarás una mano de sobre la pintura y sobre la escarcha para que se fijen mucho más y quede plastificado, así se protege más la pieza y como te dije anteriormente puedes usar brillo o barniz trasnparente.
Mira como se ven de bonitas las grietas de colores!
Lo bueno de esta técnica es que el secado es muy rápido.
Y ya para terminar este paso a paso
- Puedes pegar unas estrellitas en un lado del envase.
- Para decorar la tapa, con el pedacito de cinta puedes hacer un lacito, pegar arriba.
- Luego entorchar tres (3) florecitas, aplicar silicón y pegar sobre el lazo y así quedará listo.

Espero que haya sido de tu agrado este mi paso a paso.
Y demás está decir que me encantó haber podido participar e invito a @yobri a que se una paticipando en el concurso de Crystal World de la Comunidad de Hive diy.
Esta publicación está traducida por DeepL, para el texto utilicé las etiquetas de HTML y las fotos capturadas por mi teléfono Blu G5 y editadas con Pic collage.
English:
Good afternoon my dear friends.
Today I join this week's contest proposed by the Hive diy Community, I find it wonderful and even more because it is using a recyclable material, is one of those that so many people throw away (polluting), without knowing how to use them. That is why today I will show you a tutorial on how to paint and give textures on glass, so you will know how to decorate and reuse glass containers in an easy way and with very few materials, putting to fly all your imagination and creativity.It costs nothing to try, so we help not to pollute the planet any more.
Then it's time to start!
The materials to use are:
| Glass container | Cold paints | Brushes |
|---|---|---|
| Alcohol | Cotton or cloth | White glue |
| Scissors | Cloth tape 15 centimeters | |
| Crepe paper or (any) | Flowers and stars to decorate |
I will tell you very briefly about the crackle technique:
In this technique the main material is the white glue as it is who will make the cracking on the surface of our piece, giving texture and resembling very subtly to the aged but, that to the naked eye makes the piece very beautiful.
The best thing is that you can use any color of paint that you like or that you have on hand; there are many liquids for sale that do this function, but here we will use this one, which is the most economical.
Now we start with the procedure: !
- The first thing we will do is wash and dry the container or jar.
- Wet a piece of cotton with the alcohol and wipe the bottle to remove any dirt or grease and let it dry for a moment.
- Start applying with a soft brush or sponge, a coat of paint, in this case black, without going over, painting the shape you want and let it dry.
I left a space unpainted so that you could appreciate what is inside the container, I leave that to your imagination. - Then apply a second coat with the same procedure and let dry.
- You can apply to the piece several colors (turquoise and fuchsia) over the base paint, so you will see cracks of colors, this is (Optional).
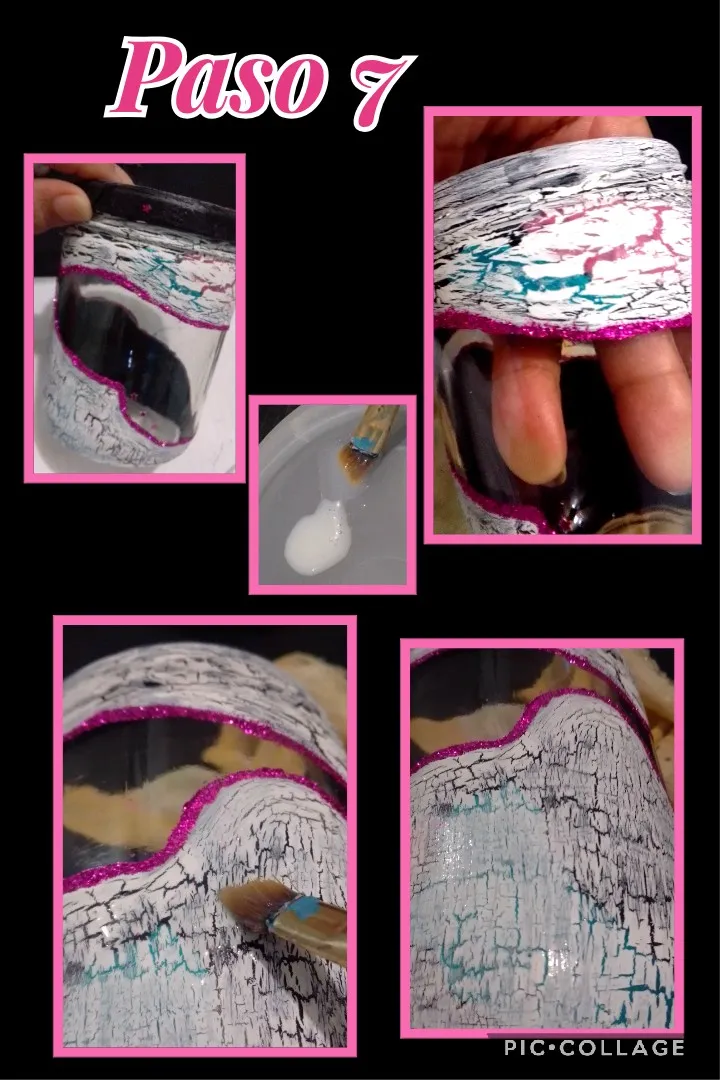
- After letting it dry, you will apply with a soft brush a coat of white glue, the thicker the glue is the bigger the cracks will be (you will do this in parts) because you should not let the glue dry.
- Once the glue is applied and you see that it is becoming transparent or you feel when you touch it that it is sticky, you will begin to apply a coat of white paint.
As it dries the glue will make cracks and if you want a quick dry you can use a hair dryer or fan and continue doing this procedure until the whole piece is finished. - As you can see the piece is already cracked.
- Then with the help of a wooden stick you will apply glue all around the edge of the painting.
- Now you are going to put or sprinkle frosting on the edge where you put the glue until it borders the whole container and let it dry well.
I really love this technique, it looks very nice.
Now it's time for the lid:
This technique of paper on metal, the same we can apply it on glass.
You can do it using any type of paper (crepe, kitchen paper, napkins, newspapers, magazines, etc.).
It consists of applying glue or white glue on the base to be used and sticking the paper making wrinkles or tearing with your hands in squares or strips and paste one or more layers, letting dry one from the other.
- Apply glue with a brush or with your finger on the cover and without letting dry place the paper and make wrinkles to give texture.
- Let it dry.
- Then apply glue again on the sides of the lid and cut the paper in a circular shape, let it dry well and then apply glue on the inside of the lid and glue without leaving many folds so that it closes well when closing the container.
- Now apply a coat of glue on the lid so that it looks like a plastic coating, you can also use water-based gloss or varnish.
- To paint the lid, dip a brush in white paint and dry well on a rag, trying to remove all the paint this technique is called brush to dry.
- Pass the brush on the opposite side of the wrinkles to mark them. You can apply only one coat, but if you want them to look more pronounced, let them dry and apply the second coat.
I really think they look very nice. - And to combine with the color of the frost and give a touch of brightness to the piece, put a few dots of glue and glue a few mini stars.
- Already almost finished our container will unite the glue with a little water to make it more liquid and you will apply a coat of on the painting and on the frost so that they are fixed much more and it is plasticized, this way the piece is protected more and as I said previously you can use shine or trasnparent varnish.
*Look how beautiful the colored cracks look!
The good thing about this technique is that it dries very fast.
And now to finish this step by step
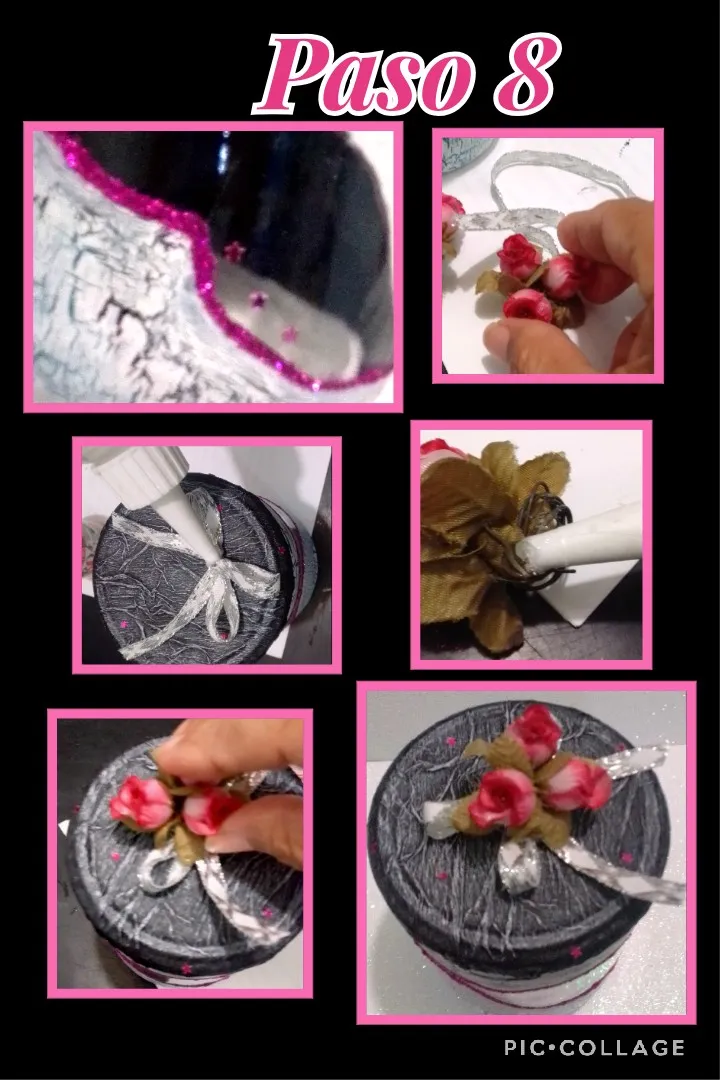
- You can glue some stars on one side of the container.
- To decorate the lid, with the little piece of ribbon you can make a little bow, glue it on top.
- Then twist three (3) little flowers, apply silicone and glue on the ribbon and it will be ready.
I hope you liked this step by step.
And needless to say, I was delighted to have been able to participate and I invite @yobri to join me in the Crystal World contest of the Hive diy Community.
This post is translated by DeepL, for the text I used HTML tags and photos captured by my Blu G5 phone and edited with Pic collage.
*** Translated with www.DeepL.com/Translator (free version) ***