Hola, queridos amigos de esta Comunidad, estaba alejada por cuestiones de salud, pero poco a poco en nombre de Dios...
Les cuento que siempre me han llamado la atención estos lindos muñequitos y me preguntaba, por qué no le colocan ojos? e aquí la respuesta: Según una leyenda mitológica se trata de un ser especial, muy carismático jamás visto por nadie llamado Tomte (Gnomo de Navidad) que fué elegido como ayudante por Santa Claus para repartir regalos a todos los niños el 24 y 25 de Diciembre y que no quedara ningún niño sin recibir su dosis de ilusión, se dice que era muy tímido y no le gustaba recibir elogios, es por eso que a él se le representa con un gorro que le tapa los ojos
Fuente..https://www.de-navidad.es/gnomos/
Después de esta breve historia, les mostraré y nombraré los materiales a usar:

| 2 Tubos de papel sanitario | Cartón de caja |
|---|---|
| Cinta a rayas | Cinta dorada |
| Fieltro rojo, negro y carne | Retazo de tela de peluche |
| Relleno | Hilo y aguja |
| Alambre | Tijera |
| Cascabel | Lápiz |
| Silicón | Retazo tela de gamuza |
Comencemos con el Procedimiento:

- Marca una línea desde el borde, 2 cms hacia adentro en el tubo de cartón, recorta cuadritos aproximados de 1 cm dobla y pega, seguido recorta en cartón de caja, la forma de unas suelas de unos zapatos de 6 cms y recorta en icopor 2 pedacitos de la forma de adelante del zapato y pega al cartón, luego mide el contorno de la suela y recorta 2 rectángulos de 15cms x 5cms en fieltro negro, aplica silicón por todo el borde de la suela y pega el fieltro, recorta el sobrante.

- Coloca el tubo sobre el fieltro, marca y recorta aumentando a esa medida 3 cms de ancho y 2 de alto, después toma el ancho del tubo y recorta un cono de 14 cms de altura, también recorta 2 conos pequeños para los brazos de 7cms de altura y 3 círculos en fieltro color carne (manos y naríz) hilvánalas, mete relleno y para arruchar hala el hilo, remata y anuda. Luego recorta en peluche una tira de 2 cms de ancho y del largo del rectángulo con que vas a forrar el tubo.

- Ahora cose el gorro y voltea con la ayuda de un pincel o palito de madera, esto ya va bien adelantado jajajaja...
- Dobla otro tubo de papel sanitario y recorta sacando 2 rectángulos, los que vas a enrollar y pegar para formar las piernas, has un poco de presión y espera que seque bien.
- Nuevamente, aplica silicón en el cartón enrollado y pega la cinta de rayas, recorta el sobrante y mete el alambre por dentro del tubito forrado con rayas (estás serán las piernas), deja secar y ahora mete en el zapato.

- En este paso aplica silicón en la suela, dobla el alambre pega y deja secar bien, ahora con el dedo dobla hacia el alambre y pega sobre el icopor pegado en el zapato, igual deja secar y aplica silicón a los zapatos y pega donde irá el lazo de zapato.
- Cose el rectángulo para hacer la camisa y pega por la orilla la tira de peluche.
- Aparte recorta en gamuza verde 2 cuadritos (pantalón)de 5 x4, aplica silicón y pega sobre las medias y un rectángulo para coser en el borde de gorro.

- Volteas el gorro del lindo gnomo.
- Recorta la barba en peluche, aplica silicón en todo el borde y pega donde está el empate de la costura, sujeta en los extremos y ahora mete el alambre dentro del tubo, hilvana toda la parte de arriba y amarra.

- Toma el cascabel, y con una aguja con hilo, anuda en el centro y luego cose en la punta del gorrito, deja un poco flojo para que suene al moverse.
- Llegó la hora de aplicar silicón en la parte superior donde pegamos la barba, mete el gorro y sujeta para que peguen las dos piezas, y cose la nariz.
- Arma los brazos y pega metiendo las manitos dentro de la manga, pega una tira de peluche al rededor de la manga y luego aplica silicón en la parte superior de la manga y pega a los lados dentro del gorro.

- En este último paso, solo queda pegar hacer para decorar una tira de peluche en los zapatos o botas y unos lazos dorados.
De verdad que me encantó este tutorial.
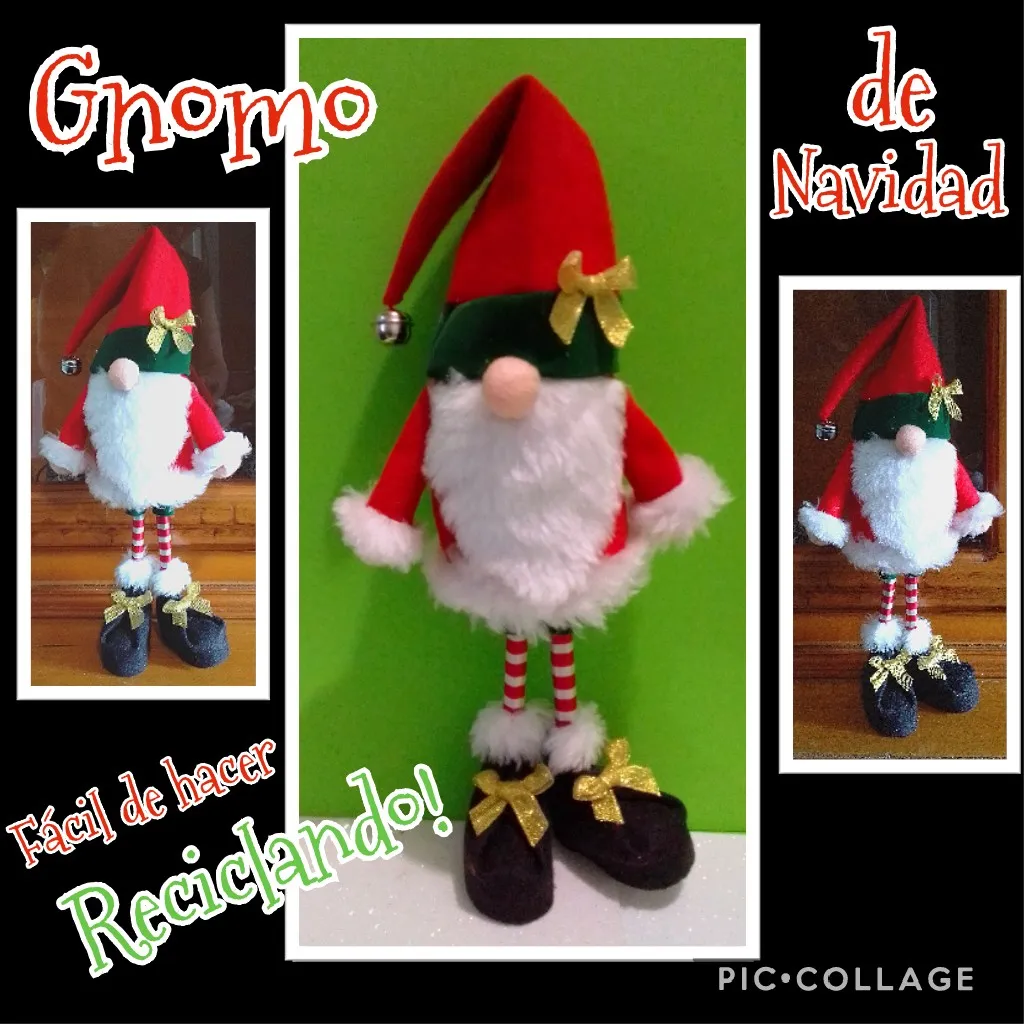
Mira como quedó terminado....

Ahora si me despido feliz de haber compartido con todos ustedes este fácil y bonito paso a paso y espero te animes a realizar.
cualquier duda estoy a la orden.
Saludos, gracias por tu apoyo y si te gusta deja un comentario!
English
Hello, dear friends of this Community, I was away for health reasons, but little by little in the name of God....
I have always been attracted to these cute little dolls and I wondered, why don't they have eyes? Here is the answer: According to a mythological legend it is about a special being, very charismatic never seen by anyone called Tomte (Christmas Gnome) who was chosen as an assistant by Santa Claus to deliver gifts to all children on 24 and 25 December and that no child was left without receiving his dose of illusion, it is said that he was very shy and did not like to receive praise, that's why he is represented with a hat that covers his eyes.
Source..https://www.de-navidad.es/gnomos/
After this brief history, I will show you and name the materials to use:
| 2 Tubes of sanitary paper | Carton box |
|---|---|
| Striped ribbon | Gold ribbon |
| Red, black and flesh felt | Piece of plush cloth |
| Filling | Thread and needle |
| Wire | Scissors |
| Silicone | Suede cloth scrap |
Let's start with the Procedure:
- Mark a line from the edge, 2 cm inward on the cardboard tube, cut out squares of approximately 1 cm, fold and glue, then cut in cardboard box, the shape of the soles of a 6 cm shoes and cut 2 small pieces of the shape of the front of the shoe and glue to the cardboard, then measure the outline of the sole and cut 2 rectangles of 15cms x 5cms in black felt, apply silicone all around the edge of the sole and glue the felt, trim the excess.
- Place the tube on the felt, mark and cut out 3 cm wide and 2 cm high, then take the width of the tube and cut out a cone of 14 cm high, also cut out 2 small cones for the arms of 7 cm high and 3 circles in flesh colored felt (hands and nose) thread them, put stuffing in and pull the thread, finish it off and tie a knot. Then cut out a strip of plush 2 cm wide and the length of the rectangle with which you are going to line the tube.
- Now sew the cap and flip it over with the help of a paintbrush or wooden stick, this is already well underway hahahaha....
- Fold another toilet paper tube and cut out 2 rectangles, which you are going to roll up and glue to form the legs, press a little and wait for it to dry well.
- Again, apply silicone on the rolled cardboard and glue the striped tape, trim the excess and put the wire inside the striped tube (these will be the legs), let it dry and now put it in the shoe.
- In this step apply silicone on the sole, bend the wire, glue and let it dry well, now with your finger bend the wire and glue it on the icopor glued on the shoe, let it dry and apply silicone to the shoes and glue where the shoe loop will go.
- Sew the rectangle to make the shirt and glue the teddy strip around the edge.
- Cut out 2 5 x 4 squares (pants) from green suede, apply silicone and glue on the socks and a rectangle to sew on the edge of the hat.
- Turn the hat of the cute gnome upside down.
- Cut the beard out of plush, apply silicone all around the edge and glue where the seam allowance is, pin at the ends and now tuck the wire into the tube, baste all the way around the top and tie.
- Take the bell, and with a needle and thread, tie a knot in the center and then sew on the tip of the hat, leaving it a little loose so that it makes a sound when it moves.
- It's time to apply silicone on the upper part where we glue the beard, put the hat in and hold it so that the two pieces stick together, and sew the nose.
- Assemble the arms and glue the little hands inside the sleeve, glue a strip of plush around the sleeve and then apply silicone on the upper part of the sleeve and glue the sides inside the hat.
- In this last step, all that's left to do is to glue a strip of plush on the shoes or boots and some golden bows to decorate.
I really loved this tutorial.
Look how it turned out....
Now if I say goodbye happy to have shared with all of you this easy and beautiful step by step and I hope you are encouraged to perform.
Any questions I am at your service.
Greetings, thanks for your support and if you like it leave a comment!