Titulo: DIYS: beach sandals - tutorial (ESP-ENG)
Saludos, linda comunidad de Hive Diy, este es mi primer post y les traigo una tiernas cholitas playeras hechas con material de provecho, específicamente en cartón, me gusta trabajar con el cartón porque es bastante fácil para manipular, y lo podemos conseguir en cualquier lugar, por consiguiente siempre tendrán alguno en el hogar. Esta idea esta relindas espero les guste.
Greetings, nice community of Hive Diy, this is my first post and I bring you a cute little beach cholitas made with useful material, specifically cardboard, I like working with cardboard because it is quite easy to manipulate, and we can get it anywhere, so you will always have some at home. I hope you like this cute idea.

Materiales:
- Cartón
- Hoja recicladas
- Tijera
- Pega
- Barra de Silicón (pistola)
- Pega.
- Estambre
- Pintura al frio
- Pincel
- Palito de altura.
Materials:
- Cardboard
- Recycled sheets
- Scissors
- Glue
- Silicone stick (gun)
- Glue.
- Stamen
- Cold paint
- Brush
10.Height stick.
Paso a paso / Step by Step:
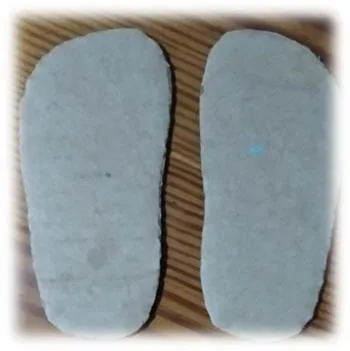
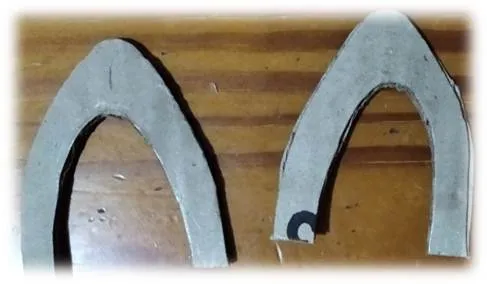
Paso 1: Tomé como referencia unas cholitas de mi hija, tu busca el tamaño que desees, la calqué y de allí saque el patrón, la marque en el cartón las dos piezas.
Step 1: I took as a reference some cholitas of my daughter, you look for the size you want, I traced it and from there I took the pattern, I marked it on the cardboard the two pieces.
Paso 2: Luego tome una pieza y le coloque pega por unas de las caras, repartí la pega con el dedo para que el acabado sea más liso, seguidamente la pegue en hoja. Repites este mismo paso para crear la otra pieza.
Step 2: Then take a piece and put glue on one of the faces, spread the glue with your finger to make the finish smoother, then glue it on a sheet. Repeat this same step to create the other piece.


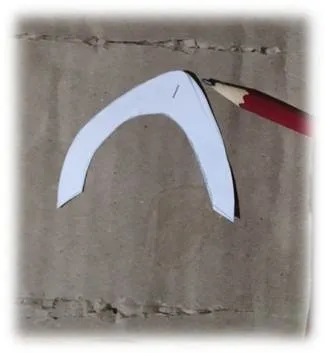
Paso 3: En este paso es donde vamos a remarcar el patrón de la cholitas pero dejando como 1 cm de distancia para poder forrar con más facilidad el borde del cartón. Con la tijera recortamos tiritas en el borde que dejamos, es como hacer flequillos, este nos permitirá manipular el papel al pegar los bordes.
Step 3: In this step is where we are going to mark the pattern of the cholitas but leaving about 1 cm of distance to be able to line more easily the edge of the cardboard. With the scissors we cut strips on the edge we left, it is like making bangs, this will allow us to manipulate the paper when gluing the edges.


Paso 4: En la hoja de reciclaje dibujamos las tiras de las cholitas, teniendo como guía la parte frontal de la cholitas, hacemos el molde de la cholitas. Cabe realzar que para sacar el molde del lado derecho volteamos el molde así será más fácil y no tendrás que hacer dos moldes.
Step 4: On the recycling sheet we draw the strips of the cholitas, taking the front of the cholitas as a guide, we make the mold of the cholitas. It should be noted that to remove the mold from the right side we flip the mold so it will be easier and you will not have to make two molds.

Step 5: With a lot of patience we line the strips of the cholitas with recycled paper on both sides. Here we follow the same procedure as in step 3.


Paso 6: Ahora realizaremos el palito que va a sujetar los dedos en la cholitas, sacamos 2 pequeñas tira de cartón y la forramos con hojas de reciclaje, una vez forrada abrimos las puntas en dos para poder sujetar bien las tiras de la cholita.
Step 6: Now we will make the stick that will hold the fingers in the cholitas, we take out 2 small strips of cardboard and cover it with recycling leaves, once lined we open the ends in two to hold the strips of the cholita.


Paso 7: Luego con un exacto abrimos una abertura en el centro de la tira de la cholita, pegamos sus dos orejitas con silicón, de manera que quede muy real y así te aseguras que no se van a despegar.
Step 7: Then with an exact we open an opening in the center of the strip of the cholita, we glue her two little ears with silicone, so that it is very real and so you make sure that they will not come off.


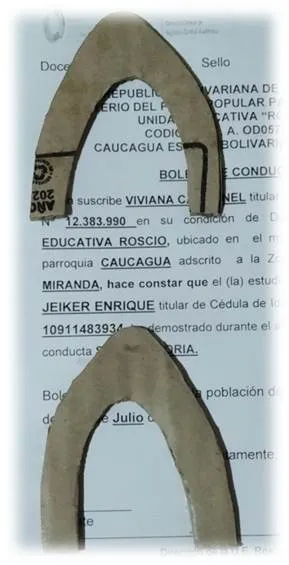
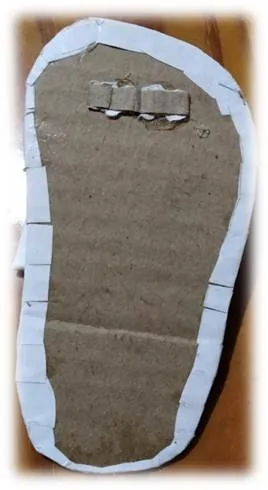
Paso 8: Una vez forrada las tiras procedemos a colocarlas en la suela de la cholita. Entonces con ayuda de un exacto y teniendo como referencia la posición del dedo gordo, abrimos un orificio un poco más grande que los palitos que elaboramos en el paso 6, luego con silicón pegamos las dos puntas que abrimos en los extremos de los palitos. Así como lo muestra la siguiente foto:
Step 8: Once the strips are lined, we proceed to place them on the sole of the cholita. Then with the help of an exact and taking as a reference the position of the big toe, we open a hole a little larger than the sticks that we made in step 6, then with silicone we glue the two tips that we opened at the ends of the sticks. As shown in the following picture:


Paso 9: Luego vamos a forrar con hoja la parte de debajo de las cholitas de manera que quede uniforme. Recuerda que cuando trabajamos con hoja reciclada pegamos siempre del lado de las letras para así aprovechar el blanco de la hoja.
Step 9: Then we are going to line the underside of the cholitas with paper so that it is uniform. Remember that when we work with recycled paper we always glue on the side of the letters to take advantage of the white of the paper.


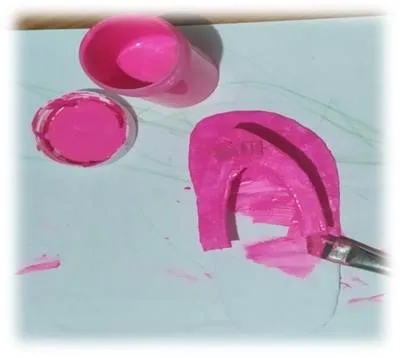
Paso 10: En esta etapa tiende a ser la más divertida como lo es el pintar, según tu preferencia escoges un color, yo en esta oportunidad usare un rosa fluorescente y blanco. La pintaremos por ambas caras y repetiremos el proceso para las dos cholitas.
Step 10: In this stage tends to be the most fun as it is to paint, according to your preference you choose a color, this time I will use a fluorescent pink and white. We will paint it on both sides and repeat the process for the two cholitas.


Paso 11: Aquí también pones la creatividad en su máximo funcionamiento y según lo que queramos creamos el diseño, como lo que quiero es una cholitas playeras bien tiernas usare punticos blancos que realice con un palito de altura.
Step 11: Here you also put the creativity at its best and according to what we want we create the design, as what I want is a very tender cholitas playeras I will use white dots that I made with a stick height.


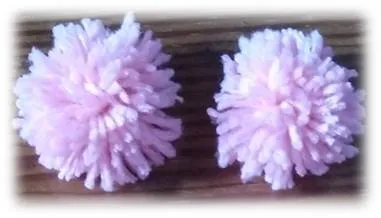
Paso 12: Procedemos a decorar nuestras cholitas, realice unos pequeños pompones con estambre rosado, con un pedacito de cartón enrollamos el estambre y contamos hasta 50 vueltas, luego amarramos en el centro y cortamos en sus extremos con la tijera, luego lo despeinamos un poco y vamos viendo donde queda el estambre más largo y recortamos de manera que quede uniforme.
Step 12: We proceed to decorate our cholitas, make small pompoms with pink yarn, with a piece of cardboard we roll the yarn and count up to 50 turns, then tie in the center and cut the ends with the scissors, then we tousle it a little and see where the longest yarn is and cut so that it is uniform.


Paso 13: Y para terminar solo nos queda pegar los pompones en la cholitas y listo.
Step 13: And finally we just have to glue the pompoms on the cholitas and that's it.


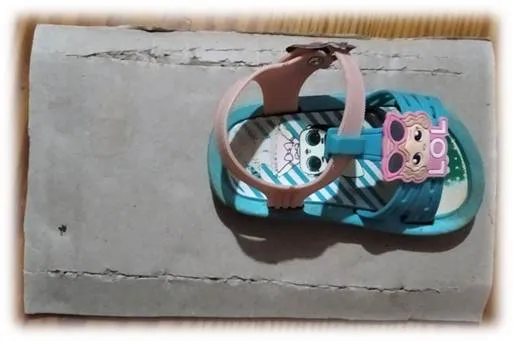
Así quedan estas lindas beach sandals, te invito a que te animes y realices una a tu gusto, es sencilla y muy agradable a la vista….
This is how these cute beach sandals look like, I invite you to take the plunge and make one to your liking, it is simple and very pleasant to the eye ....
☆…☆…☆…☆…☆…☆…☆…☆…☆…☆…☆…☆…☆…☆
Ediciones en Canva
Traducido por Deep
Mis redes sociales:
Twitter: @tmariangel11
Facebook: Maria Toro
Instagram: @tmariangel
☆…☆…☆…☆…☆…☆…☆…☆…☆…☆…☆…☆…☆…☆