Happy Monday my dear and creative friends of #NeedleWorkMonday. Happy start of August, by the way this month I celebrate one year in #hive, a month full of emotions, learning and creativity.

This week's idea was transmitted to me by @alejandria12, who in the Whatsapp group "Ruteros Elites" told me that she really liked elephants and what better character to represent such huge and intelligent animals than "Dumbo", the cute elephant with big ears that could fly.
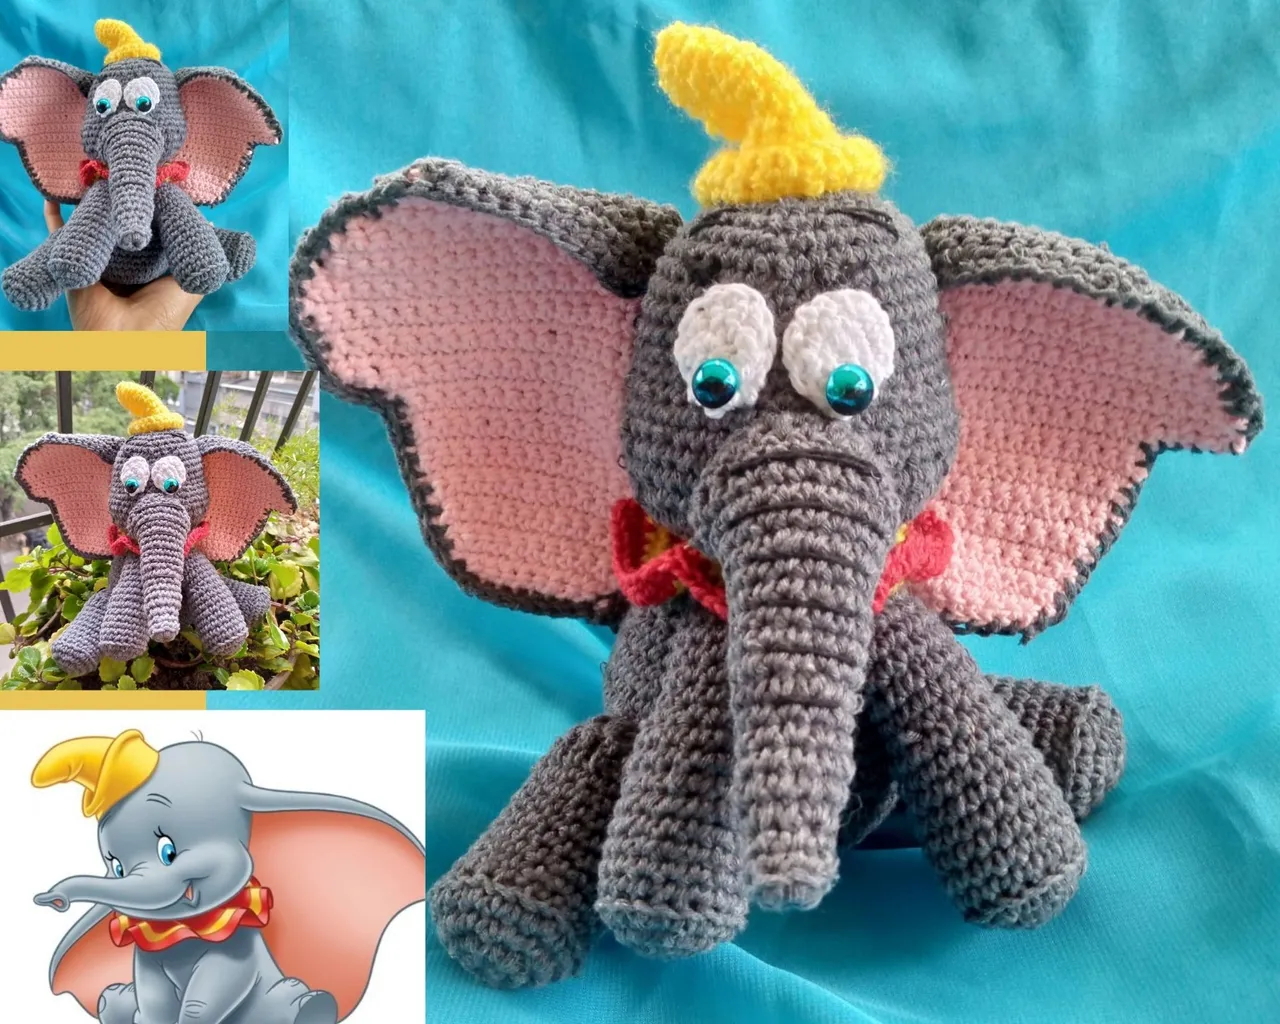
Dumbo, is a Walt Disney movie released in 1941, about the life of a small elephant who at birth and product of a sneeze developed giant ears.
His mother, seeing the mockery of her classmates, reacted by defending her little boy. She was locked up and the little elephant was demoted to the position of clown in the circus where he was born.
There he meets his best friend, a little mouse who helps him to gain self-confidence. One night out, the two of them wake up on a tree branch, discovering at that moment that Dumbo could fly?
To make little Dumbo with big ears, use the following MATERIALS:
- Cotton yarn colors gray, black, white, pink, yellow and red.
- Anti-allergic stuffing.
- Wool needle.
- Crochet needle N° 2.
PROCEDURE
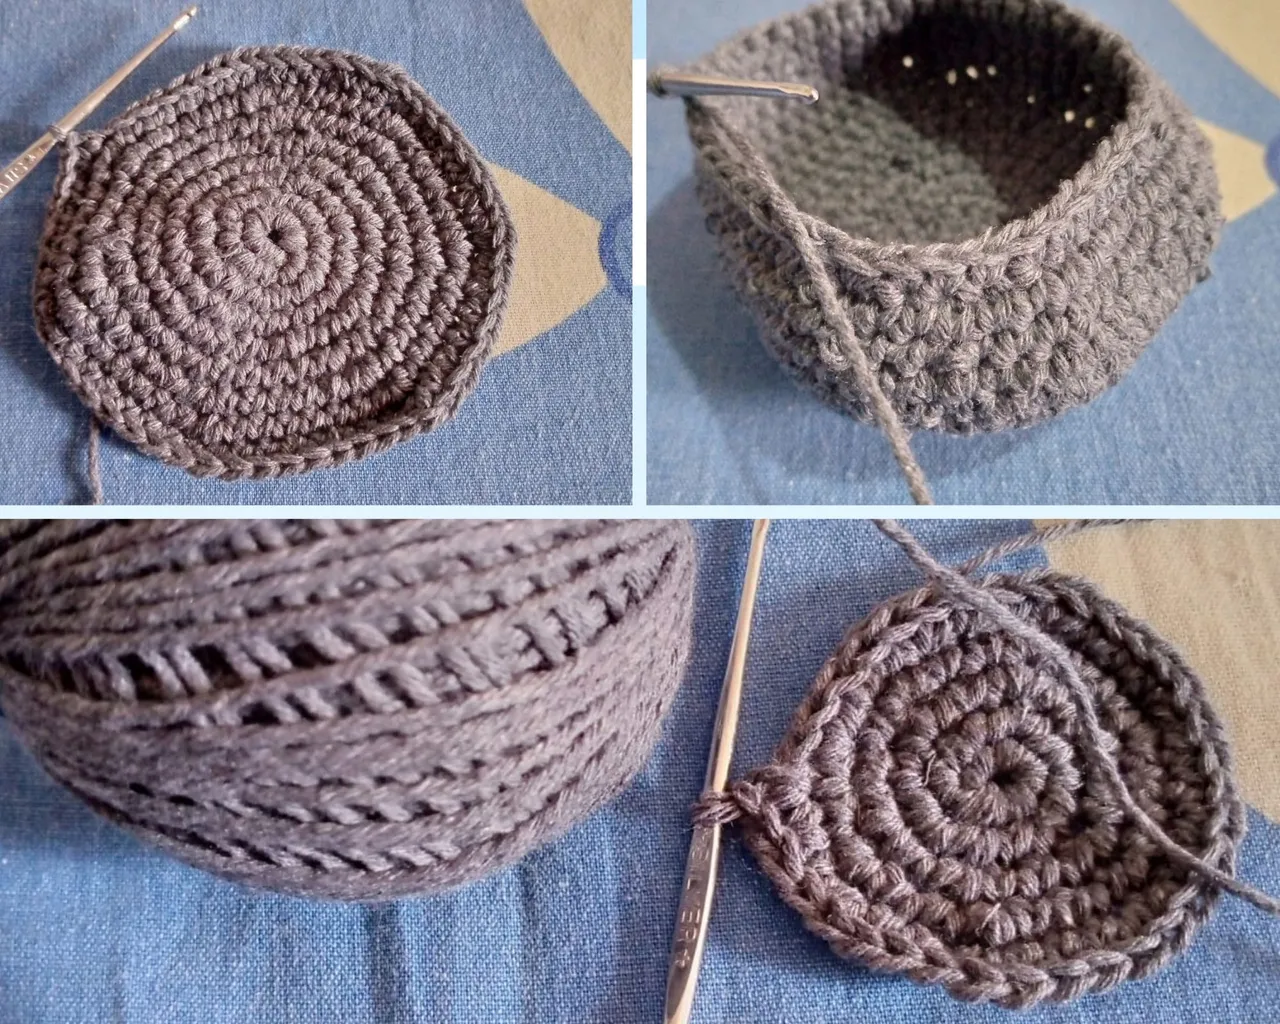
Start by knitting two gray balls 7 centimeters high, to make the BODY and HEAD. I knitted a magic ring of 5 chains and closed it. Then I made 5 rows with increases of 1, 2, 3, 3, 4 and 5 half stitches in each row. From row 7 to row 19 I knitted the same number of half stitches on each chain, that is, I did neither increases nor decreases. In row 20 I started with decreases every 5 half stitches, in row 21 I made decreases every 4 half stitches. At this point I filled in the balls and continued with decreases until closing.
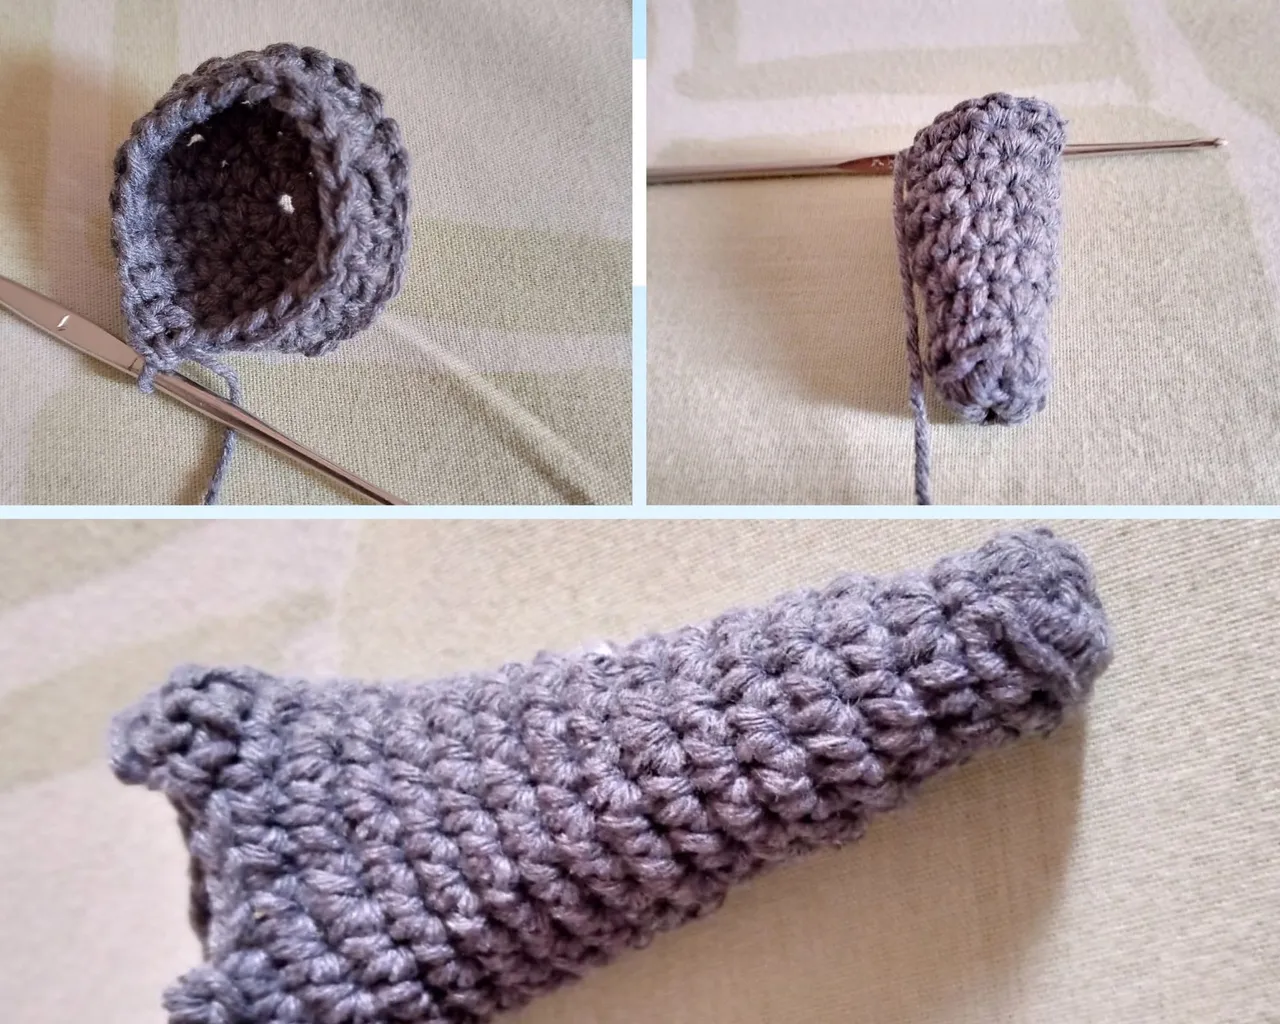
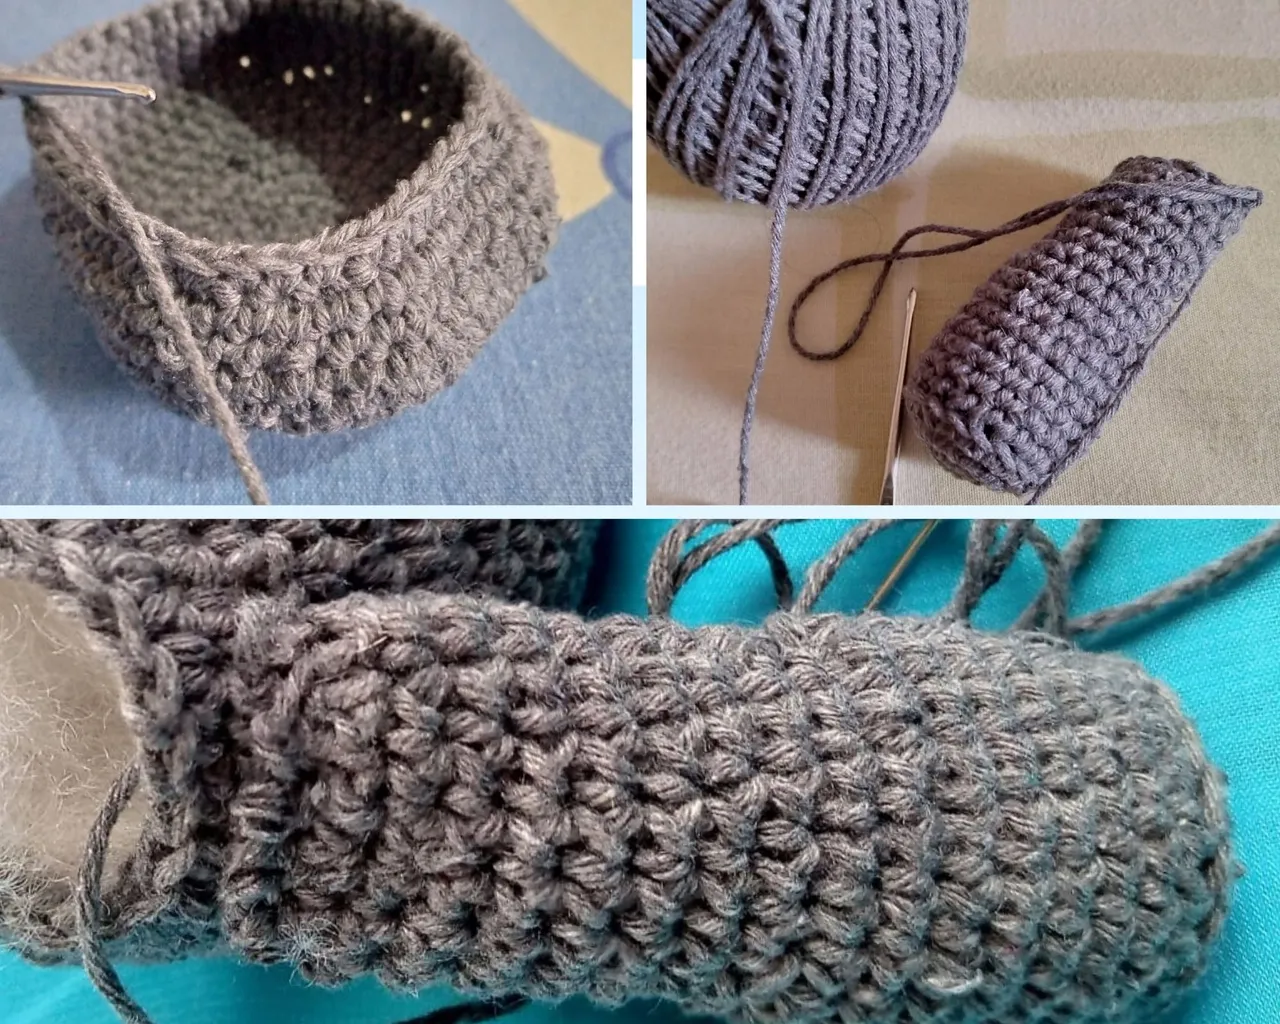
For the ARMS, I started with a magic ring of 5 chains and closed. Next I knit 6 half stitches. In the next round I knit one half stitch and one increase until the end of the round and in the next round I knit two half stitches and one increase. At this point I went around knitting a half stitch over each half stitch, but only taking up half of the chain stitch. Then I knit 18 rows without increases or decreases, filled in and closed.

As for the LEGS, I started with the same procedure as for the arms. I knitted e with half stitches up to row 12. Rounds 13 and 14 I knit 4 with half stitches and the rest of the stitches in rods to give height to one end of the legs and closed.
For the TROMPA, I started with a magic ring of 5 half stitches and then knit 6 half stitches. Then I knit a half stitch over each chain until I reached row 4. In row 5 I knit 4 half stitches and then made an increase. In rows 6 to 9 I knit a single crochet over each chain. In row 10 I knit 3 half stitches and an increase until the end of the row. Row 11 to 15 I knit a stockinette stitch on each chain. In row 16 I knit an increase every 5 half stitches. In the 17th and 18th rows I knitted a single crochet.
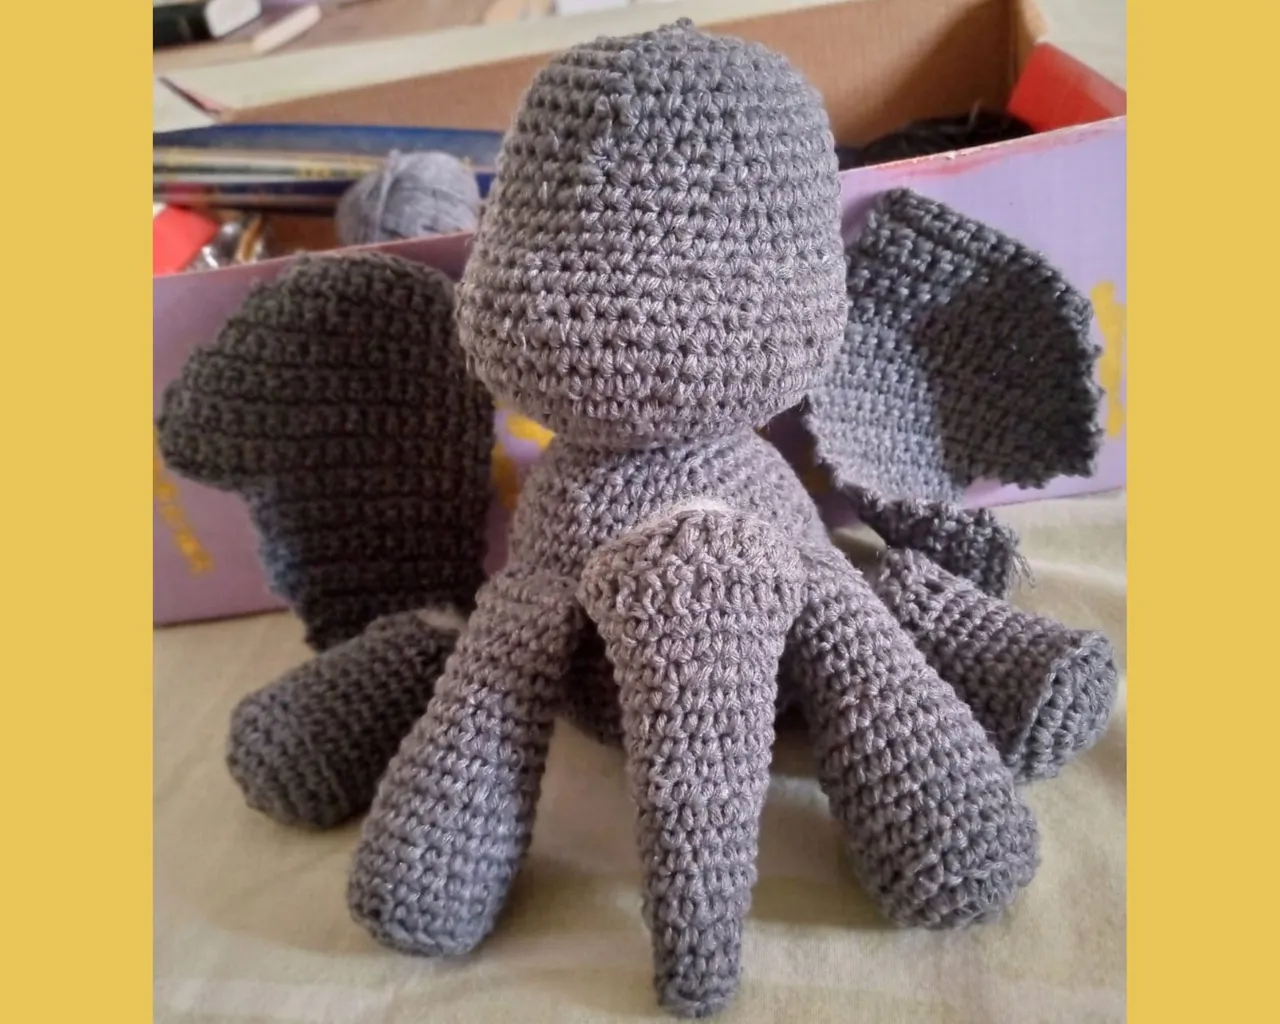
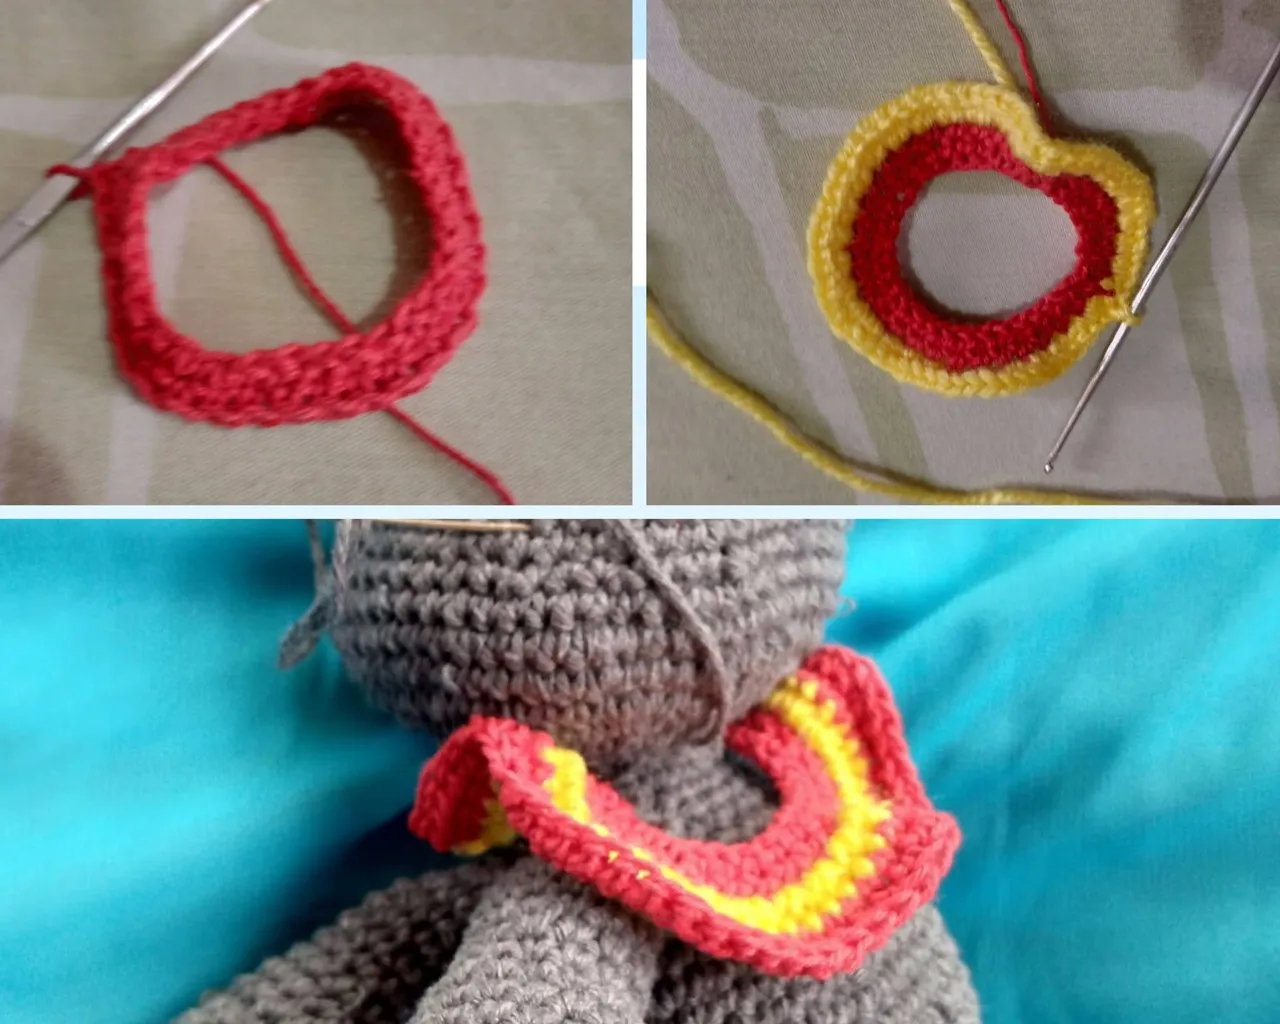
At this point I joined all the pieces together with the help of the knitting needle. Previously I had knitted a ring in red color starting with a ring of 25 chains, then I knitted 25 half stitches and in the next row I intercalated the yellow color, knitting 50 half stitches, that is to say, an increase in each chain. This is the ornament that Dumbo has on his neck.
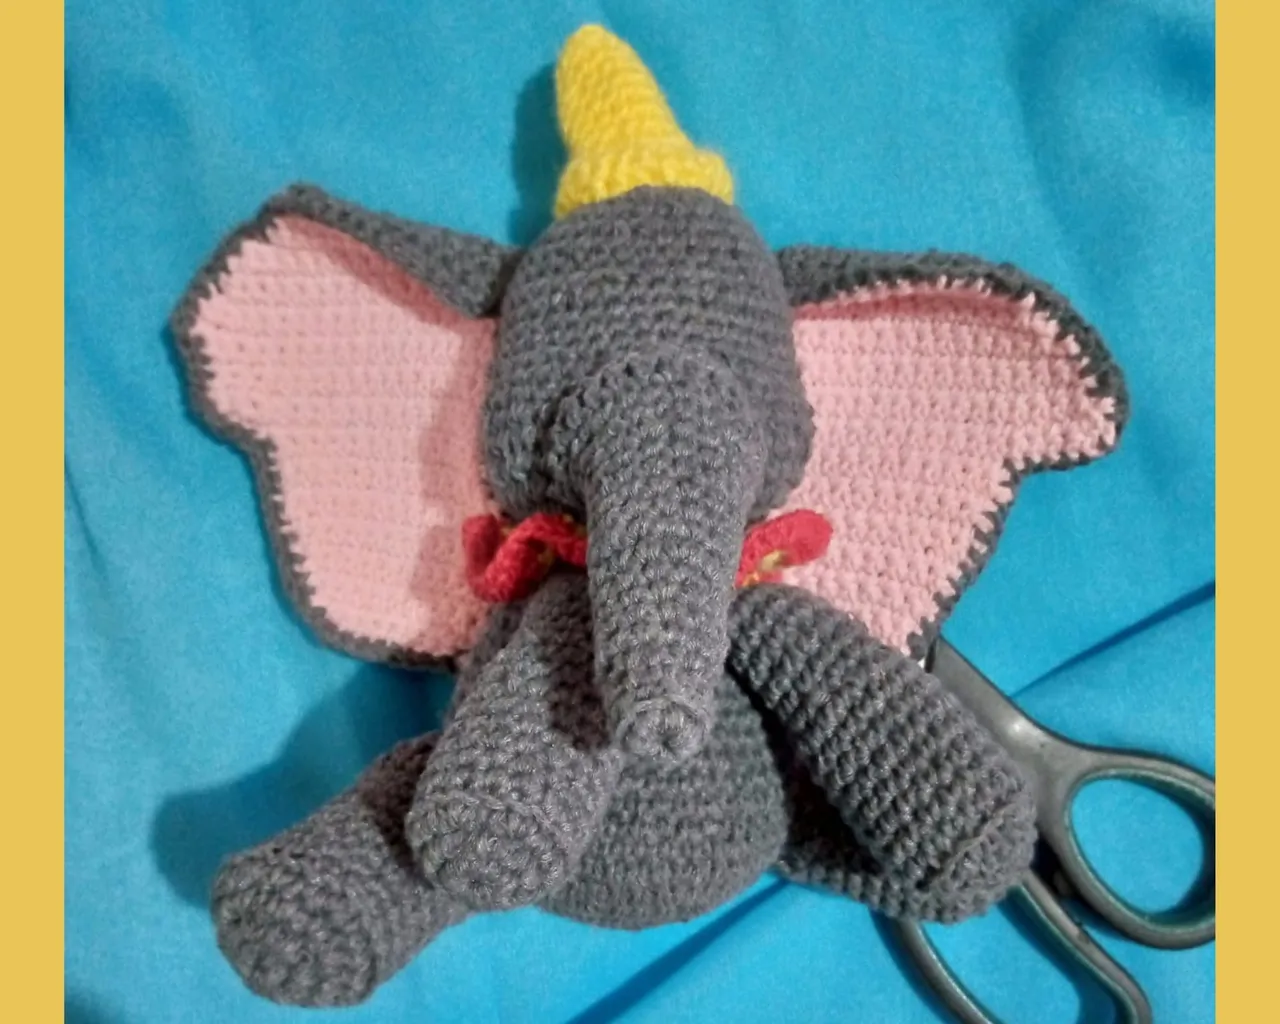
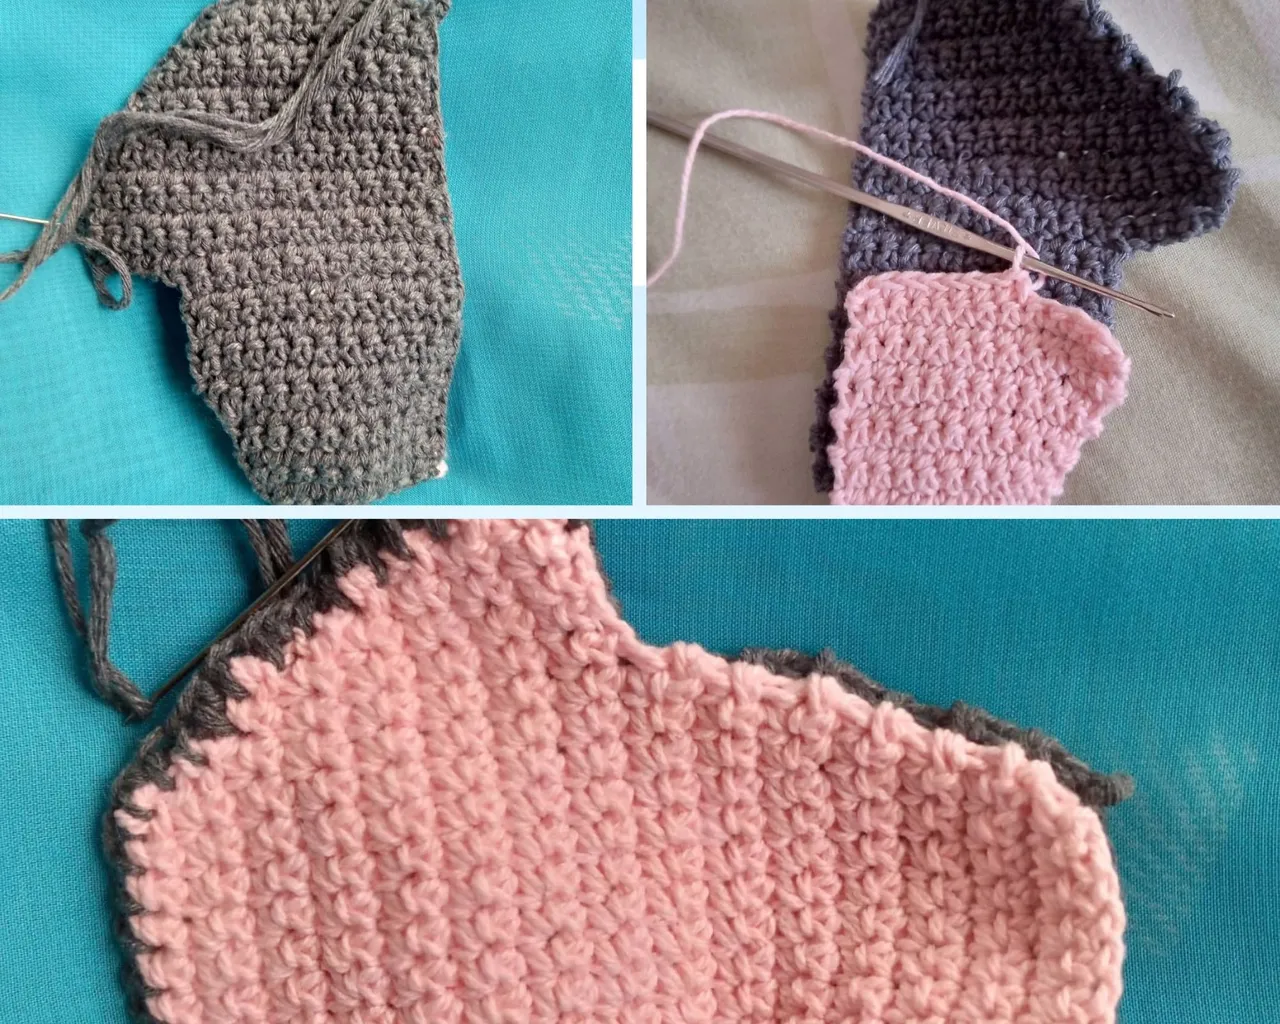
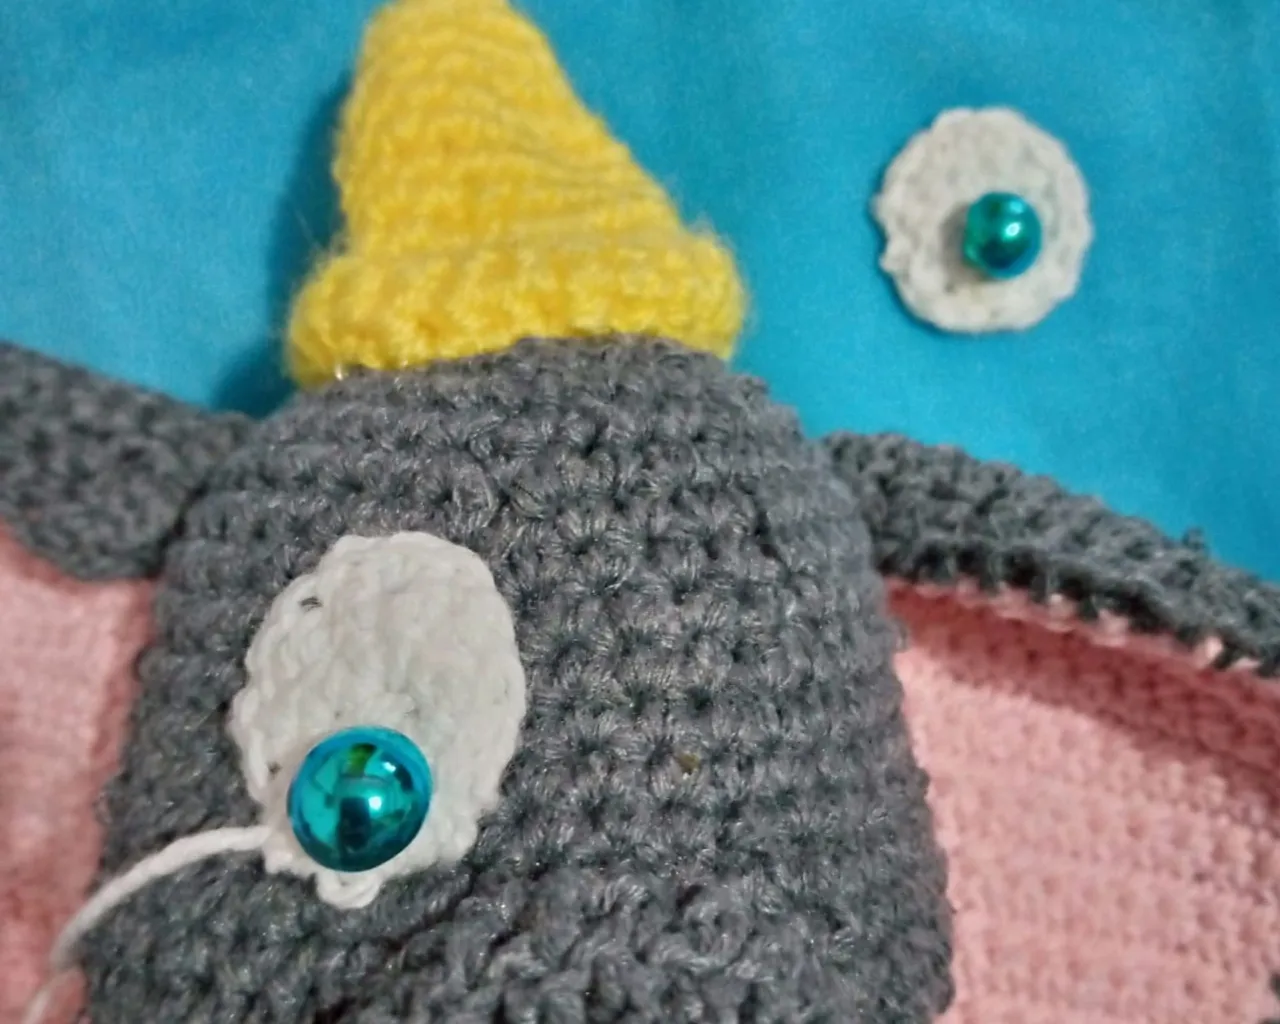
For the EARS. I knitted 4 pieces. 2 in gray and 2 in pink. I knitted them measuring the ears against the previously assembled body, making increases and decreases as I saw fit until I reached the desired size and dimension.
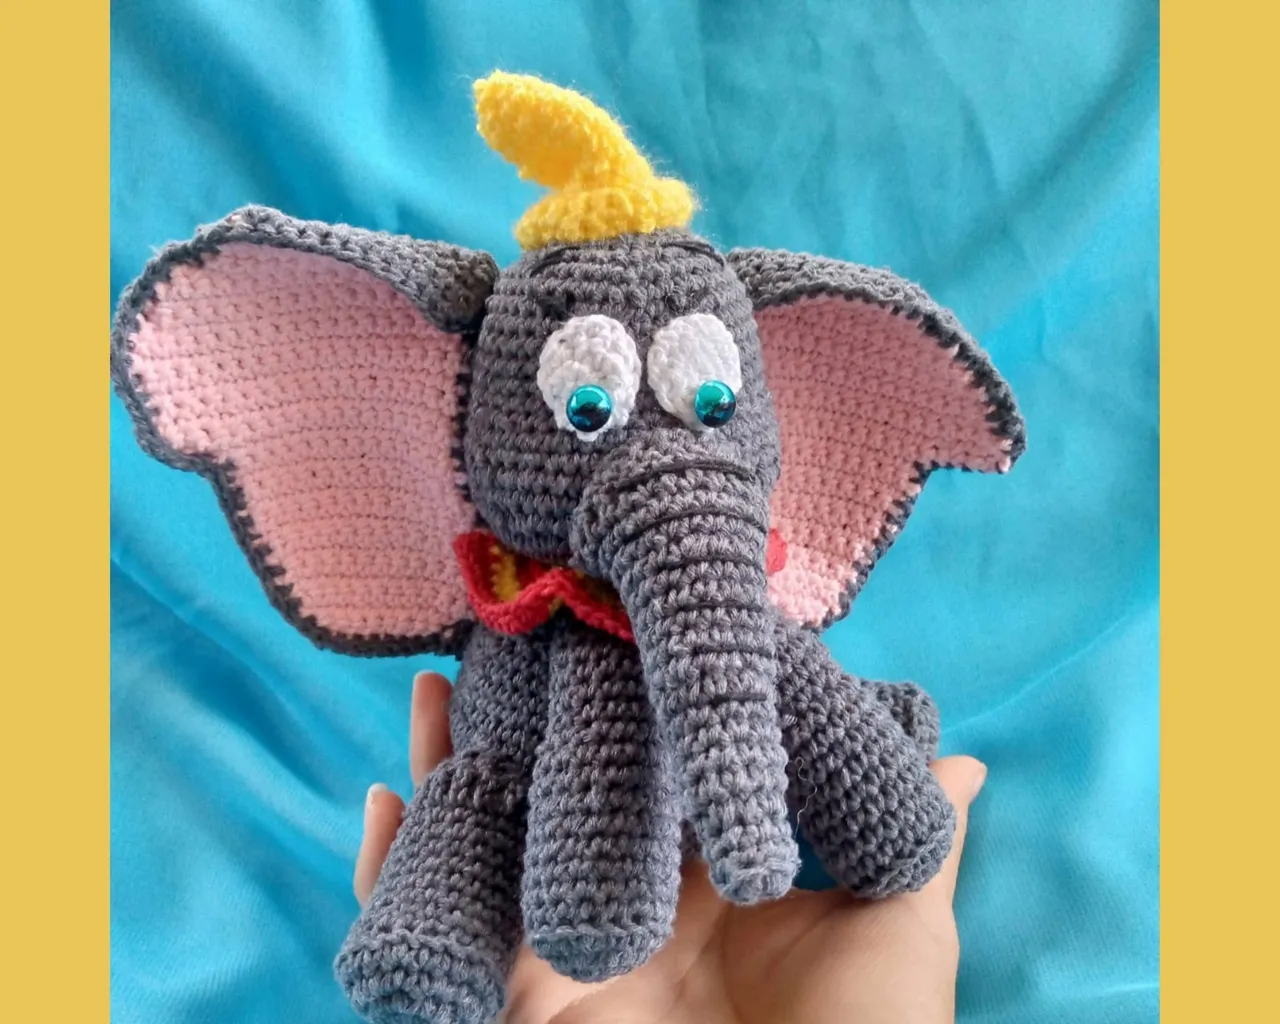
The yellow HAT, I knitted it from the upper end, knitting with half wrap stitches and sizing it as I thought appropriate with respect to the size of the head.
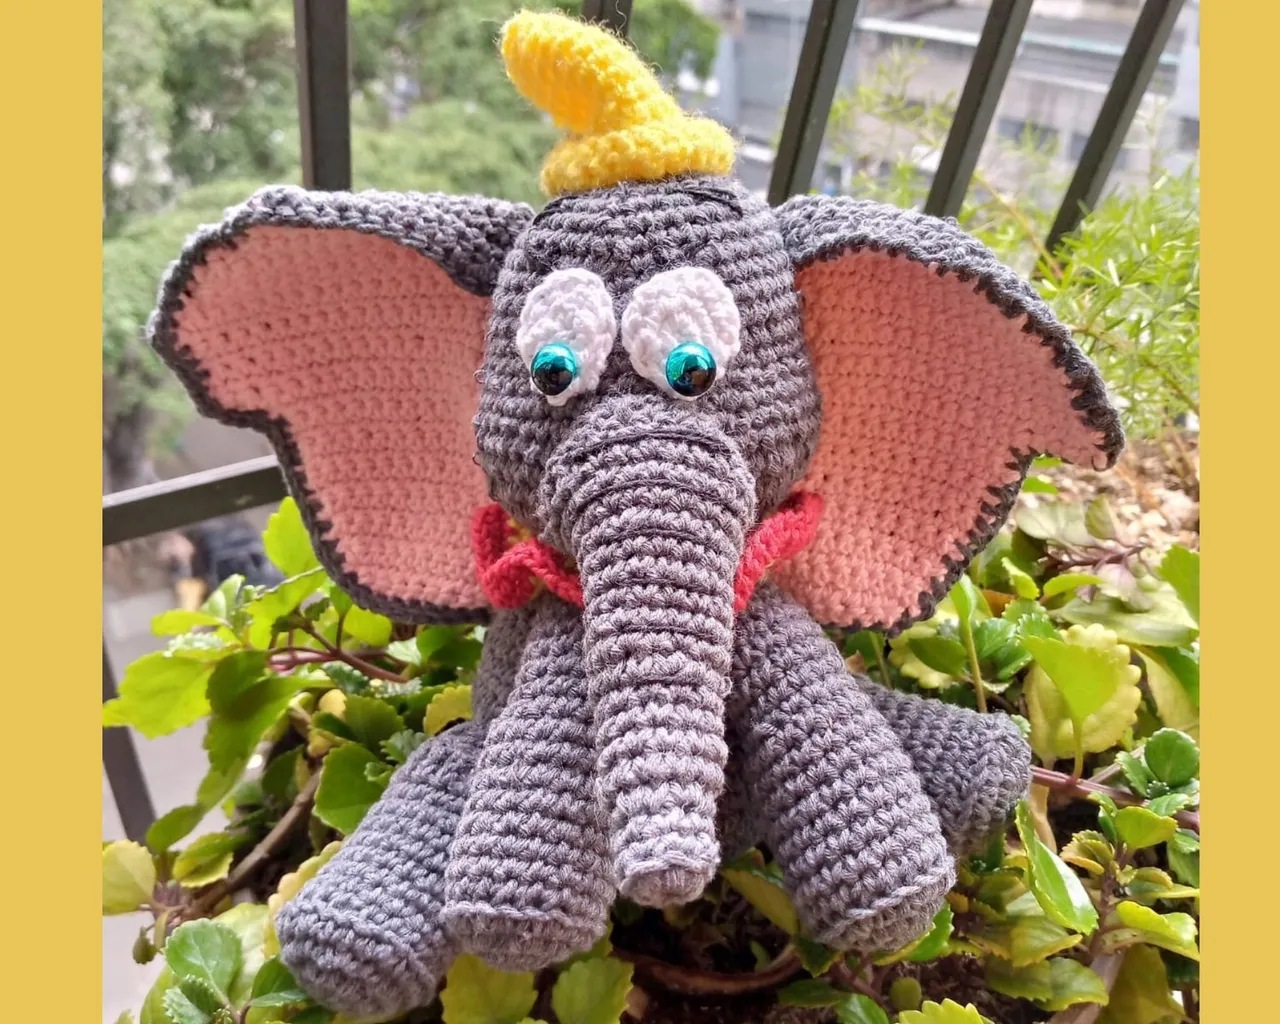
Finally I knitted the eyes in white and glued the buttons, then with the help of the knitting needle I attached them to the head and bordered the eyebrows, eyelashes and horn ornaments.
AHORA EN ESPAÑOL
Feliz lunes mis queridas y creativas amigas de #NeedleWorkMonday. Feliz inicio de Agosto, por cierto este mes cumplo un año en #hive, un mes lleno de emociones, aprendizajes y creatividad.
La idea de esta semana me la trasmitió @alejandria12, quien en el grupo de Whatsapp “Ruteros Elites” me comentó que le gustaban mucho los elefantes y que mejor personaje para representar a tan enormes e inteligentes animales sino a “Dumbo”, el tierno elefante de grandes orejas que podía volar.
Dumbo, es una película de Walt Disney estrenada en 1941, sobre la vida de un pequeño elefante que al nacer y producto de un estornudo se le desarrollaron unas gigantes orejas.
Su mamá al ver la burla de sus compañeras, reaccionó defendiendo a su pequeño. Ella fue encerrada y el pequeño elefante fue degradado al puesto de payaso en el circo donde había nacido.
Allí conoce a su mejor amigo, un pequeño ratón que le ayuda a tener confianza en sí mismo. Una noche de farra, los dos despiertan en la rama de un árbol, descubriendo en ese momento que Dumbo podía volar…
Para hacer al pequeño Dumbo de grandes orejas, utilice los siguientes MATERIALES:
- Hilo algodón colores gris, negro, blanco, rosado, amarillo y rojo.
- Relleno antialérgico.
- Aguja lanera.
- Aguja de ganchillo N° 2.
PROCEDIMIENTO
Inicie tejiendo dos bolas en color gris de 7 centímetros de alto, para hacer el CUERPO y CABEZA. Tejí un anillo mágico de 5 cadenetas y cerré. A continuación hice 5 vueltas con aumentos de 1, 2, 3, 4 y 5 medio puntos en cada vuelta. Desde la vuelta 7 hasta la vuelta 19 tejí el mismo número de medio puntos sobre cada cadeneta, es decir, no hice ni aumentos, ni disminuciones. En la vuelta 20 inicie con disminuciones cada 5 medio puntos, en la vuelta 21 hice disminuciones cada 4 medio puntos. En este momento rellené las bolitas y continúe con las disminuciones hasta cerrar.
Para LOS BRAZOS, inicié con un anillo mágico de 5 cadenetas y cerré. A continuación tejí 6 medio puntos. En la siguiente vuelta tejí un medio punto y un aumento hasta terminar la vuelta y en la próxima vuelta tejí dos medio puntos y un aumento. En este momento di una vuelta tejiendo un medio punto sobre cada medio punto, pero solo tomando la mitad de la cadeneta. Seguidamente tejí 18 vueltas sin hacer aumentos o disminuciones, rellené y cerré.
En cuanto a las PIERNAS inicié con el mismo procedimiento de los brazos. Tejí e con medios puntos hasta la vuelta 12. Las vueltas 13 y 14 las tejí 4 con medio puntos y el los demás puntos en varetas para darle altura a un extremo de las piernas y cerré.
Para la TROMPA, inicié con un anillo mágico de 5 medio puntos y a continuación tejí 6 medio puntos. Luego tejí un medio punto sobre cada cadeneta hasta llegar a la vuelta 4. En la vuelta 5 tejí 4 medio puntos y luego hice un aumento. En las vueltas 6 a la 9 tejí un medio punto sobre cada cadeneta. En la vuelta 10 tejí 3 medio puntos y un aumento hasta finalizar la vuelta. Vuelta 11 a la 15 tejí un medio punto sobre cada cadeneta. En la vuelta 16 hice un aumento cada 5 medio puntos. En las vueltas 17 y 18 hice varetas.
En este momento uní todas las piezas con ayuda de la aguja lanera. Previamente había tejido un anillo en color rojo iniciando con un anillo de 25 cadenetas, posteriormente tejí 25 medio puntos y en la siguiente vuelta intercalé el color amarillo, tejiendo 50 medio puntos, es decir, un aumento en cada cadeneta. Este es adorno que tiene Dumbo en su cuello.
Para las OREJAS. Tejí 4 piezas. 2 en color gris y 2 en color rosado. Las tejí midiendo las orejas contra el cuerpo previamente armado, haciendo aumentos y disminuciones según me pareció apropiado hasta lograr el tamaño y dimensión deseado.
El GORRO en color amarillo, lo tejí desde la punta superior, tejiendo con medio puntos envolventes y dándole el tamaño según me pareció adecuado con respecto al tamaño de la cabeza.
Finalmente tejí los ojos en blanco y pegué los botones, seguidamente con ayuda de la aguja lanera los uni a la cabeza y borde las cejas, pestañas y adornos de la trompa.