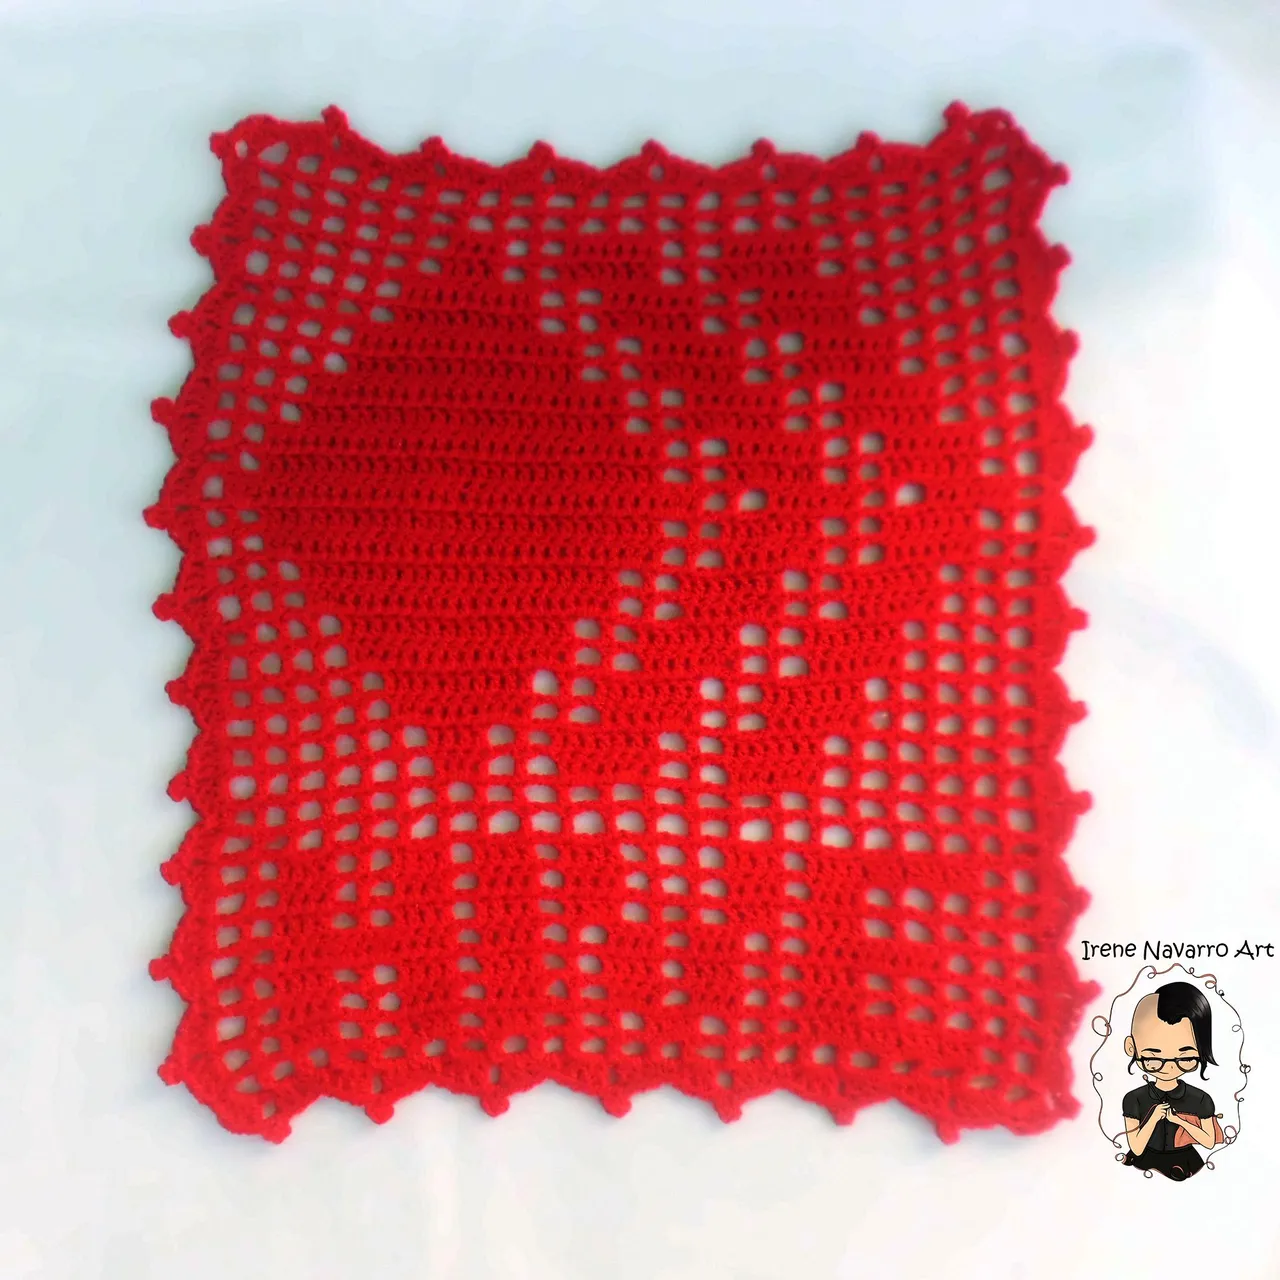
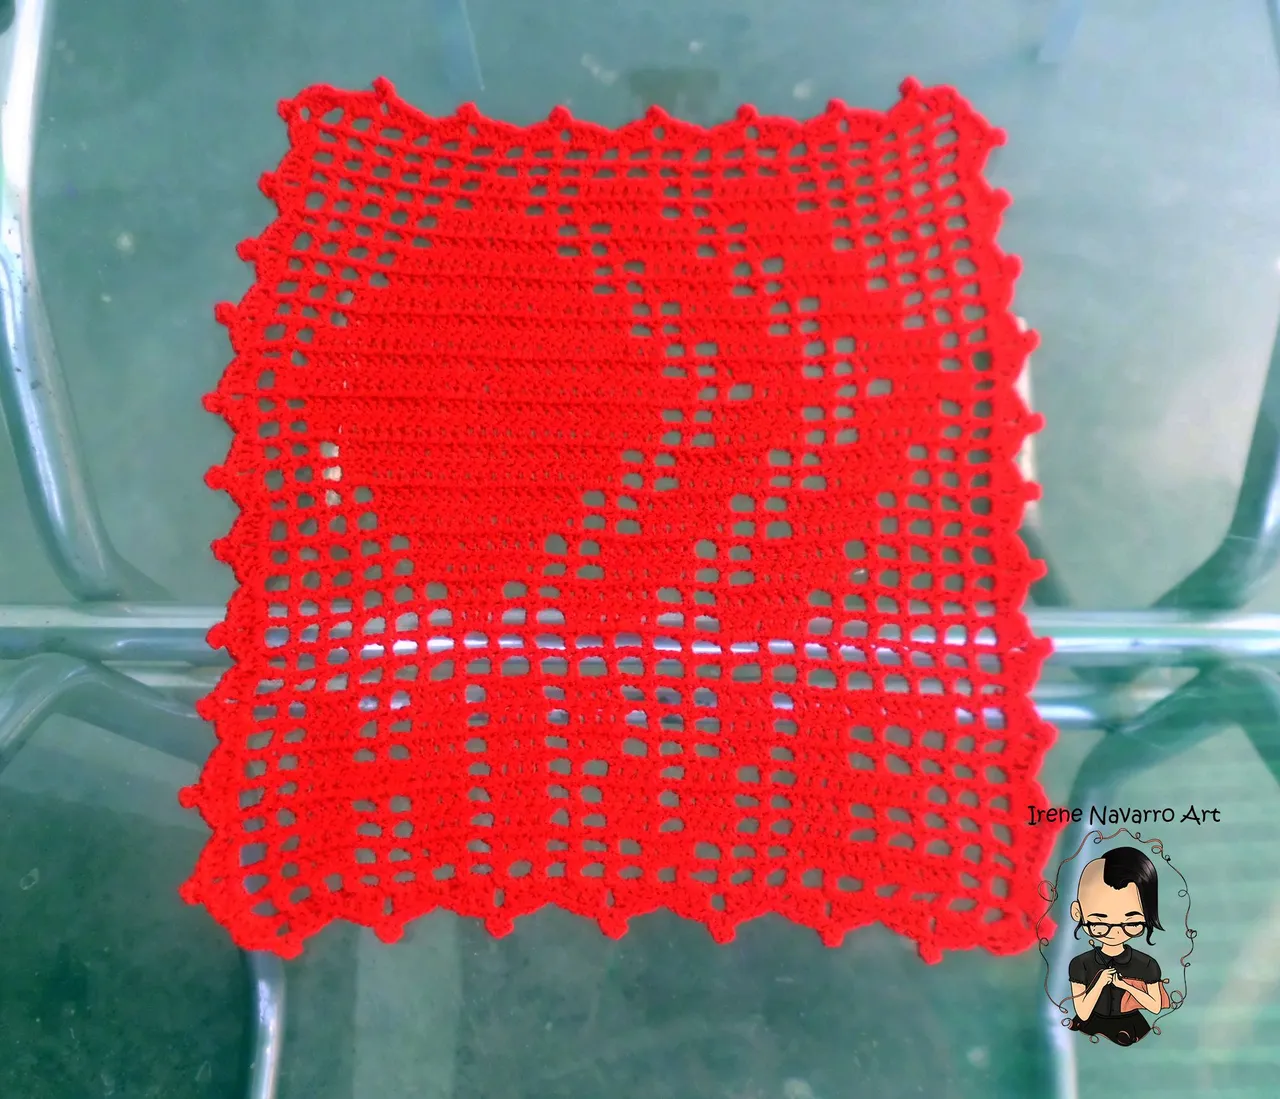
Saludos comunidad feliz #NeedleWorkMonday , el día de hoy les muestro un tapete de mesa con el logo Hive hecho con la técnica de filet a crochet, este lo hice para regalárselo a mi mamá quien tiene una pequeña mesa en la sala, pero es un placer compartir el grafico que realicé y las instrucciones generales de cómo hacerlo.
Greetings community, happy #NeedleWorkMonday, today I show you a table mat with the Hive logo made with the crochet filet technique, I made this to give it to my mother who has a small table in the living room, but it is a pleasure to share the chart I made and the general instructions on how to do it.
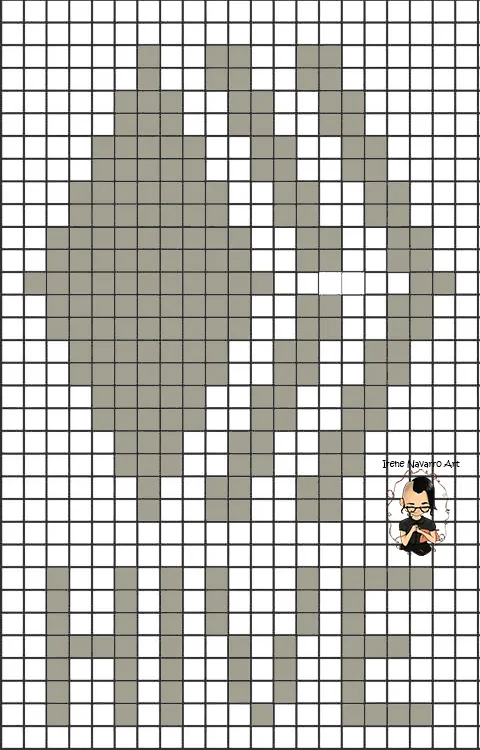
Patrón / Graphic pattern
La motivación vivo porque estaba viendo una chica en redes sociales que tejía con la técnica de filet a crochet y recordé que hace mucho que no la pongo práctica, además tengo el grafico que hice para tener el botón con el logo de Hive en técnica Jacquard a dos agujas que publiqué hace un tiempo, este mismo gráfico se puede tomar para tejer en filet , así que lo que hice fue dibujarlo de nuevo pero digital para que todos los que quieran hacerlo puedan descargarlo e incluso imprimirlo.
The motivation I live because I was seeing a girl on social networks who knit with the crochet filet technique and I remembered that I have not put it into practice for a long time, I also have the graphic that I made to have the button with the Hive logo in Jacquard technique two needles that I posted a while ago, this same graphic can be taken to filet so what I did was draw it again but digitally so that everyone who wants to can download it and even print it.
Técnica Filet Crochet / Filet Crochet Technique
La técnica de filet en crochet es muy simple, solo tejemos cuadros y algunos de estos cuadros están vacios mientras que otros están rellenos para formar la figura, los cuadros están formados en el grafico por líneas verticales y líneas horizontales, lo que hay que interpretar en el tejido es que cada línea vertical en el cuadro es un punto alto y cada línea horizontal representa la separación por dos cadenas.
Para hacer las cadenas de montaje solo se tiene que contar los cuadros de la primera fila horizontal, el número de cuadro se multiplica por tres y al resultado se le suma uno, entonces se obtiene el número exacto de cadenas para iniciar. En este grafico son 21 cuadros, por lo tanto (21 x 3) + 1 = 64 cadenas.
The filet crochet technique is very simple, we only knit squares and some of these squares are empty while others are filled to form the figure, the squares are formed in the graph by vertical lines and horizontal lines, which must be interpreted in the weaving is that each vertical line in the square is a double crochet and each horizontal line represents the separation by two chains.
To make the starting chains, you only have to count the boxes in the first horizontal row, the box number is multiplied by three and the result is added one, then the exact number of chains to start is obtained. In this graph there are 21 squares, therefore (21 x 3) + 1 = 64 chains.
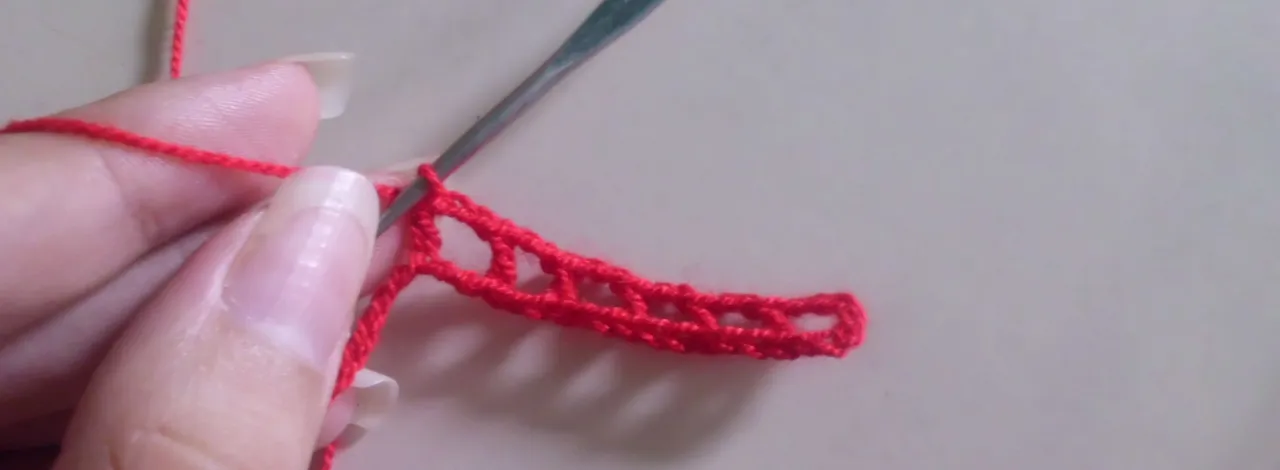
Ronda de inicial / Initial round
Para el inicio de cada ronda se debe tejer tres cadenas para sustituir el primer punto alto y dos cadenas mas para la separación.
Solamente en la primera ronda para tener el primer punto alto se debe meter el aguja en la cadena numero 8, después de tejer un punto alto se tejen dos cadenas de separación y se hace el próximo punto alto en la tercera cadena contado desde el punto anterior y así sucesivamente hasta llegar al final. En las demás rondas los puntos altos se realizan metiendo la aguja en el punto alto de la ronda anterior.
For the beginning of each round you should work three chains to replace the first double crochet and two more chains for the separation.
Only in the first round to have the first double crochet you should put the needle in the chain number 8, after knitting a double crochet two separating chains are knitted and the next double crochet is made in the third chain counted from the previous stitch. and so on until the end. In the other rounds the double crochets are made by inserting the needle in the double crochet of the previous round.
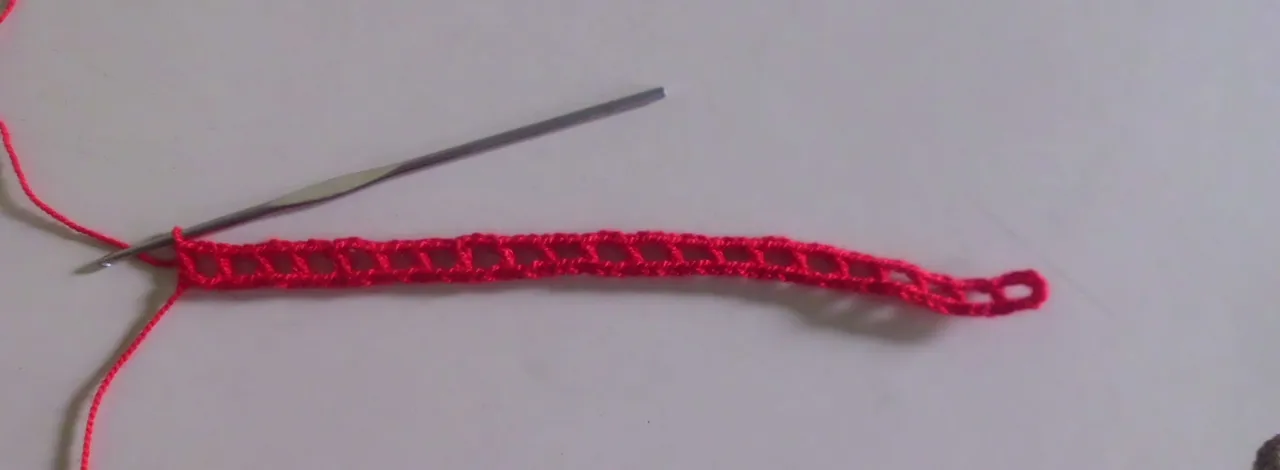
Rellenar cuadros / Fill squares
Siguiendo el grafico, cuando se encuentre un cuadro relleno lo que se tiene que hacer es en lugar de tejer dos cadenas de separación se debe tejer dos puntos altos, metiendo la aguja en el agujero dejado por en el cuadro de la ronda anterior paralelo a este.
Following the graph, when you find a filled square, what you have to do is instead of knitting two separating chains you should knit two double crochets, putting the needle in the hole left by in the square of the previous round parallel to this .
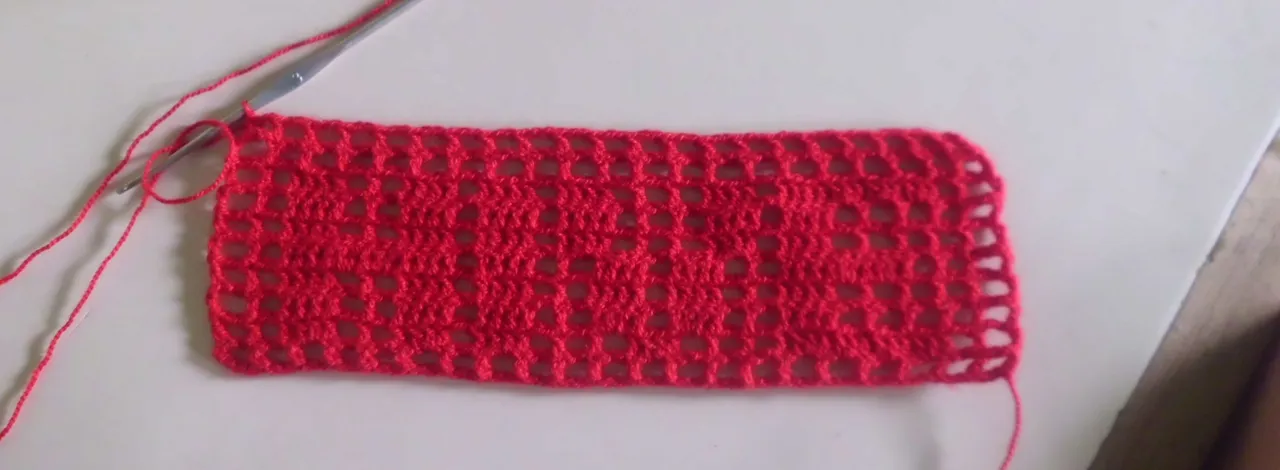
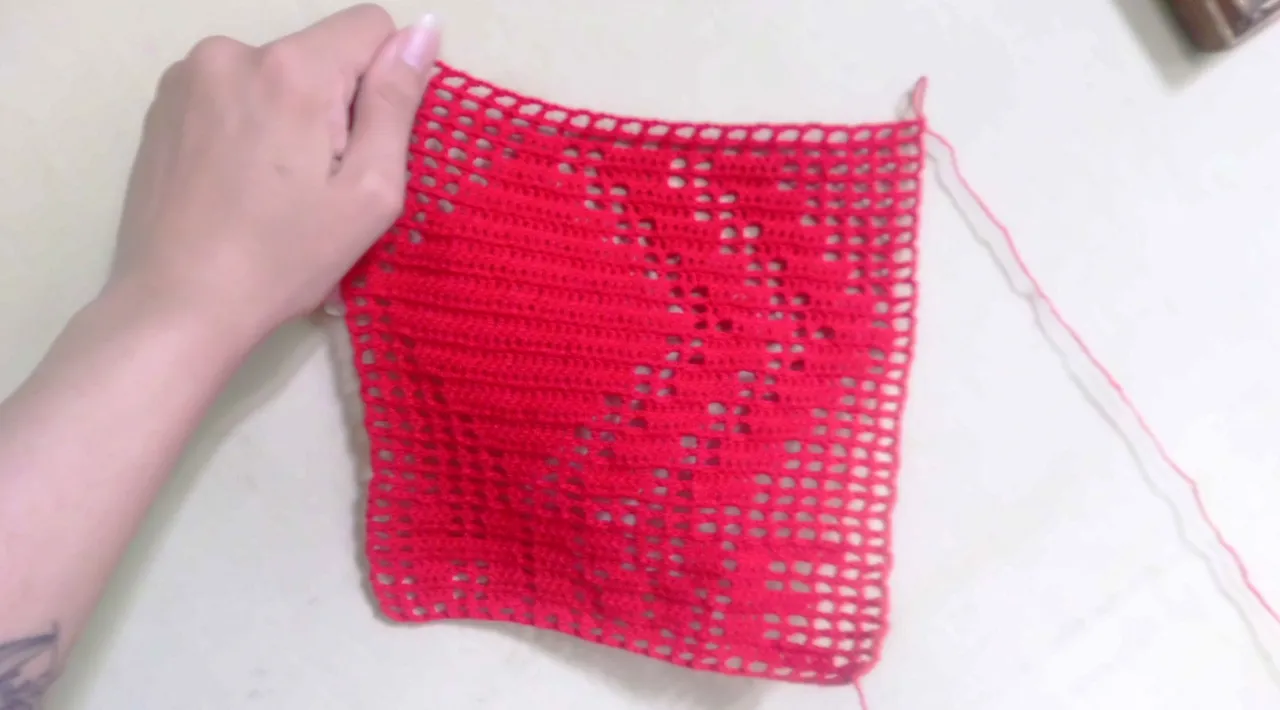
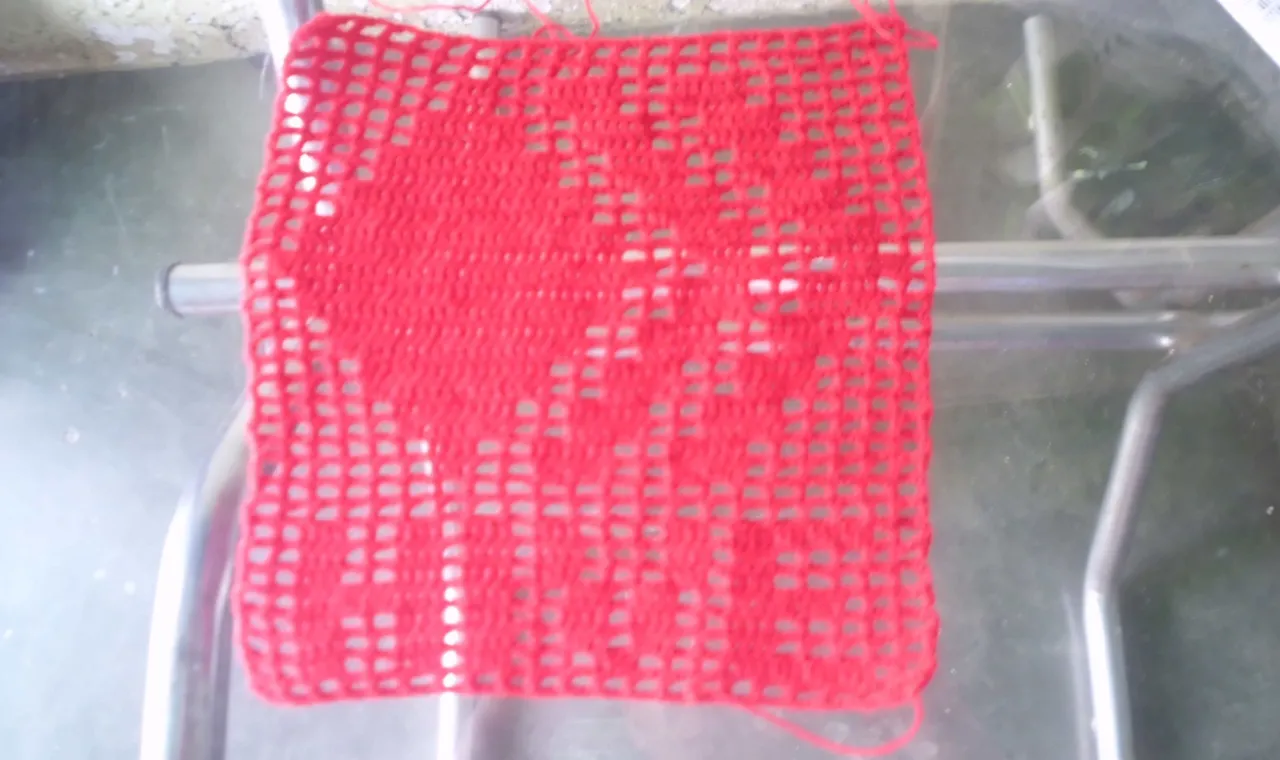
Proceso / Process
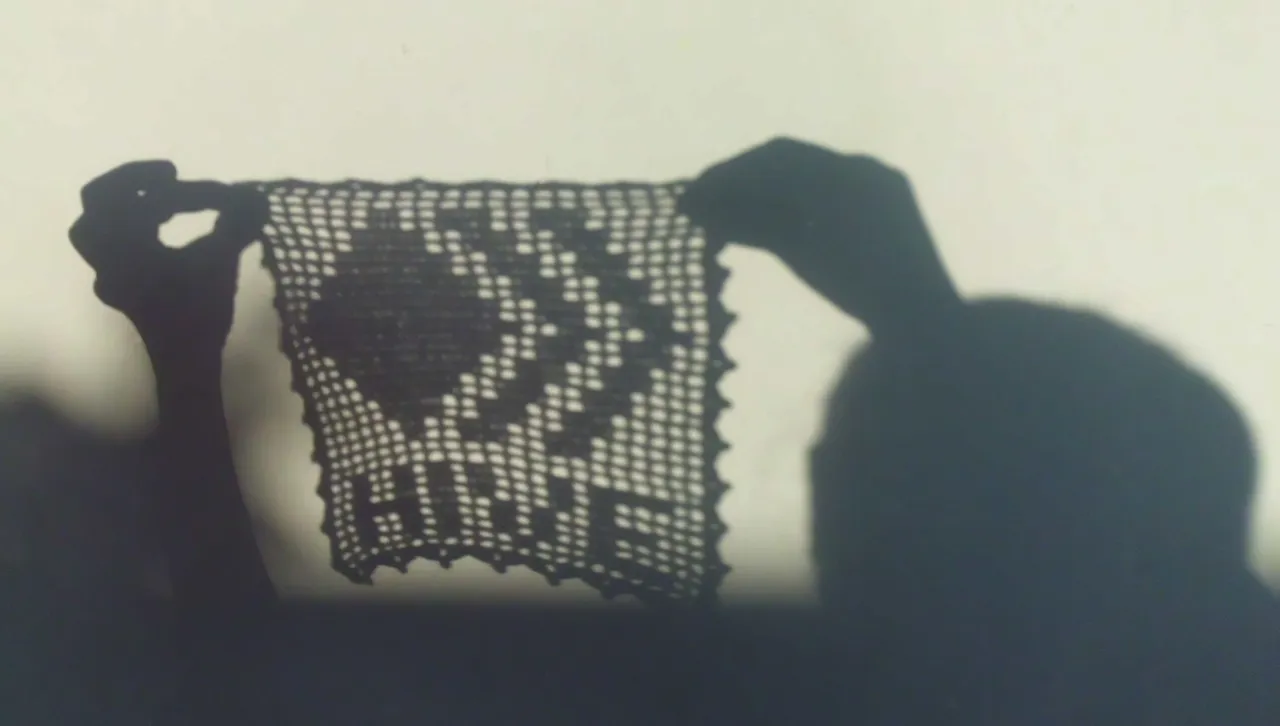
Estaba tejiendo en una mesa que no dejaba ver muy bien la figura en la foto, por eso en algunas fotos tome el tejido con mi mano el tejido para que en el contraste con la pared se pudiera notar la figura en la fotografía.
I was weaving on a table that did not allow the figure in the photo to be seen very well, so in some photos I took the fabric with my hand so that the figure in the photograph could be seen in the contrast with the wall.
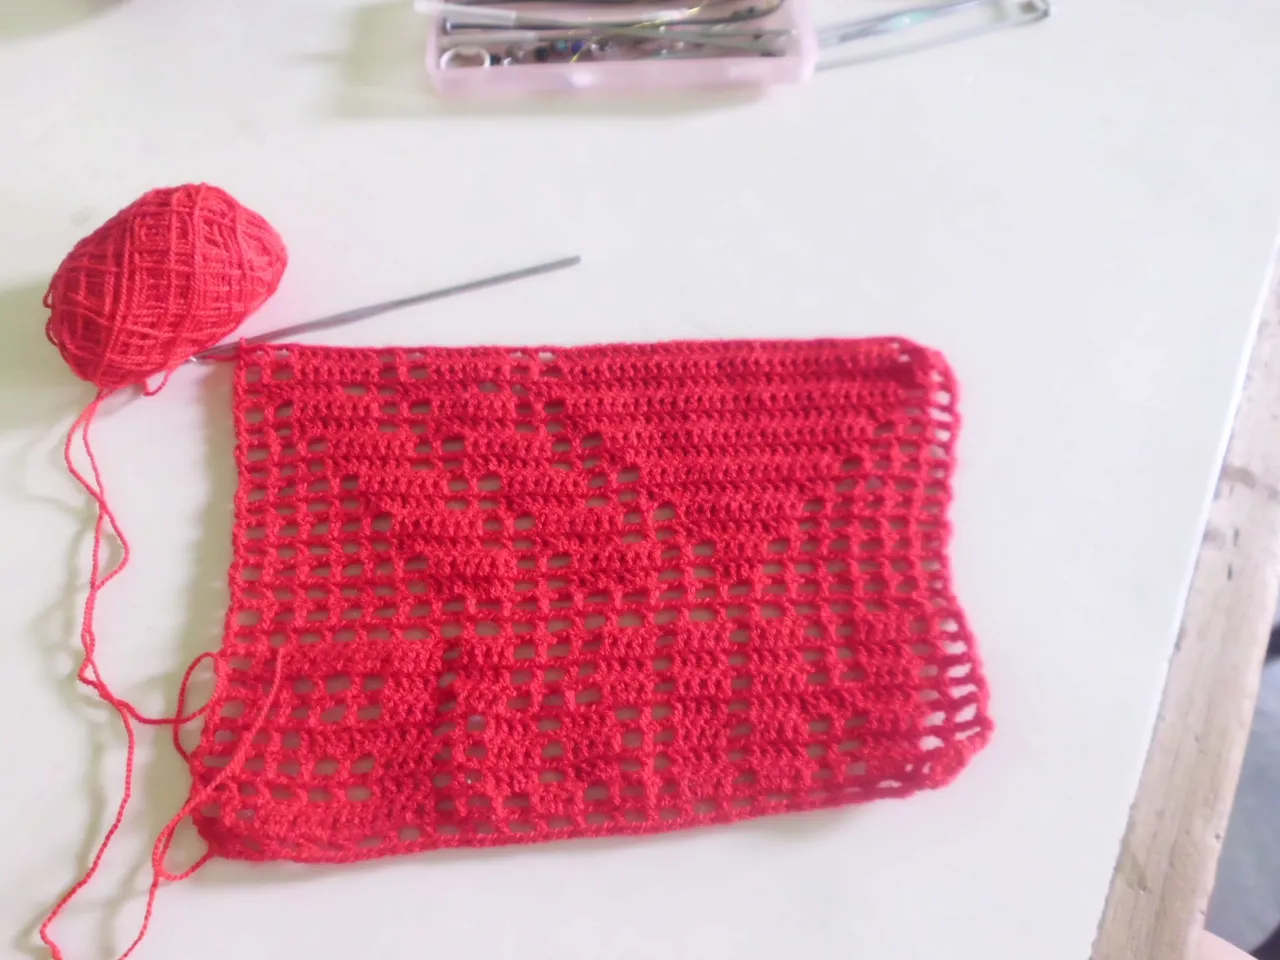
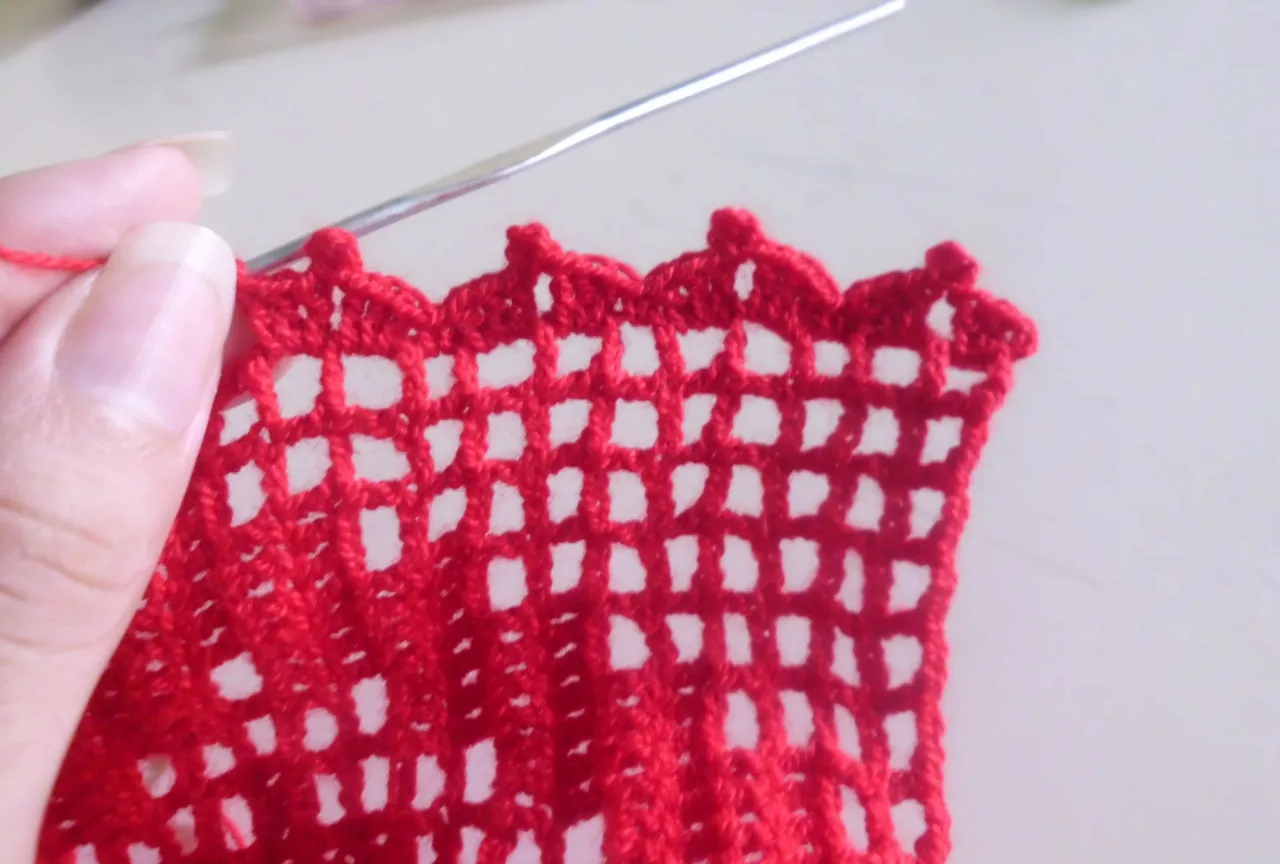
Ronda de borde / Edge round
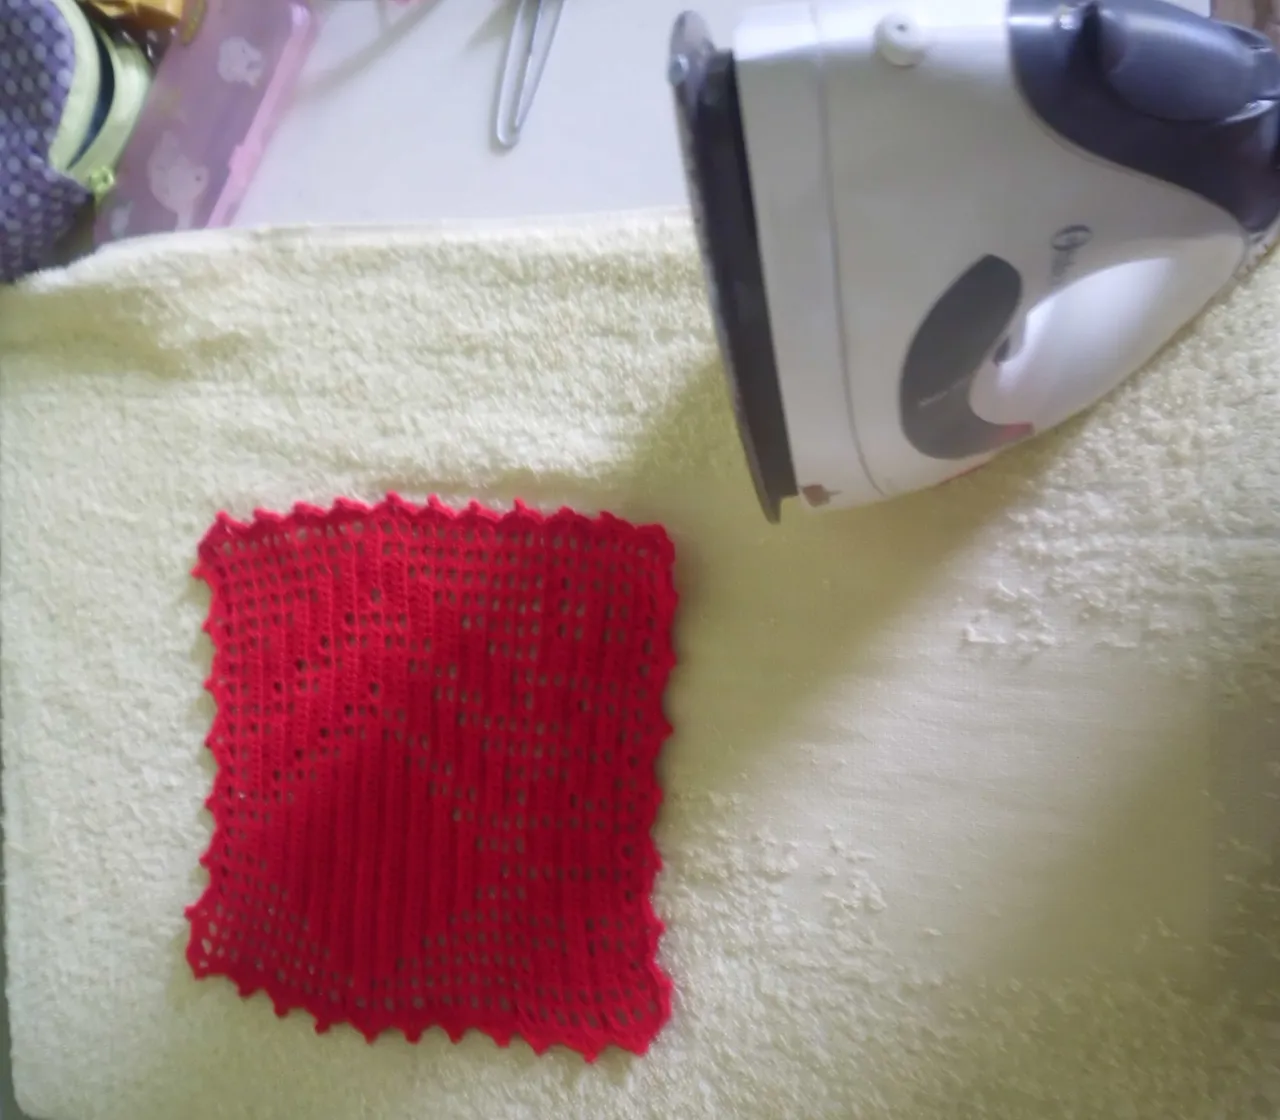
Una vez tejido el grafico completo, hice un ronda por todo el borde del tapete, esta ronda es opcional sin embargo puede aportarle más belleza a la pieza tejida, es a gusto de la persona pueden utilizar puntadas tipo abanico, con en mi caso en el intermedio de los abanicos hice unos picos, el borde decorativo entonces tiene tres puntos altos es un cuadro, un pico y luego tres puntos altos en el siguiente cuadro y de separación un punto bajo en el siguiente cuadro. Lo último que hice fue planchar e tapete para que los hilos tomaran mejor su forma.
Once the complete graphic was woven, I made a round around the edge of the table mat, this round is optional, however it can add more beauty to the woven piece, it is to the taste of the person, they can use fan stitches, with in my case In the middle of the fans I made some peaks, the decorative border then has three high points is a square, a peak and then three double crochets in the next square and separating a low point in the next square. The last thing I did was iron the mat so that the threads would take their shape better.
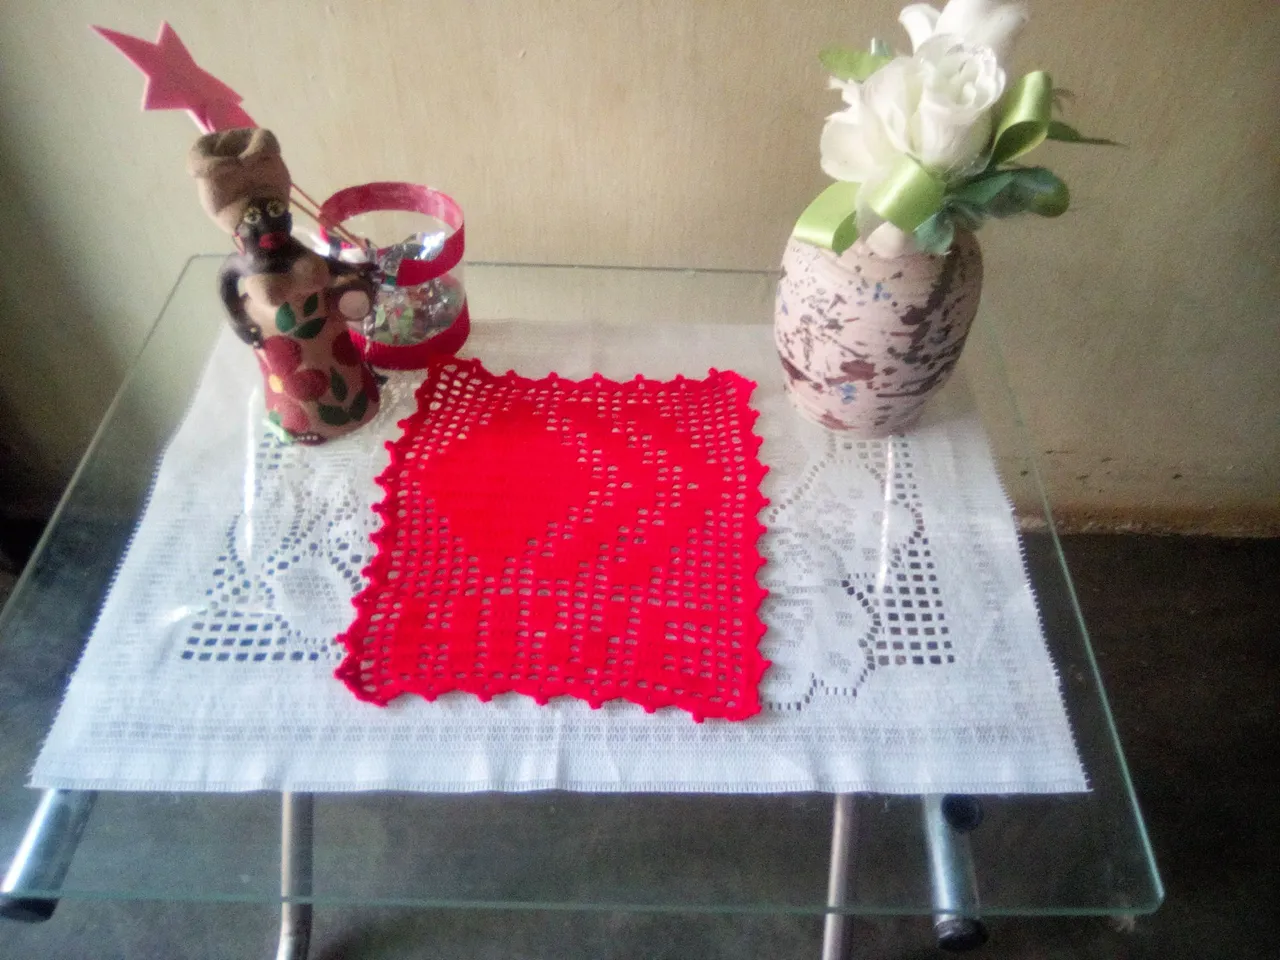
Resultado / Result
Mi mamá quedo encantada con el resultado de una vez lo puso en su mesita de la sala, así mismo aproveche de sacarle una foto a la sombra del tapete cuando por accidente descubrí que el tapete producía una sombra muy bonita.
My mother was delighted with the result of once putting it on her table in the living room, likewise I took advantage of taking a photo of it in the shade of the mat when by accident I discovered that the mat produced a very beautiful shadow.

Imágenes tomadas con cámara Casio QV-R100 y teléfono Krip 4, editadas en Adobe Photoshop Cs6
Images taken with Casio QV-R100 camera and Krip 4 and edited in Adobe Photoshop Cs6
Invítenme un Café/Support Me on Ko-Fi
 https://ko-fi.com/irenenavarroart
Si deseas apoyar mi contenido también puedes hacer donaciones por el valor de un café en Ko-Fi
If you want to support my art you can also make donations for the value of a coffee (Ko-Fi)

Espero les haya gustado. Les invito a leer mis próximas publicaciones y siempre estaré dispuesta a responder sus preguntas y comentarios, también pueden seguirme y contactarme en cualquiera de mis redes sociales. ¡Muchas gracias!
I hope you liked it. I invite you to read my next publications and I will always be willing to answer your questions and comments, you can also follow me and contact me on any of my social networks. Thank you!