
Español
Hola linda comunidad de #NeedleWorkMonday
Espero hayan pasado una semana maravillosa, llegó el día de mostrar nuestros trabajos en agujas, se que para muchos fue difícil crear contenido sin terminar, pero al final también nos dejó muchas curiosidad de saber que estaba haciendo cada una de los participantes, gracias a la dedicación, la creatividad, la disposición, la organización, confianza y constancia, estamos aquí con nuestro trabajo final y eso es lo importante.
Debo confesarles que es la primera vez que realizo un personaje en muñeca de tela y wow vaya que es un experiencia espectacular, quedé con ganas de crear unos cuantos personajes de Hive. ¿Qué les parece esa idea? Bueno ya me responderán al final del post.
Sabía que estabas viendo mi trabajo en agujas...y no solo el mío sino el de muchos que pertenecen a esta grandiosa comunidad.
Les contaré mi experiencia y es que la tela principal que utilicé fue fieltro pero no me gustó para diseñar el personaje, fue difícil de manipular además de no tener la forma deseada, así que cambié de fieltro a la tela lycra carioca la cual recomiendo con los ojos cerrado, es una tela fascinante para hacer muñecos.
Todos los detalles en el rostro son característicos del personaje final, por ejemplo tiene muchas pecas. Ya saben de quién se trata? más abajo se los diré así que vamos con los materiales y el paso a paso.
English
Hello beautiful #NeedleWorkMonday community
I hope you had a wonderful week, the day came to show our needlework, I know it was difficult for many to create unfinished content, but in the end it also left us very curious to know what each of the participants was doing, thanks to the dedication, creativity, willingness, organization, confidence and perseverance, we are here with our final work and that's what is important.
I must confess that this is the first time I make a character in fabric doll and wow it is a spectacular experience, I wanted to create a few Hive characters. What do you think about this idea? Well, I'll get back to you at the end of the post.
I knew you were watching my needlework...and not only mine but that of many who belong to this great community.
I will tell you my experience and the main fabric I used was felt but I did not like it to design the character, it was difficult to manipulate besides not having the desired shape, so I changed the felt to lycra carioca fabric which I recommend with eyes closed, it is a fascinating fabric to make dolls.
All the details on the face are characteristic of the final character, for example he has a lot of freckles. You know who it is? I'll tell you below so let's go with the materials and the step by step.

Materiales que utilicé || Materials I used
- Tela lycra carioca
- Maquina de coser
- Hilo blanco y rojo
- 2 Botones color bronce
- Pestañas postizas
- Estambre marrón
- Marcador marrón
- Aros azules
- Algodón para rellenar
- Brocha para difuminar
- Rubor
- Patrón
- Aguja
- Pega de silicón caliente
- Lycra carioca fabric
- Sewing machine
- White and red thread
- 2 bronze buttons
- False eyelashes
- Brown yarn
- Brown marker
- Blue earrings
- Cotton to fill in
- Blending brush
- Blusher
- Pattern
- Needle
- Hot silicone glue
- Tela blanca terciopelo
- Tela negra terciopelo
- 1 x 1 centímetro de cierre mágico
- Tela dorada para los pies
-Tela de fieltro amarillo - Marcador negro punta fina
- White velvet fabric
- Black velvet fabric
- 1 x 1 centimeter magic clasp
- Gold fabric for the feet
-Yellow felt fabric - Black fine tip marker
Procedimientos || Procedures
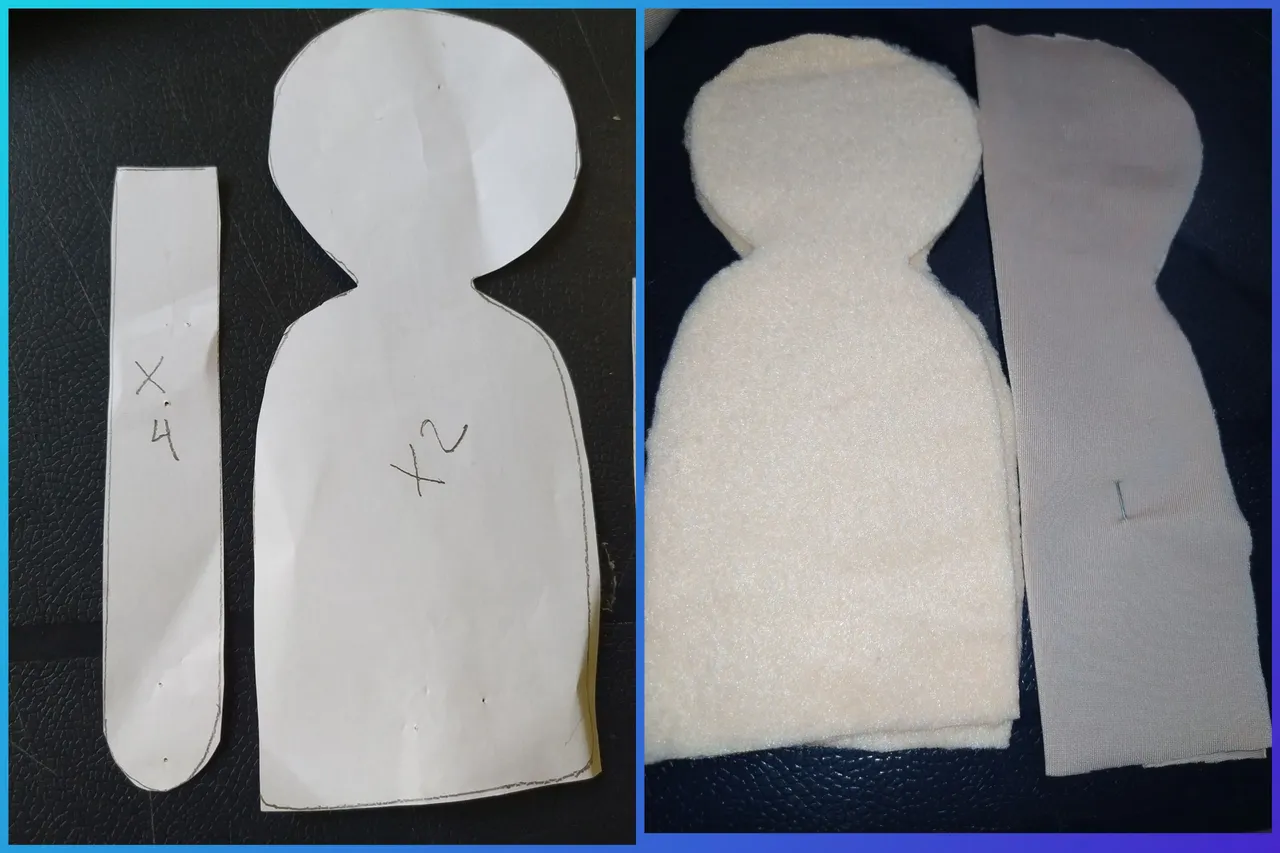
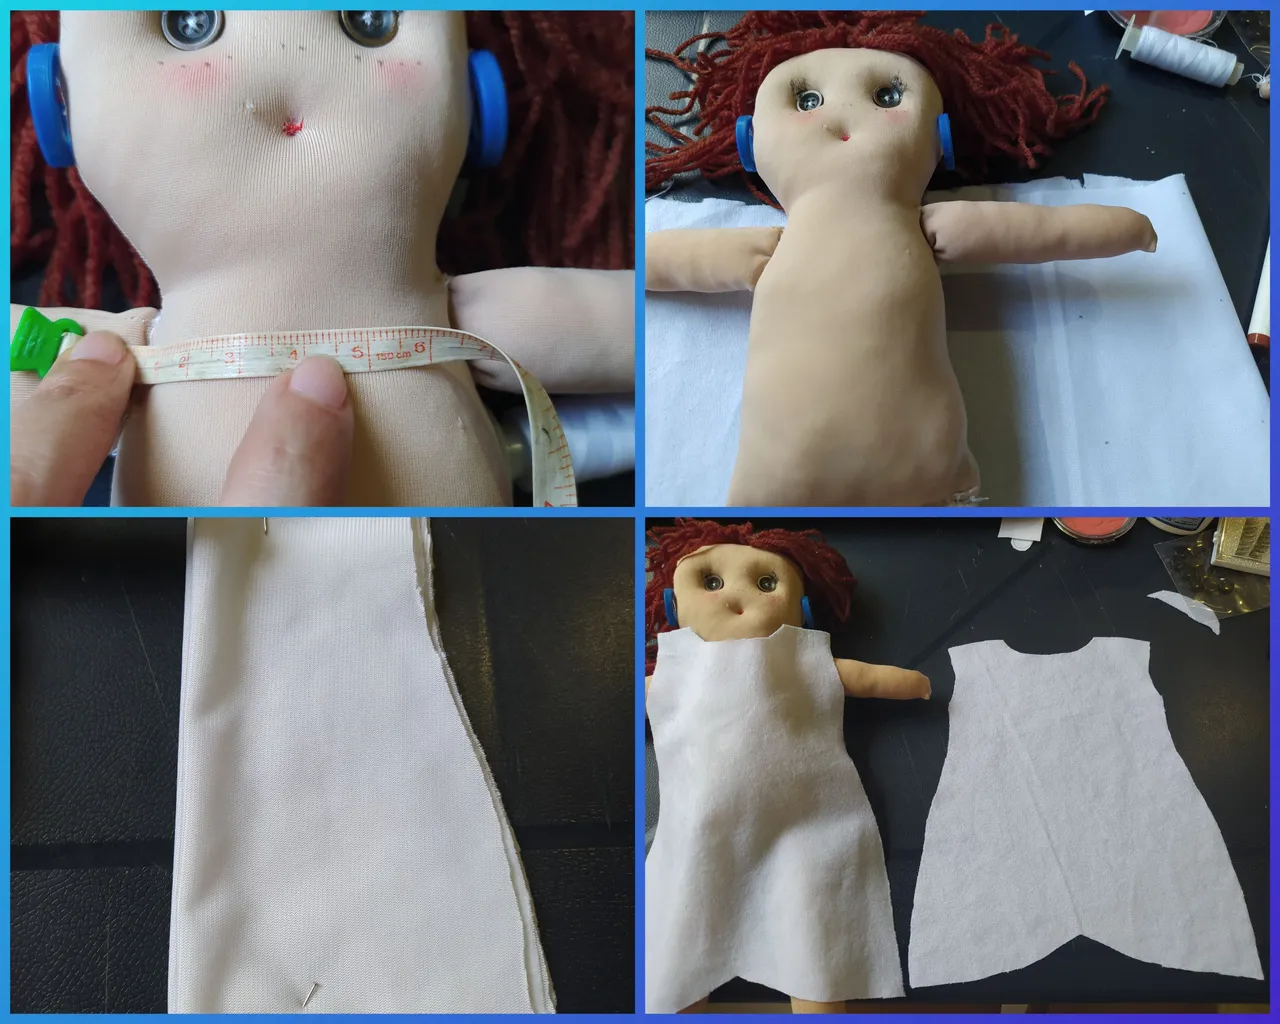
Cortamos el patrón para luego transferirlo a la tela. Empecé por cortar cabeza y cabeza.
We cut the pattern and then transfer it to the fabric. I started by cutting out the head and the head.
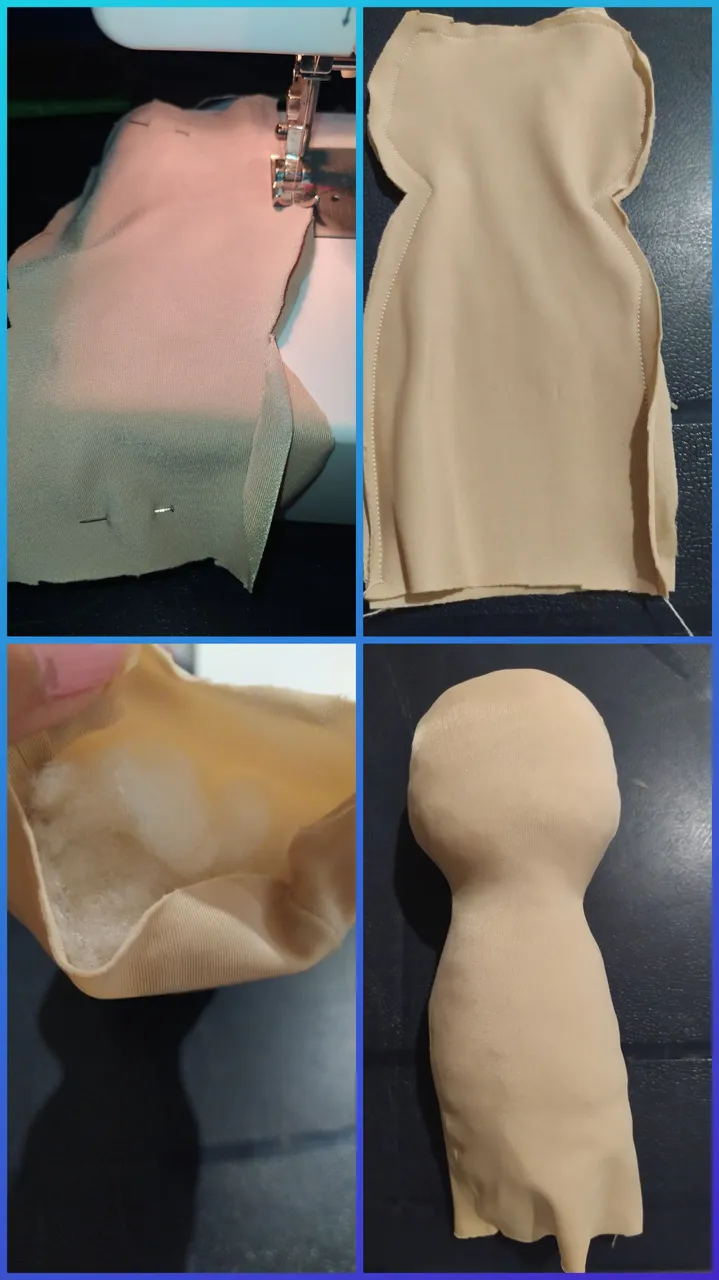
Paso 2 Relleno y costura del tronco.
Se cose por el reverso de las telas con puntada recta, volteamos y rellenamos con algodón.
Step 2 Stuffing and sewing the trunk.
Sew on the back of the fabrics with a straight stitch, turn over and stuff with cotton.
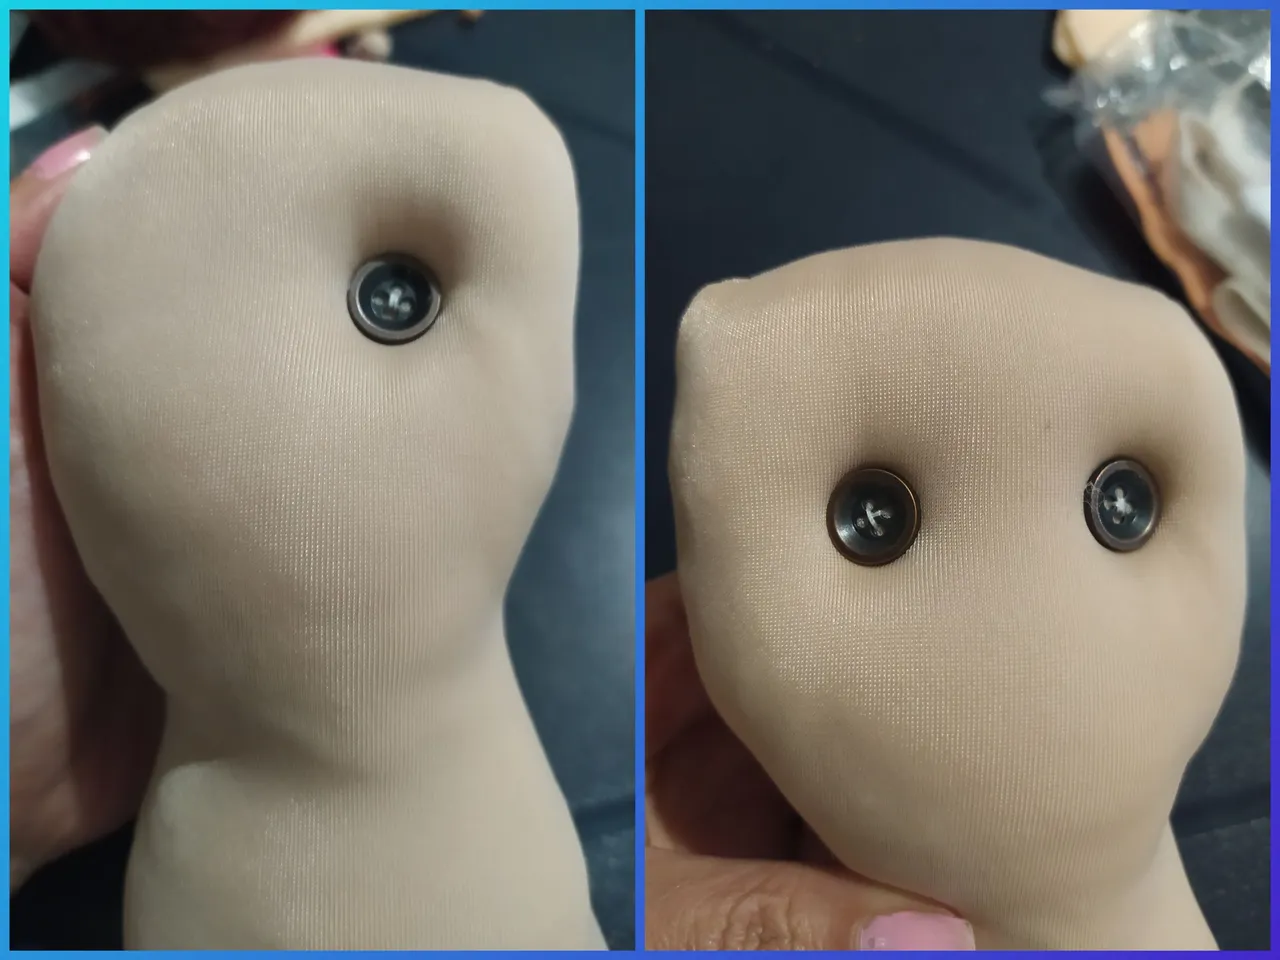
Paso 3 Colocación de ojos.
Mi personaje tiene ojos claros así que decidí colocar botones bronce, con ayuda de una aguja e hilo blanco.
Step 3 Placing eyes.
My character has light eyes so I decided to place bronze buttons, with the help of a needle and white thread.
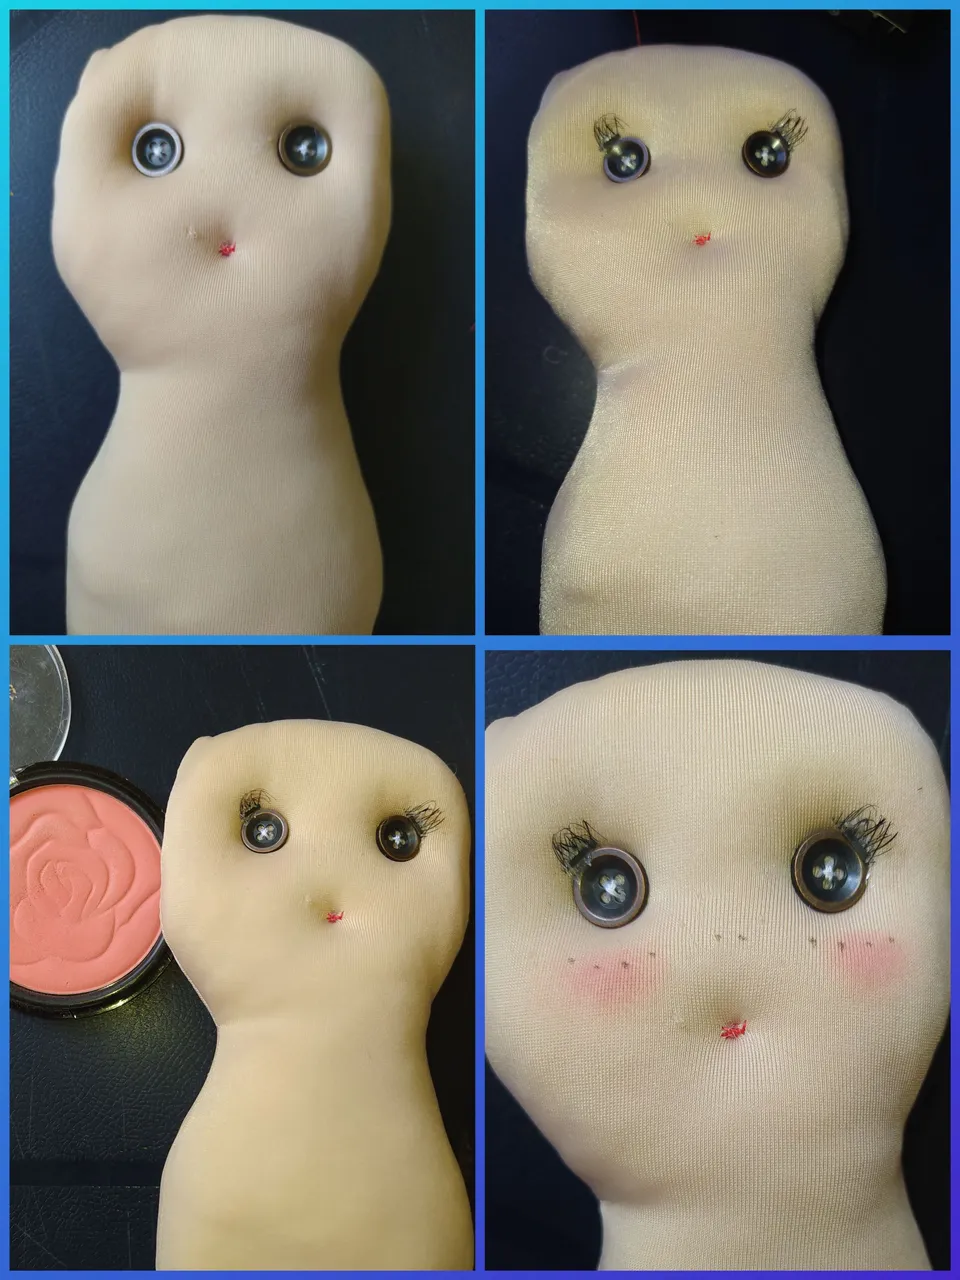
Paso 4 Realización de boca
Con la ayuda de una aguja y el hilo rojo realizamos una puntada, luego pegamos las pestañas postizas, con la ayuda de una brocha para difuminar sombras aplicamos rubor rosa para mejillas y con un marcador marrón colocamos pecas.
Step 4 Making the mouth
With the help of a needle and the red thread we make a stitch, then we glue the false eyelashes, with the help of a brush to blur shadows we apply pink blush for cheeks and with a brown marker we place freckles.
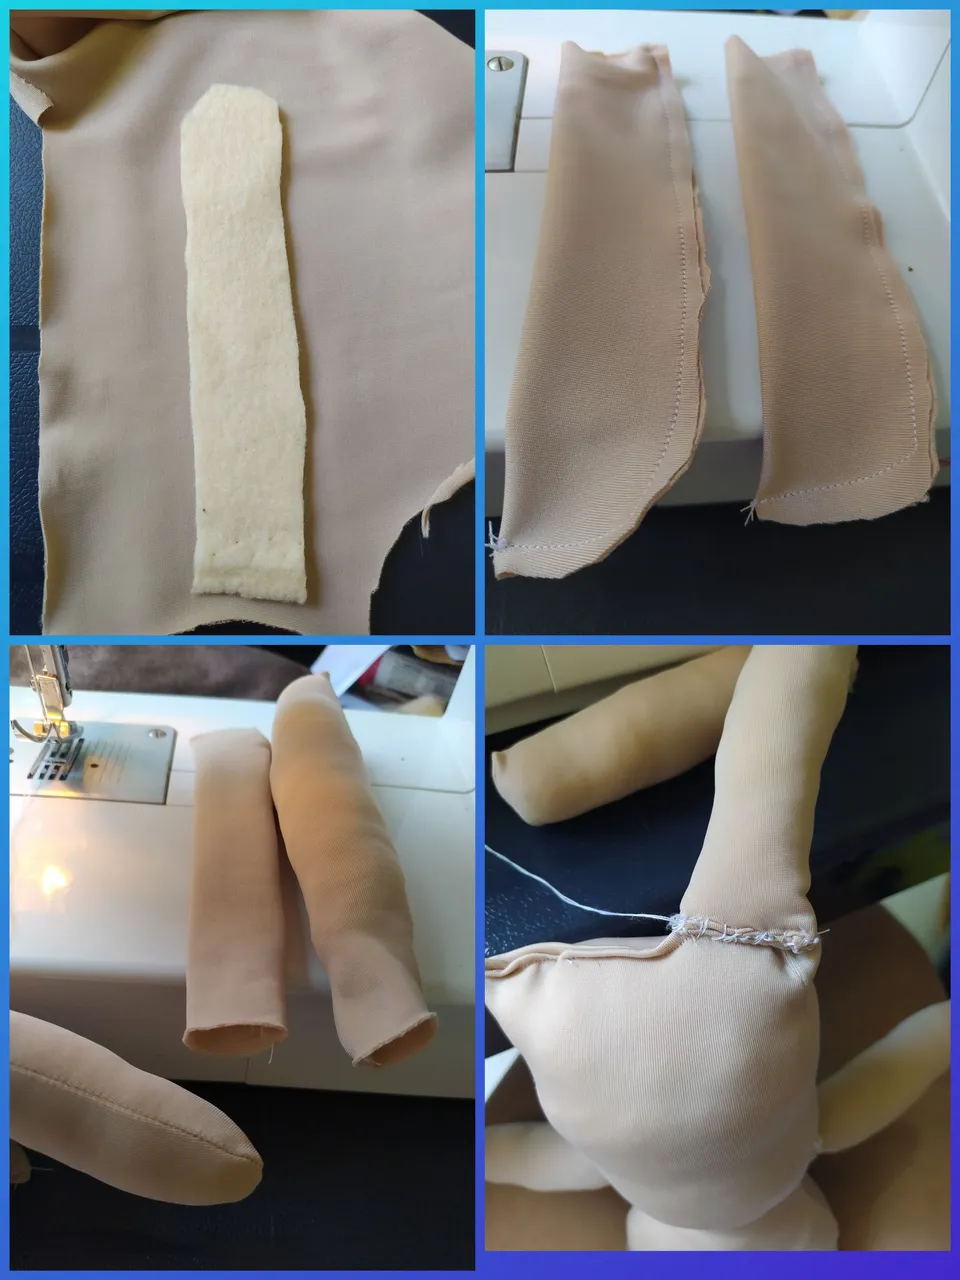
Paso 5 Transferencia, corte y realización de los brazos.
Lo primero es transferir el patrón del brazo (x2) a la tela lycra carioca, cosemos con puntada recta, volteamos por el derecho de la tela y rellenamos con algodón.
Step 5 Transfer, cut and make the arms.
The first thing is to transfer the pattern of the arm (x2) to the lycra carioca fabric, sew with straight stitch, turn the fabric right side out and fill with cotton.
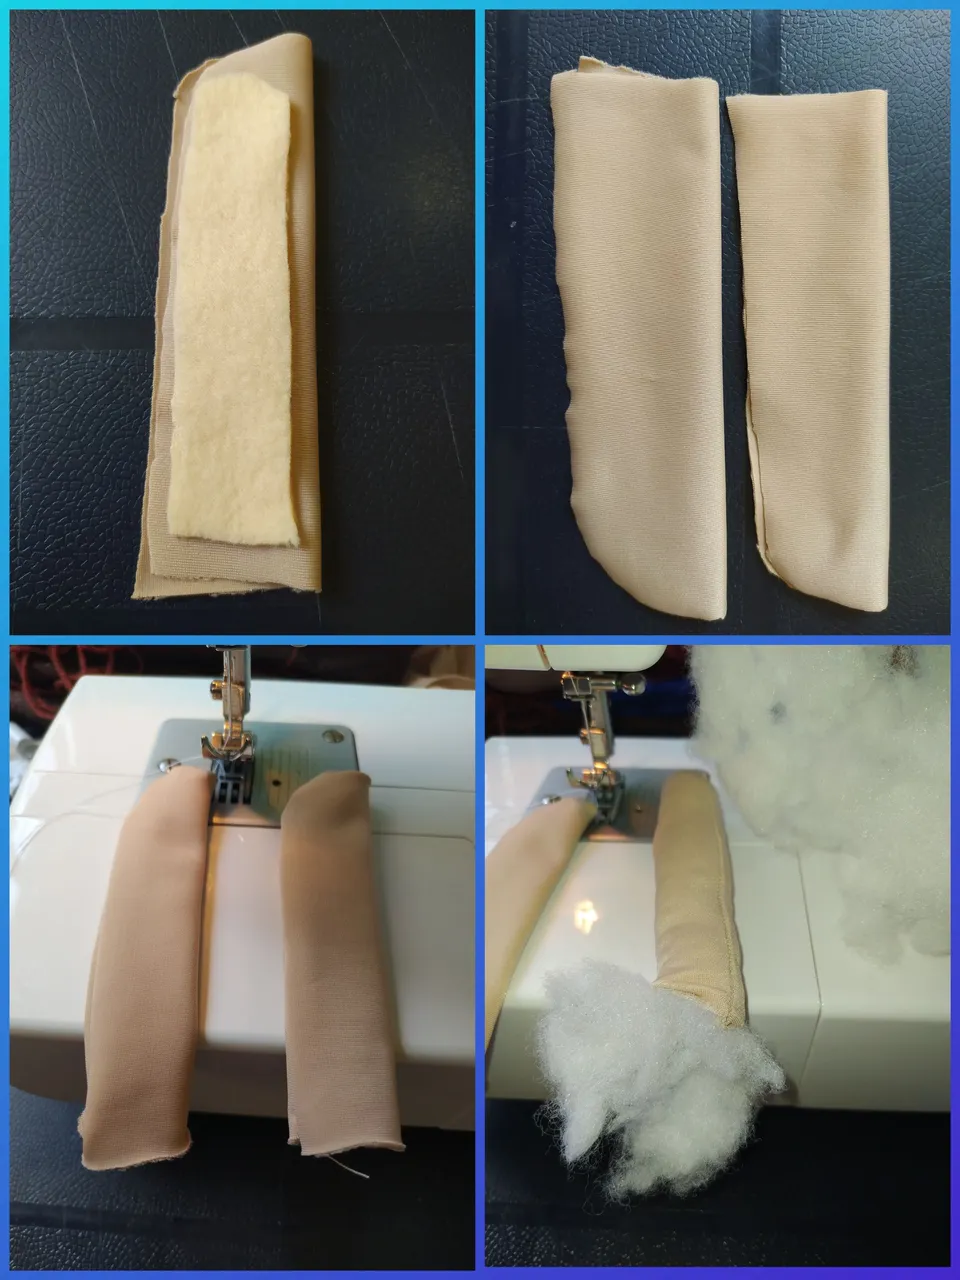
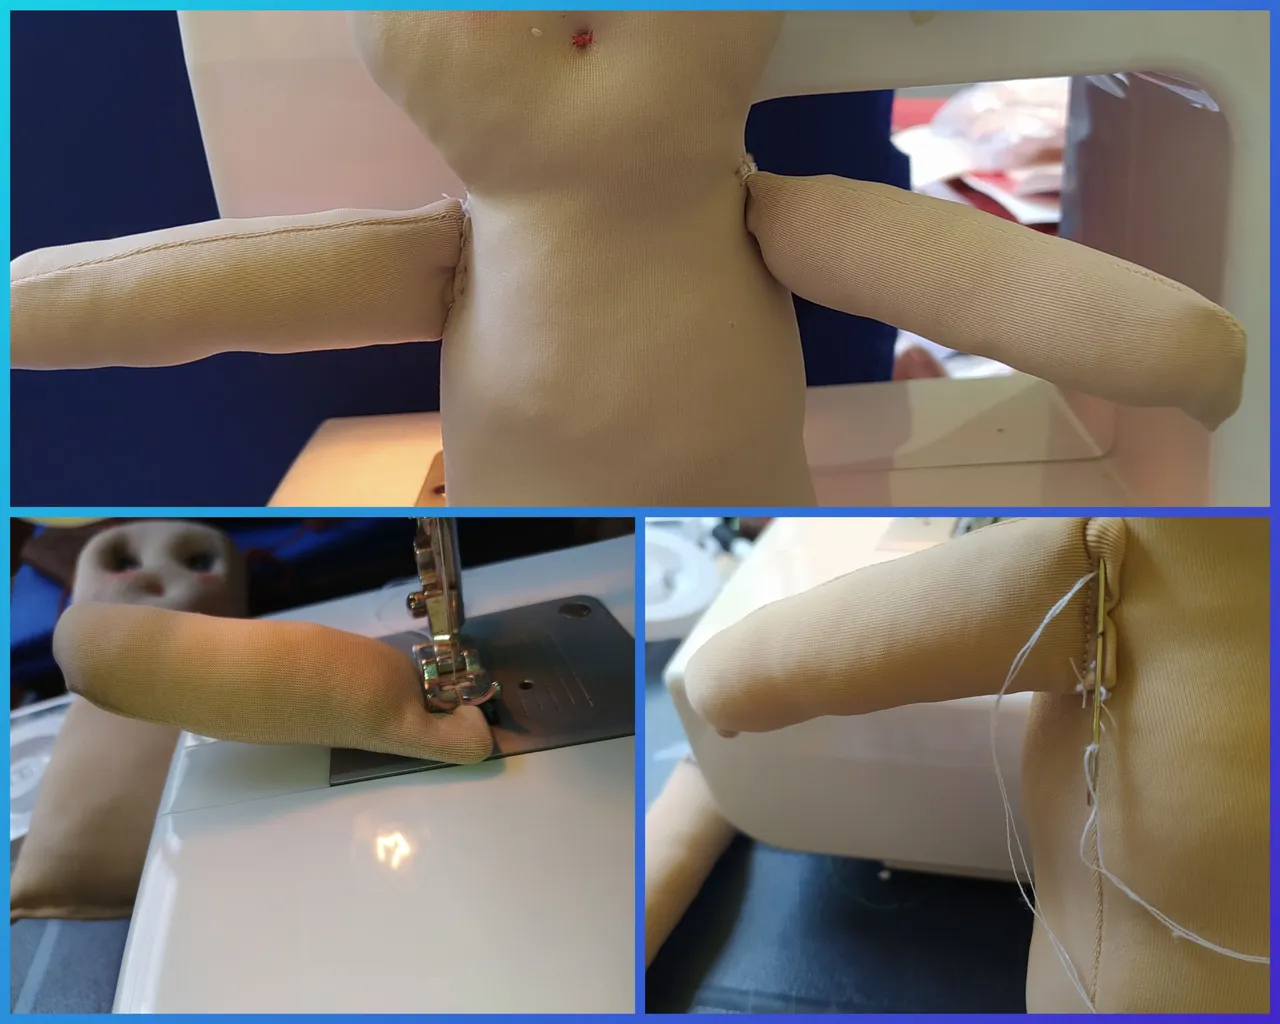
Paso 6 Cierre de costura de brazos y colocación de ambos al tronco.
Con la maquina de coser realizamos puntada recta para cerrar los brazos y con la ayuda de una aguja y el hilo blanco los colocamos en el tronco.
Step 6 Sewing the arms and attaching them to the trunk.
With the sewing machine we make straight stitch to close the arms and with the help of a needle and the white thread we place them on the trunk.
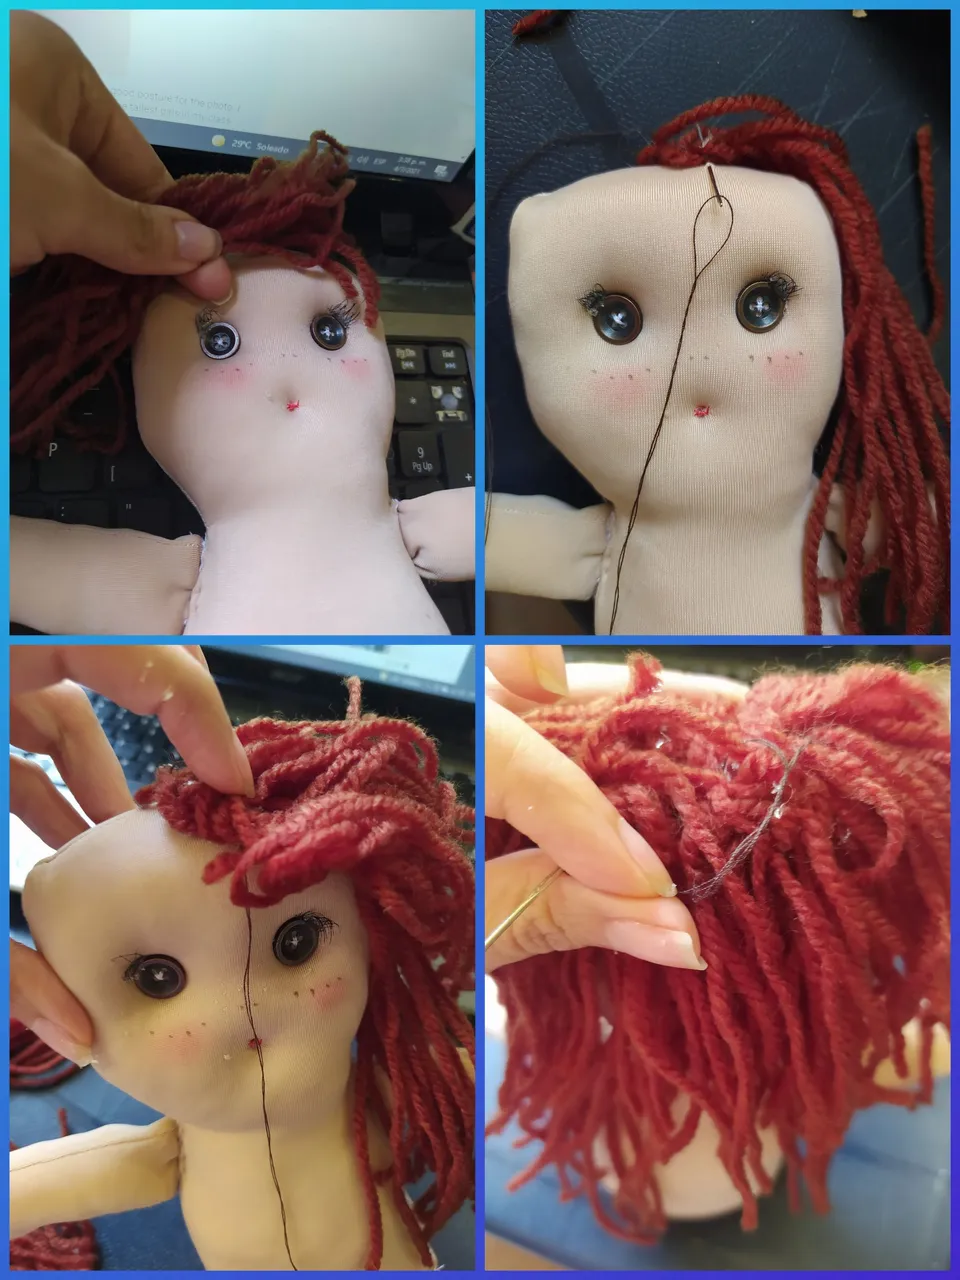
Paso 8 Colocación del cabello
Con estambre marrón realizaremos el cabello del personaje incognito, vaya que lo estuve viendo en mi computadora de trabajo, así que observé su peinado y empecé a coser sobre su cabeza.
Step 8 Hair placement
With brown worsted we will make the hair of the incognito character, wow I was watching him on my work computer, so I watched his hairstyle and started stitching over his head.
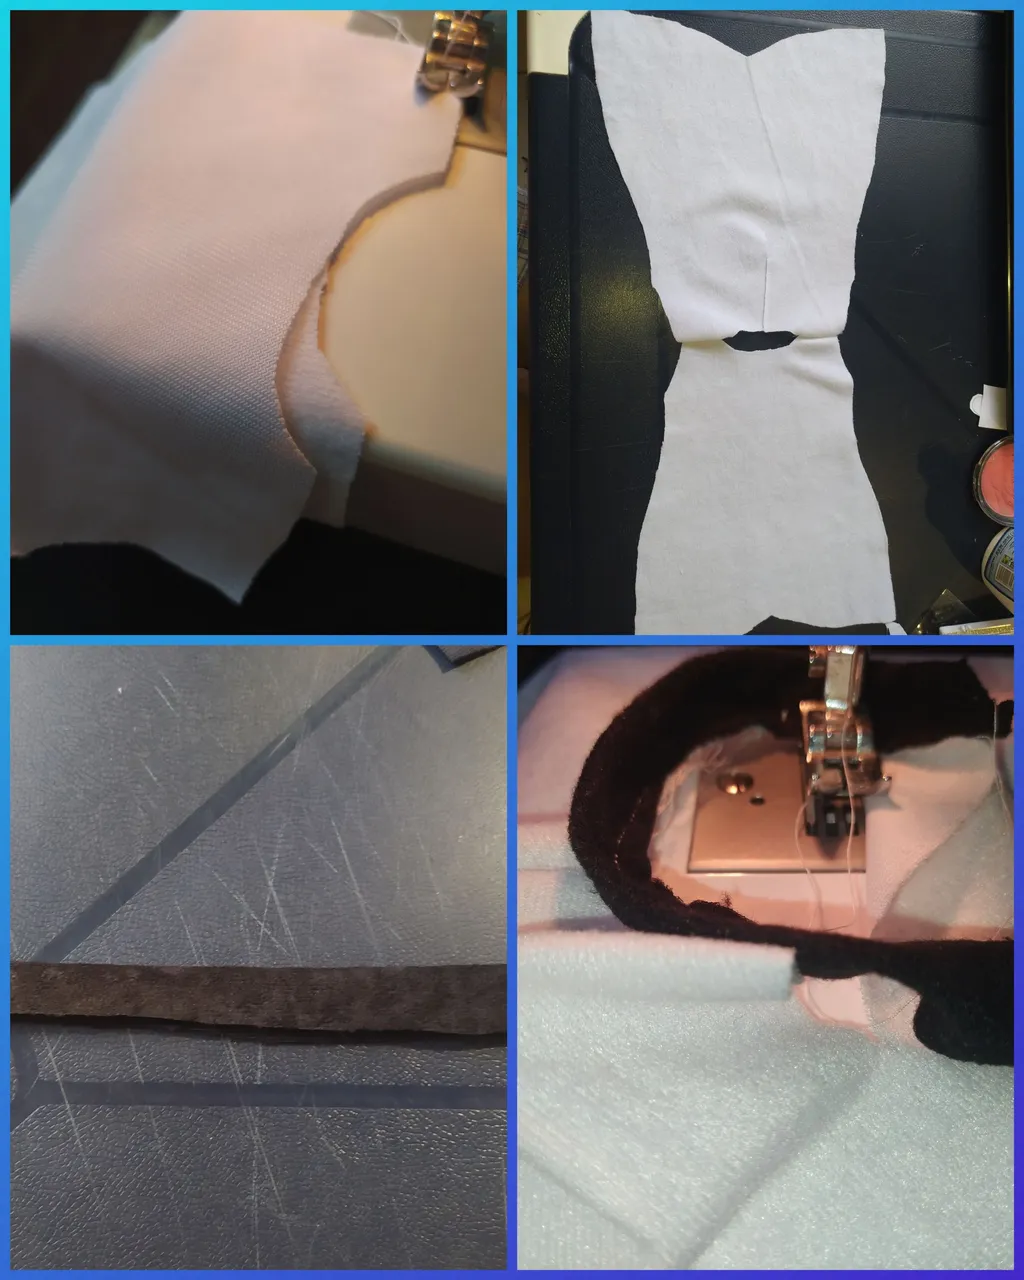
Paso 9 Realización de vestido.
Aunque debo confesarles que solo se observa la parte superior de la fotografía, pero como es una muñeca decidí convertirlo en un vestido pero con los mismos detalles de la fotografía que observé. Tome las medidas y escogí una tela blanca terciopelo y a crear. ( En cuanto a los zarcillos solo utilicé un punto de pega de silicón y listo)
Step 9 Making the dress.
Although I must confess that only the upper part of the photograph is observed, but as it is a doll I decided to turn it into a dress but with the same details of the photograph that I observed. I took the measurements and chose a white velvet fabric and started creating. (As for the tendrils I just used a point of silicone glue and ready).
Paso 10 Unimos los hombros e incorporamos el cuello con tela negra de terciopelo.
Unimos los hombros con puntada recta, realizamos una tira de 1 centímetro y medio, doblamos y cosemos al rededor del cuello, dejamos un centímetro sobrante para pegar cierre mágico negro.
Step 10 Join the shoulders and incorporate the collar with black velvet fabric.
Join the shoulders with straight stitch, make a strip of 1 cm and a half, fold and sew around the neck, leaving a centimeter left over to glue black magic clasp.
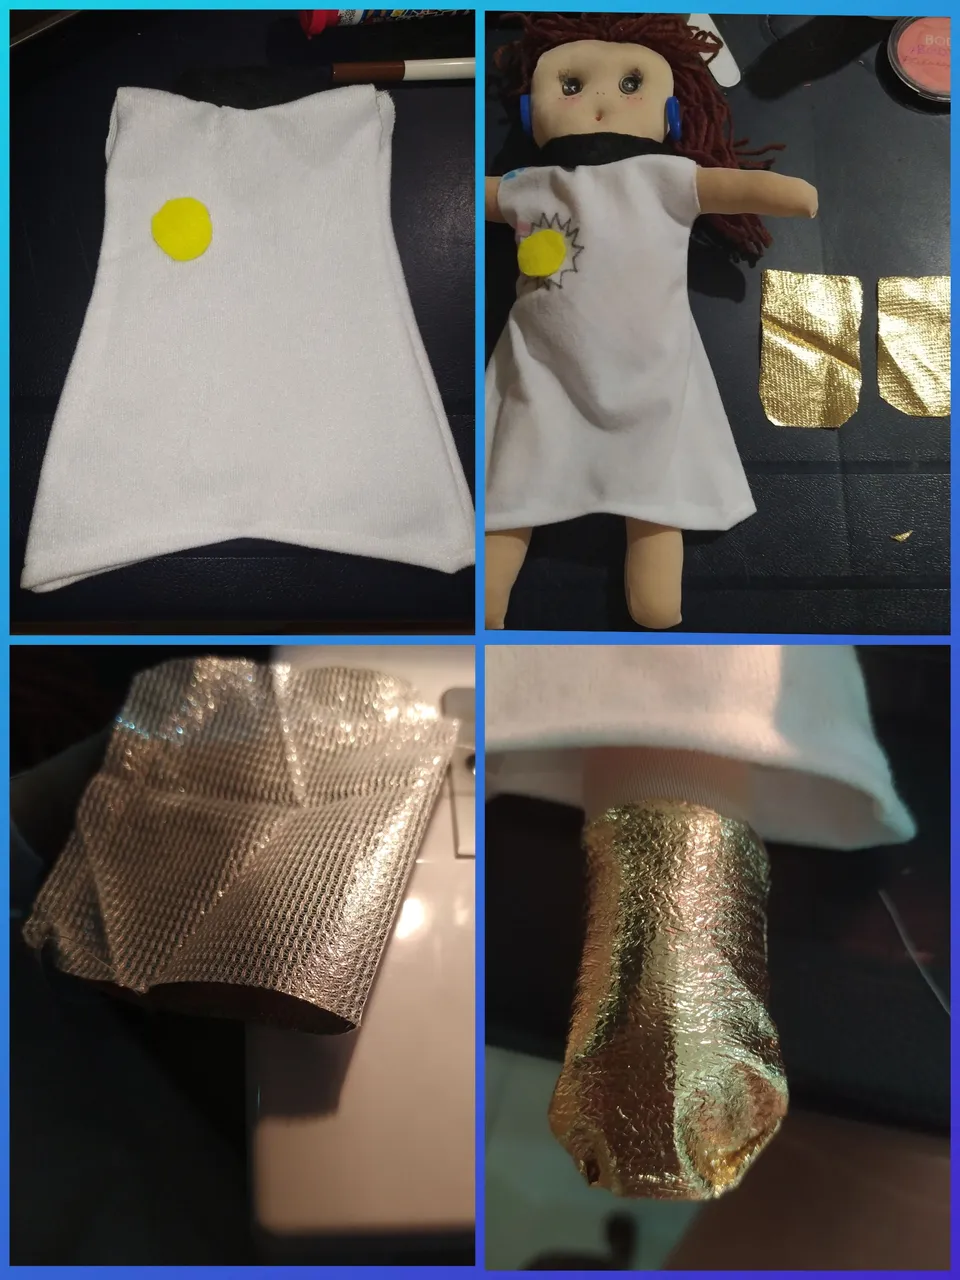
Paso 11 Colocación del sol en el vestido y creación de botas doradas.
Primero con tela de fieltro amarilla realicé figura del sol con un marcador negro, luego terminé los detalles, medí sus pies, realicé dos botas doradas, cosemos con puntada recta, volteamos al derecho y listo.
Step 11 Placing the sun on the dress and creating golden boots.
First with yellow felt fabric I made a figure of the sun with a black marker, then I finished the details, measured her feet, made two golden boots, sew with straight stitch, flip to the right and ready.
Tenemos el personaje creado ya saben de quién se trata? / We have already created the character, do you know who it is?
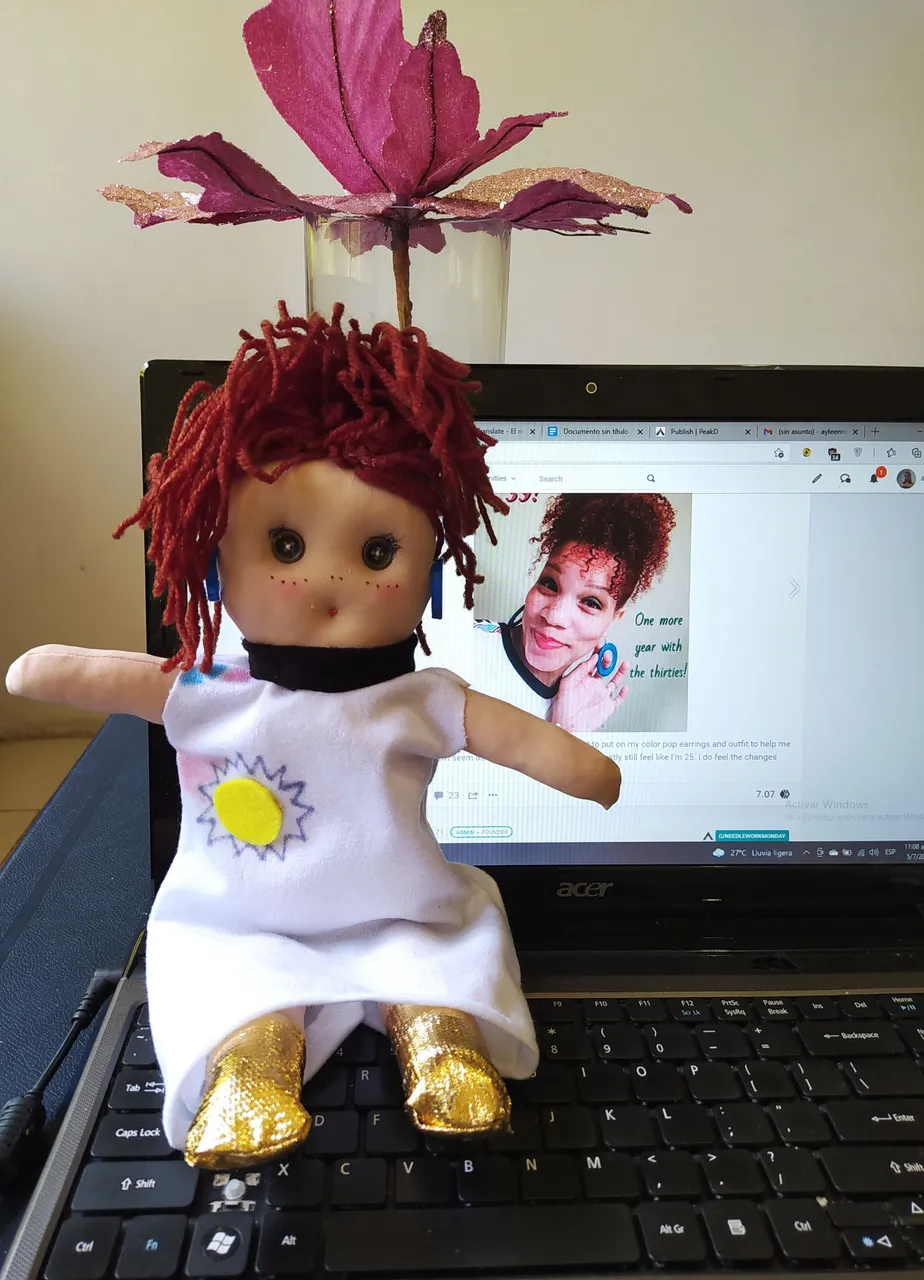
Photo from computer belongs to @crosheille
Siii se trata de la Fundadora de esta hermosa comunidad de NeedleWorkMonday @crosheille no sabía cómo incorporar su fotografía pero se me ocurrió realizarlo de esta manera.
Debo decirles que le tengo mucho aprecio a @crosheille tuve su apoyo desde que empecé mis trabajos en agujas, es una persona muy carismática, estoy agradecida por la cantidad de publicaciones de calidad que ofrece en HIVE, gracias por tu apoyo, sé que muchos de nosotros estamos contento con la motivación que recibimos de parte de la fundadora @crosheille.
Gracias a todos los que comentaron y participaron en el post anterior @tibaire @belkyscabrera @jomarbym @kattycrochet @carolinacardoza @chacald.dcymt @irenenavarroart @tere.alv @jennynas @marblely @jicrochet @lauramica de тeαѕe aquí están los detalles.
Yes, this is the Founder of this beautiful NeedleWorkMonday community @crosheille, I didn't know how to incorporate her photography but I thought of doing it this way.
I must tell you that I have much appreciation to @crosheille I had her support since I started my needlework, she is a very charismatic person, I am grateful for the amount of quality publications that she offers in HIVE, thank you for your support, I know that many of us are happy with the motivation we receive from the founder @crosheille.
Thanks to everyone who commented and participated in the previous post @tibaire @belkyscabrera @jomarbym @kattycrochet @carolinacardoza @chacald.dcymt @irenenavarroart @tere. alv @jennynas @marblely @jicrochet @lauramica from тeαѕe here are the details.
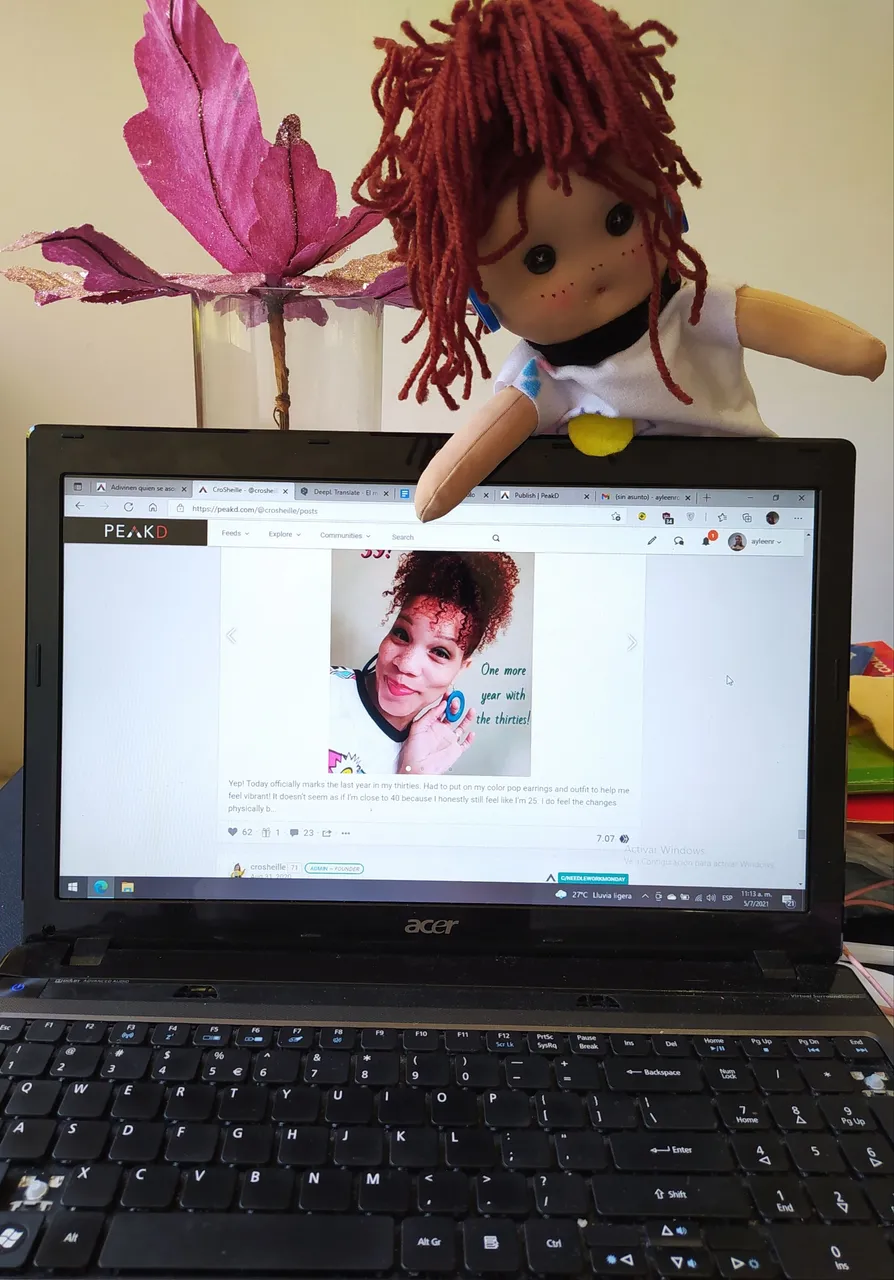
Photo from computer belongs to @crosheille
Me encantó este concurso, gracias a todos los creadores de esta iniciativa, fue fantástico como fluyó mi creatividad, quedé emocionada.
Espero les haya gustado... Nos vemos en un próximo post...
I loved this contest, thanks to all the creators of this initiative, it was fantastic how my creativity flowed, I was thrilled.
I hope you liked it... See you in a future post...

𝘚𝘦𝘱𝘢𝘳𝘢𝘥𝘰𝘳 𝘺 𝘣𝘢𝘯𝘯𝘦𝘳: 𝘥𝘪𝘴𝘦ñ𝘢𝘥𝘰 𝘱𝘰𝘳 @𝘢𝘺𝘭𝘦𝘦𝘯𝘳 𝘦𝘯 𝘊𝘢𝘯𝘷𝘢 || 𝘾𝙤𝙡𝙡𝙖𝙜𝙚: 𝙧𝙚𝙖𝙡𝙞𝙯𝙖𝙙𝙤 𝙚𝙣 𝘾𝙤𝙡𝙡𝙖𝙜𝙚 𝙈𝙖𝙧𝙠𝙚𝙧 || 𝘐𝘮á𝘨𝘦𝘯𝘦𝘴: 𝘗𝘳𝘰𝘱𝘪𝘢𝘴 𝙖𝙡𝙩𝙝𝙤𝙪𝙜𝙝 𝙩𝙝𝙚 𝙘𝙤𝙢𝙥𝙪𝙩𝙚𝙧 𝙥𝙝𝙤𝙩𝙤 𝙗𝙚𝙡𝙤𝙣𝙜𝙨 𝙩𝙤 @𝙘𝙧𝙤𝙨𝙝𝙚𝙞𝙡𝙡𝙚 | 𝘛𝘳𝘢𝘥𝘶𝘤𝘵𝘰𝘳: 𝘋𝘦𝘦𝘱𝘓.